Unity is a game engine and development environment that allows you to create interactive projects: 2D and 3D games, mobile applications, simulations, visualizations, and prototypes.
In this tutorial, we will cover the basics of working with the Unity Editor: how the interface is structured, what scenes, objects, and components are, and how to navigate the editor with confidence. This material will serve as a foundation before moving on to game mechanics and writing logic.
To get started, you need to install Unity Hub — the official Unity launcher used to manage engine versions and projects. You can download it from unity.com.
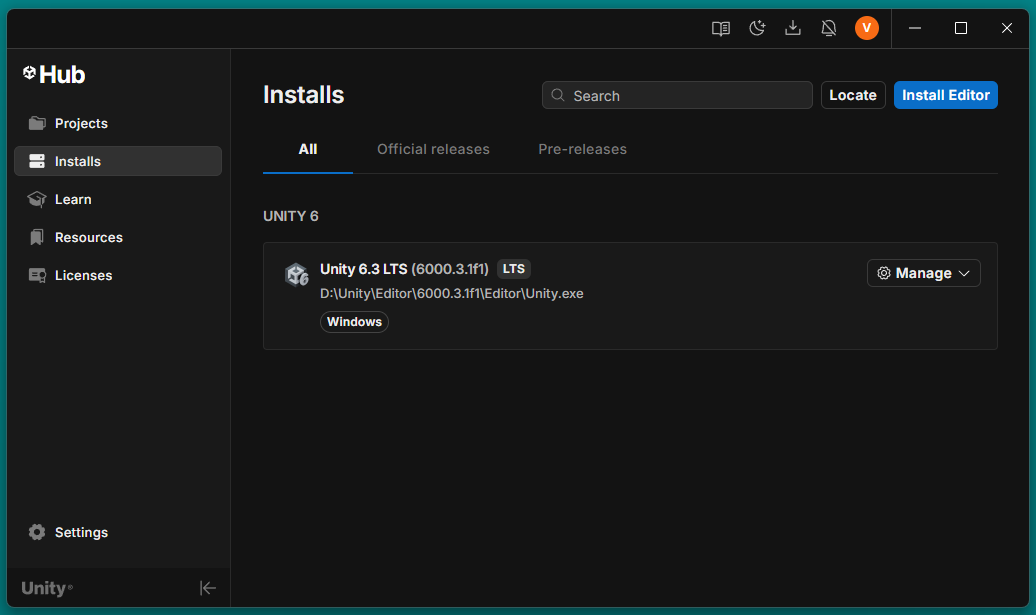
After installing Unity Hub, open it, go to the Installs tab, and add a Unity version.
💡 Which version should you choose?
For learning purposes, it is best to use an LTS
(Long Term Support) version. This is a stable release where the main
tools and interface are already well established. We will rely on it
in the following lessons. New experimental versions can be explored
later, once you gain more experience.
💡 In this tutorial, we use Unity 6 LTS — a stable version with long-term support. It is well suited for learning and will be used in all upcoming lessons.
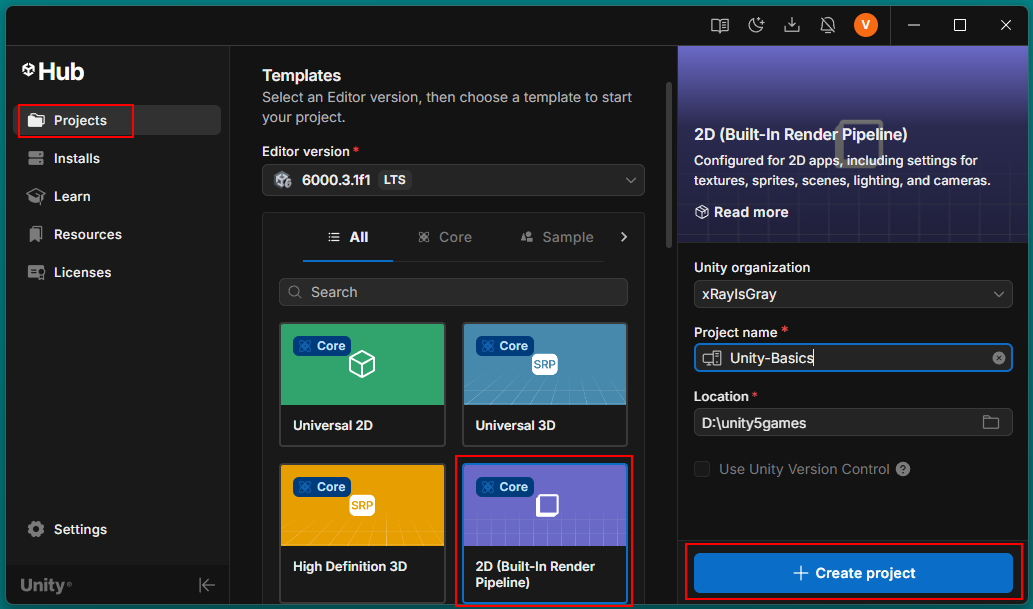
Open Unity Hub and go to the Projects tab. Click New Project and select the 2D Core (Built-in Render Pipeline) preset.
We use this preset because the tutorials focus on the basics of 2D games and working with the Unity Editor. If this template is not installed yet, Unity Hub will offer to download it automatically.
💡 Why 2D Core (Built-in)?
This is the simplest and most straightforward option for learning. It
has no unnecessary rendering settings, and all basic Unity tools work
right out of the box. More advanced presets, such as Universal 2D,
will be covered later.
Enter a project name, choose a folder to save it on your computer, and click Create Project. Unity will then start creating the project and open the editor.
💡 It is recommended to create the project locally, not in the cloud. This is simpler for learning and does not require additional account setup.
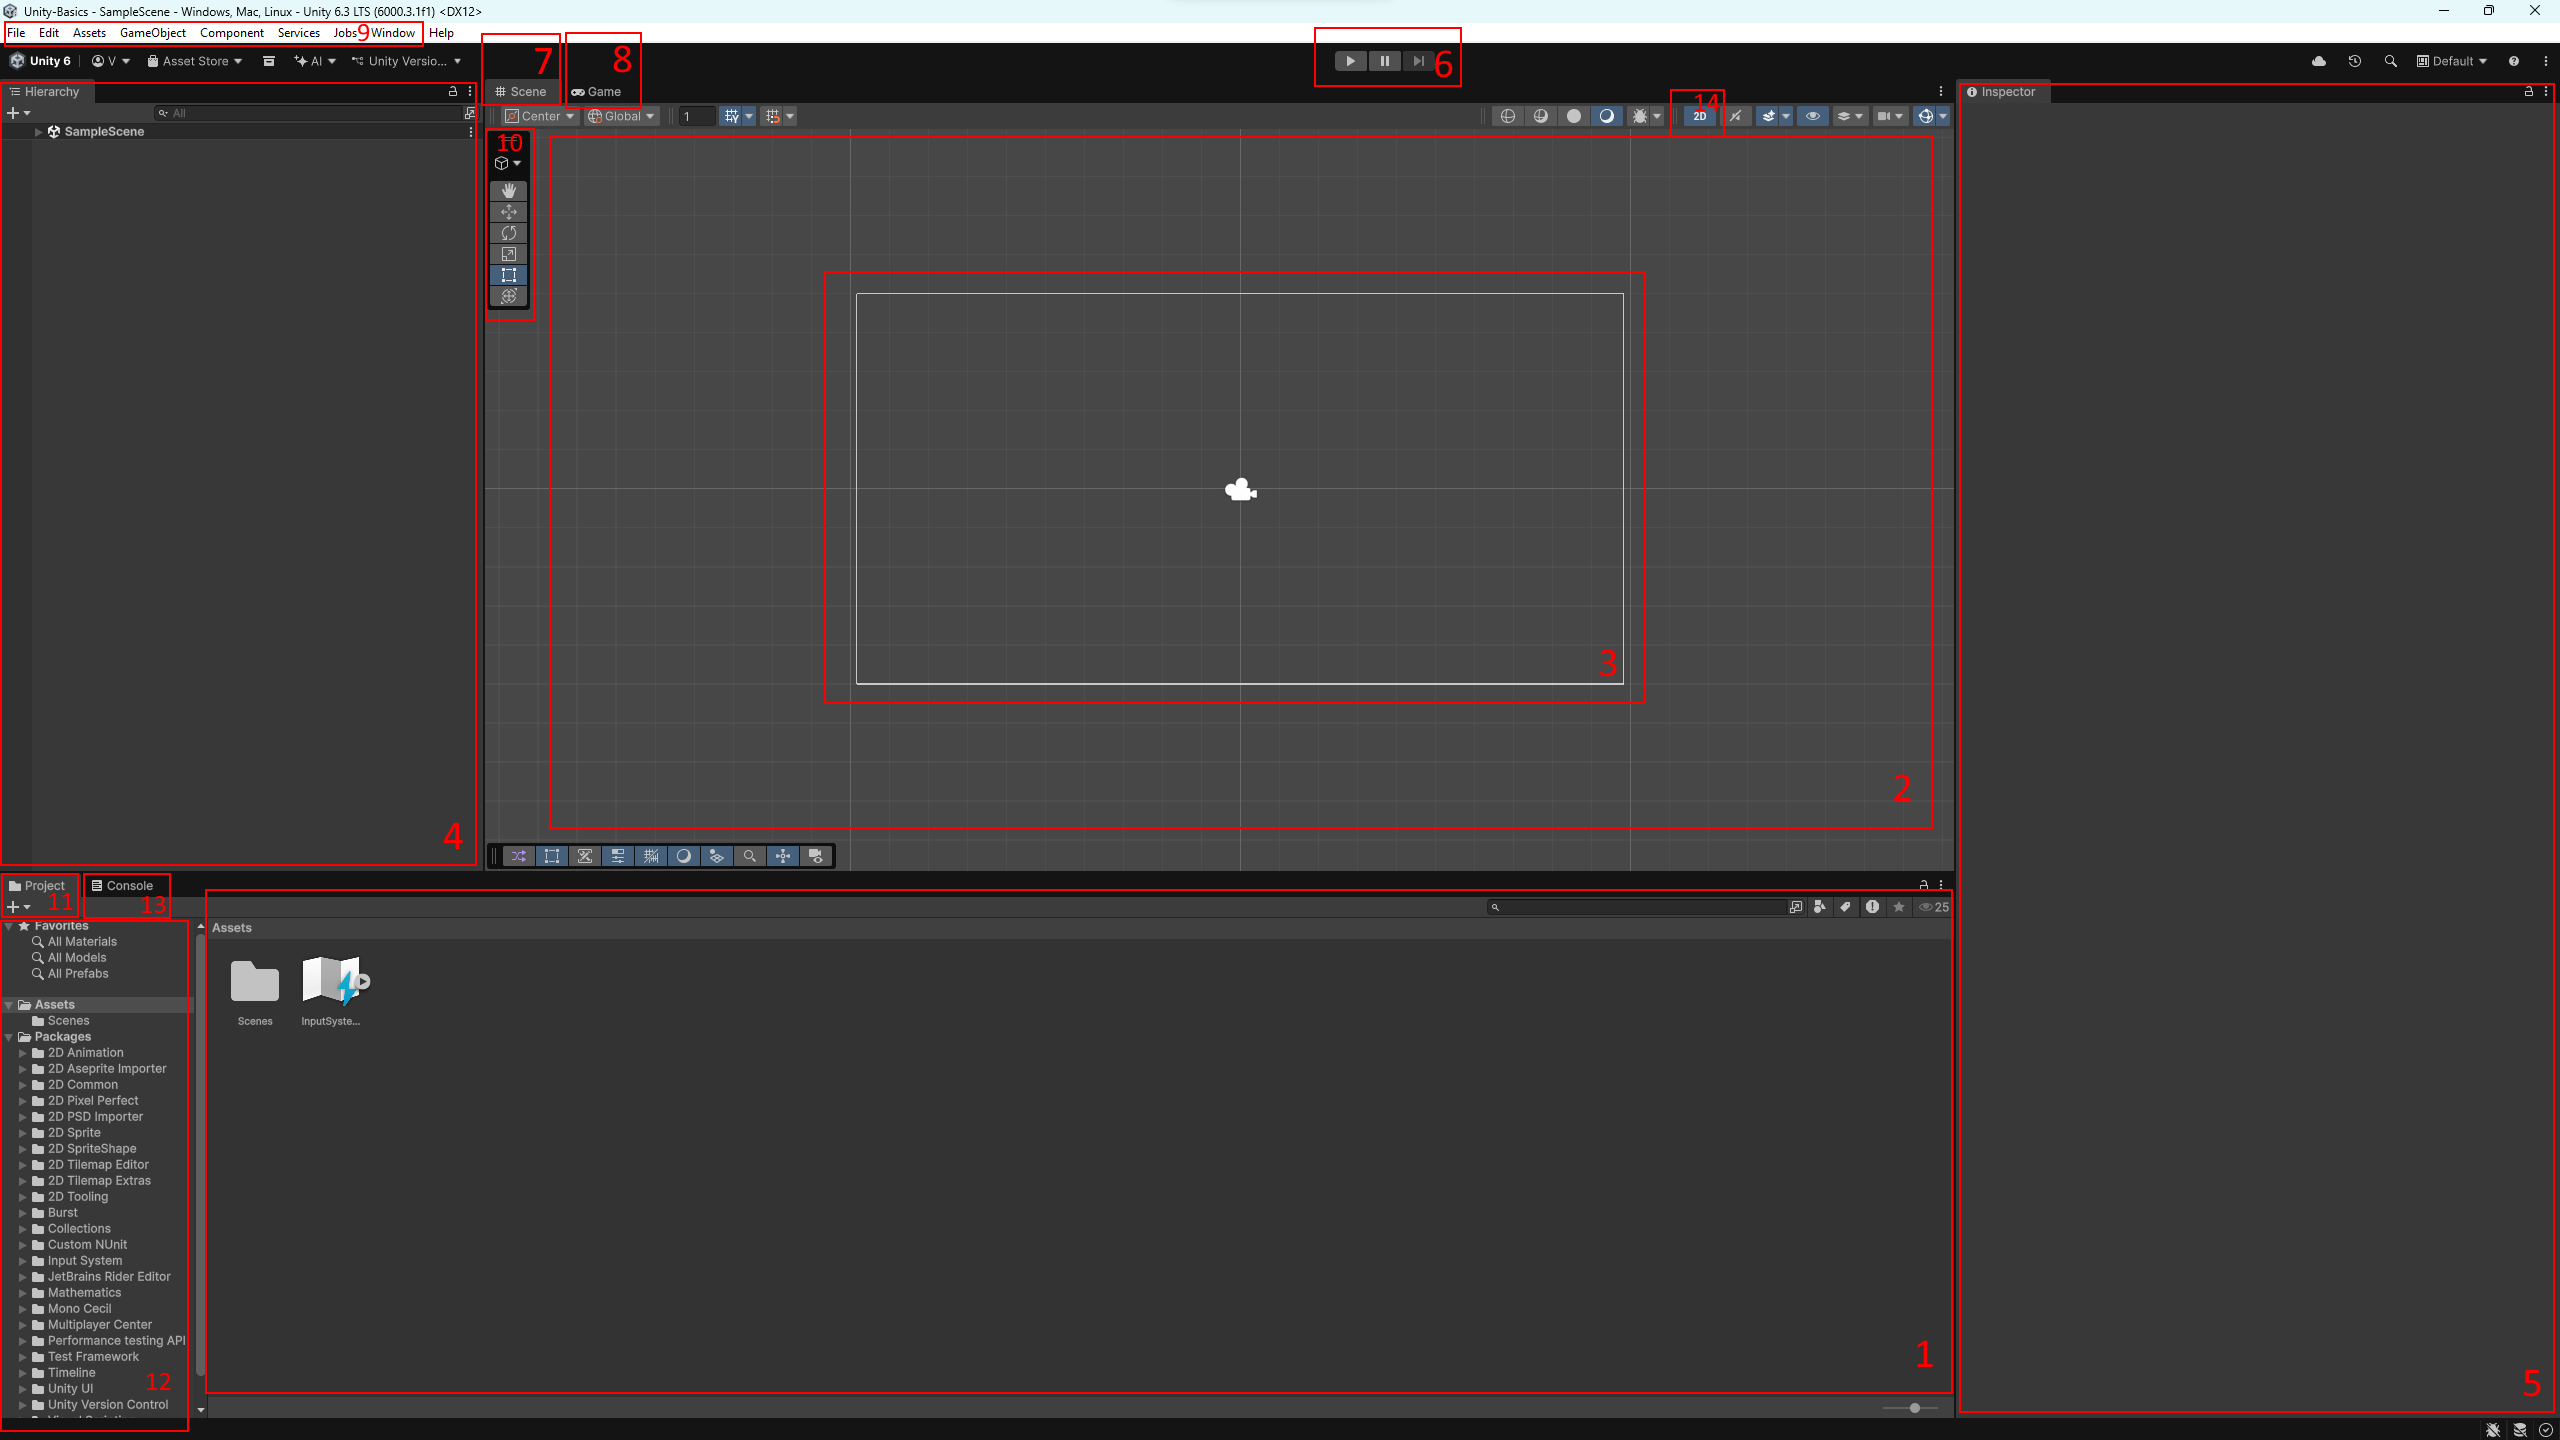
After creating and opening a project, the Unity Editor looks roughly like this. Below are the main windows and panels that you will work with on a regular basis.
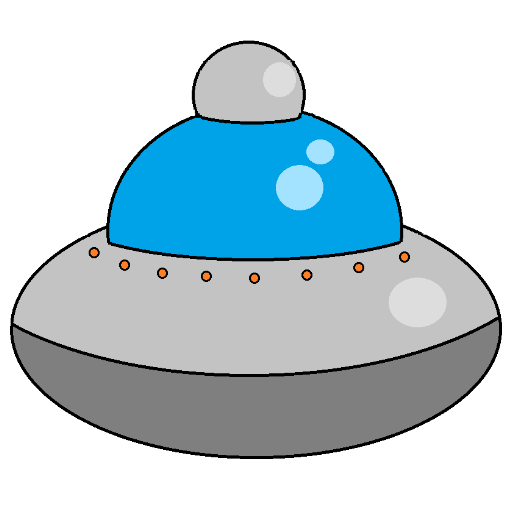
For further work, let’s add a simple sprite to the project — an image of a spaceship. First, download the image file that we will use in the examples:
There are several ways to add an asset to Unity. The simplest one is to drag and drop the image file directly into the Project (Assets) window.
An alternative method: right-click in the Assets window, choose Import New Asset…, then select the file on your computer and confirm the import.
This is how not only images, but also sounds, music, models, and other resources are added to a project.
💡 At the moment, there is only one asset in the project, but as the project grows, the number of files will increase. It is considered good practice to organize assets into folders in advance, for example: Sprites, Audio, Scenes. This helps you navigate the project more quickly and keep things organized.

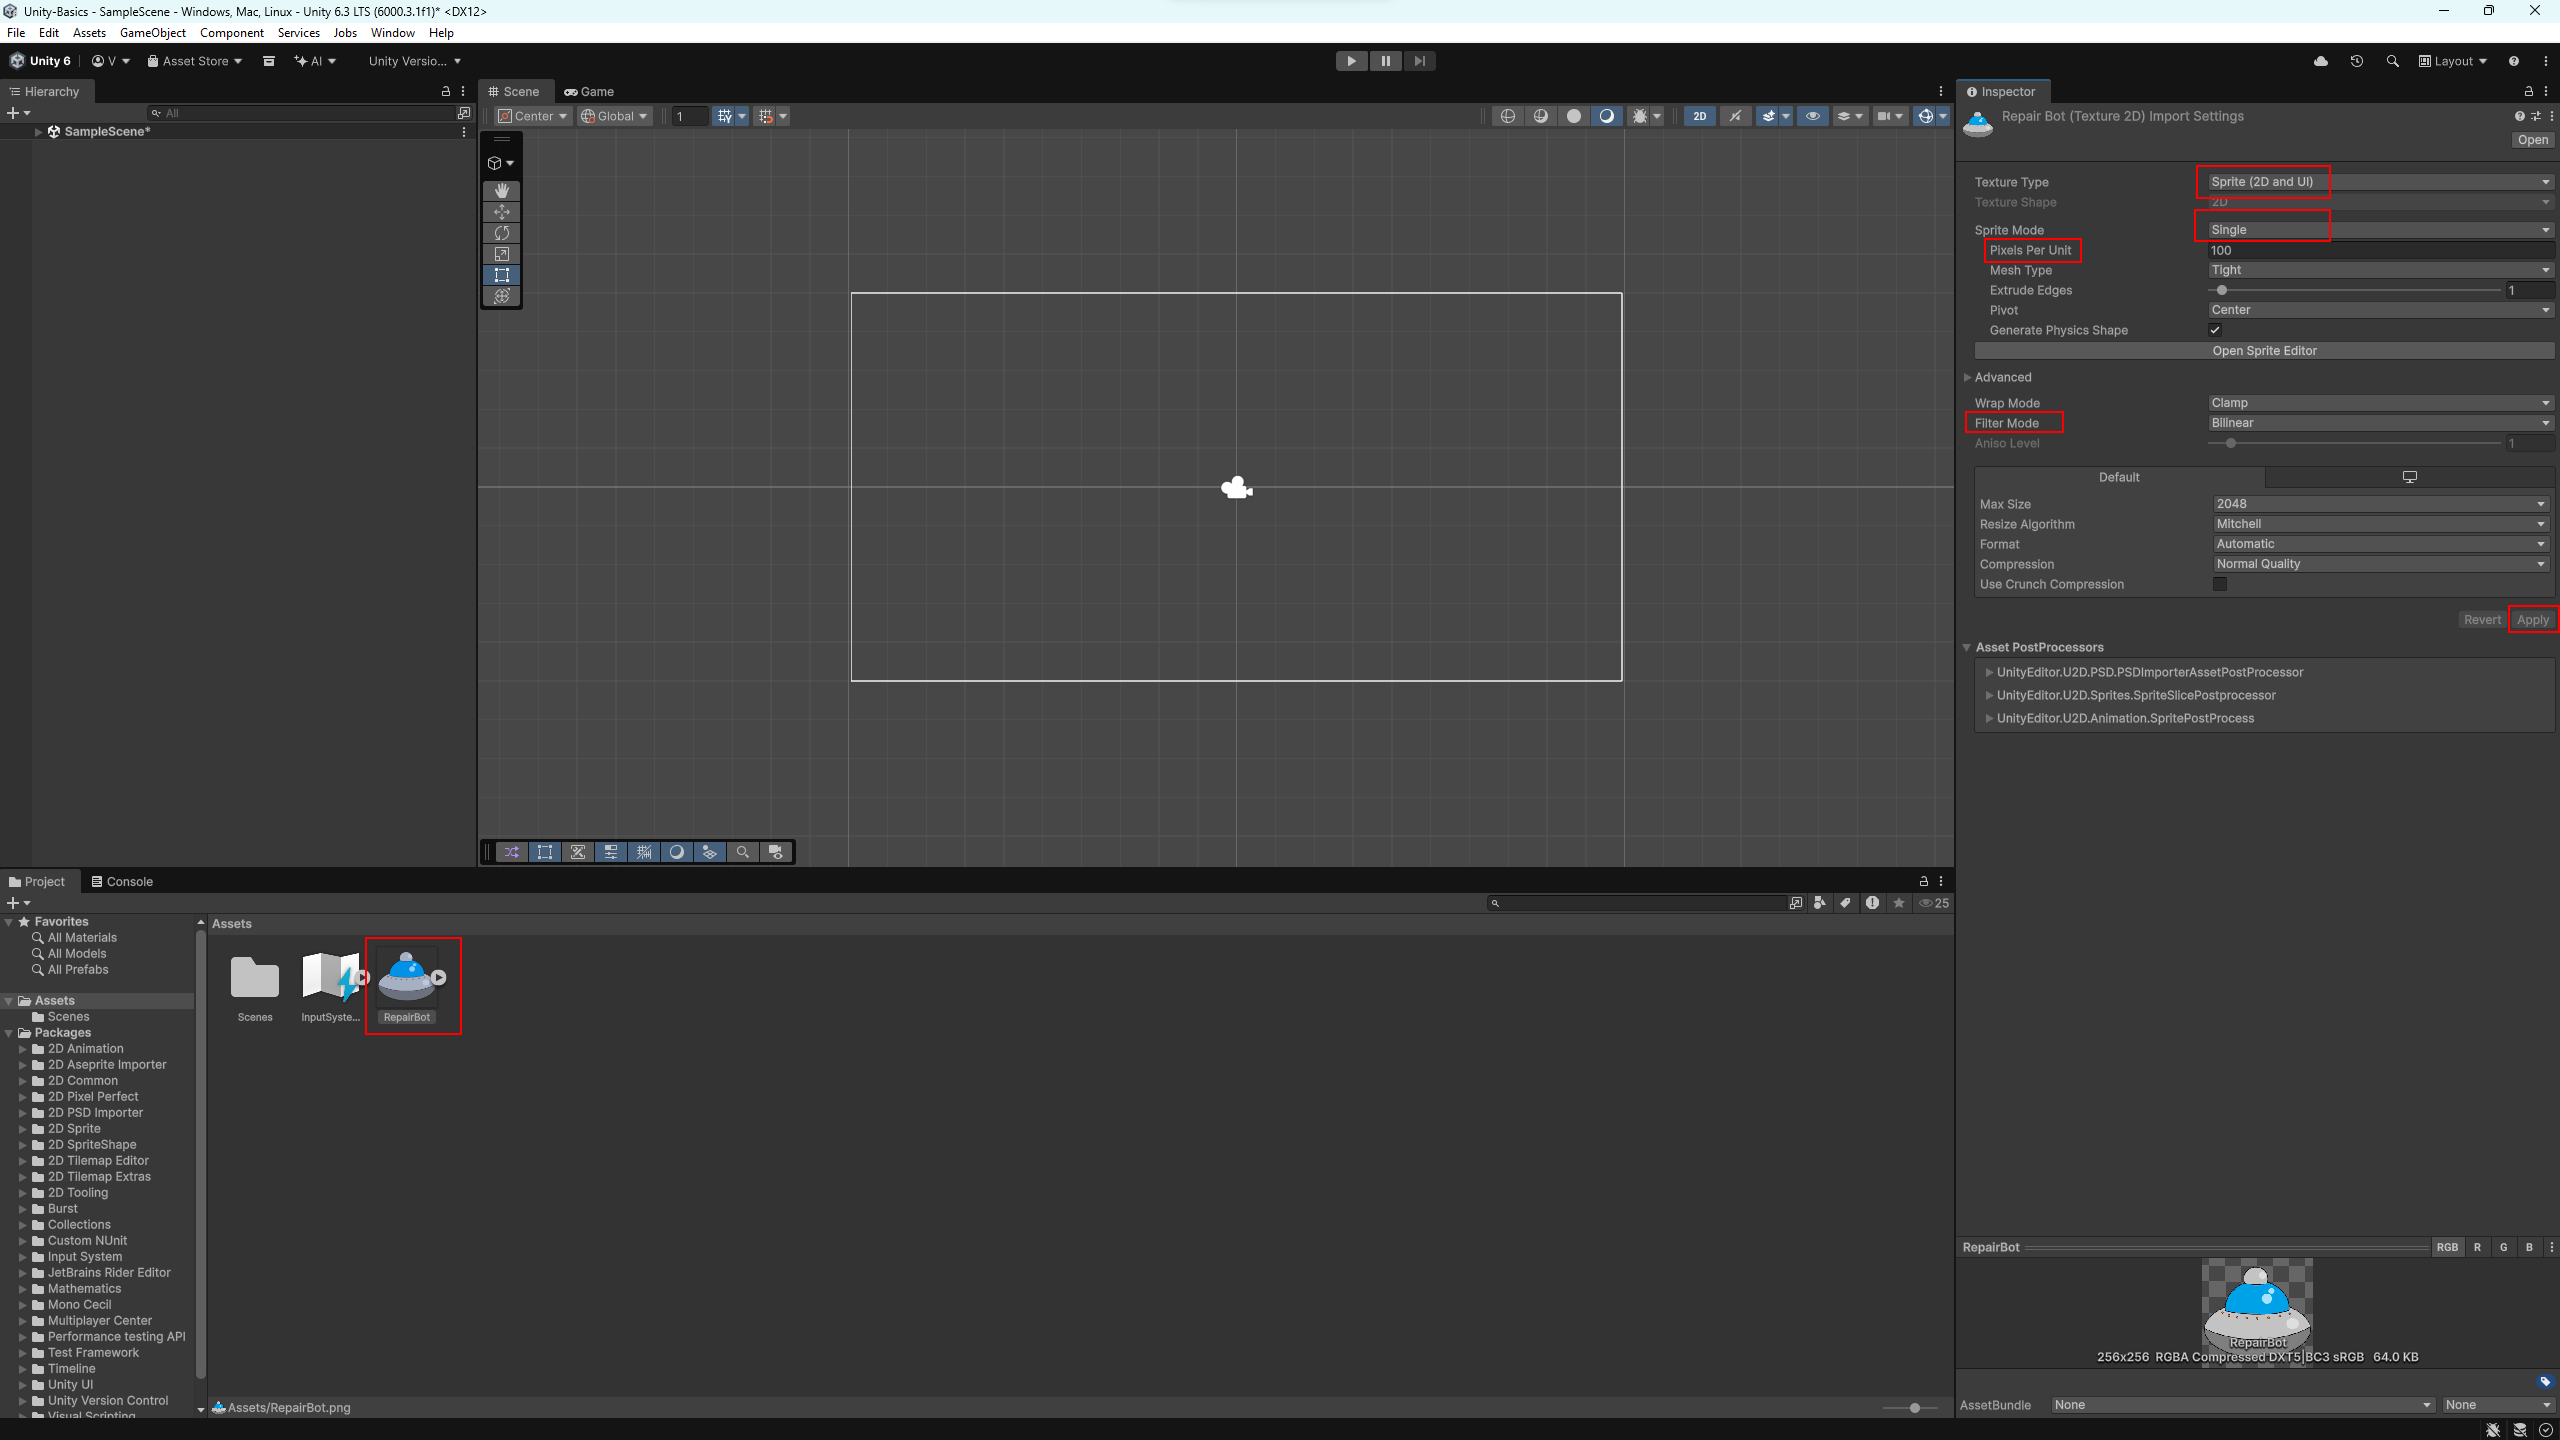
In most cases, Unity automatically selects appropriate settings for imported assets. If necessary, you can adjust them manually. To do this, select the required asset in the Project (Assets) window — in this case, the spaceship sprite — and view its parameters in the Inspector window.
If Unity did not set the correct values automatically, check the following parameters:
You can also change the Filter Mode by selecting an appropriate option: Point (sharp pixels), Bilinear (smoothing), or Trilinear (smooth filtering with distance). At this stage, you can leave the default value.
💡 After changing any parameters, do not forget to click the Apply button, otherwise the settings will not be saved.
All objects present in a Unity scene are GameObjects. Each GameObject has a set of components that define its appearance, behavior, and purpose.
The only mandatory component of any GameObject is Transform. It is responsible for the object’s position in the scene: position, rotation, and scale.
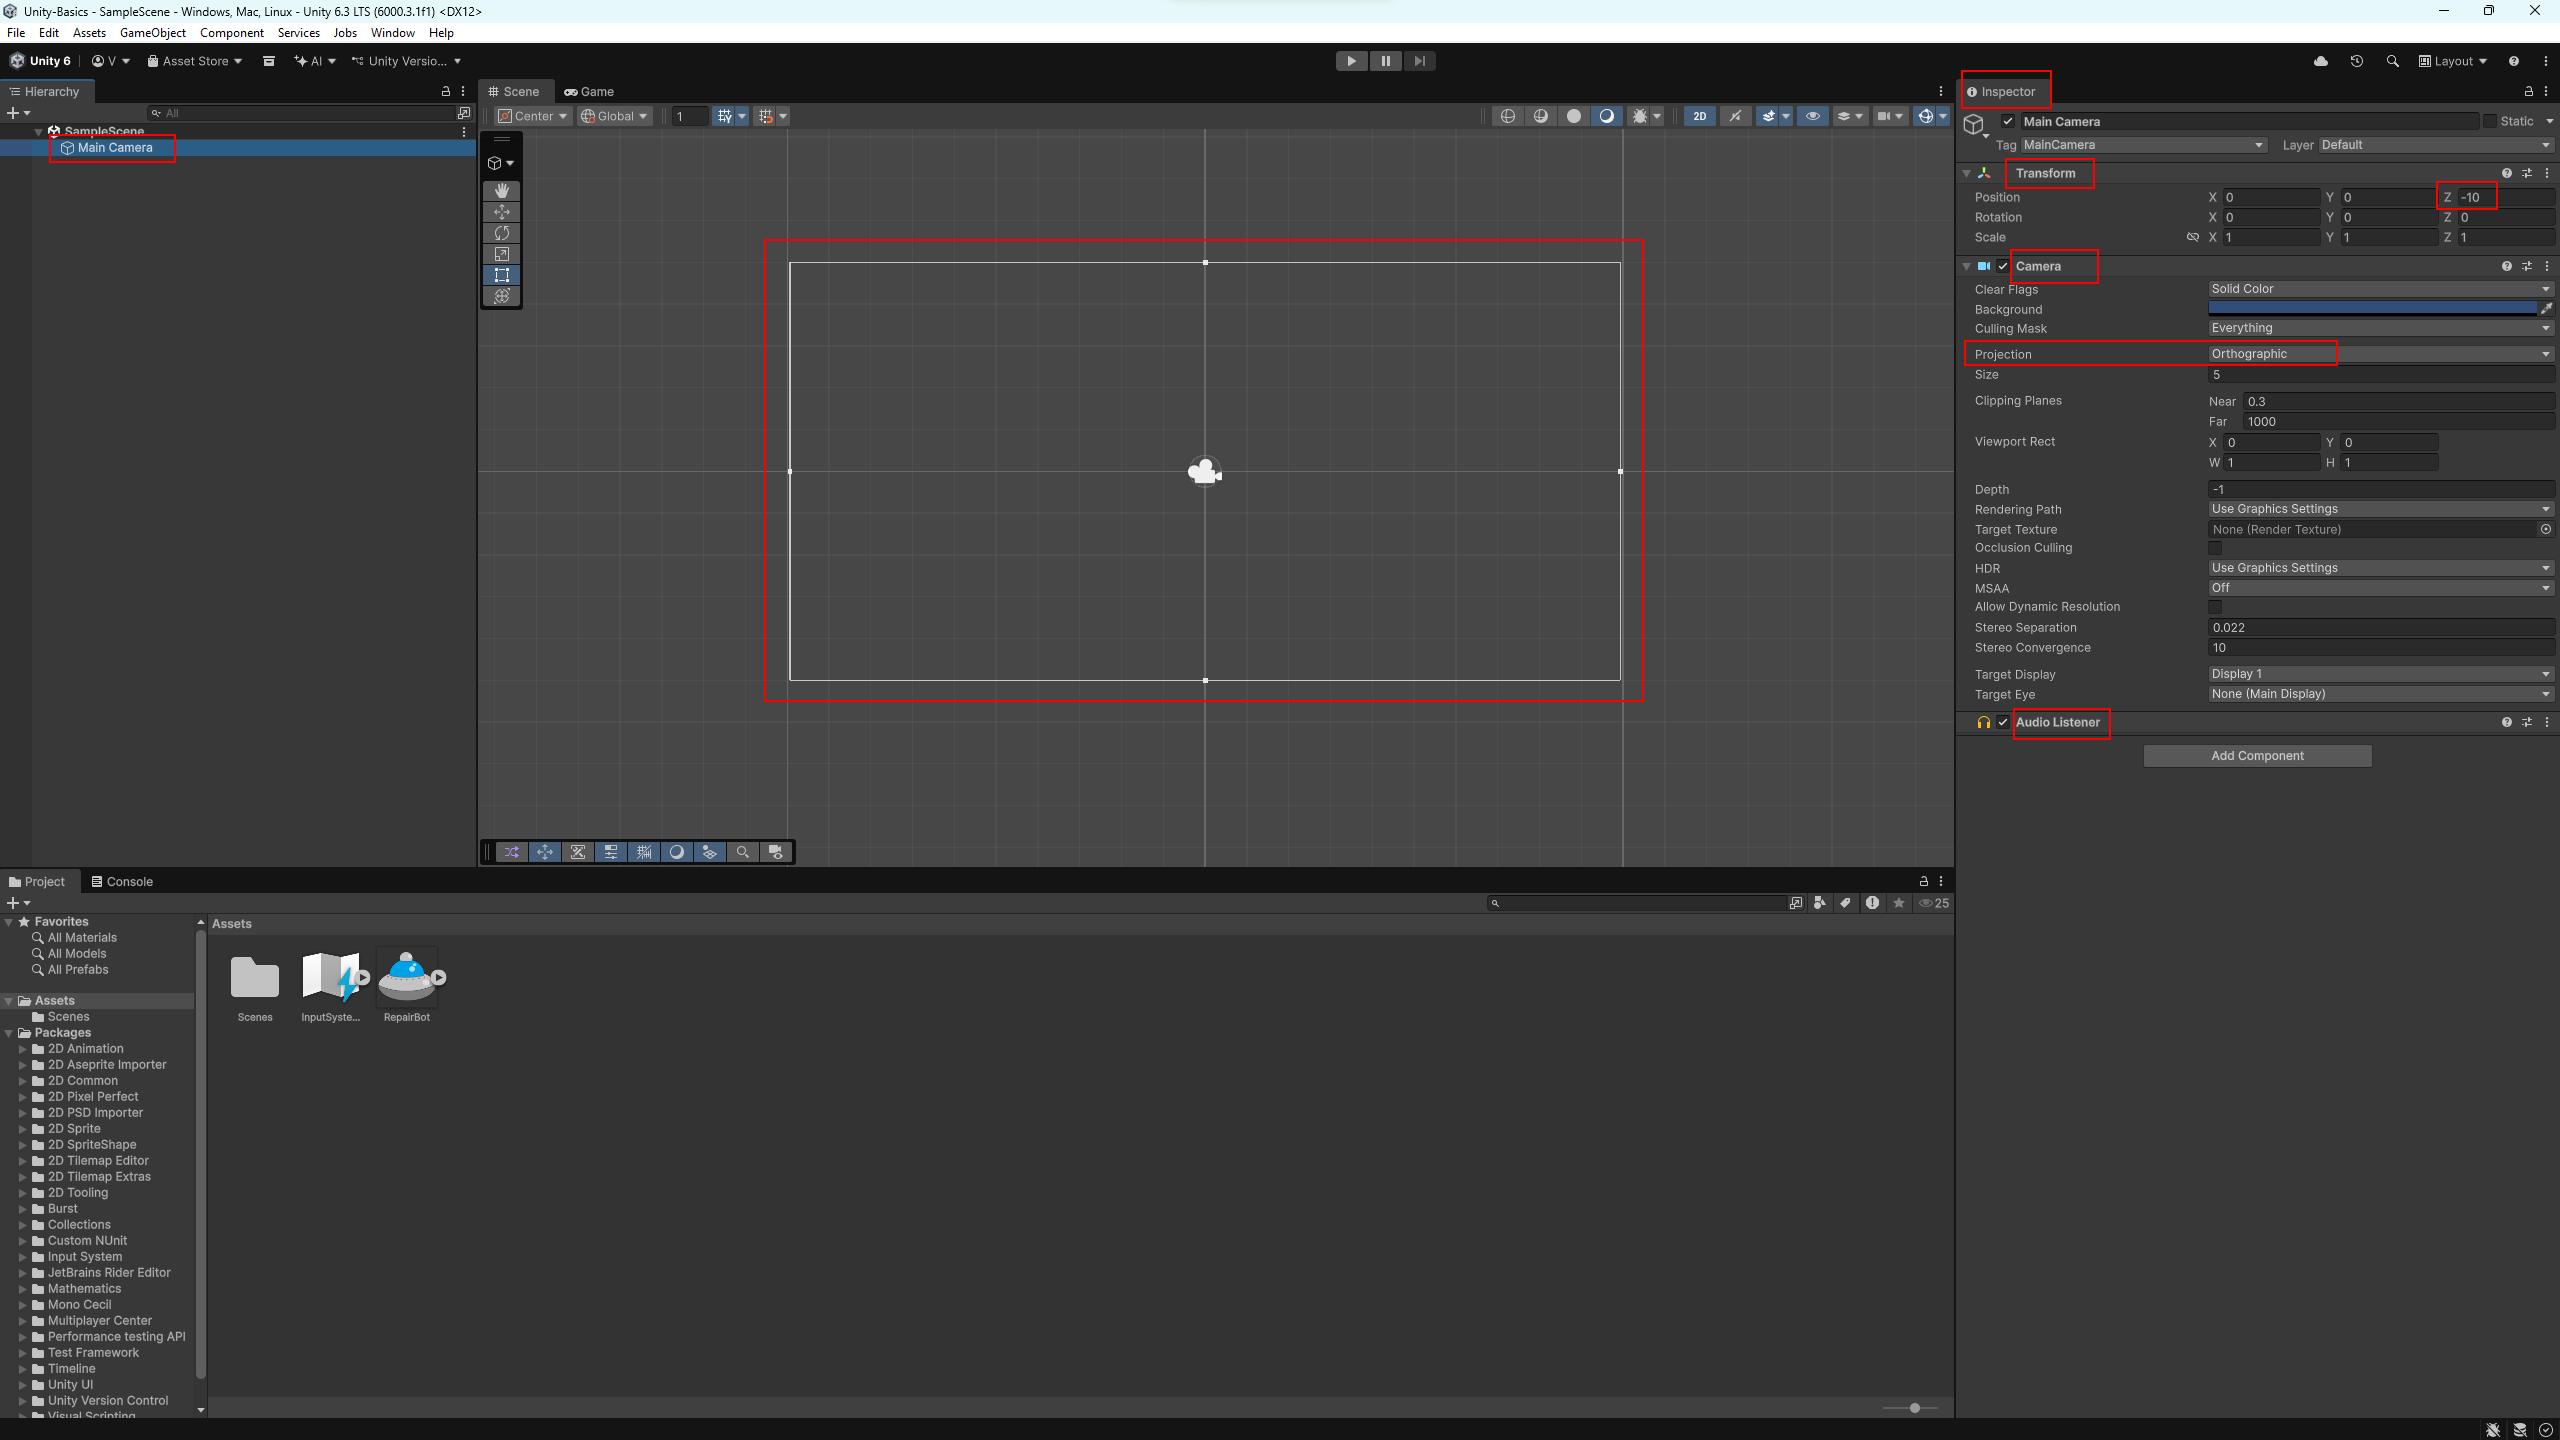
In a new scene, there is already one GameObject by default — the camera. Select it in the Hierarchy window and look at its list of components in the Inspector.
On the camera, you will see the Camera component, which is responsible for rendering the scene, as well as the Audio Listener component, which receives sound. It is the set of components that determines what kind of object a GameObject is and what role it plays.
💡 Even when working on a 2D project, Unity remains a 3D engine. The
camera only renders objects that are in front of it. By default, the
camera is positioned at Z = -10, and all visible 2D
objects are placed closer to zero on the Z axis.
Now let’s create our own GameObject in the scene. In the Project (Assets) window, we already have the spaceship sprite that we imported in the previous steps.
Drag the spaceship sprite from the Assets window directly into the Scene. Unity will automatically create a new GameObject. Select it in the scene or in the Hierarchy window and look at the list of components in the Inspector.
The created object has the mandatory Transform component, as well as the Sprite Renderer component, which is responsible for displaying the image in the scene.
A GameObject can also be created in another way. Open the menu GameObject → Create Empty to add an empty object to the scene. Select it, then in the Inspector window click Add Component and add the Sprite Renderer component. In the Sprite field, assign the spaceship sprite.
This shows that the capabilities and purpose of an object are determined not by the GameObject itself, but by the set of components added to it.
The scene now contains two objects: the camera and the spaceship. Click Play to see the scene through the camera’s view. For now, the spaceship is simply displayed on the screen — there is no movement or logic yet. Stop playback; next, we will gradually add behavior to the object.

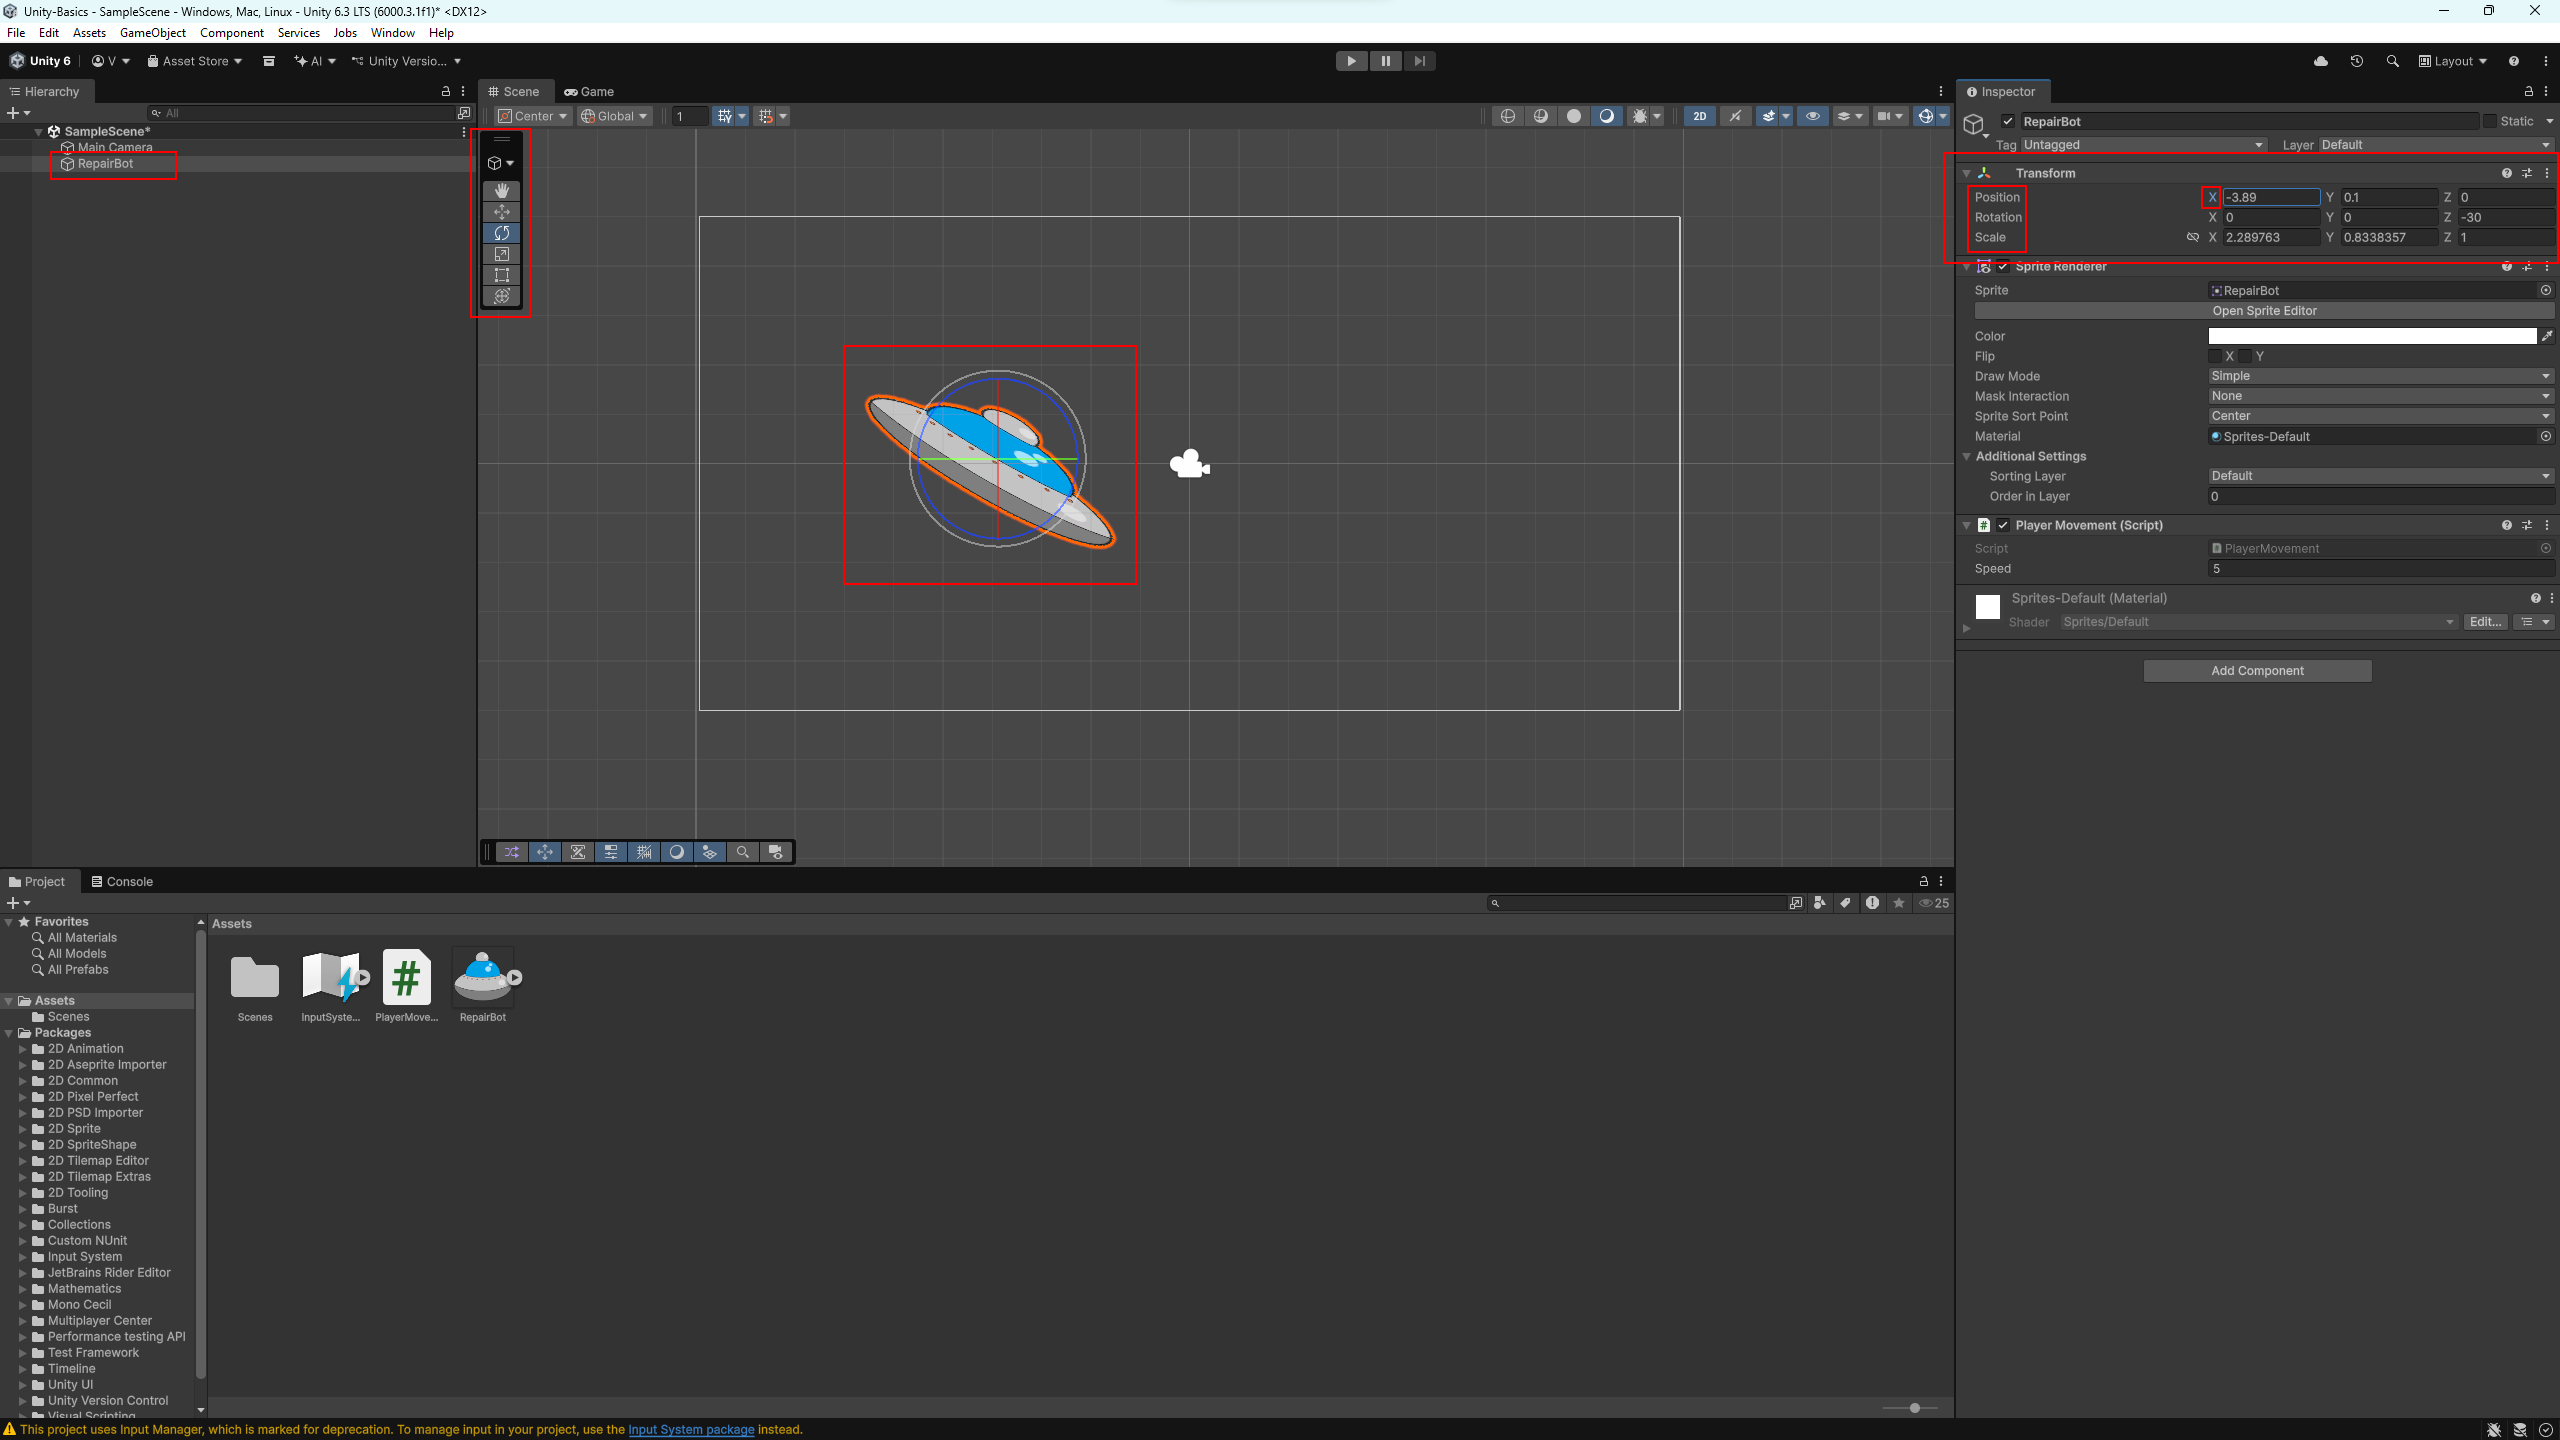
You can freely modify objects in a Unity scene: move them, rotate them, and change their size. This is done using transform tools, which allow you to work with a GameObject directly in the Scene window.
The main tools are located in the top toolbar of the editor and have the following hotkeys:
Select the spaceship in the scene and try each of the tools one by one. Changes are immediately reflected both in the scene and in the Transform component in the Inspector.
💡 You can also change an object’s position, rotation, and scale by entering exact values directly in the Transform component in the Inspector. This is useful when precise object placement is required.
💡 The axis values in the Transform component can also be adjusted using the mouse. Hover over the axis label (X, Y, or Z), hold the left mouse button, and move the cursor left or right — the object will update directly in the scene.
💡 Pay attention to the Global / Local toggle. It determines which coordinate system is used for transformations: world space or the local space of the selected object.
These tools are used constantly, so it is worth practicing with them a bit before moving on.
As you have already seen, an object’s appearance is defined by components. Control and behavior are also implemented using components — but in this case, we create them ourselves in the form of scripts.
Unity uses the C# programming language. Let’s create a simple script that allows you to control the spaceship using the keyboard.
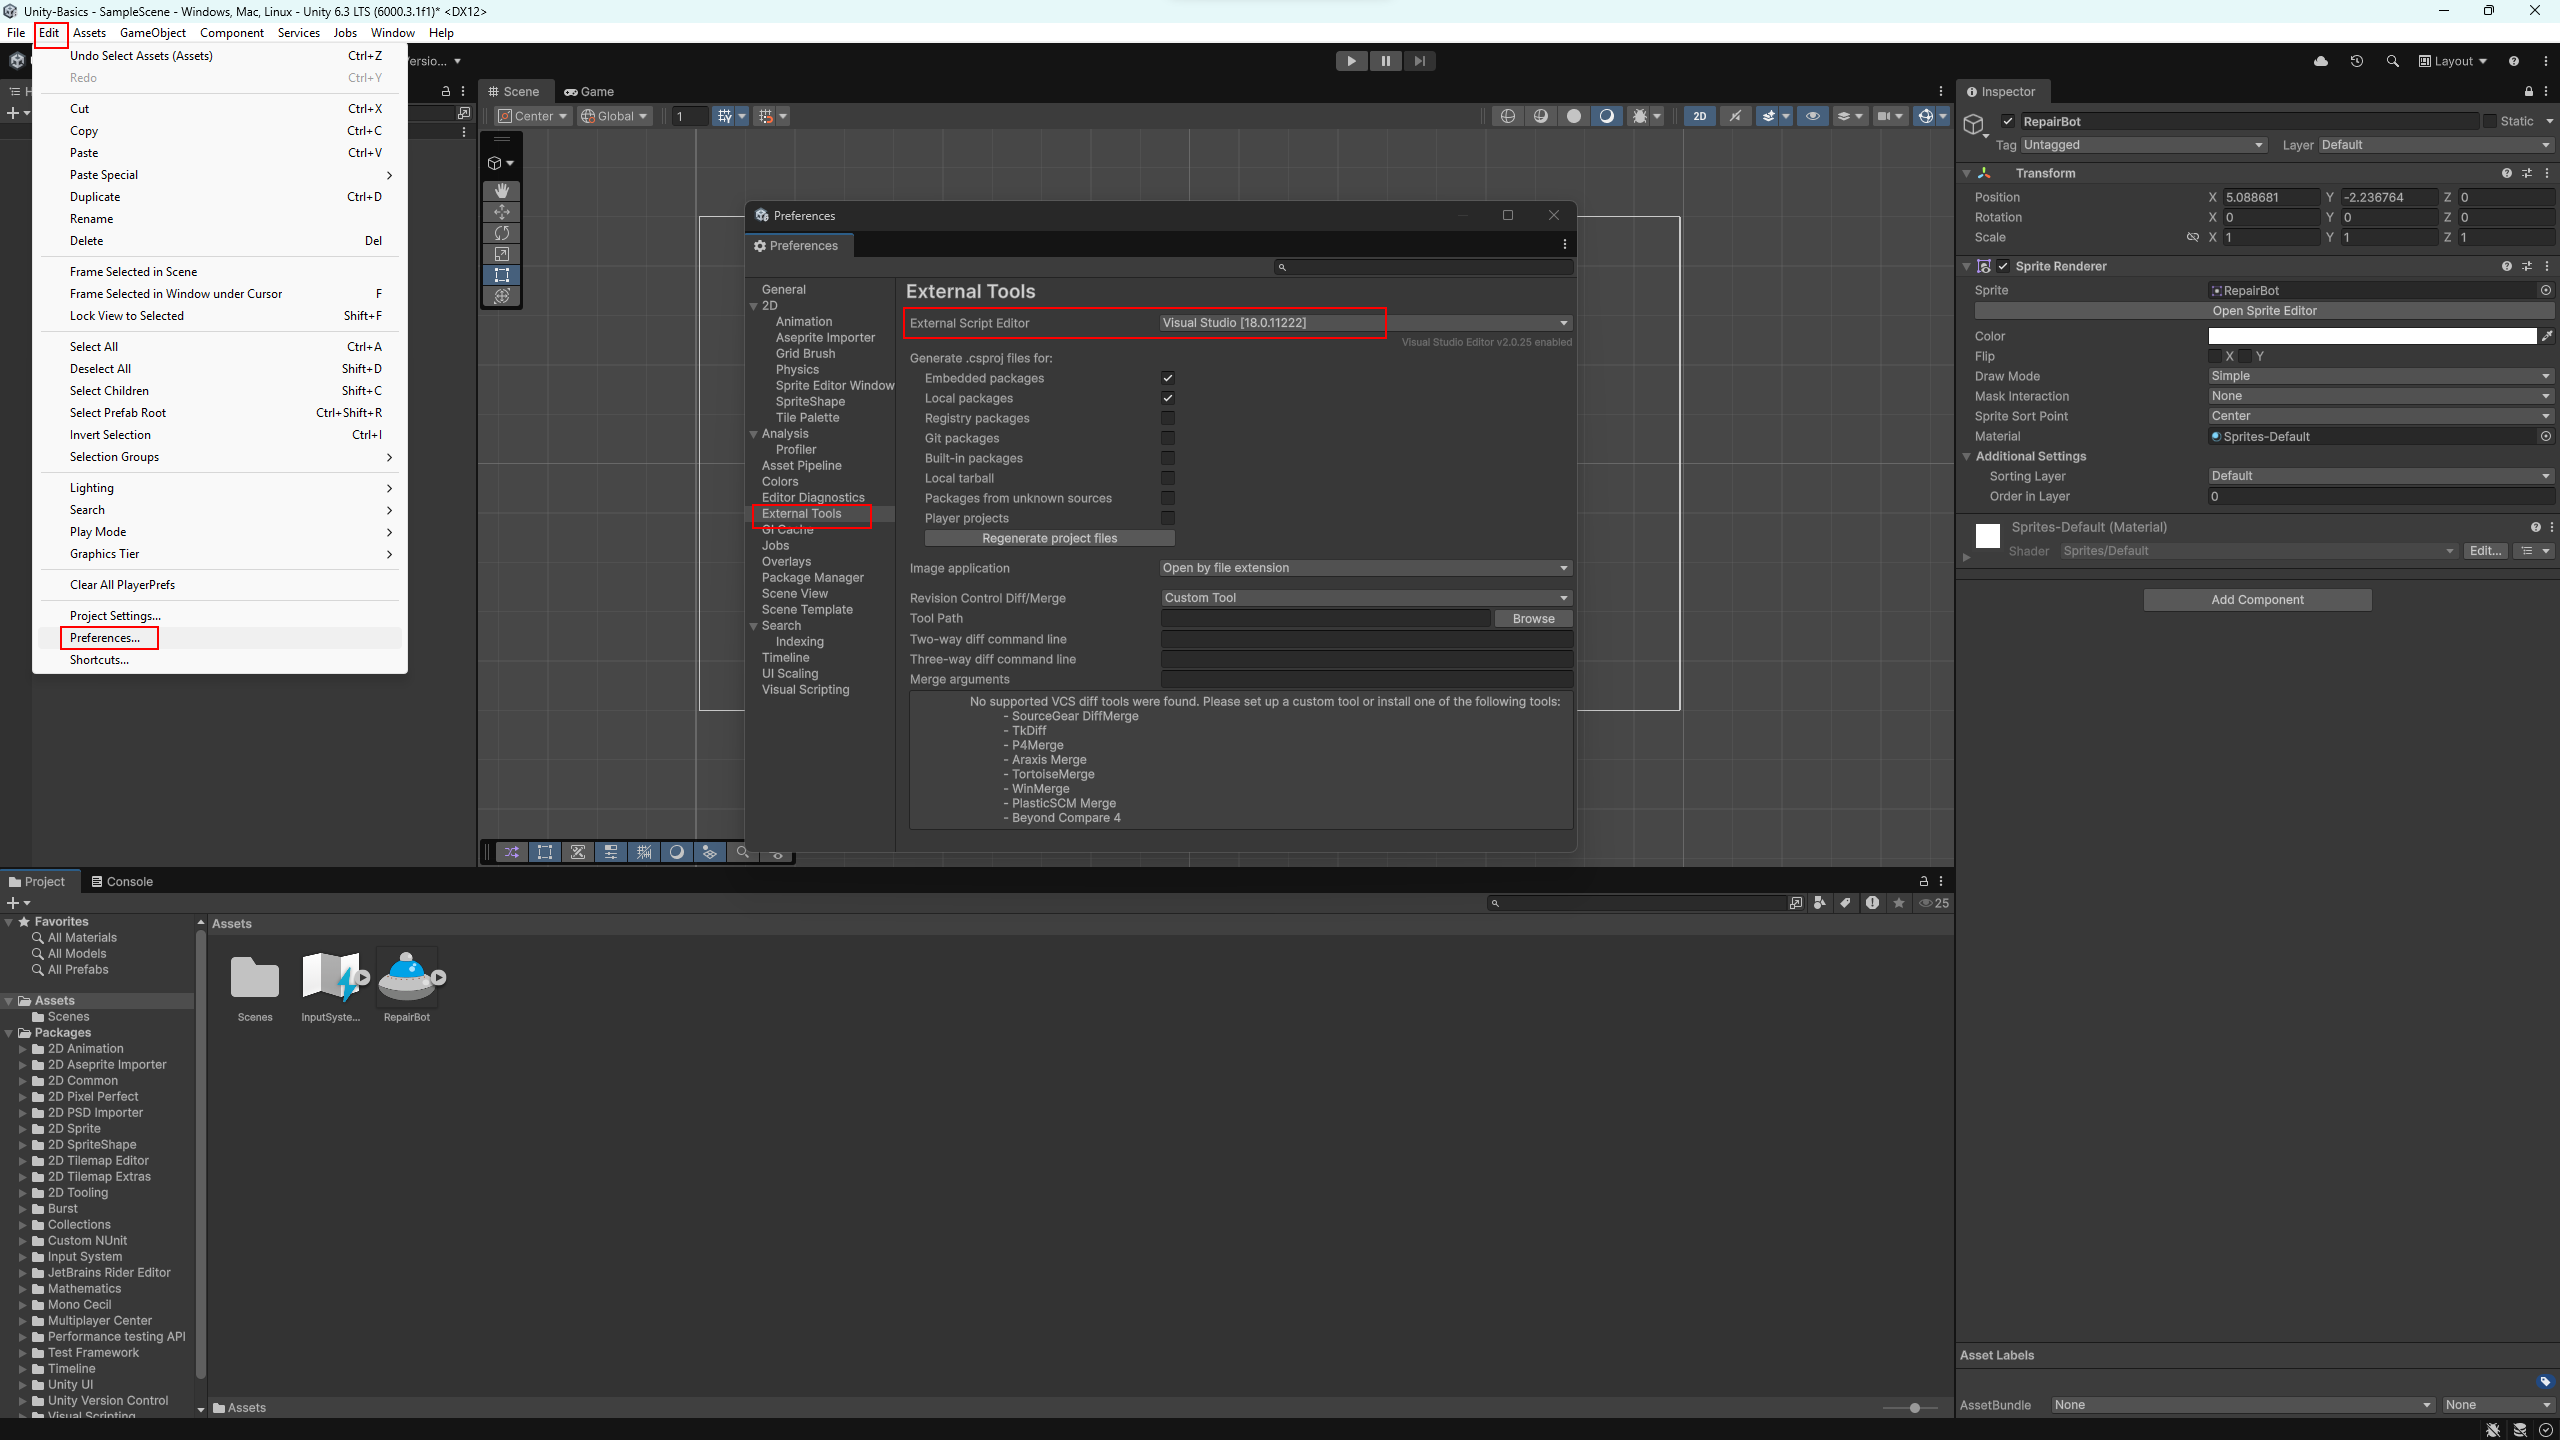
💡 To work with scripts, you need a code editor. Usually, Visual Studio is installed together with Unity (at the time of writing this tutorial — Visual Studio 2026). You can check the selected editor in Edit → Preferences → External Tools. You may also use another editor, as long as it provides good support for Unity and C#.
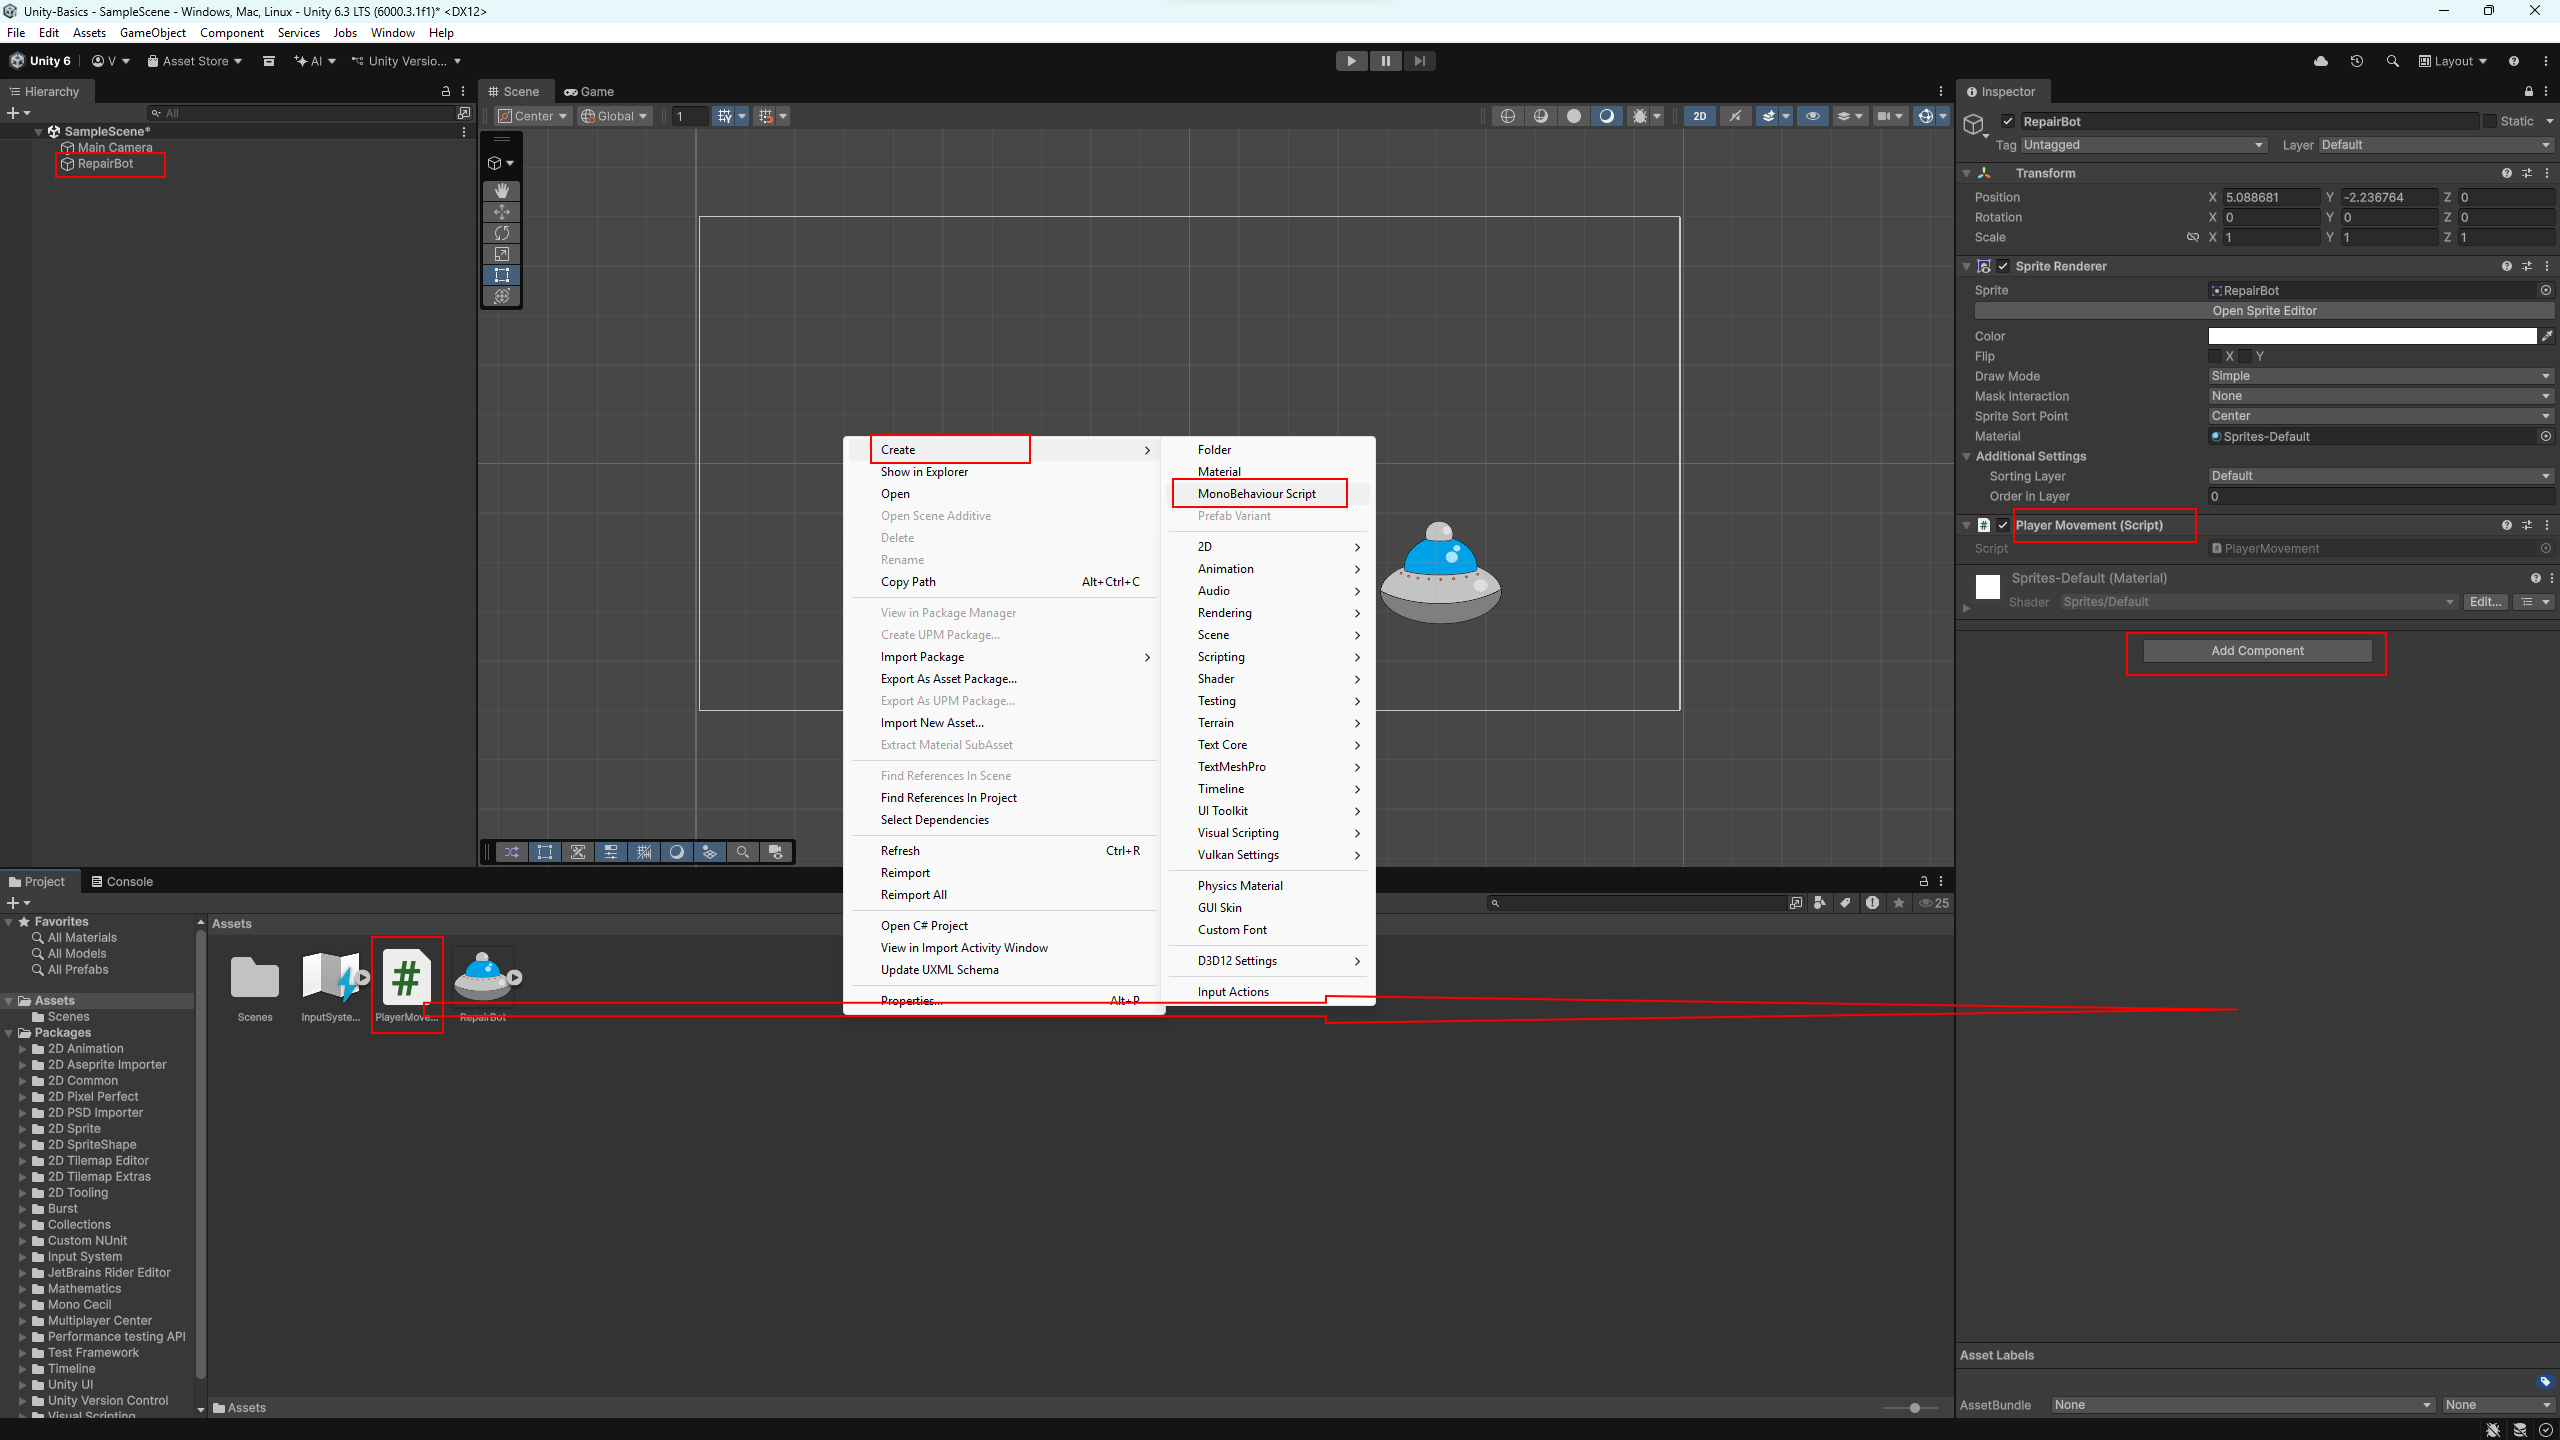
Now let’s create the script itself. In the Project (Assets) window, right-click and choose Create → MonoBehaviour Script. Name the script PlayerMovement.
Double-click the script to open it in the code editor and replace its contents with the following code:
using UnityEngine;

public class PlayerMovement : MonoBehaviour
{
    // Spaceship movement speed
    public float speed = 5f;

    void Update()
    {
        // Get keyboard input
        // Horizontal — A/D or Left/Right arrows
        // Vertical — W/S or Up/Down arrows
        float horizontal = Input.GetAxis("Horizontal");
        float vertical = Input.GetAxis("Vertical");

        // Create the movement vector
        Vector3 direction = new Vector3(horizontal, vertical, 0f);

        // Move the object
        transform.Translate(direction * speed * Time.deltaTime);
    }
}
Save the file and return to Unity. Now add the PlayerMovement script to the spaceship. This can be done by dragging the script from the Assets window into the Inspector, or via the Add Component button.
Click Play — you can now move the spaceship using the WASD keys or the arrow keys. This is a simple but clear example of how a script adds behavior to an object.
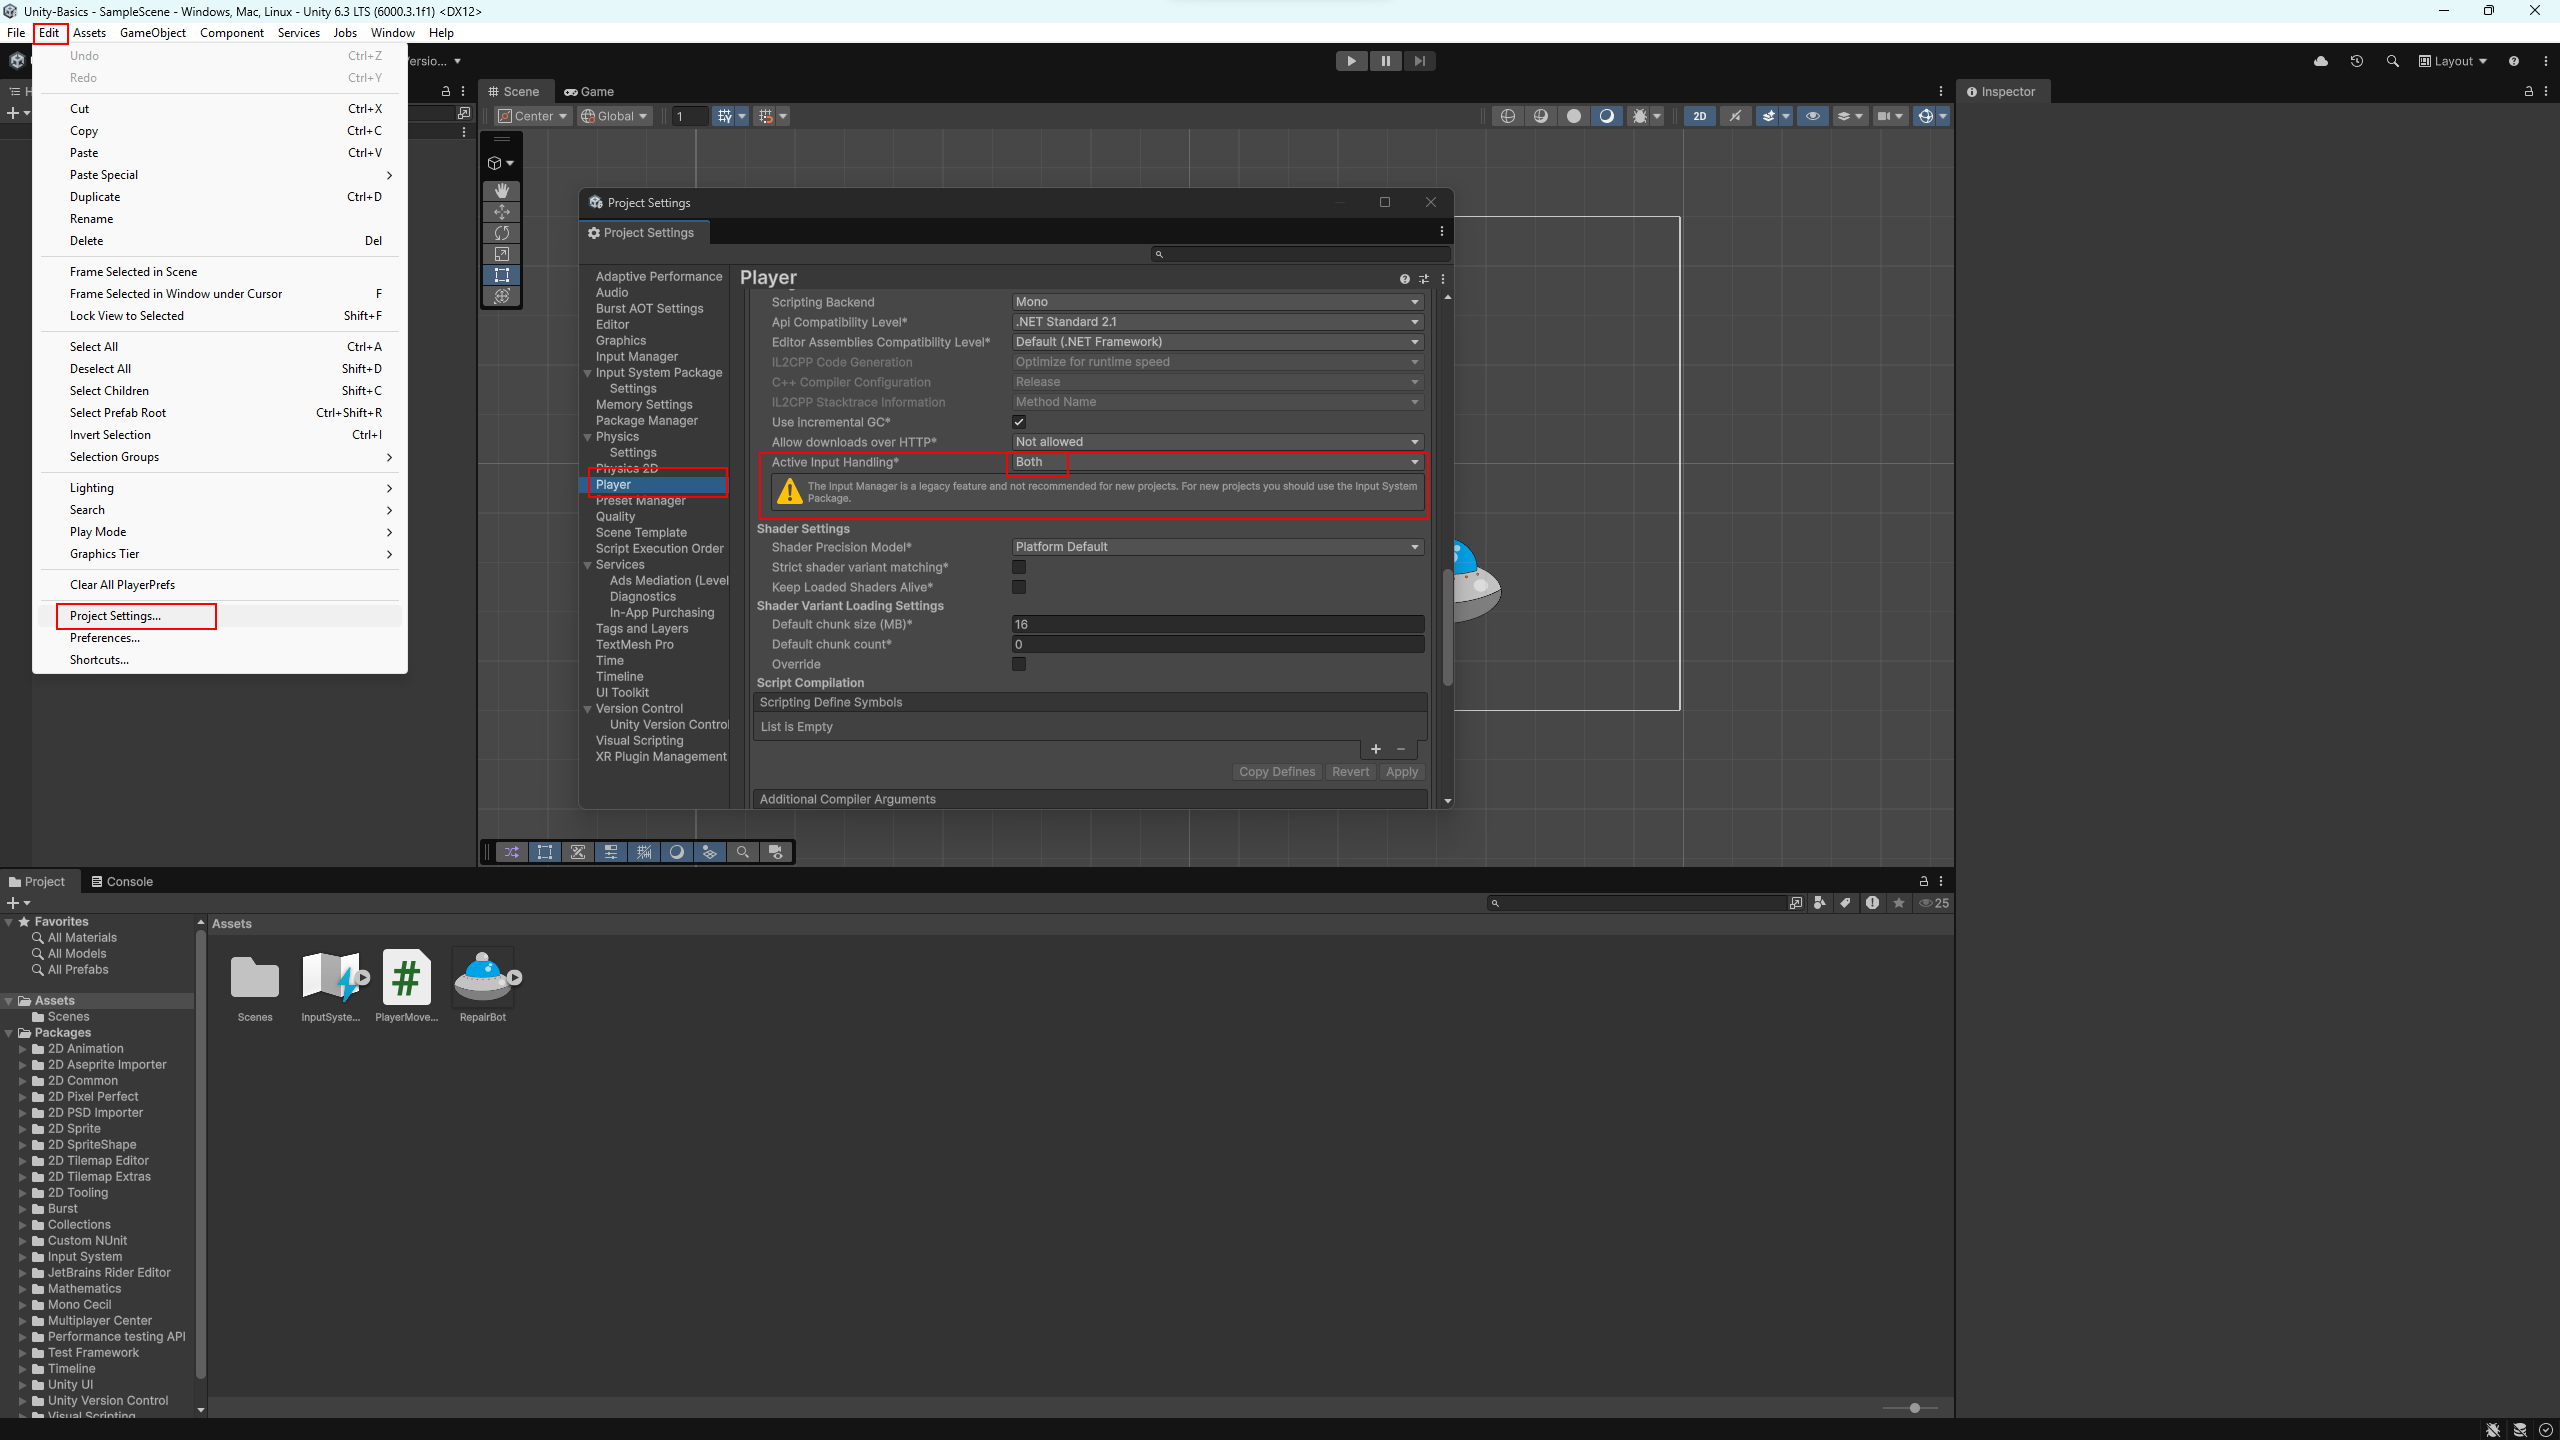
⚠️ Important: In newer versions of Unity, only the new control system (Input System) may be enabled by default. It requires additional setup and is less convenient for first learning steps. That is why these tutorials use the classic Input Manager.
To enable simultaneous support for both input systems, open Edit → Project Settings → Player and set Active Input Handling to Both. After changing this setting, Unity will ask you to restart the editor.
All changes you make in a scene are saved only after the scene is saved. If you close Unity without saving, the changes will be lost.
You can save the scene via File → Save or by using the keyboard shortcut Ctrl + S.
💡 It is recommended to save the scene right away in the Scenes folder and give it a clear, descriptive name.
Once the project is ready, it can be built as a standalone application for the desired platform. Unity supports building for various platforms (Windows, macOS, Linux, Android, and others), although some of them may require additional modules or conditions.
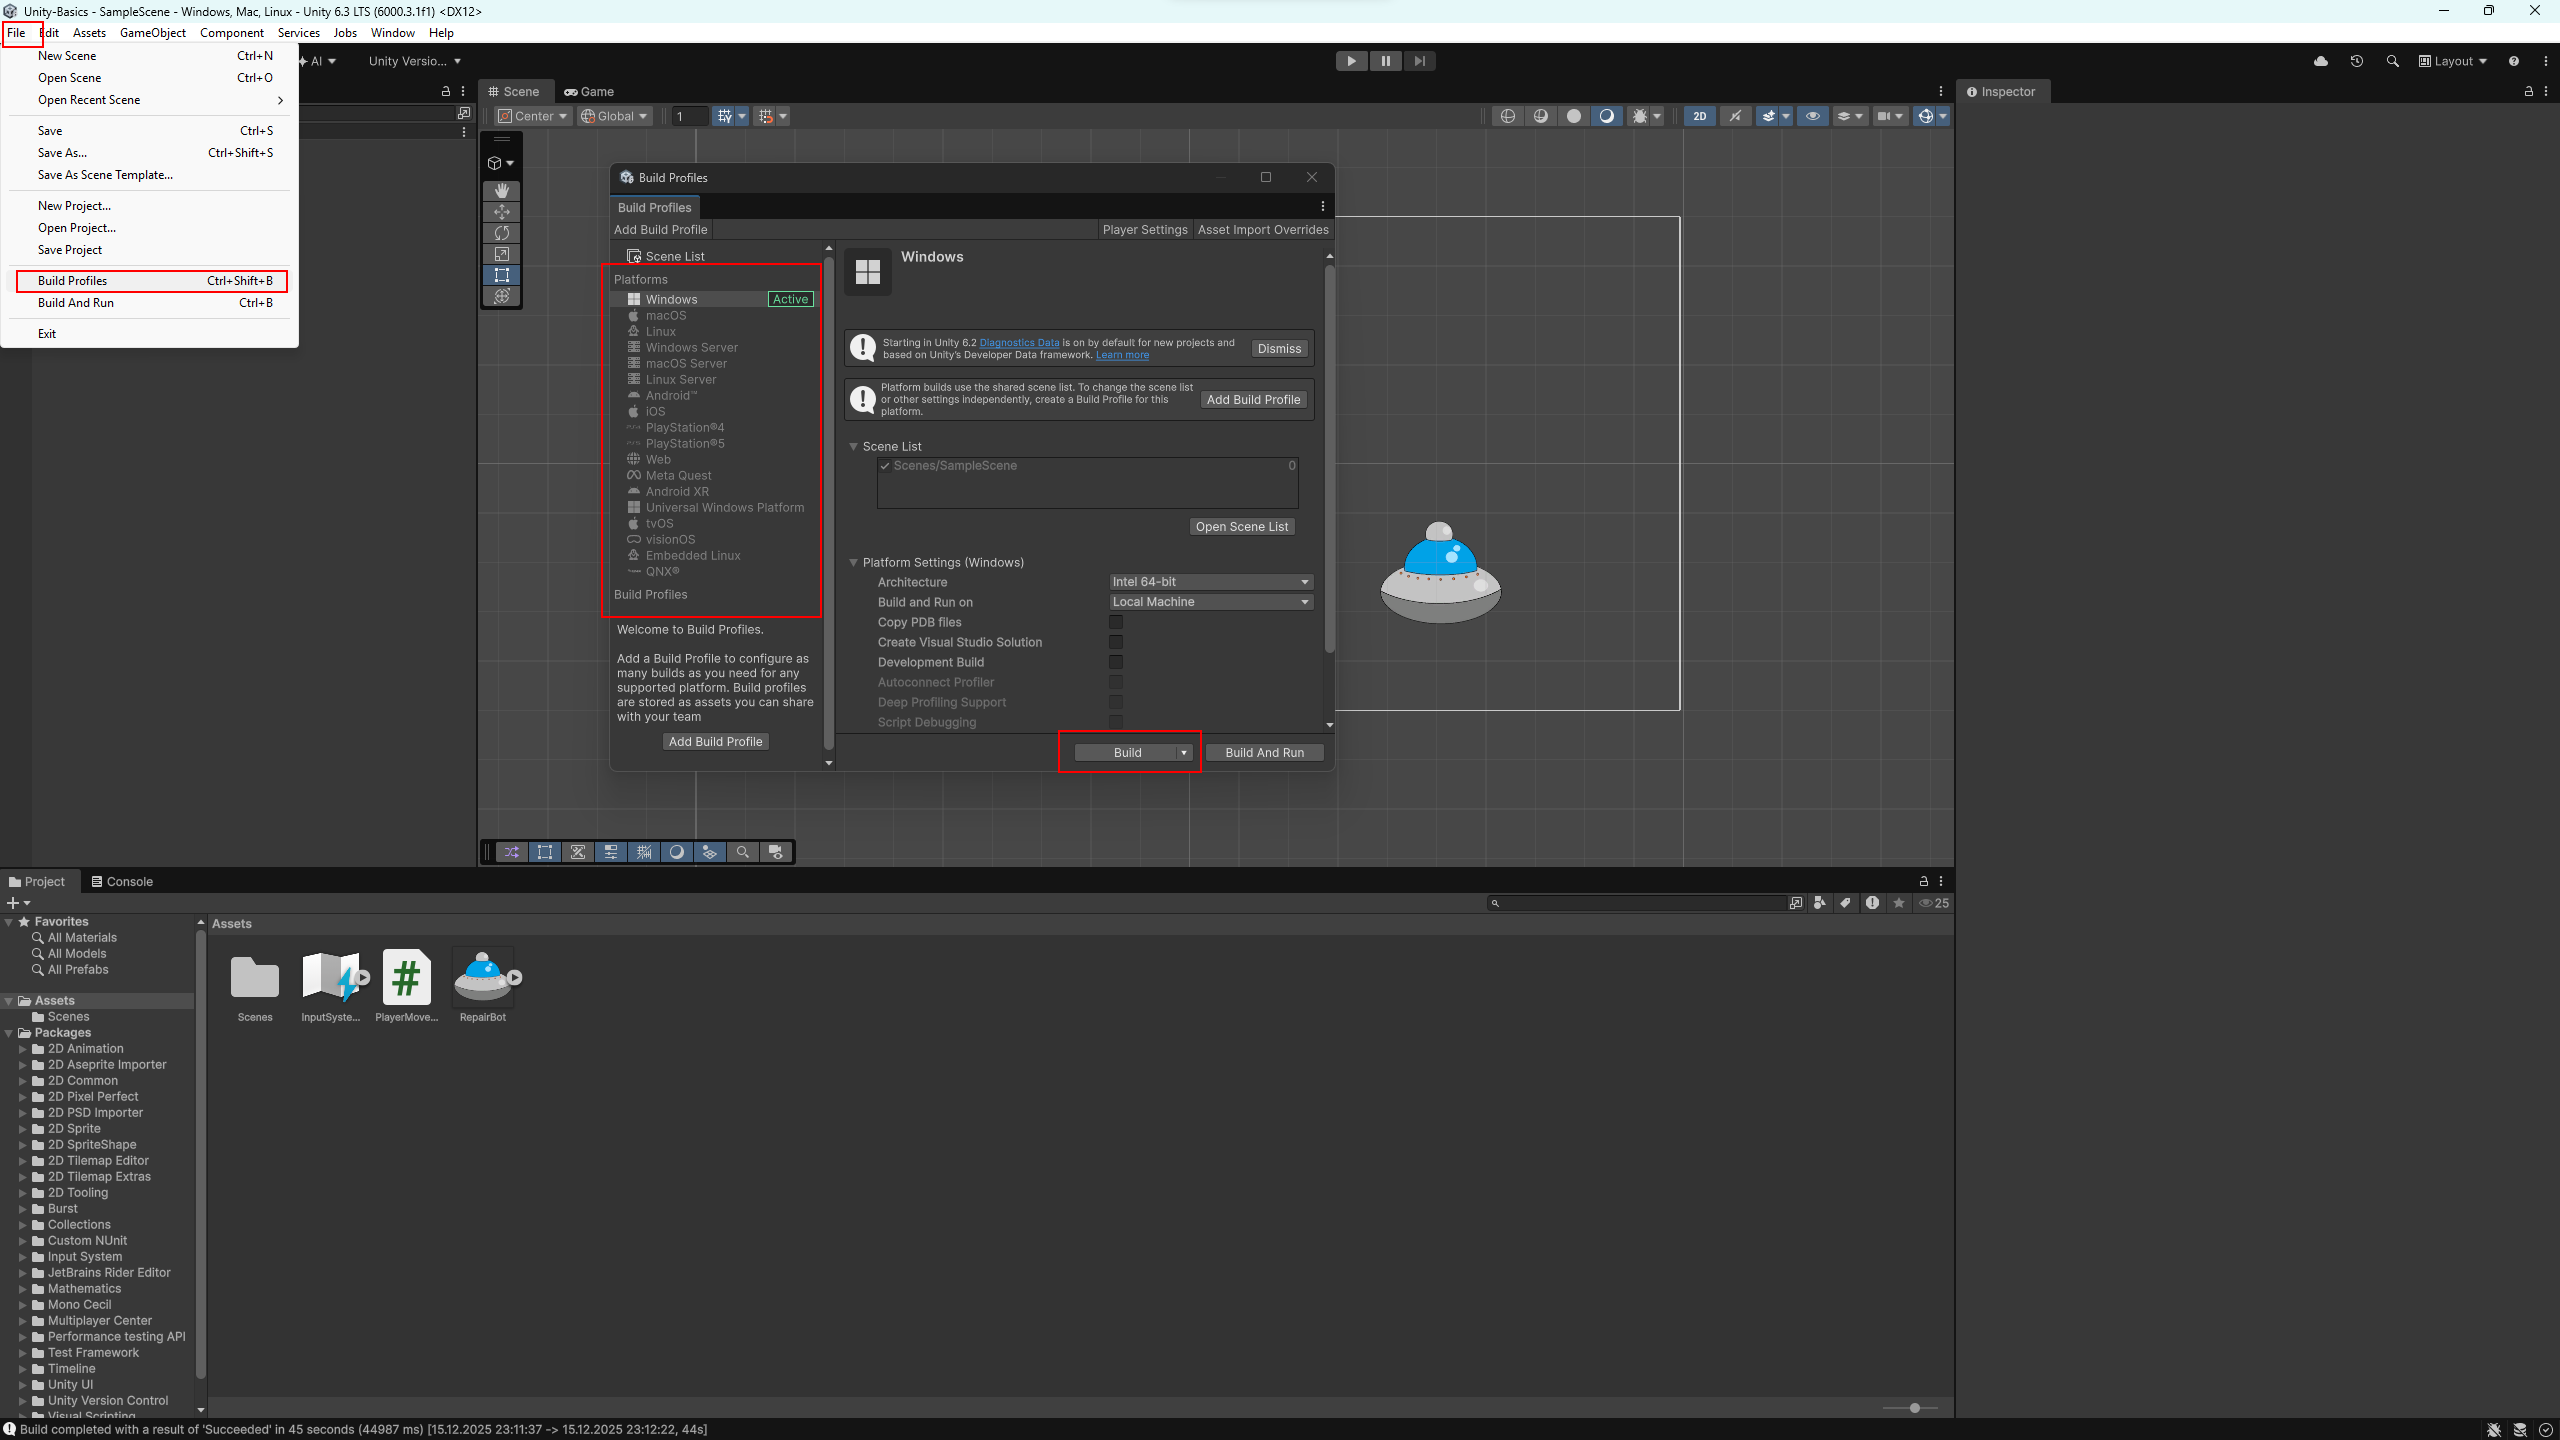
For a first test, it is convenient to create a build for Windows. Open the File → Build Profiles menu, select the Windows platform, and leave the default settings.
Click the Build button, choose a folder to save the build, and wait for the process to finish. After that, an executable file will appear in the selected folder, which you can run like a regular program.
💡 For learning purposes, it is not necessary to understand all build settings right away. The default values are sufficient to verify that the project builds and runs successfully.
This brings the basic tutorial to an end. You have become familiar with the Unity Editor, learned how to create a project, work with scenes, objects, assets, and scripts, and built your first build.
In the next tutorials, we will gradually dive deeper into practice: game mechanics, movement, collisions, interaction logic, and other elements that games are made of.
💡 Take your time. If something feels unclear, go back to the previous steps and try them again — practice matters more than speed.
See you in the next tutorials 🙂