Hi there! In this step-by-step guide, we'll create a simple
2D platformer using the Unity engine.
This tutorial is suitable for beginners: you don't need to be an expert,
we'll explain everything clearly and in detail. We'll use built-in
Unity 2D physics, add some animation, and learn how to
work with sprite sheets.
To follow along, you'll need a few resources:
sprites, sounds, and scripts.
📦 Download the .zip project archive 📦
— it contains everything you need to get started building your
platformer in Unity.
Open Unity and create a new 2D project. To start, choose 2D Built-in Render Pipeline — or any other 2D template you prefer.
First, we'll set up the basics of the game by adding the ground object and the player character.
Unzip the downloaded .zip archive and import the
largeGround sprite into Unity. Drag
largeGround into the scene and rename the created
GameObject to Ground.
Select Ground in the Hierarchy. In the Inspector:
0.
Now let's add the player. Import the sprite sheet ratIdle
(it's also in the archive). Unity will usually slice the sprite sheet
automatically, but this auto-slicing can often misalign the images,
leading to jerky animation. It’s better to slice it manually. This
sprite sheet is set up as a 4 × 5 grid of sprites.
ratIdle in the Assets folder.Multiple.4 and Rows (R): 5, then
click Slice.
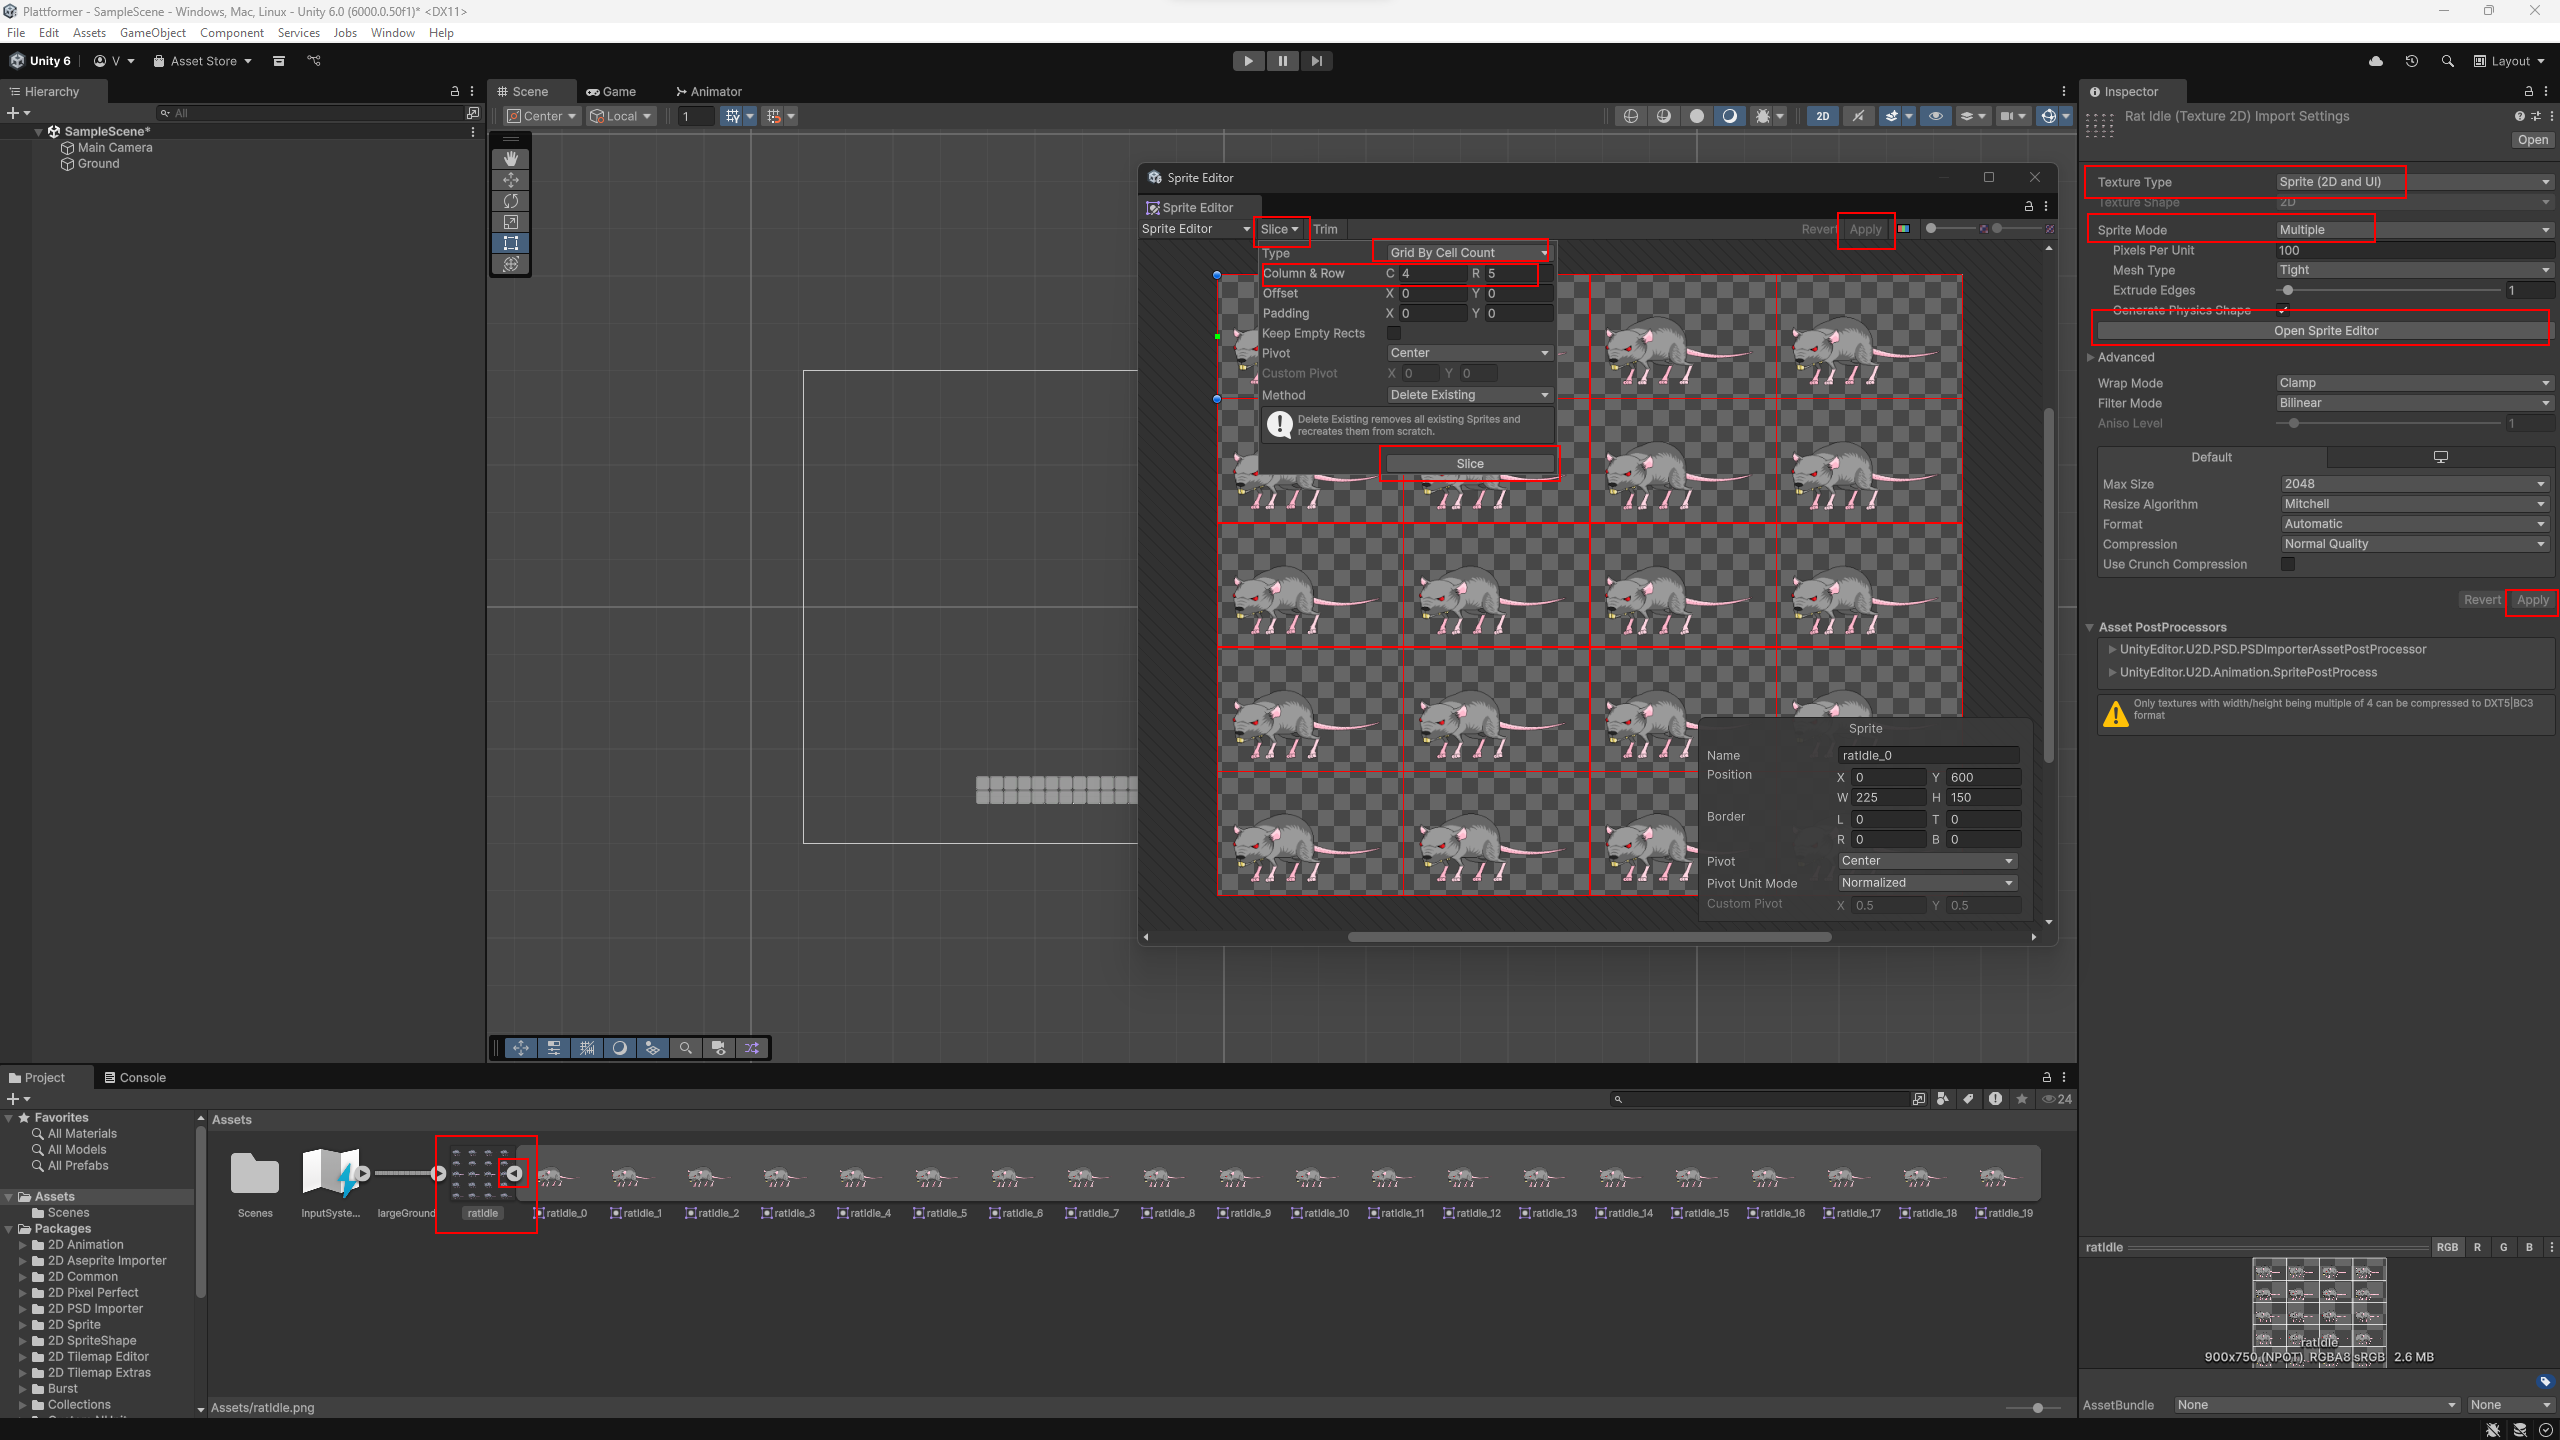
Expand the sprite sheet — it should now have 20 frames. Drag the first frame into the scene. Rename the new GameObject to Rat.
Select the Rat GameObject and make these changes:
Player.0.Interpolate.
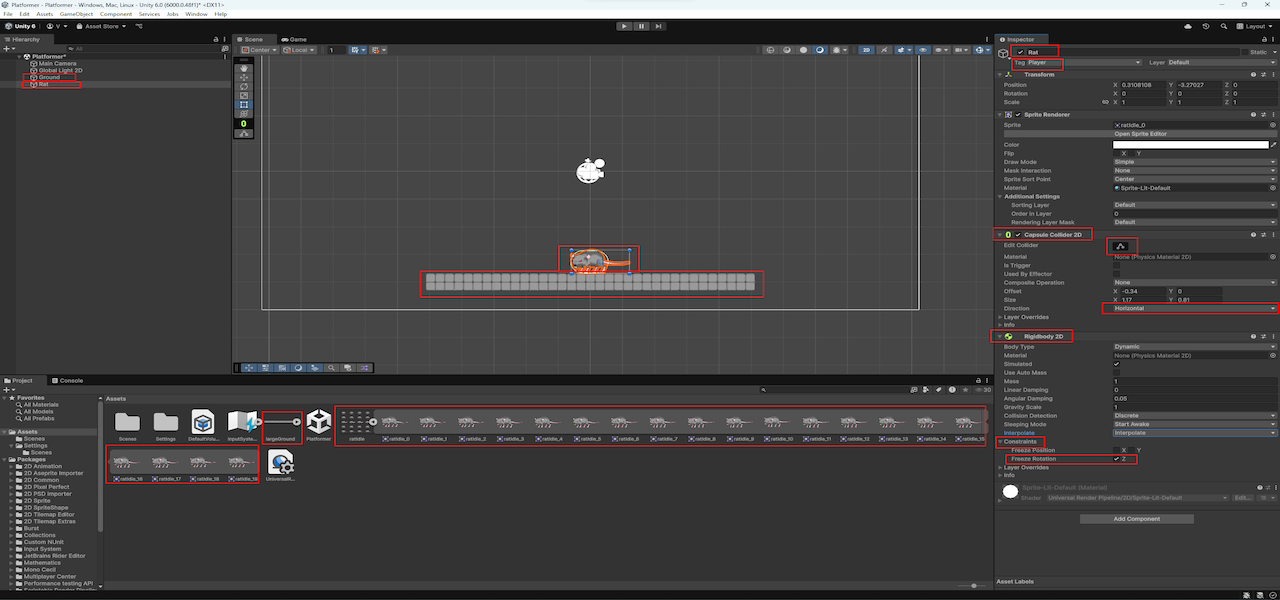
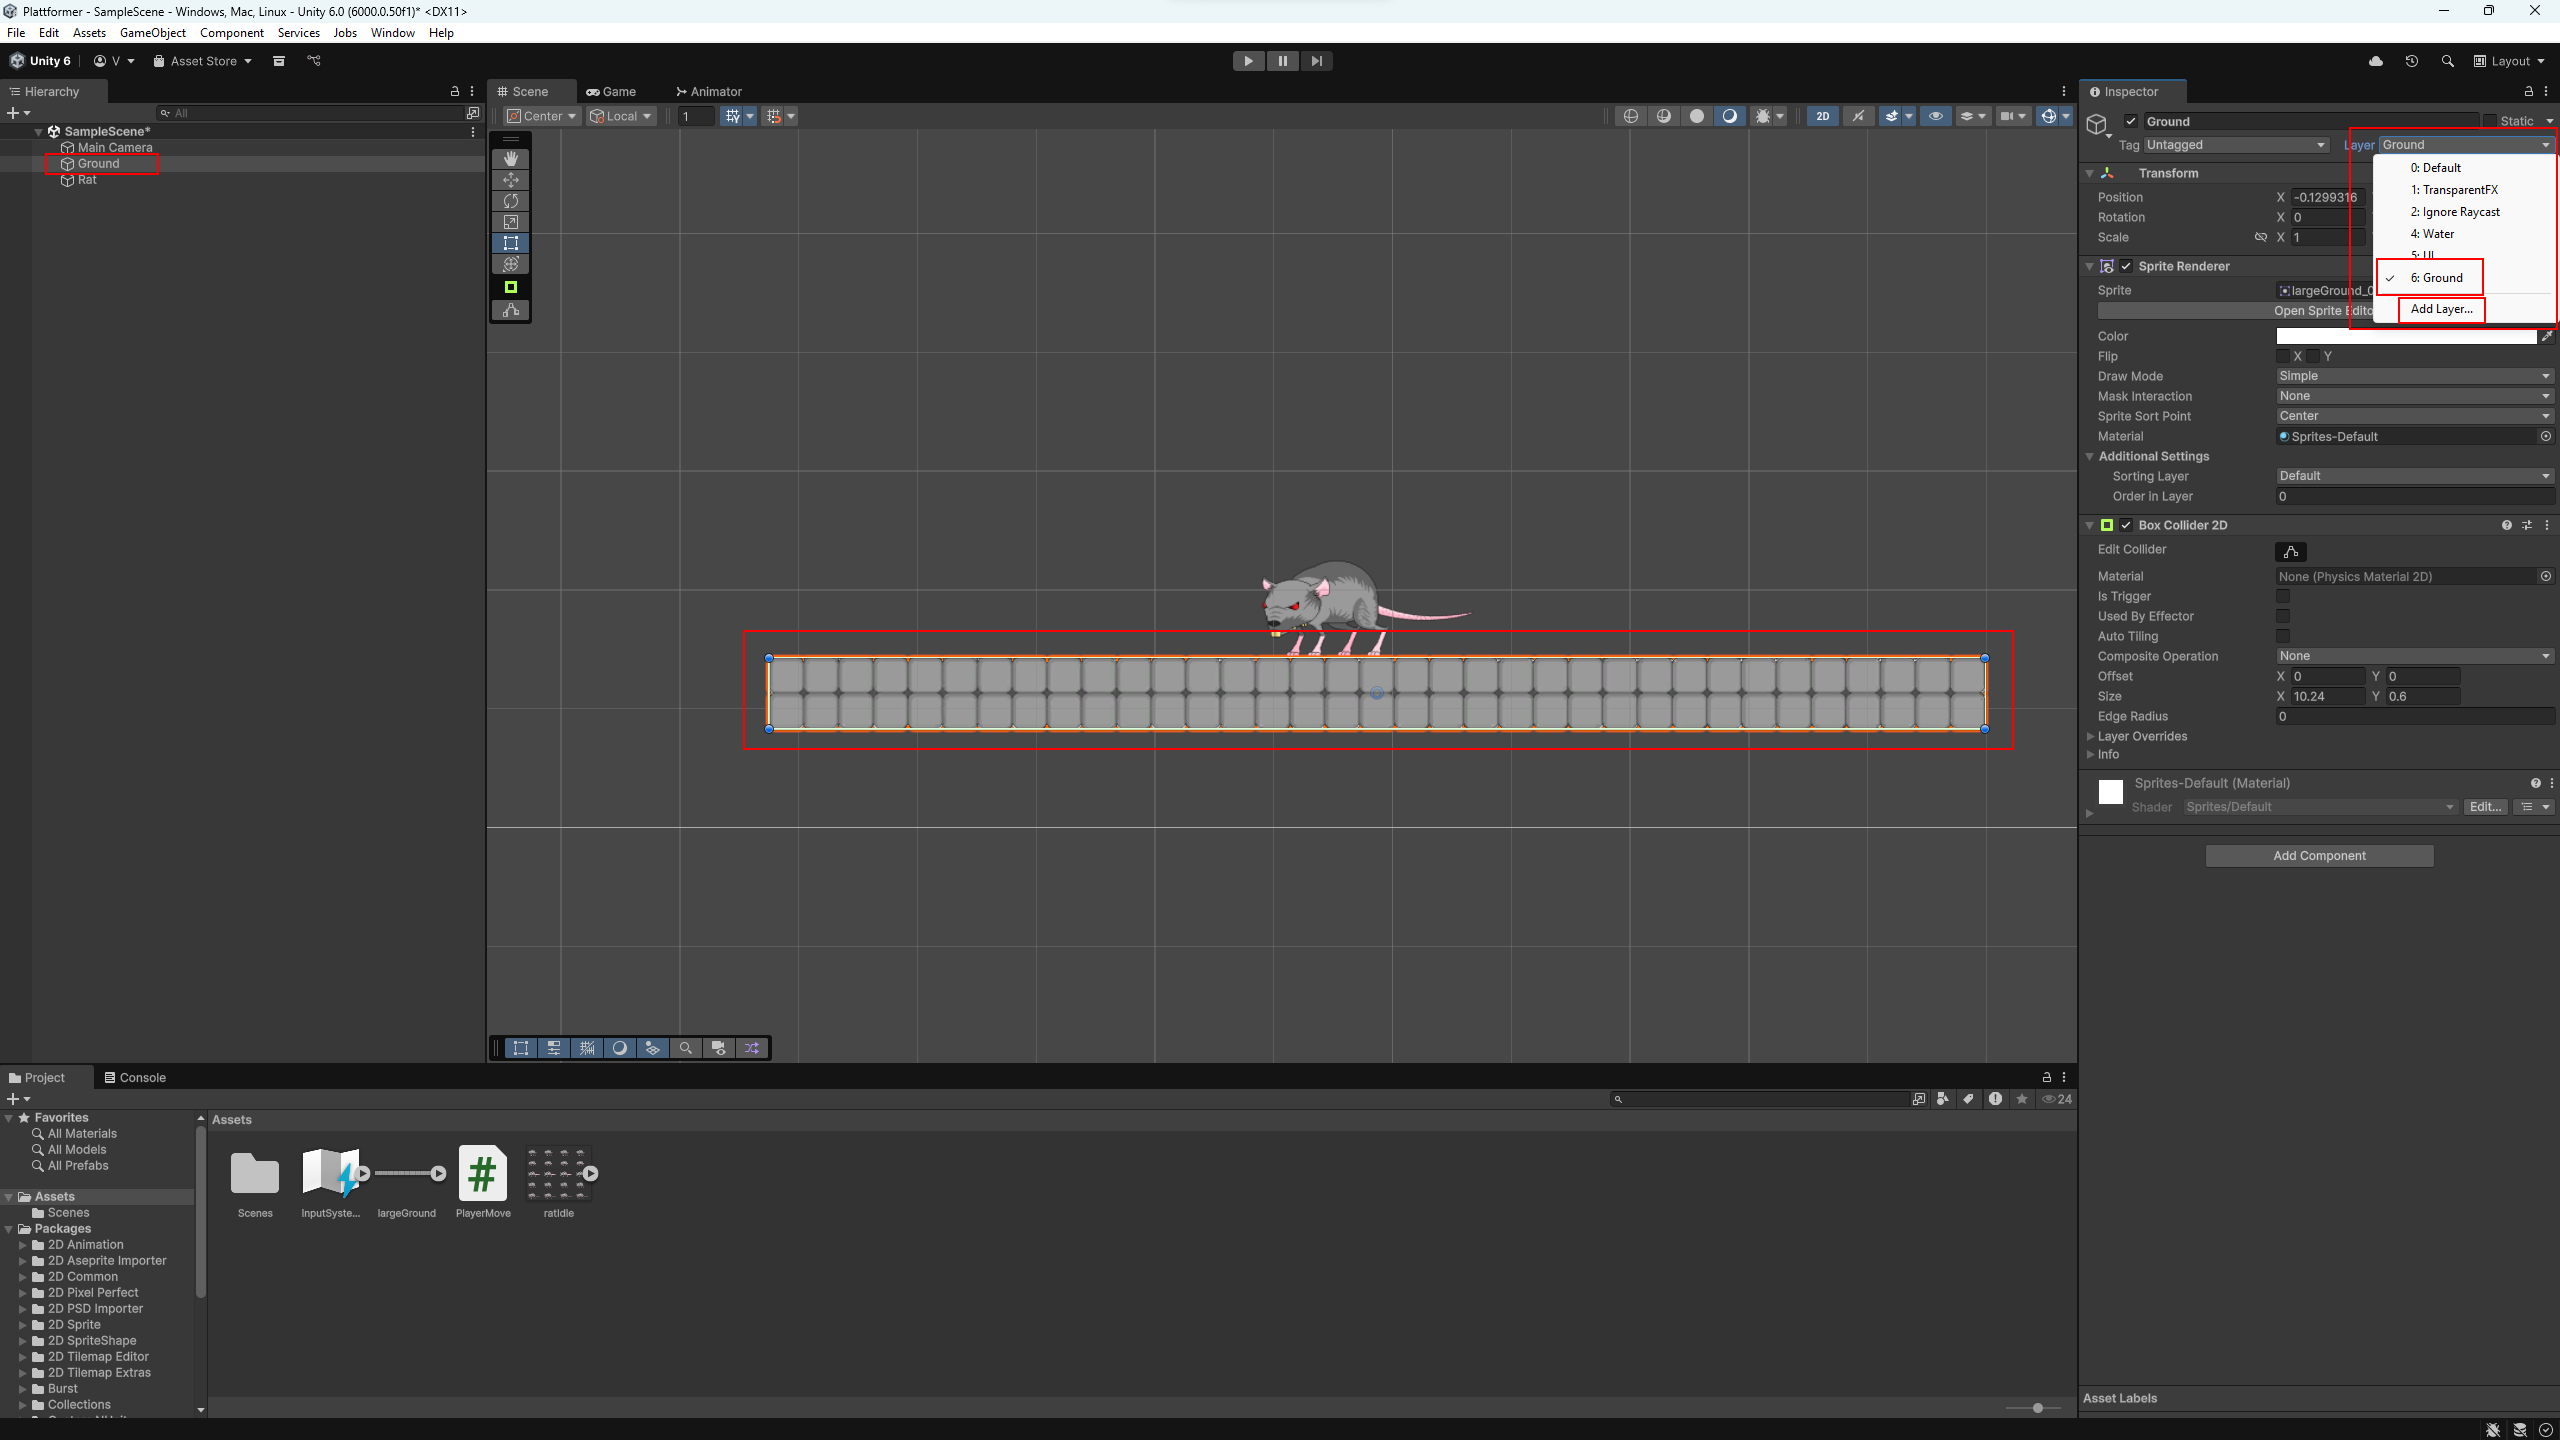
To make jumping work, we also need to define what the “ground” is.
Select the Ground object and set its
Layer to Ground. If you don’t see this
layer, create a new one with that name first.
It’s time to make our rat move! Let’s create a new script that handles both running and jumping.
In the Assets folder, right-click and create a new
MonoBehaviour script. Name it PlayerMove. This script
will use the Rigidbody2D component to move the player
with Unity's built-in physics. We'll also add jumping by applying a
force along the Y-axis. To detect whether the player is on the ground,
we'll use Physics2D.OverlapPoint. Actually, using
OverlapCircle or OverlapBox would give a
more reliable ground check, but for understanding the basic platformer
principle, OverlapPoint is enough for now.
using System.Collections;
using System.Collections.Generic;
using UnityEngine;
using UnityEngine.InputSystem;

public class PlayerMove : MonoBehaviour
{
    // Which layers count as "ground" (set this in Inspector)
    public LayerMask whatIsGround;

    // Position used to check if the player is standing on ground
    public Transform groundCheck;

    // Is the player currently on the ground?
    public bool isGrounded;

    // How high the player jumps
    public float jumpForce;

    // How fast the player moves left/right
    public float speed;

    // Reference to the Rigidbody2D component
    Rigidbody2D rb;

    void Start()
    {
        // Get the Rigidbody2D component attached to this object
        rb = GetComponent<Rigidbody2D>();
    }

    void Update()
    {
        // If Jump button is pressed and the player is on the ground
        if (Keyboard.current != null && Keyboard.current.spaceKey.wasPressedThisFrame && isGrounded)
        {
            // Add force upward to jump
            rb.AddForce(Vector2.up * jumpForce, ForceMode2D.Impulse);
            // Prevent double jumping — will be reset in FixedUpdate
            isGrounded = false;
        }
    }

    void FixedUpdate()
    {
        // Check if GroundCheck touches ground layer
        isGrounded = Physics2D.OverlapPoint(groundCheck.position, whatIsGround);

        float x = 0f;

        // Get horizontal input (left/right or A/D)
        if (Keyboard.current != null)
      {
        if (Keyboard.current.aKey.isPressed || Keyboard.current.leftArrowKey.isPressed)
            x = -1f;
        else if (Keyboard.current.dKey.isPressed || Keyboard.current.rightArrowKey.isPressed)
            x = 1f;
      }

        // Build movement vector (keep vertical speed)
        Vector3 move = new Vector3(x * speed, rb.linearVelocity.y, 0f);

        // Apply it to the Rigidbody
        rb.linearVelocity = move;
    }
}
Attach the PlayerMove script to the
Rat GameObject. In the Inspector, set
Speed to 3 and
Jump Force to 5.
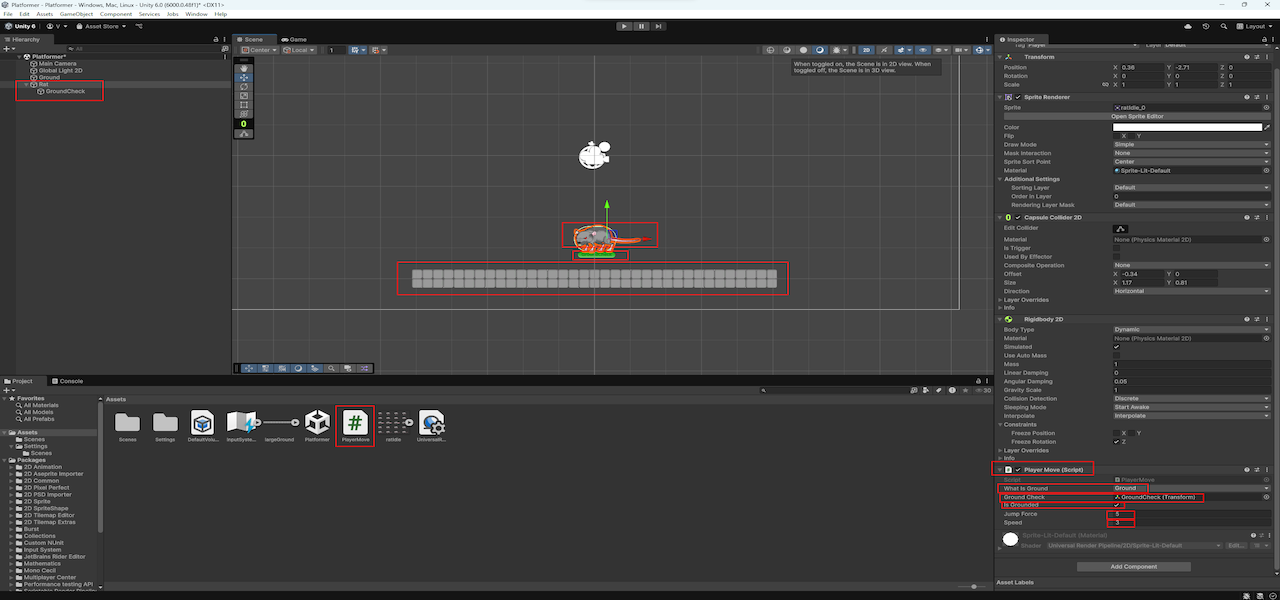
Now create a child object to help detect the ground. Right-click on
the Rat in the Hierarchy → Create Empty,
rename it to GroundCheck, and move it just below the
rat's feet (but outside its collider).
Now select Rat again. In the PlayerMove component:
Ground Check field.
What Is Ground, enable the
Ground layer.
💡 Tip: If the Ground layer doesn’t
appear in the list, make sure you’ve selected the ground object and
added a layer named Ground to it.
Press Play — the rat should now move left/right (with arrow keys or A/D) and jump when on the ground.
The rat can now move and jump — but it always looks in one direction. Let’s make it turn based on movement input. To do this, we’ll add a new variable to our script and create a function that flips the player’s sprite when the direction changes.
using System.Collections;
using System.Collections.Generic;
using UnityEngine;
using UnityEngine.InputSystem;

public class PlayerMove : MonoBehaviour
{
    // Which layers count as "ground" (set this in Inspector)
    public LayerMask whatIsGround;

    // Position used to check if the player is standing on ground
    public Transform groundCheck;

    // Is the player currently on the ground?
    public bool isGrounded;

    // How high the player jumps
    public float jumpForce;

    // How fast the player moves left/right
    public float speed;

    // Reference to the Rigidbody2D component
    Rigidbody2D rb;

    // Controls which direction the rat is currently facing
    public bool isLookingLeft;

    void Start()
    {
        // Get the Rigidbody2D component attached to this object
        rb = GetComponent<Rigidbody2D>();
    }

    void Update()
    {
        // If Jump button is pressed and the player is on the ground
        if (Keyboard.current != null && Keyboard.current.spaceKey.wasPressedThisFrame && isGrounded)
        {
            // Add force upward to jump
            rb.AddForce(Vector2.up * jumpForce, ForceMode2D.Impulse);
            // Prevent double jumping — will be reset in FixedUpdate
            isGrounded = false;
        }
    }

    void FixedUpdate()
    {
        // Check if GroundCheck touches ground layer
        isGrounded = Physics2D.OverlapPoint(groundCheck.position, whatIsGround);

        float x = 0f;

        // Get horizontal input (left/right or A/D)
        if (Keyboard.current != null)
      {
        if (Keyboard.current.aKey.isPressed || Keyboard.current.leftArrowKey.isPressed)
            x = -1f;
        else if (Keyboard.current.dKey.isPressed || Keyboard.current.rightArrowKey.isPressed)
            x = 1f;
      }

        // Build movement vector (keep vertical speed)
        Vector3 move = new Vector3(x * speed, rb.linearVelocity.y, 0f);

        // Apply it to the Rigidbody
        rb.linearVelocity = move;

        // If moving left and not already facing left — flip
        if (x < 0 && !isLookingLeft)
    TurnTheRat();

        // If moving right and currently facing left — flip
        if (x > 0 && isLookingLeft)
    TurnTheRat();
    }

    // Flip the rat by inverting its X scale
    void TurnTheRat()
    {
        // Flip the direction flag
        isLookingLeft = !isLookingLeft;

        // Flip the sprite visually
        transform.localScale = new Vector3(
            transform.localScale.x * -1,
            transform.localScale.y,
            transform.localScale.z
        );
    }
}
Select the Rat object in the Hierarchy. In the
PlayerMove script component, enable the checkbox
Is Looking Left — this should match the initial
orientation of the sprite (if your rat faces left by default).
That’s it! Now the rat moves, jumps, and turns to face the direction it’s running. A tiny touch — but it brings the whole scene to life.
Let’s start animating our rat! First, we need to add an Animator component and create a controller.
In the Hierarchy, select the Rat GameObject. In the Inspector, click Add Component and choose Animator.
Then, go to the Assets window, right-click and create
a new Animator Controller. Name it
RatAnimator.
Finally, assign the RatAnimator controller to the
Controller field in the Animator component on the
Rat GameObject.

Let’s bring the rat to life with its first animation — the idle loop.
Open the Animation window if it’s not already visible. You can enable it via Window → Animation → Animation and dock it wherever you like (I’ve placed it above the Assets window).
Select Rat in the Hierarchy. In the Animation window,
click Create and save the new animation as
IdleRatAnimation.
Now let’s add frames from the sprite sheet. In the
Assets window, expand ratIdle. Select
all 20 frames: click the first frame, then hold
Shift and click the last one. Drag the selected
frames into the Animation timeline.
Open the Animator window (Window → Animation →
Animator) if it’s not already visible. Double-click the
IdleRatAnimation state — or click on it directly in the
Assets. In the Inspector panel, make sure
Loop Time is enabled.
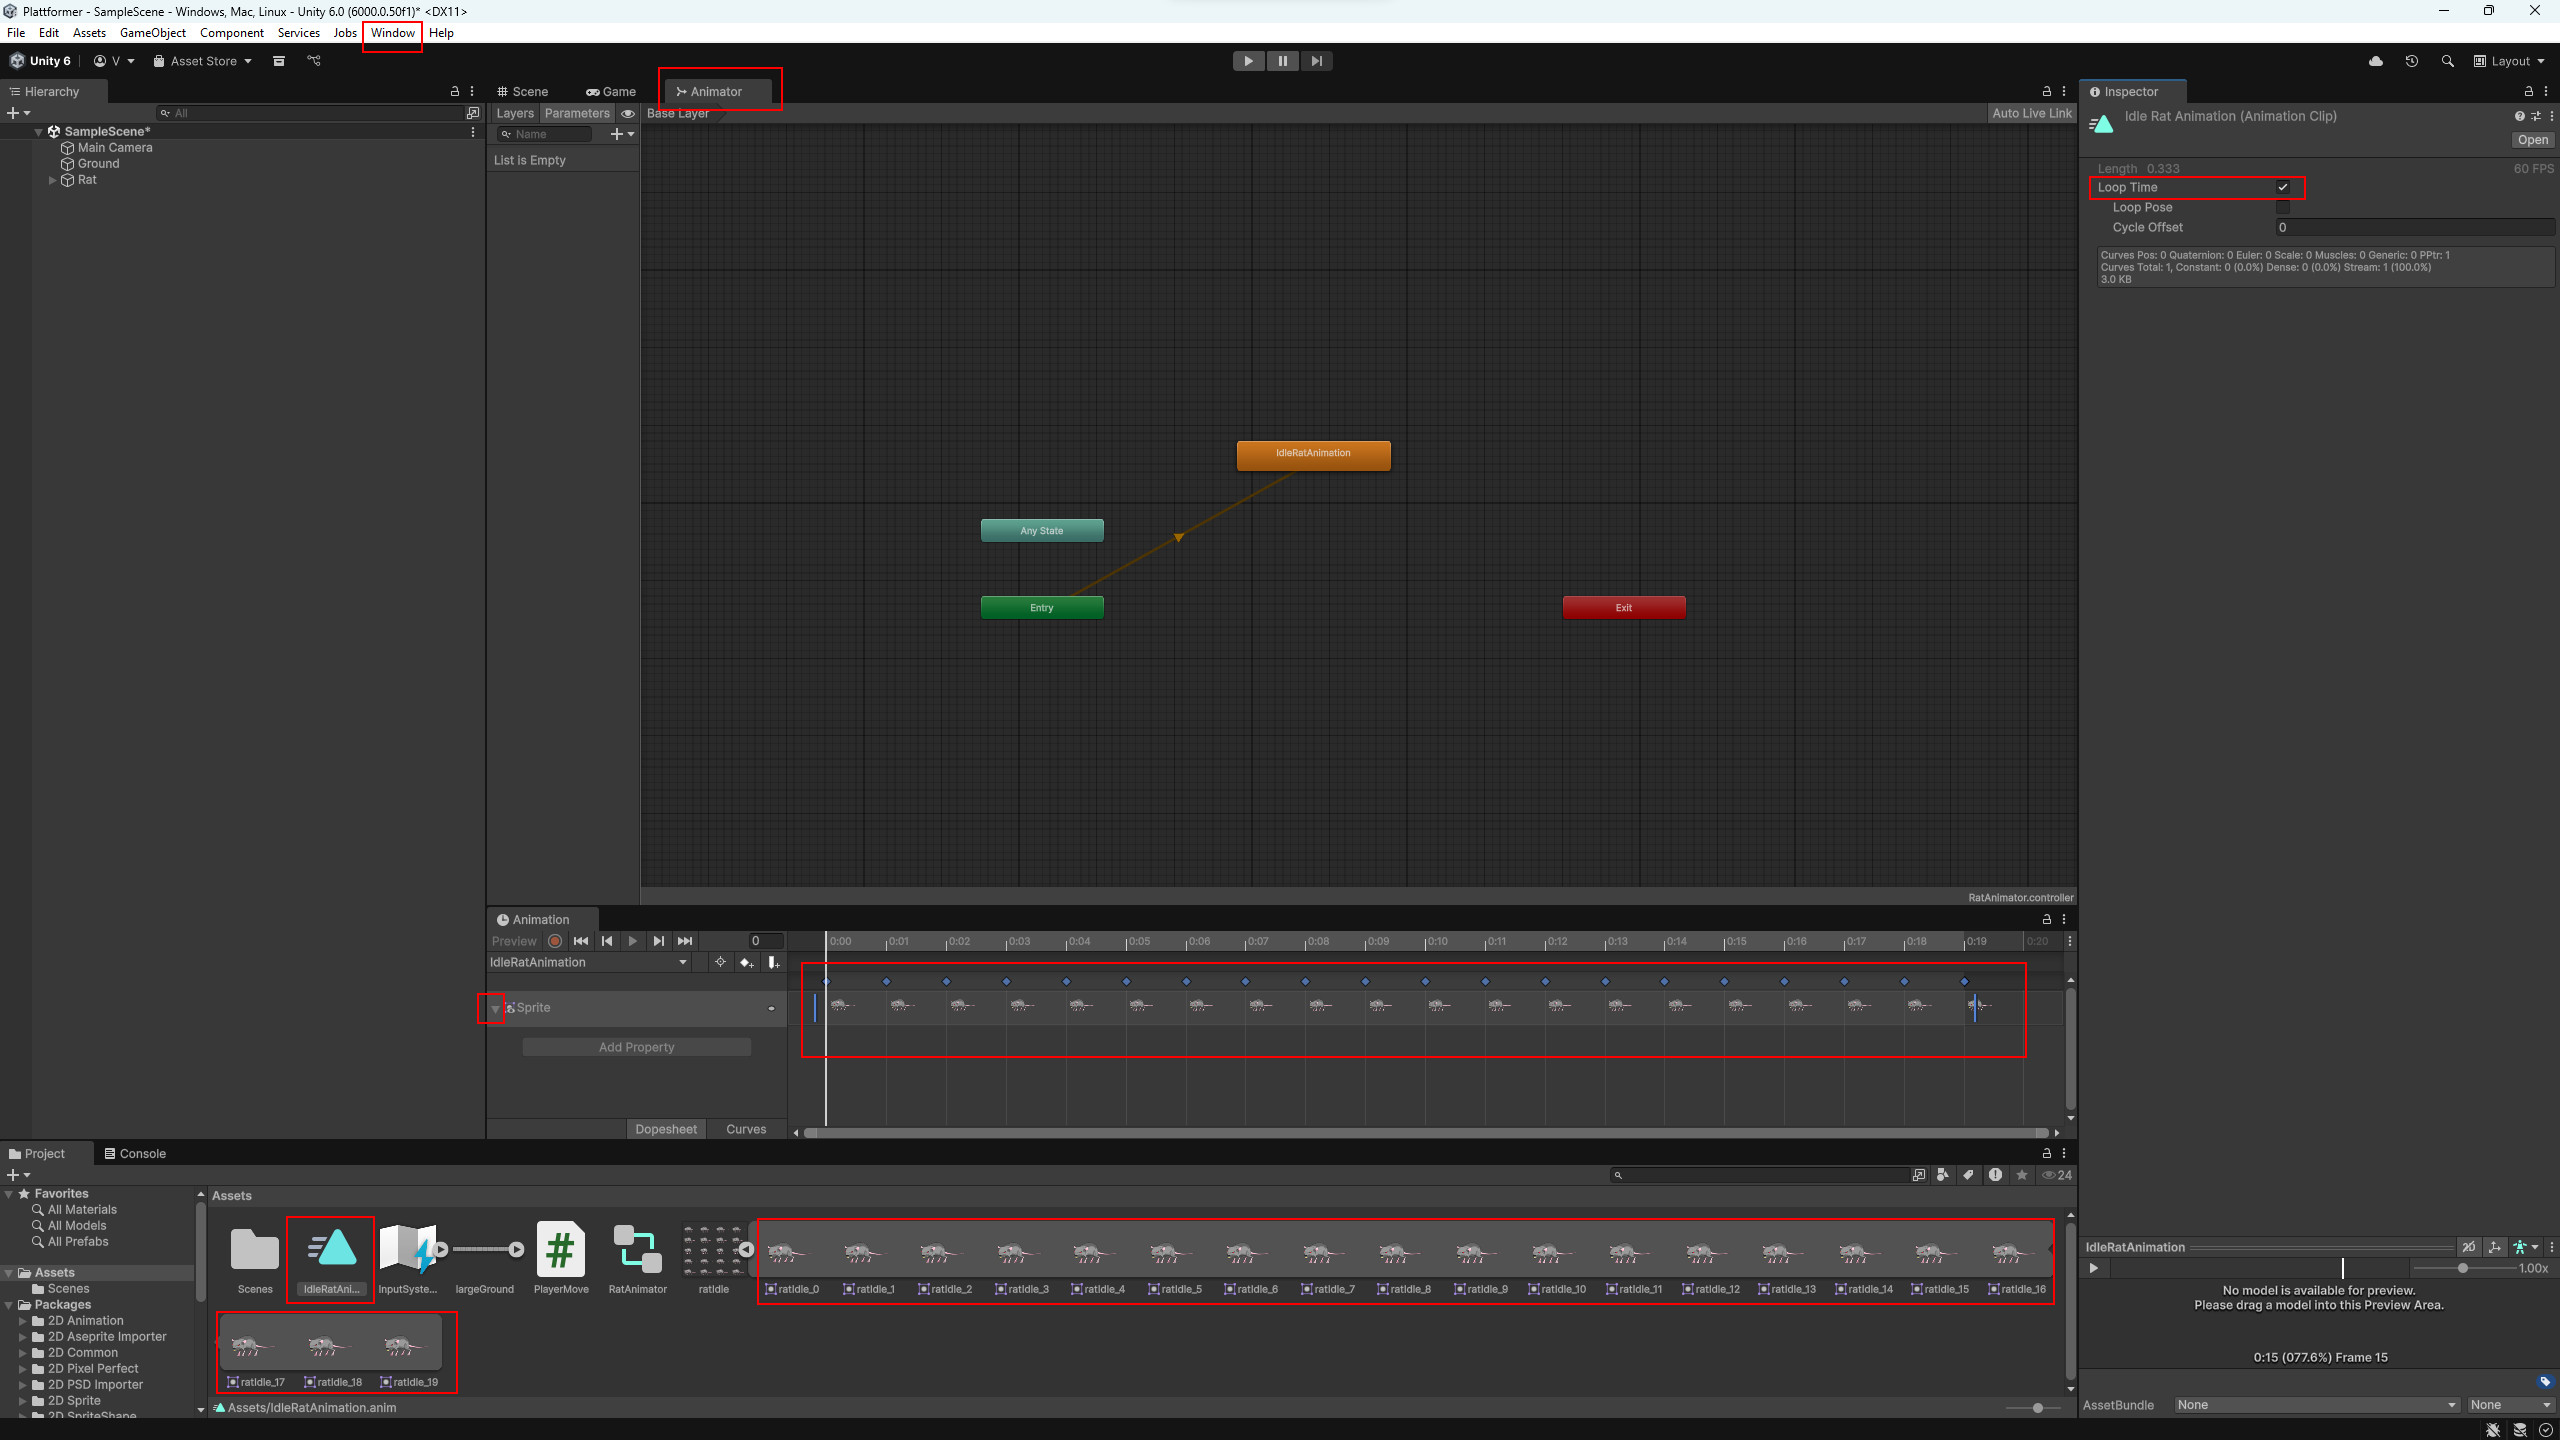
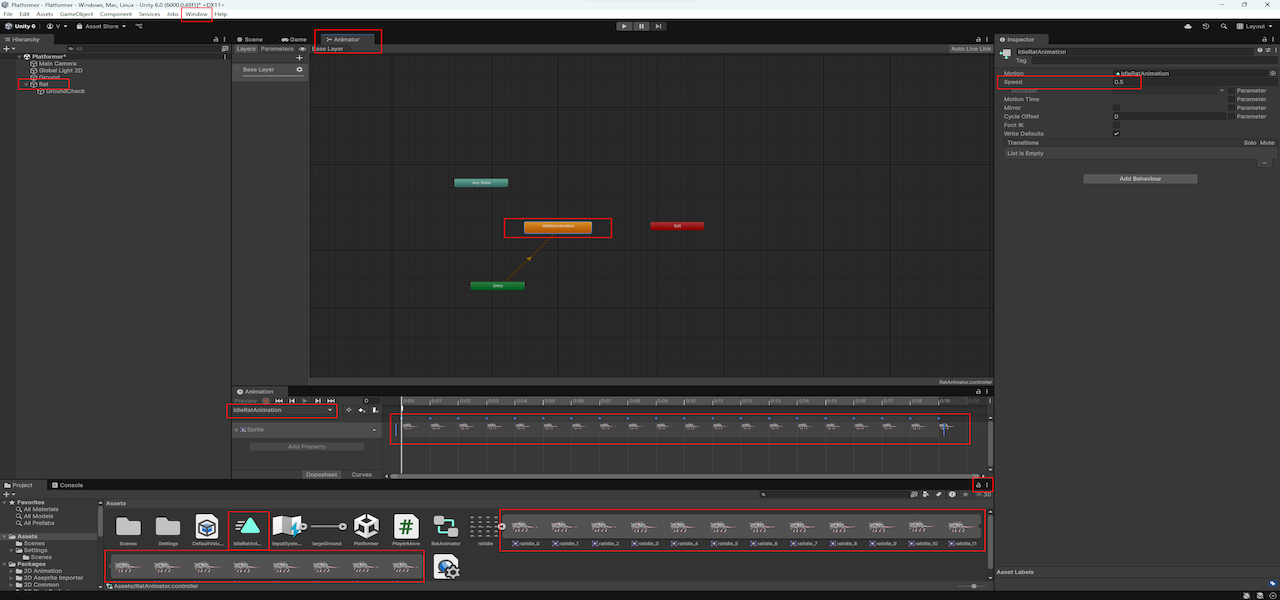
You can also adjust the
Speed of the animation — for example, try setting it
to 0.5
to make the movement smoother.
Time to animate the rat's movement! Let’s create a running animation and set up transitions.
First, import the ratRun sprite from the archive into the
Assets folder.
Just like we did with ratIdle in Step 1, select the
ratRun sprite in the Assets folder, set
Sprite Mode to Multiple, and click
Apply. Then open the Sprite Editor, choose
Slice → Grid by Cell Count, enter Columns (C):
4 and Rows (R): 5, click Slice,
then Apply.
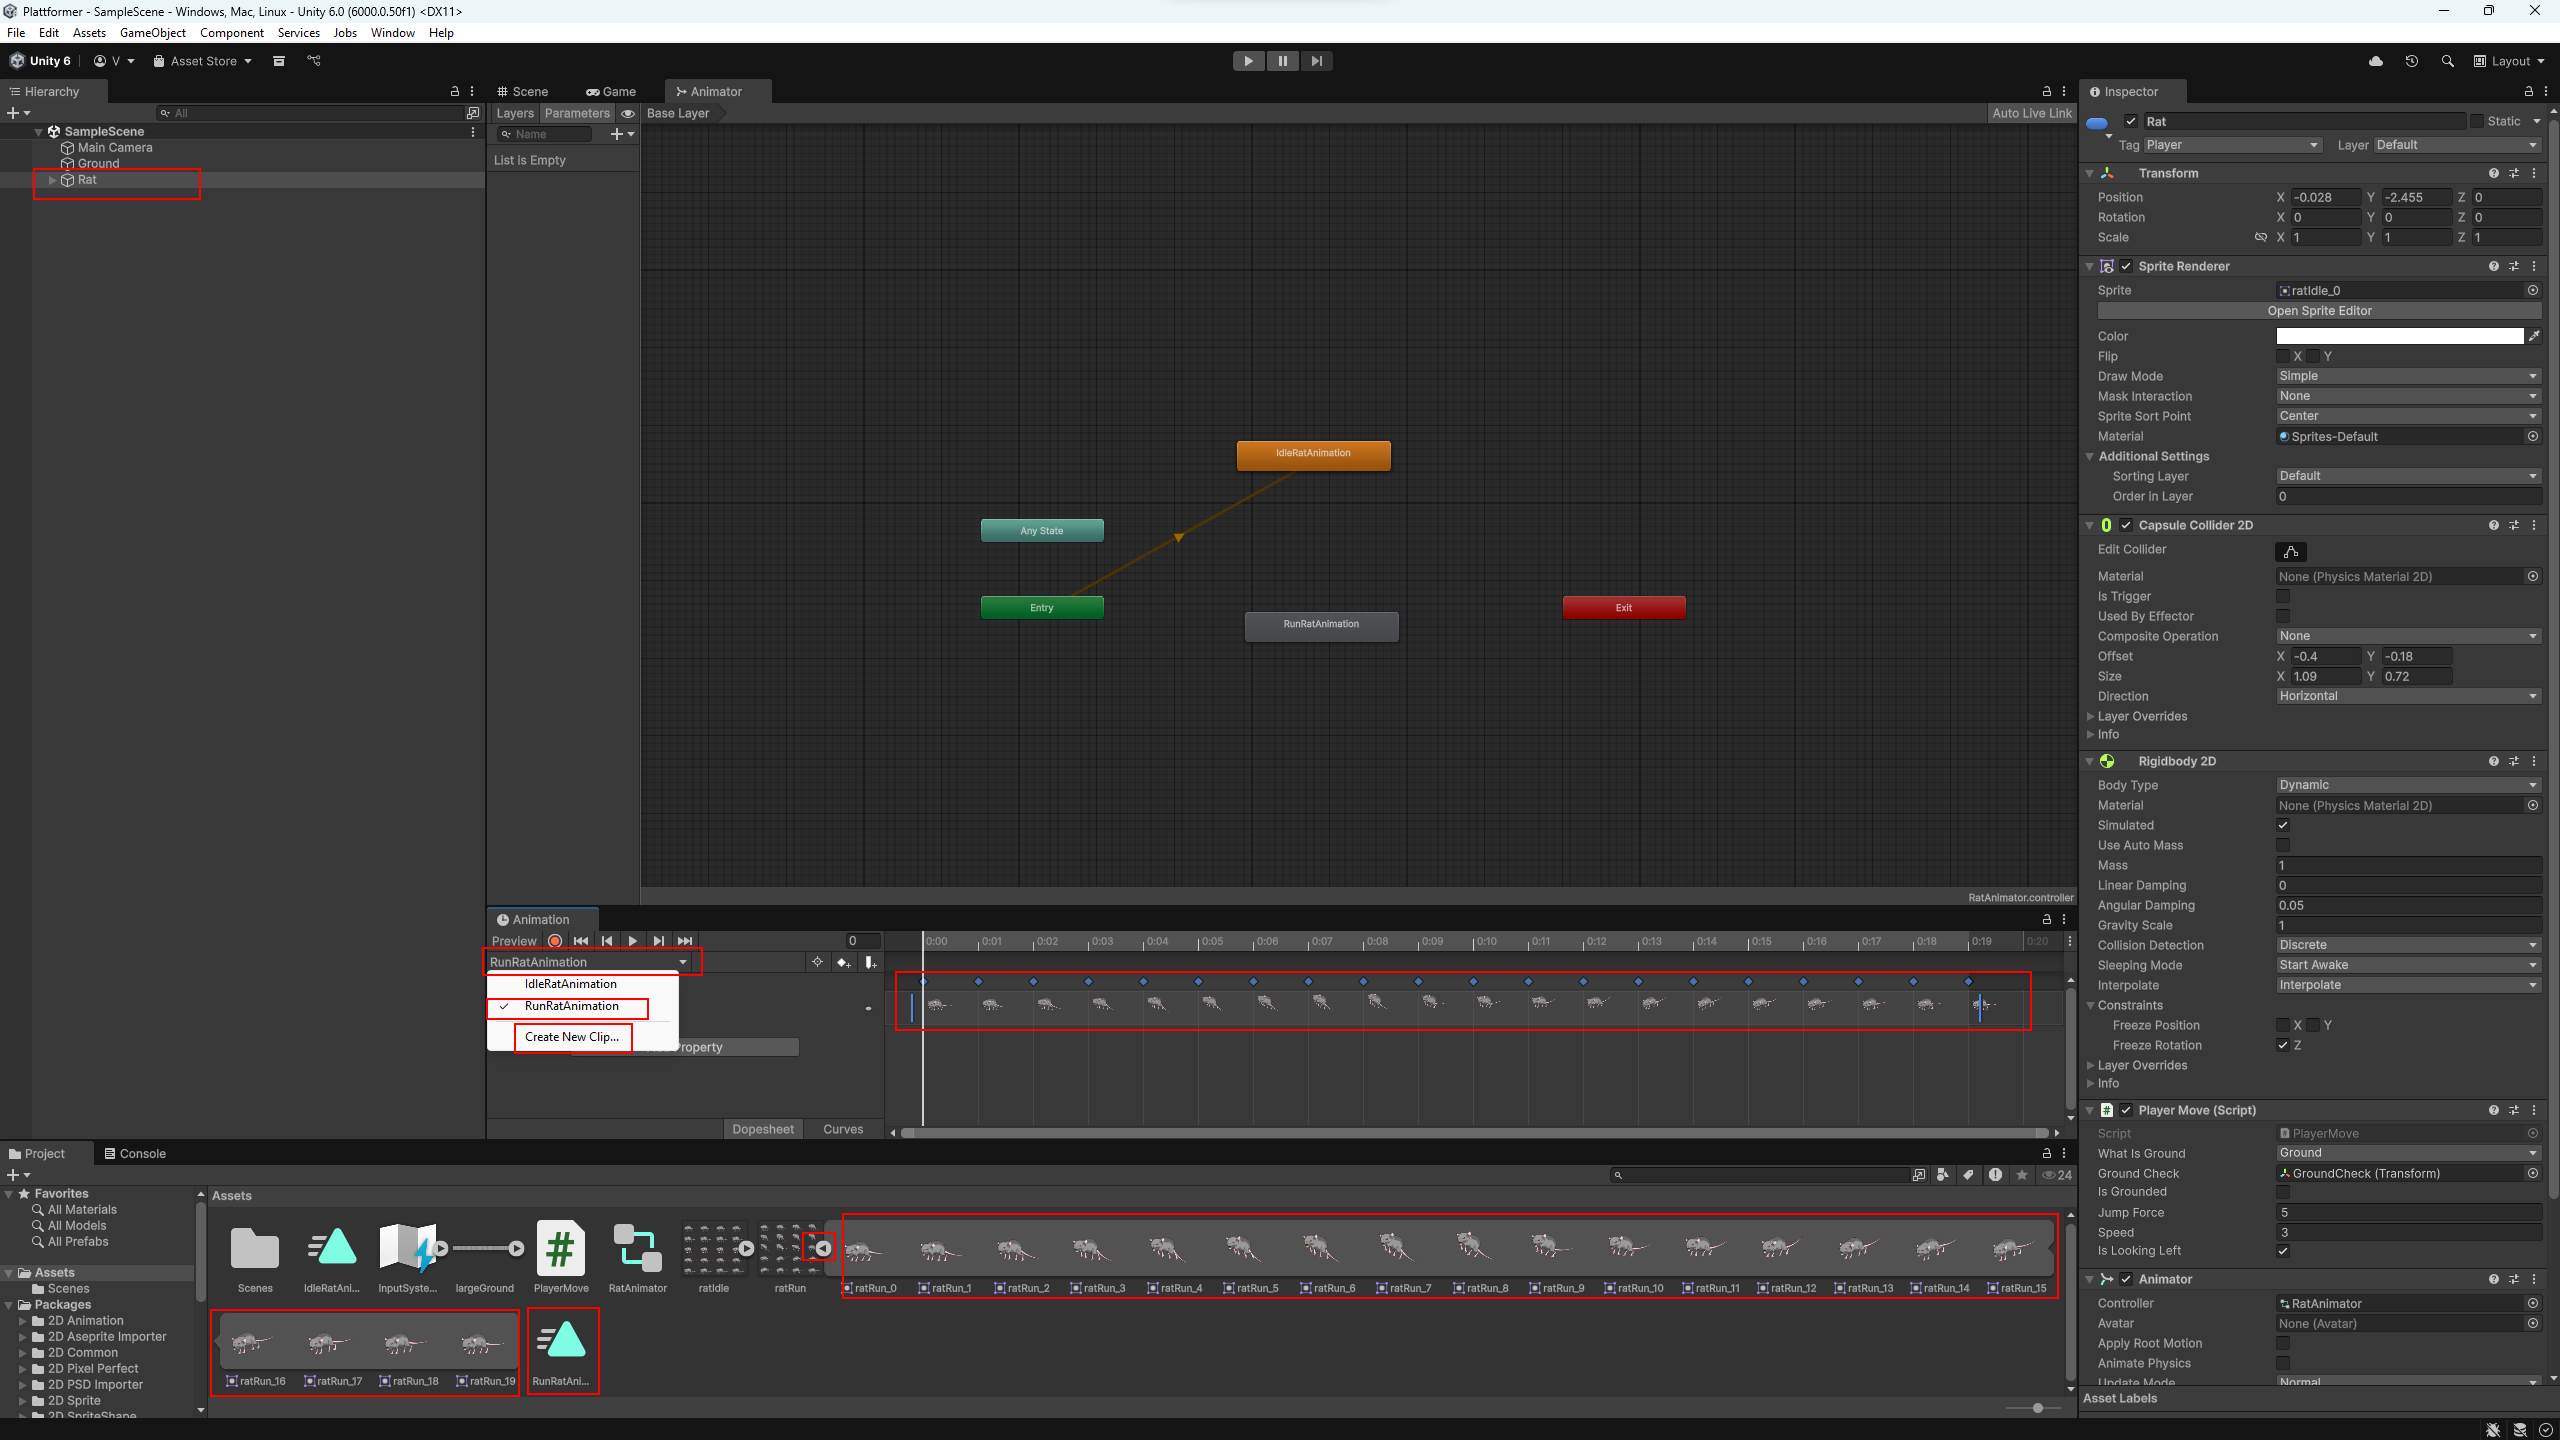
Select Rat in the Hierarchy. In the
Animation window, click on the dropdown next to
IdleRatAnimation and choose
Create New Clip. Name the new animation
RunRatAnimation.
(Make sure Rat is selected in the Hierarchy, or Unity won’t allow
adding a new animation.)
In the Assets, expand ratRun and select all 20 frames:
click the first, hold Shift, and click the last. Drag
all selected frames into the Animation window to
populate the timeline.
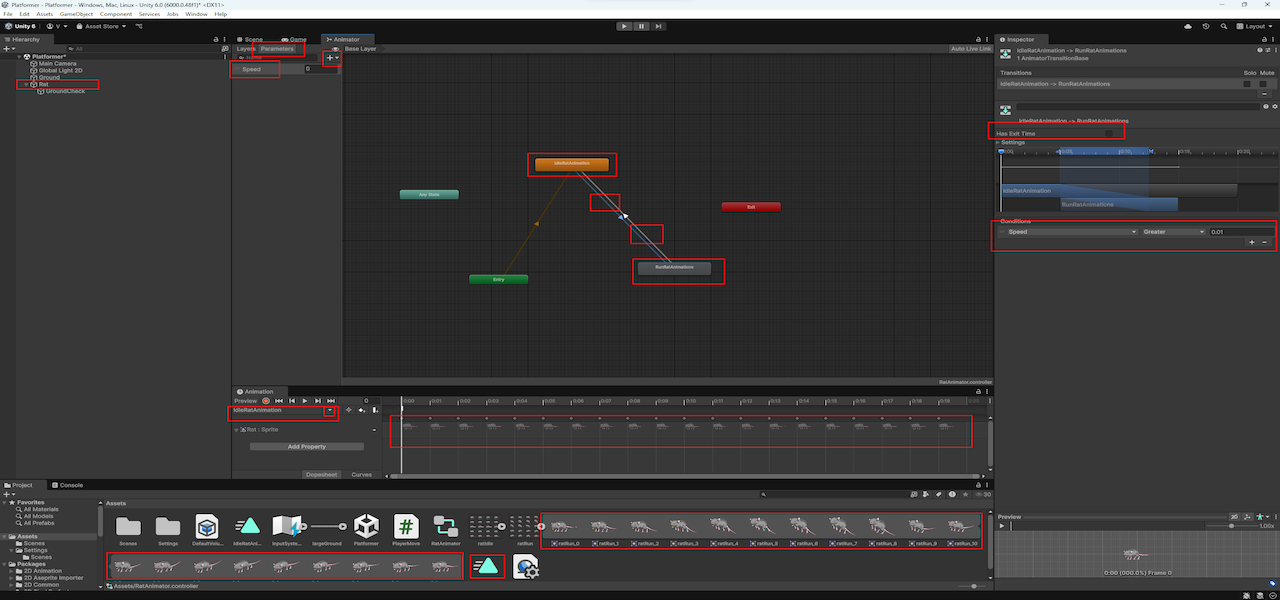
Now open the Animator window. If you don’t see it, enable it from Window → Animation → Animator.
By default, IdleRatAnimation is the starting state. We’ll
create a float parameter to control transitions between idle and run.
Speed.
IdleRatAnimation →
Make Transition → click on
RunRatAnimation.
RunRatAnimation to IdleRatAnimation.
Now configure the transitions:
IdleRatAnimation → RunRatAnimation.
Speed to
Greater than 0.1.
RunRatAnimation → IdleRatAnimation.
Speed Less than
0.1.
To control the animation transitions, we’ll create a simple script
that passes movement information to the Animator. This will switch
between Idle and Run based on the rat’s
velocity.
In the Assets folder, create a new
MonoBehaviour script and name it PlayerAnim.
Then paste the following code:
using System.Collections;
using System.Collections.Generic;
using UnityEngine;

public class PlayerAnim : MonoBehaviour
{
    // Reference to Animator
    Animator anim;

    // Reference to Rigidbody2D
    Rigidbody2D rb;

    void Start()
    {
        anim = GetComponent<Animator>();
        rb = GetComponent<Rigidbody2D>();
    }

    void Update()
    {
        // Update Animator with the current speed (absolute value of horizontal velocity)
        anim.SetFloat("Speed", Mathf.Abs(rb.linearVelocity.x));
    }
}
Attach the PlayerAnim script to the
Rat GameObject.
That’s it! Now when you run the scene, the rat will automatically switch between idle and running animations based on movement.
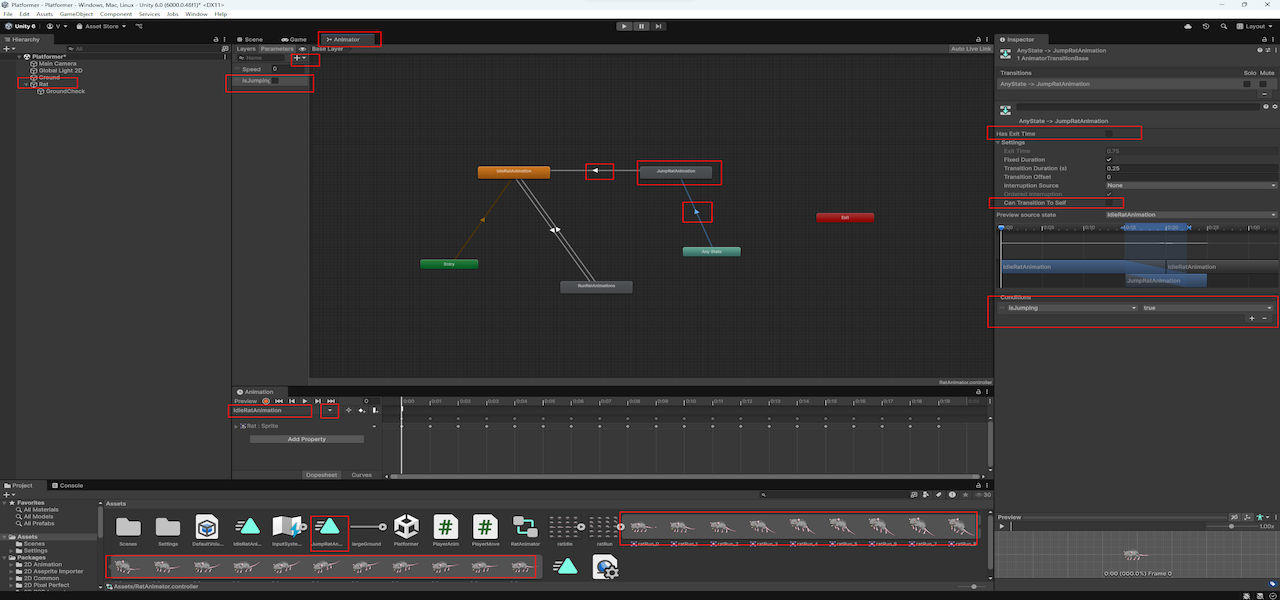
Let's create a jump animation for our rat. We don’t have a dedicated
jump sprite, but we can reuse the ratRun sprites at a
slower speed to simulate a jumping motion.
Select the Rat in the Hierarchy. In the
Animation window, click the dropdown and select
Create New Clip. Name the new animation
JumpRatAnimation.
In the Assets, expand the ratRun sprite sheet. Select all
20 frames (first frame → hold Shift → last frame),
then drag & drop them into the Animation timeline.
Now open the Animator window. We’ll add a new animation parameter and connect the jump logic.
Go to the Parameters tab and add a new
Bool named isJumping.
Let's configure the transitions as follows:
isJumping == true.isJumping == true.isJumping == false.
Finally, select the JumpRatAnimation state and set its
Speed to 0.2
to make the run-like animation look like a jump.
Now we’ll connect the jump animation to the actual state of the rat.
We’ll do this by accessing the isGrounded variable from
the PlayerMove script. If the rat is not on the ground
(including when falling), we’ll trigger the jump animation.
Open the PlayerAnim script and update it like this:
using System.Collections;
using System.Collections.Generic;
using UnityEngine;

public class PlayerAnim : MonoBehaviour
{
    // Reference to the Animator component
    Animator anim;

    // Reference to the Rigidbody2D component
    Rigidbody2D rb;

    // Reference to the PlayerMove script (to access isGrounded)
    PlayerMove pm;

    void Start()
    {
        // Get the Animator component on this GameObject
        anim = GetComponent<Animator>();

        // Get the Rigidbody2D component
        rb = GetComponent<Rigidbody2D>();

        // Get the PlayerMove script
        pm = GetComponent<PlayerMove>();
    }

    void Update()
    {
        // If the rat is on the ground
        if (pm.isGrounded)
        {
            // Not jumping anymore
            anim.SetBool("isJumping", false);

            // Set Speed to current horizontal movement
            anim.SetFloat("Speed", Mathf.Abs(rb.linearVelocity.x));
        }
        else
        {
            // While jumping or falling, set Speed to 0
            anim.SetFloat("Speed", 0);

            // Trigger jump animation
            anim.SetBool("isJumping", true);
        }
    }
}
That’s all — no extra setup needed. Now the jump animation will automatically play whenever the rat is in the air — either jumping up or falling down.
Now let’s add a bit of life to the rat — we’ll make it play footstep sounds while running. This will be done using an animation event that triggers a function from a new script.
In the Assets folder, create a new
MonoBehaviour script and name it
PlayerSound. Add the following code:
using System.Collections;
using System.Collections.Generic;
using UnityEngine;

public class PlayerSound : MonoBehaviour
{
    // The audio clip for footsteps
    public AudioClip footsteps;

    // Public function to play the sound — called from animation event
    public void FootStepsAudio()
    {
        // Play the sound at the rat’s position
        AudioSource.PlayClipAtPoint(footsteps, transform.position);
    }
}
Select the Rat object in the Hierarchy and add the
PlayerSound script to it. Then import the
ratStep sound from the archive, and assign it to the
Footsteps field in the component.
Now switch to the Animation window and select
RunRatAnimation. Choose a frame where a footstep should
happen and click Add Event in the timeline. In the
Inspector (right panel), set the function to
FootStepsAudio().
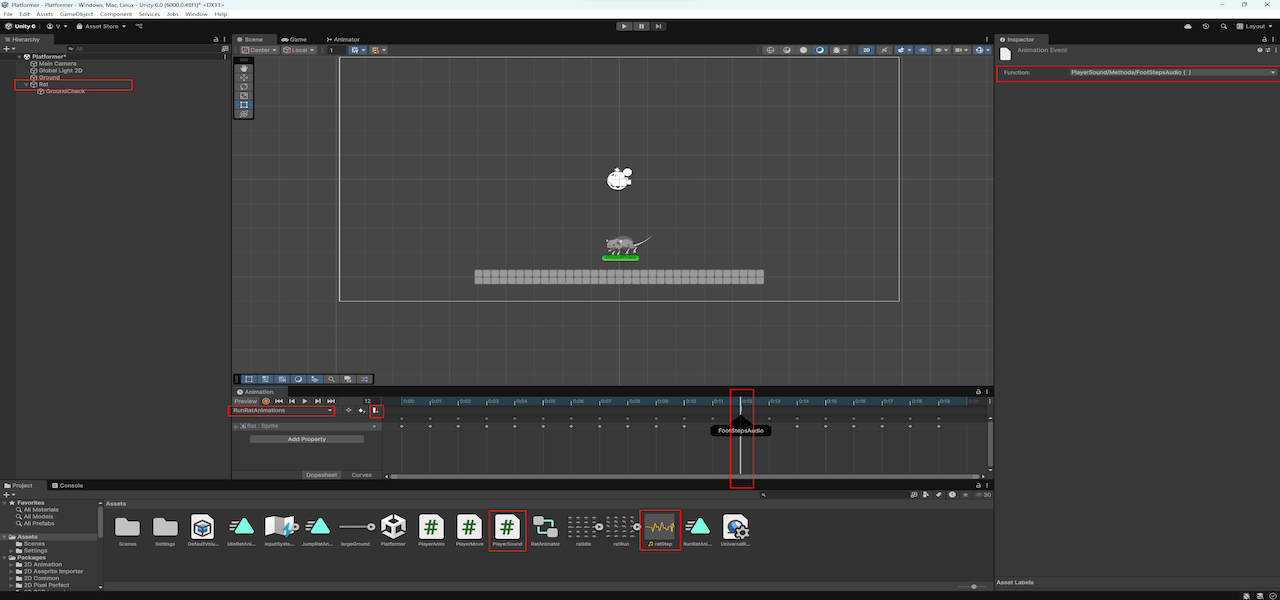
That’s it! When the rat reaches that frame during running, it will now play a footstep sound. You can add multiple events to sync with each step.
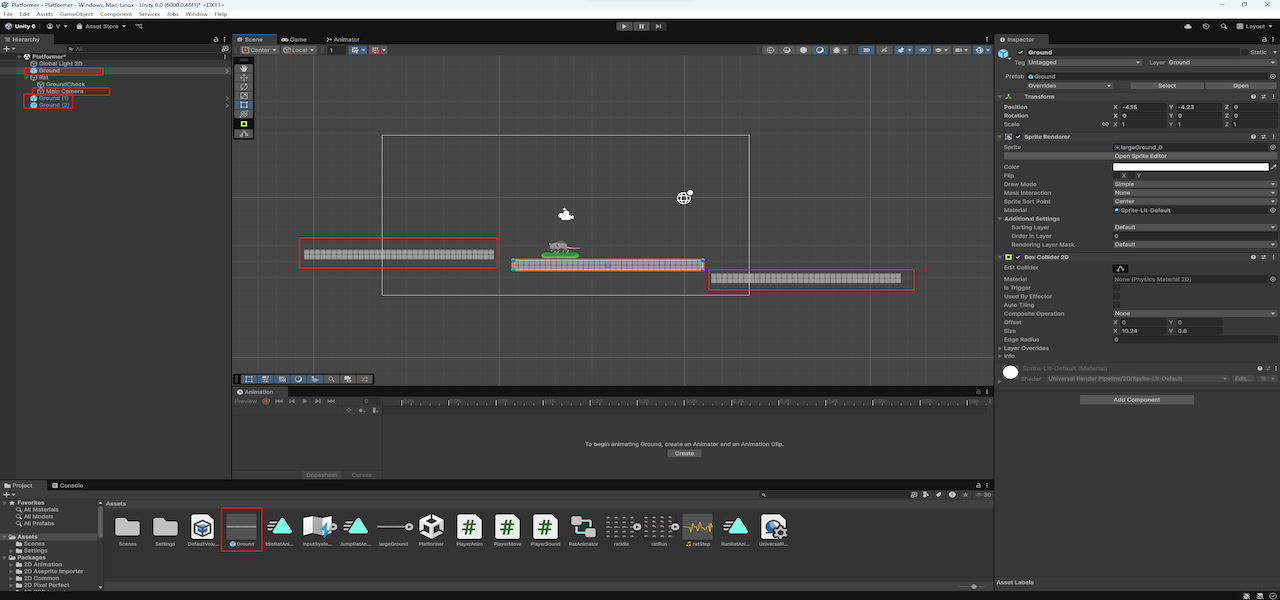
Let’s expand the level slightly and set up the camera to follow the rat. This will give us more room for testing and prepare us for the next part.
First, turn the original ground into a prefab. Select Ground in the Hierarchy and drag it into the Assets folder to create a prefab.
Now drag the prefab back into the scene a few times to create more platforms. Position them at different horizontal (and optionally vertical) positions to create a jumping challenge.
Then, select the Main Camera in the Hierarchy and drag it onto the Rat object. This makes the camera a child of the rat, so it will follow the rat as it moves.
You can optionally set the camera’s X-position to 0 in
the Transform, to keep the movement smoother and centered during
flips.
That’s it — the first part is complete! You now have a moving, jumping, animated rat with sound, camera tracking, and an extended level to explore.