Welcome to Part 2 of our Unity 2D platformer tutorial. In Part 1, you learned how to move your character. Now it's time to build a real level — one that feels fun to explore.
Instead of complex enemies or scene transitions, we’ll focus on the environment: coins to collect, walls to climb, pits to fall into, a slightly grumpy mushroom… and something unexpected that stays with you until the end.
You'll place objects in the scene, fix a sticky wall, ride a moving platform, and create basic logic for enemies and level restarts. And when you reach the exit — you might realize it wasn’t really about the exit at all.
So open Unity, take a breath, and begin — not because you have to, but because something quiet is already waiting for you to bring it into the scene.
We’ll begin by adding a vertical wall to the scene. Use the same
largeGround sprite we used for the floor — just rotate it
and place it upright. Unity will automatically create a new
GameObject. Rename it to Wall.
In the Inspector for the new Wall:
0.Now press Play and try this: run toward the wall, jump onto it, and hold the movement key. The rat will cling to the wall like a tiny superhero. That’s not magic — it’s friction.
This happens because Unity’s default colliders have built-in friction. To fix it, we’ll assign a Physics Material 2D with zero friction.
In the Assets folder:
noFriction.0 in the Inspector.
Now select the Rat GameObject. In its
Capsule Collider 2D component, set the
Material to noFriction.
Play the scene again — the rat should no longer get stuck on walls or platforms.
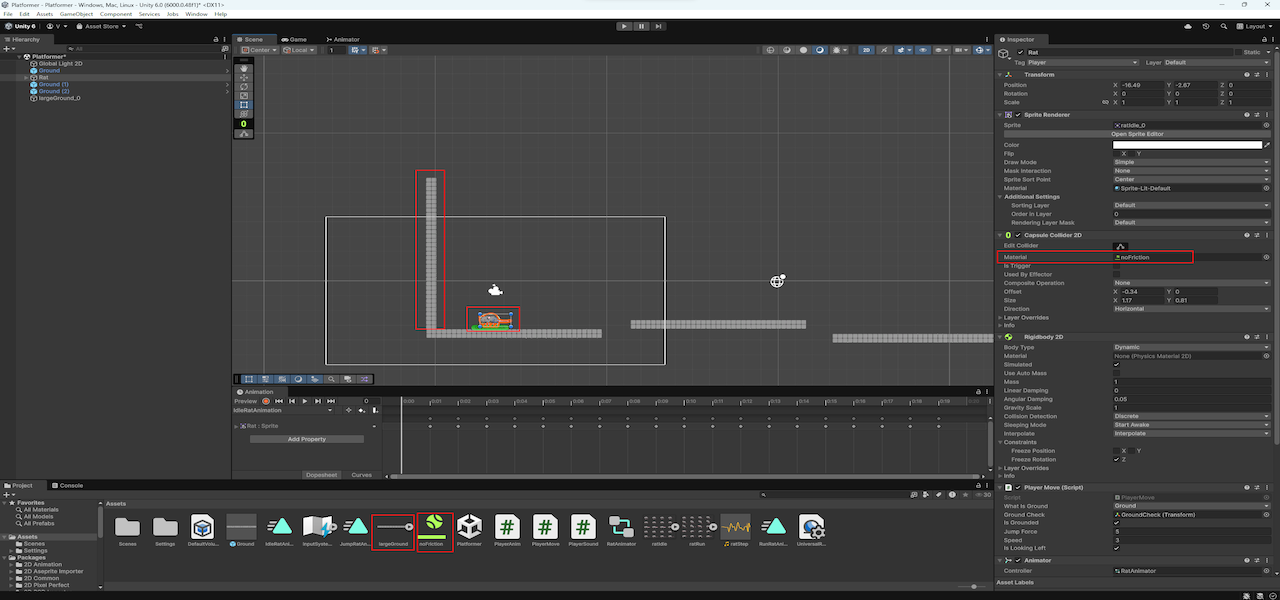
noFriction material assigned to
the rat.
Let’s give our rat something to collect — coins!
Import the coin image into your project:
Download the image here
(we’ll use the coin from this sprite sheet). Then drag it into the
scene — Unity will create a new GameObject.
Select the coin in the Hierarchy, then in the Inspector:
0.-10 (so it
appears behind the rat).
Create a new tag named Coin and assign it to the coin
object.
Rename the coin to CoinPrefab, then drag it into the Assets folder to create a prefab.
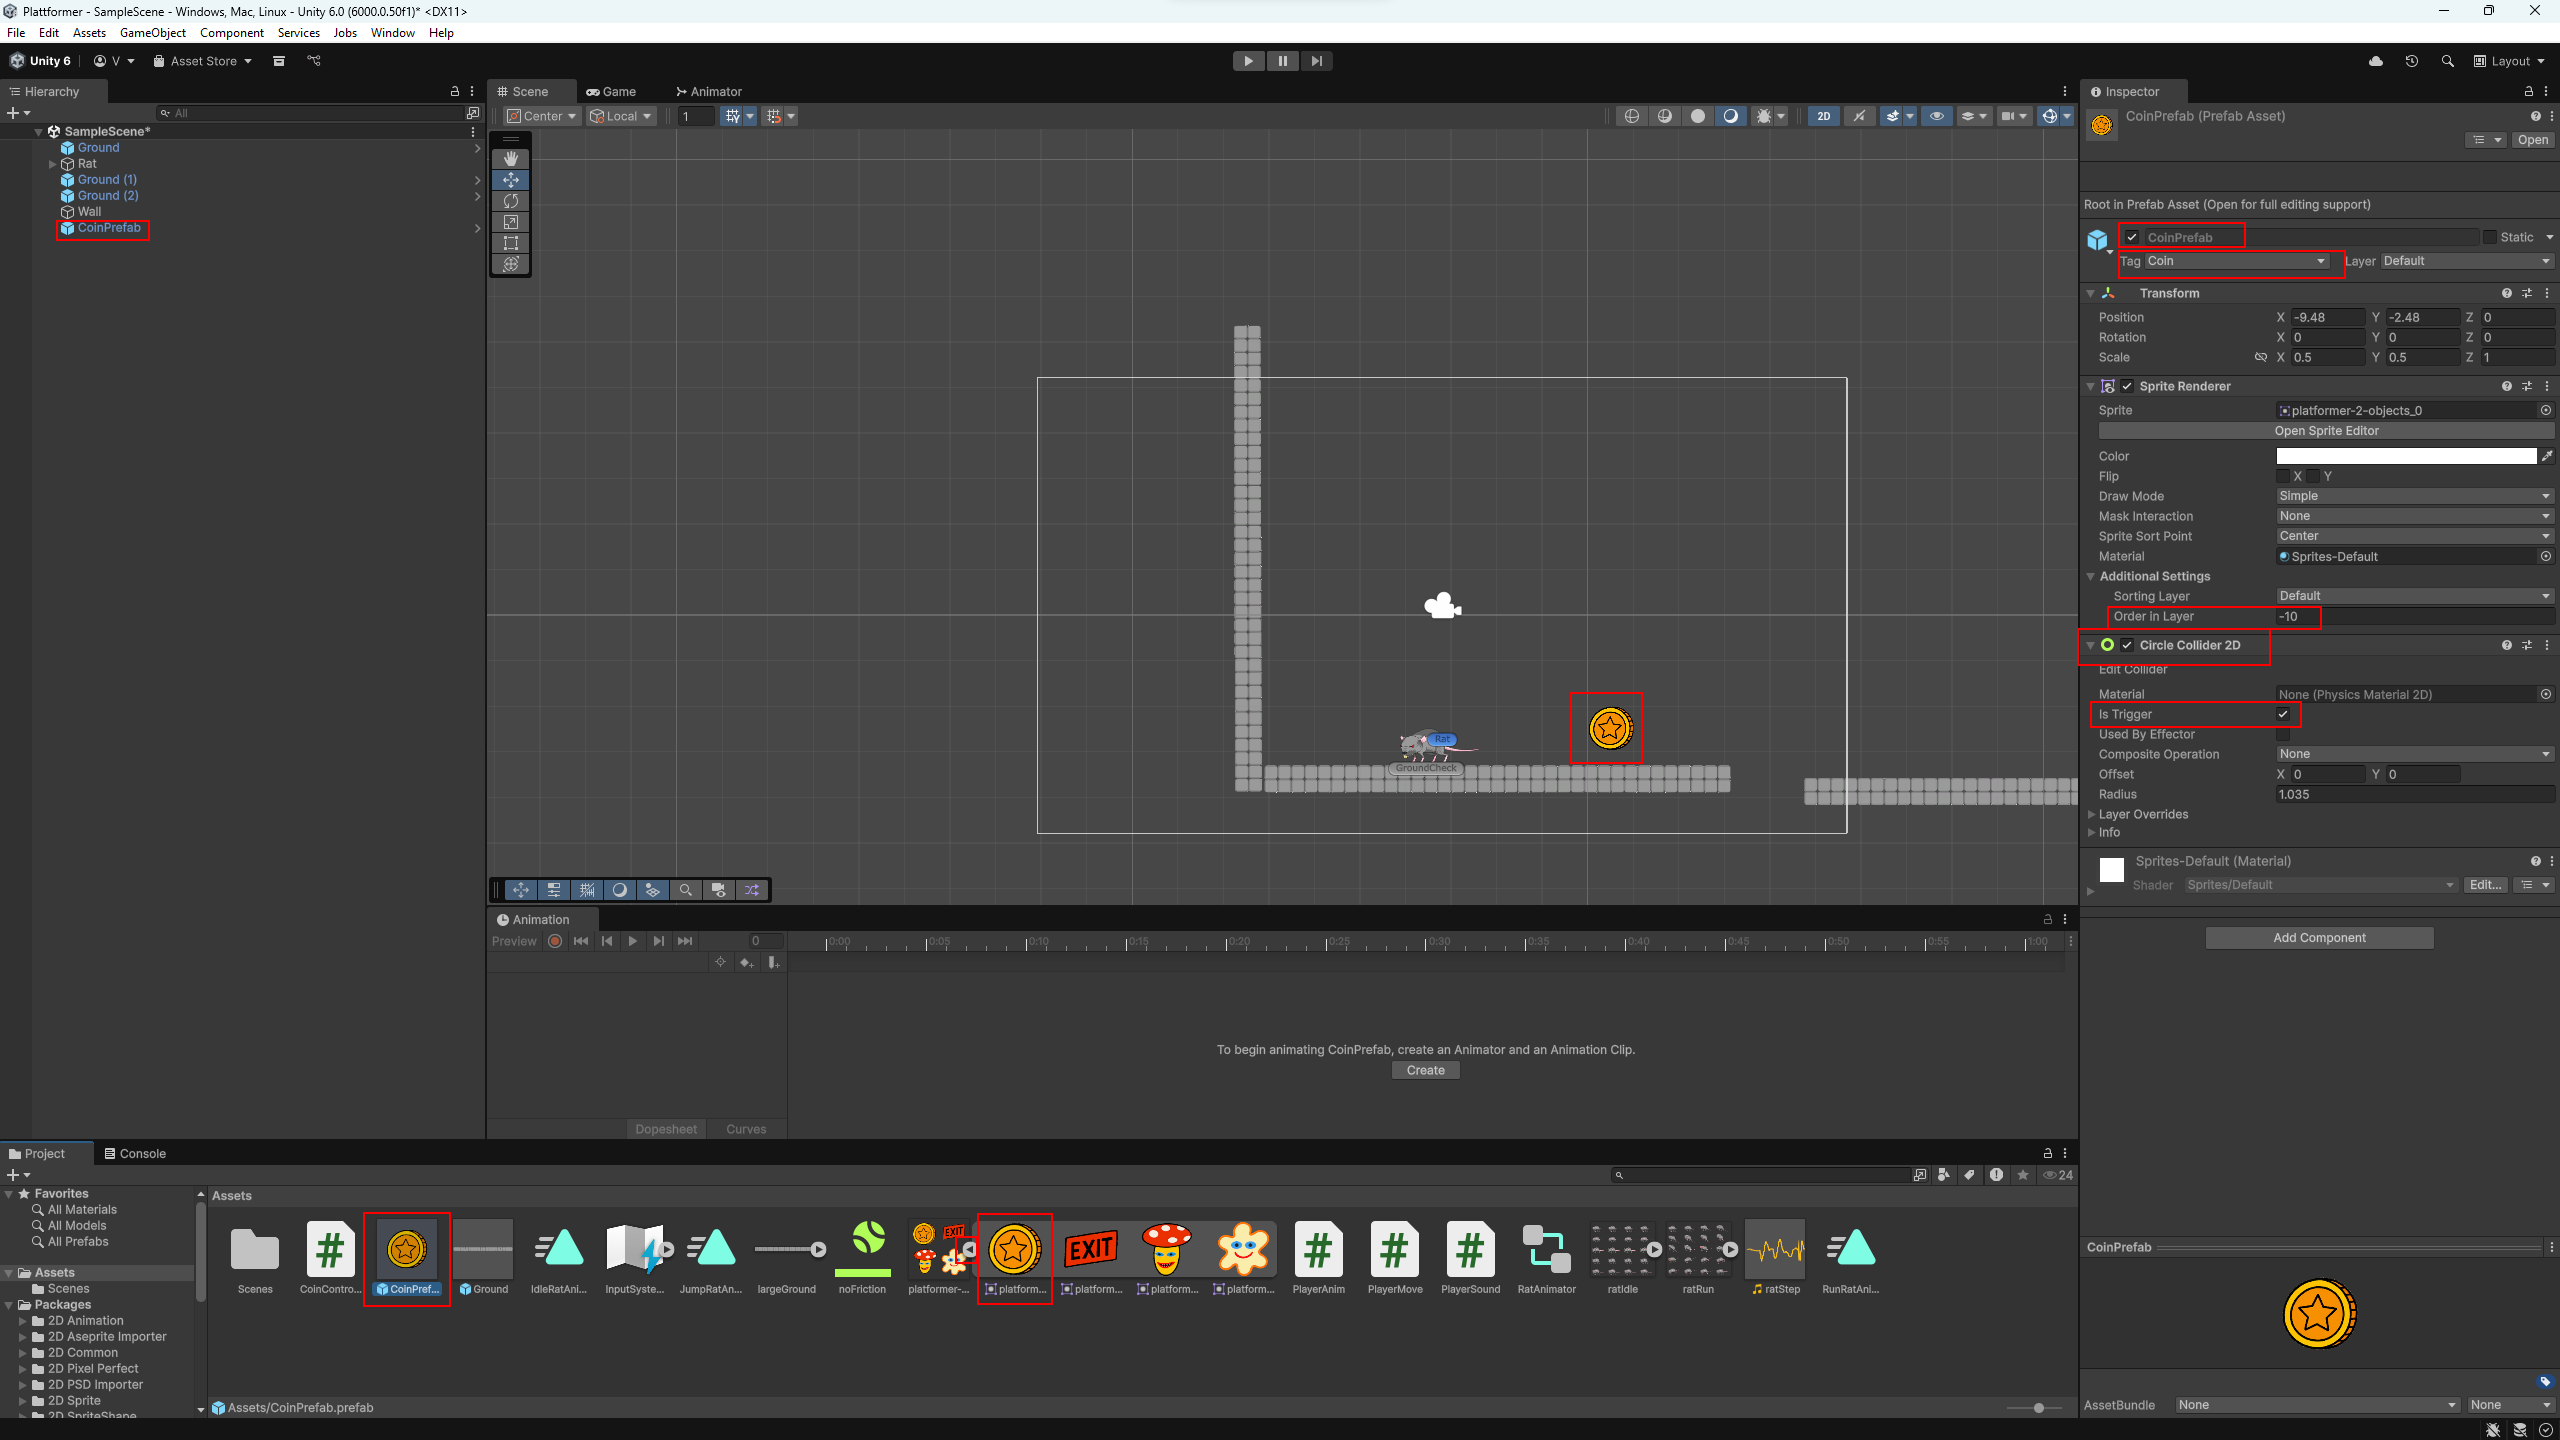
Coin tag is assigned.
Now let’s create a script to collect coins. In the Assets folder:
CoinController.
Paste the following code into the script:
using System.Collections;
using System.Collections.Generic;
using UnityEngine;

public class CoinController : MonoBehaviour {

    // Sound to play when collecting a coin
    public AudioClip CoinSound;

    // Coin counter
    public int coin;

    void OnTriggerEnter2D (Collider2D other) {
        // If the object we hit has the Coin tag
        if (other.tag == "Coin") {
            // Increase the coin counter
            coin = coin + 1;

            // Play the coin pickup sound
            AudioSource.PlayClipAtPoint(CoinSound, transform.position);

            // Destroy the collected coin
            Destroy(other.gameObject);
        }
    }
}
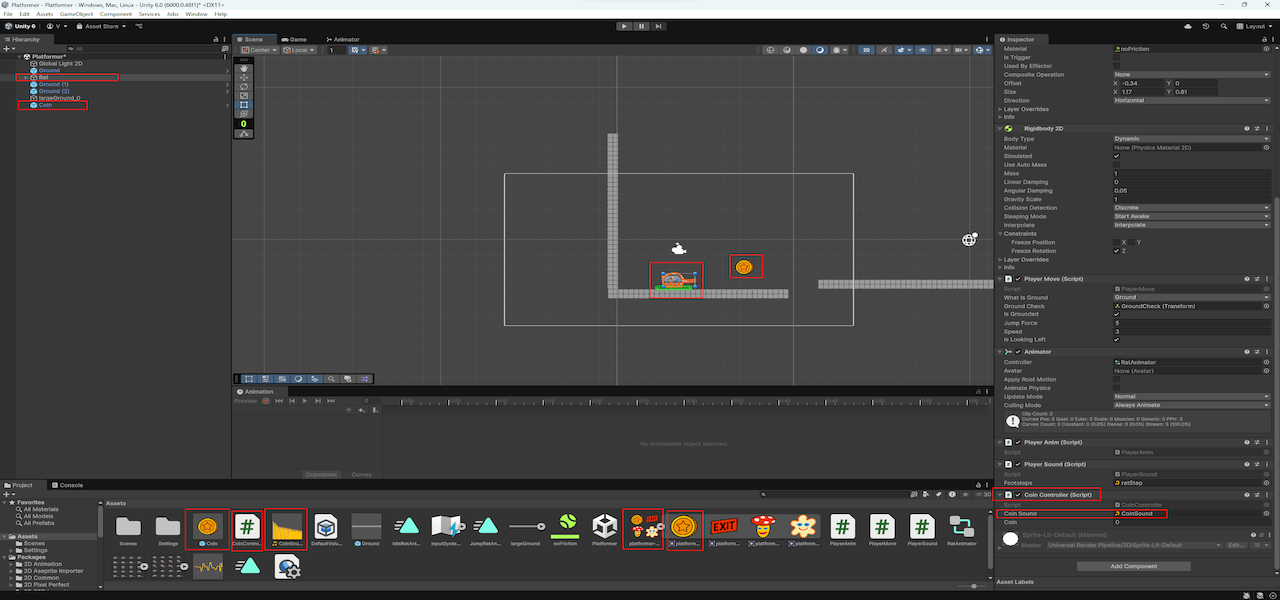
Attach the CoinController script to the
Rat GameObject. You can download the coin sound here:
Download CoinSound.wav. Import the CoinSound clip into the project and assign
it to the Coin Sound field of the script in the
Inspector.
💡 Tip: We’re using PlayClipAtPoint, so the sound plays
in world space. If it sounds too quiet, it’s likely because the
Audio Listener is still on the camera. To fix this,
either move the camera closer to the player or move the
Audio Listener from the camera to the
Rat object.
Let’s show how many coins the rat has collected using a UI text element.
In the Hierarchy, go to:
Canvas,
Text(TMP), and EventSystem.
Select the Canvas GameObject. In the Inspector:
Scale With Screen Size.
Expand.
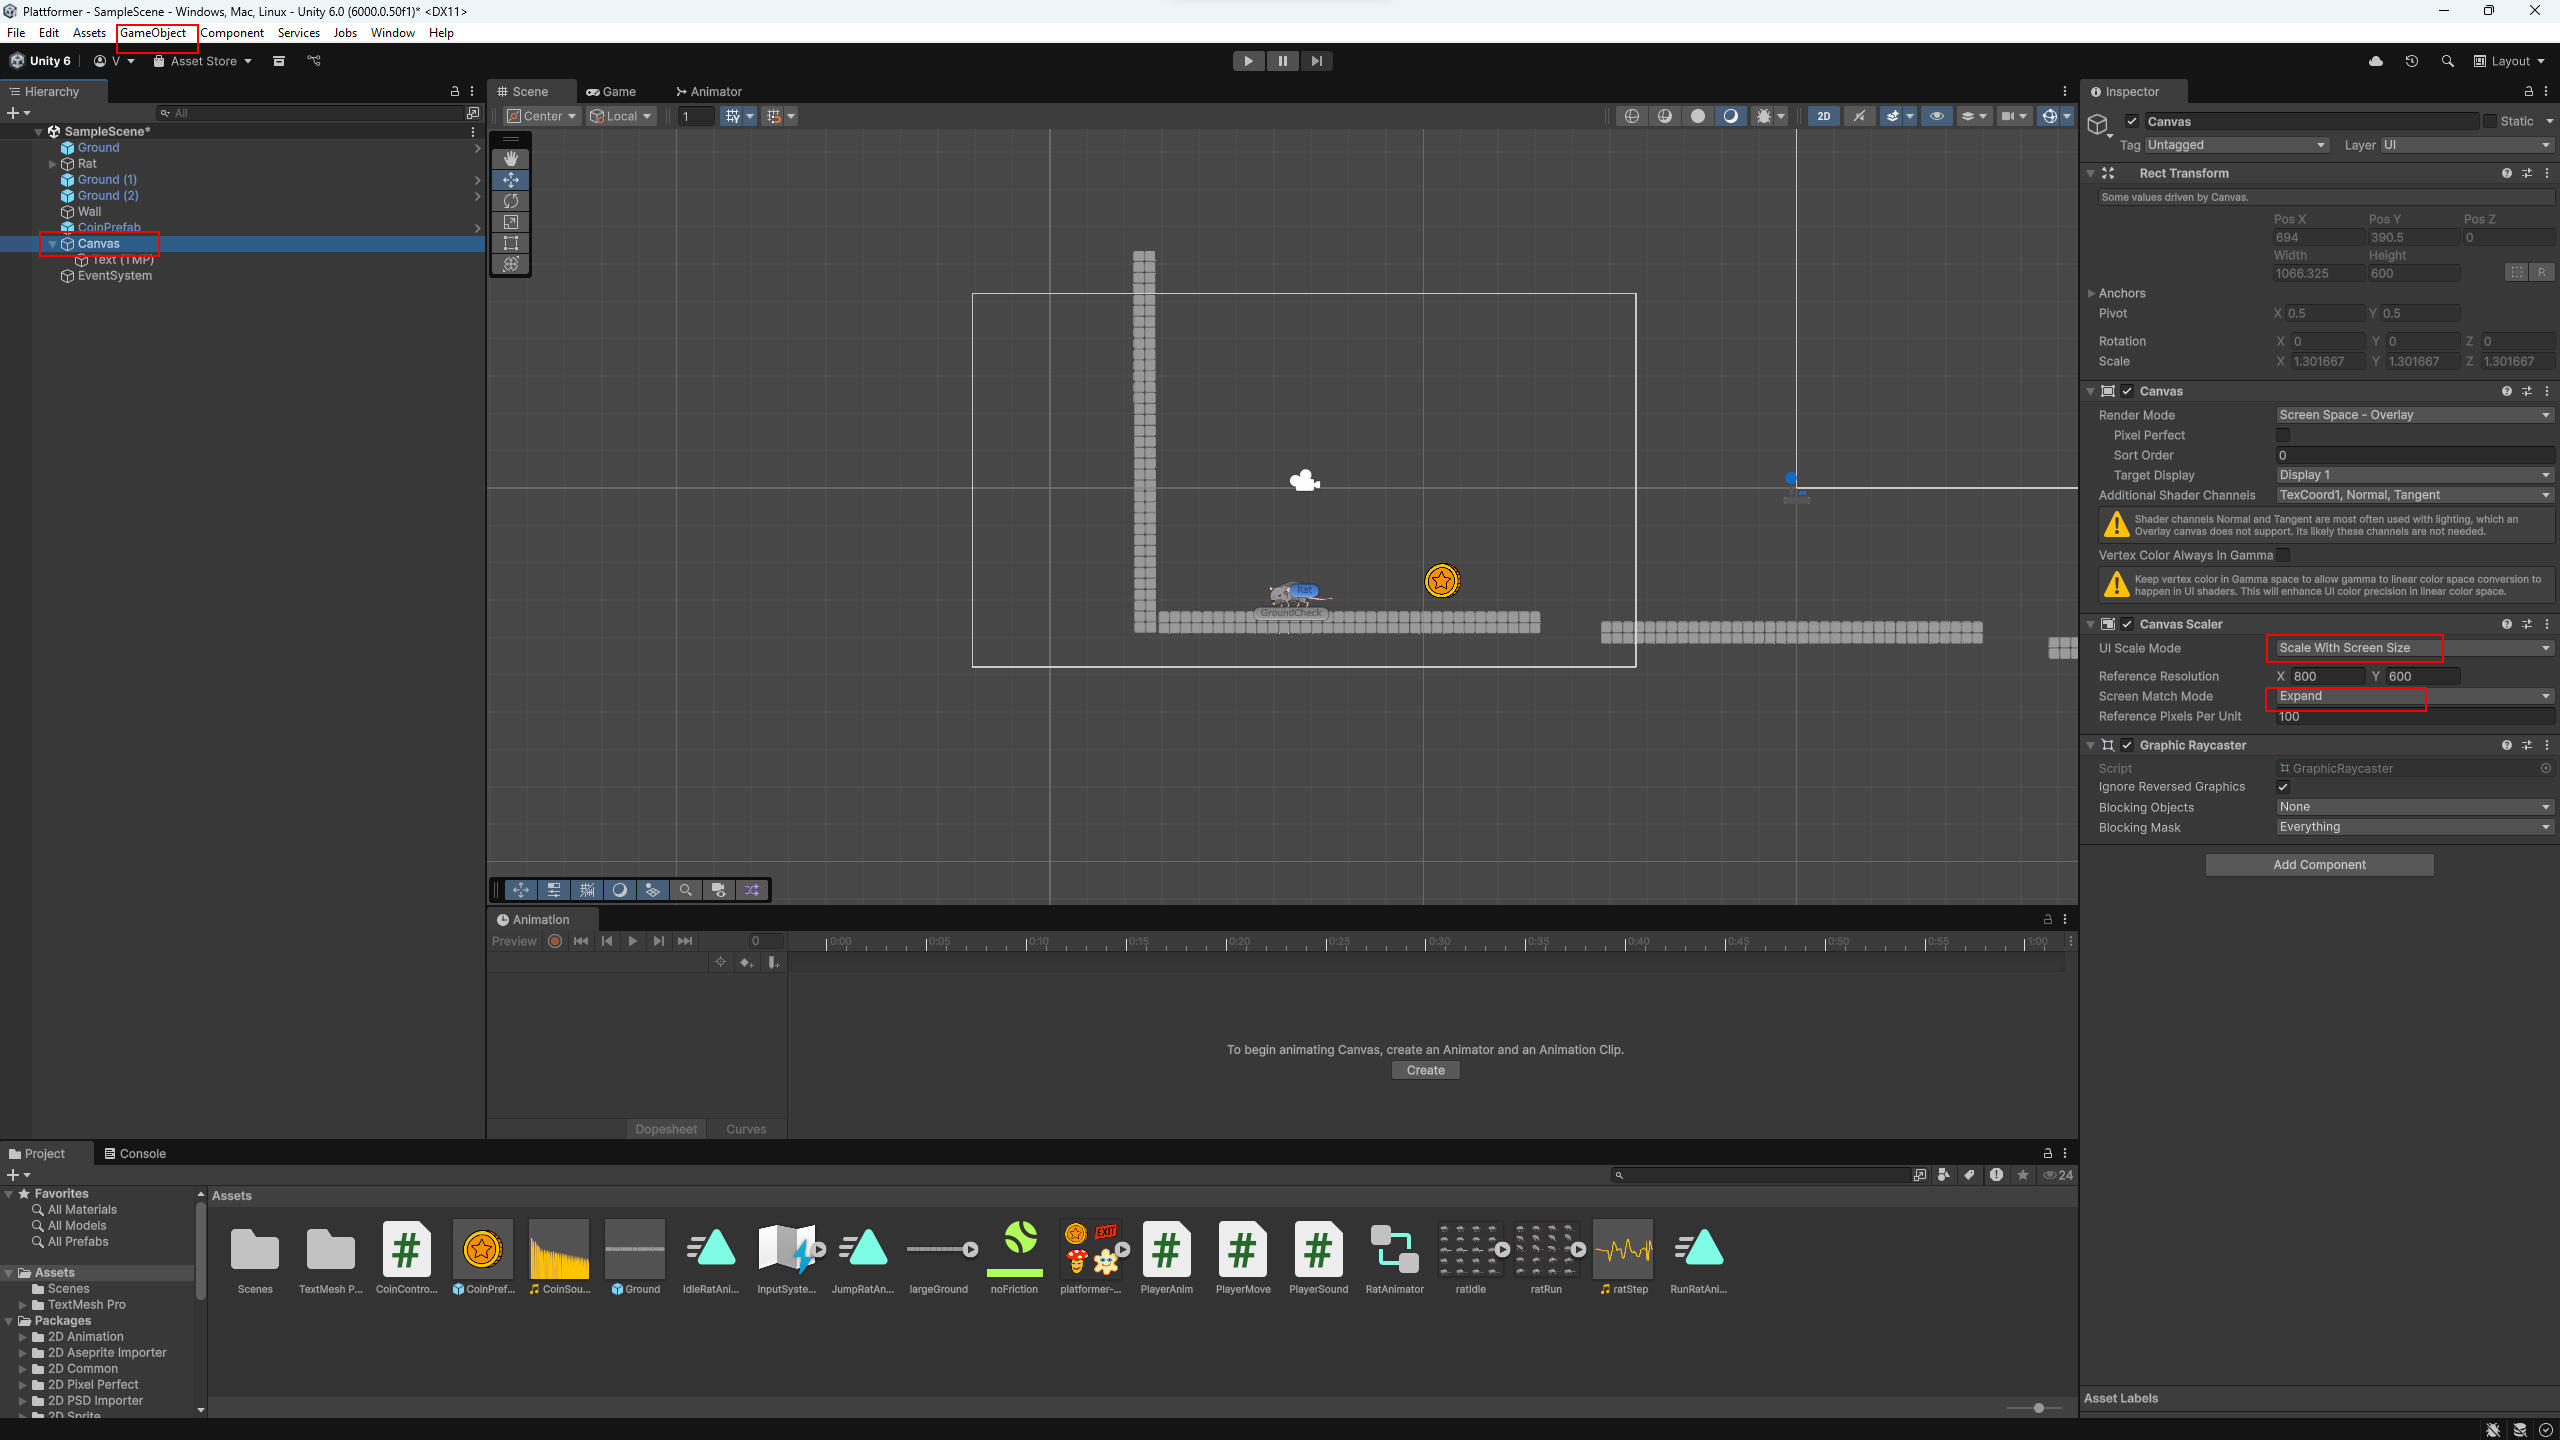
Scale With Screen Size with Expand for
flexible UI layout.
Double-click the Canvas in the Hierarchy to frame the UI view. You’ll see a white rectangle that represents the visible area of the screen.
Select Text(TMP) and make the following adjustments:
CoinCounterText.0.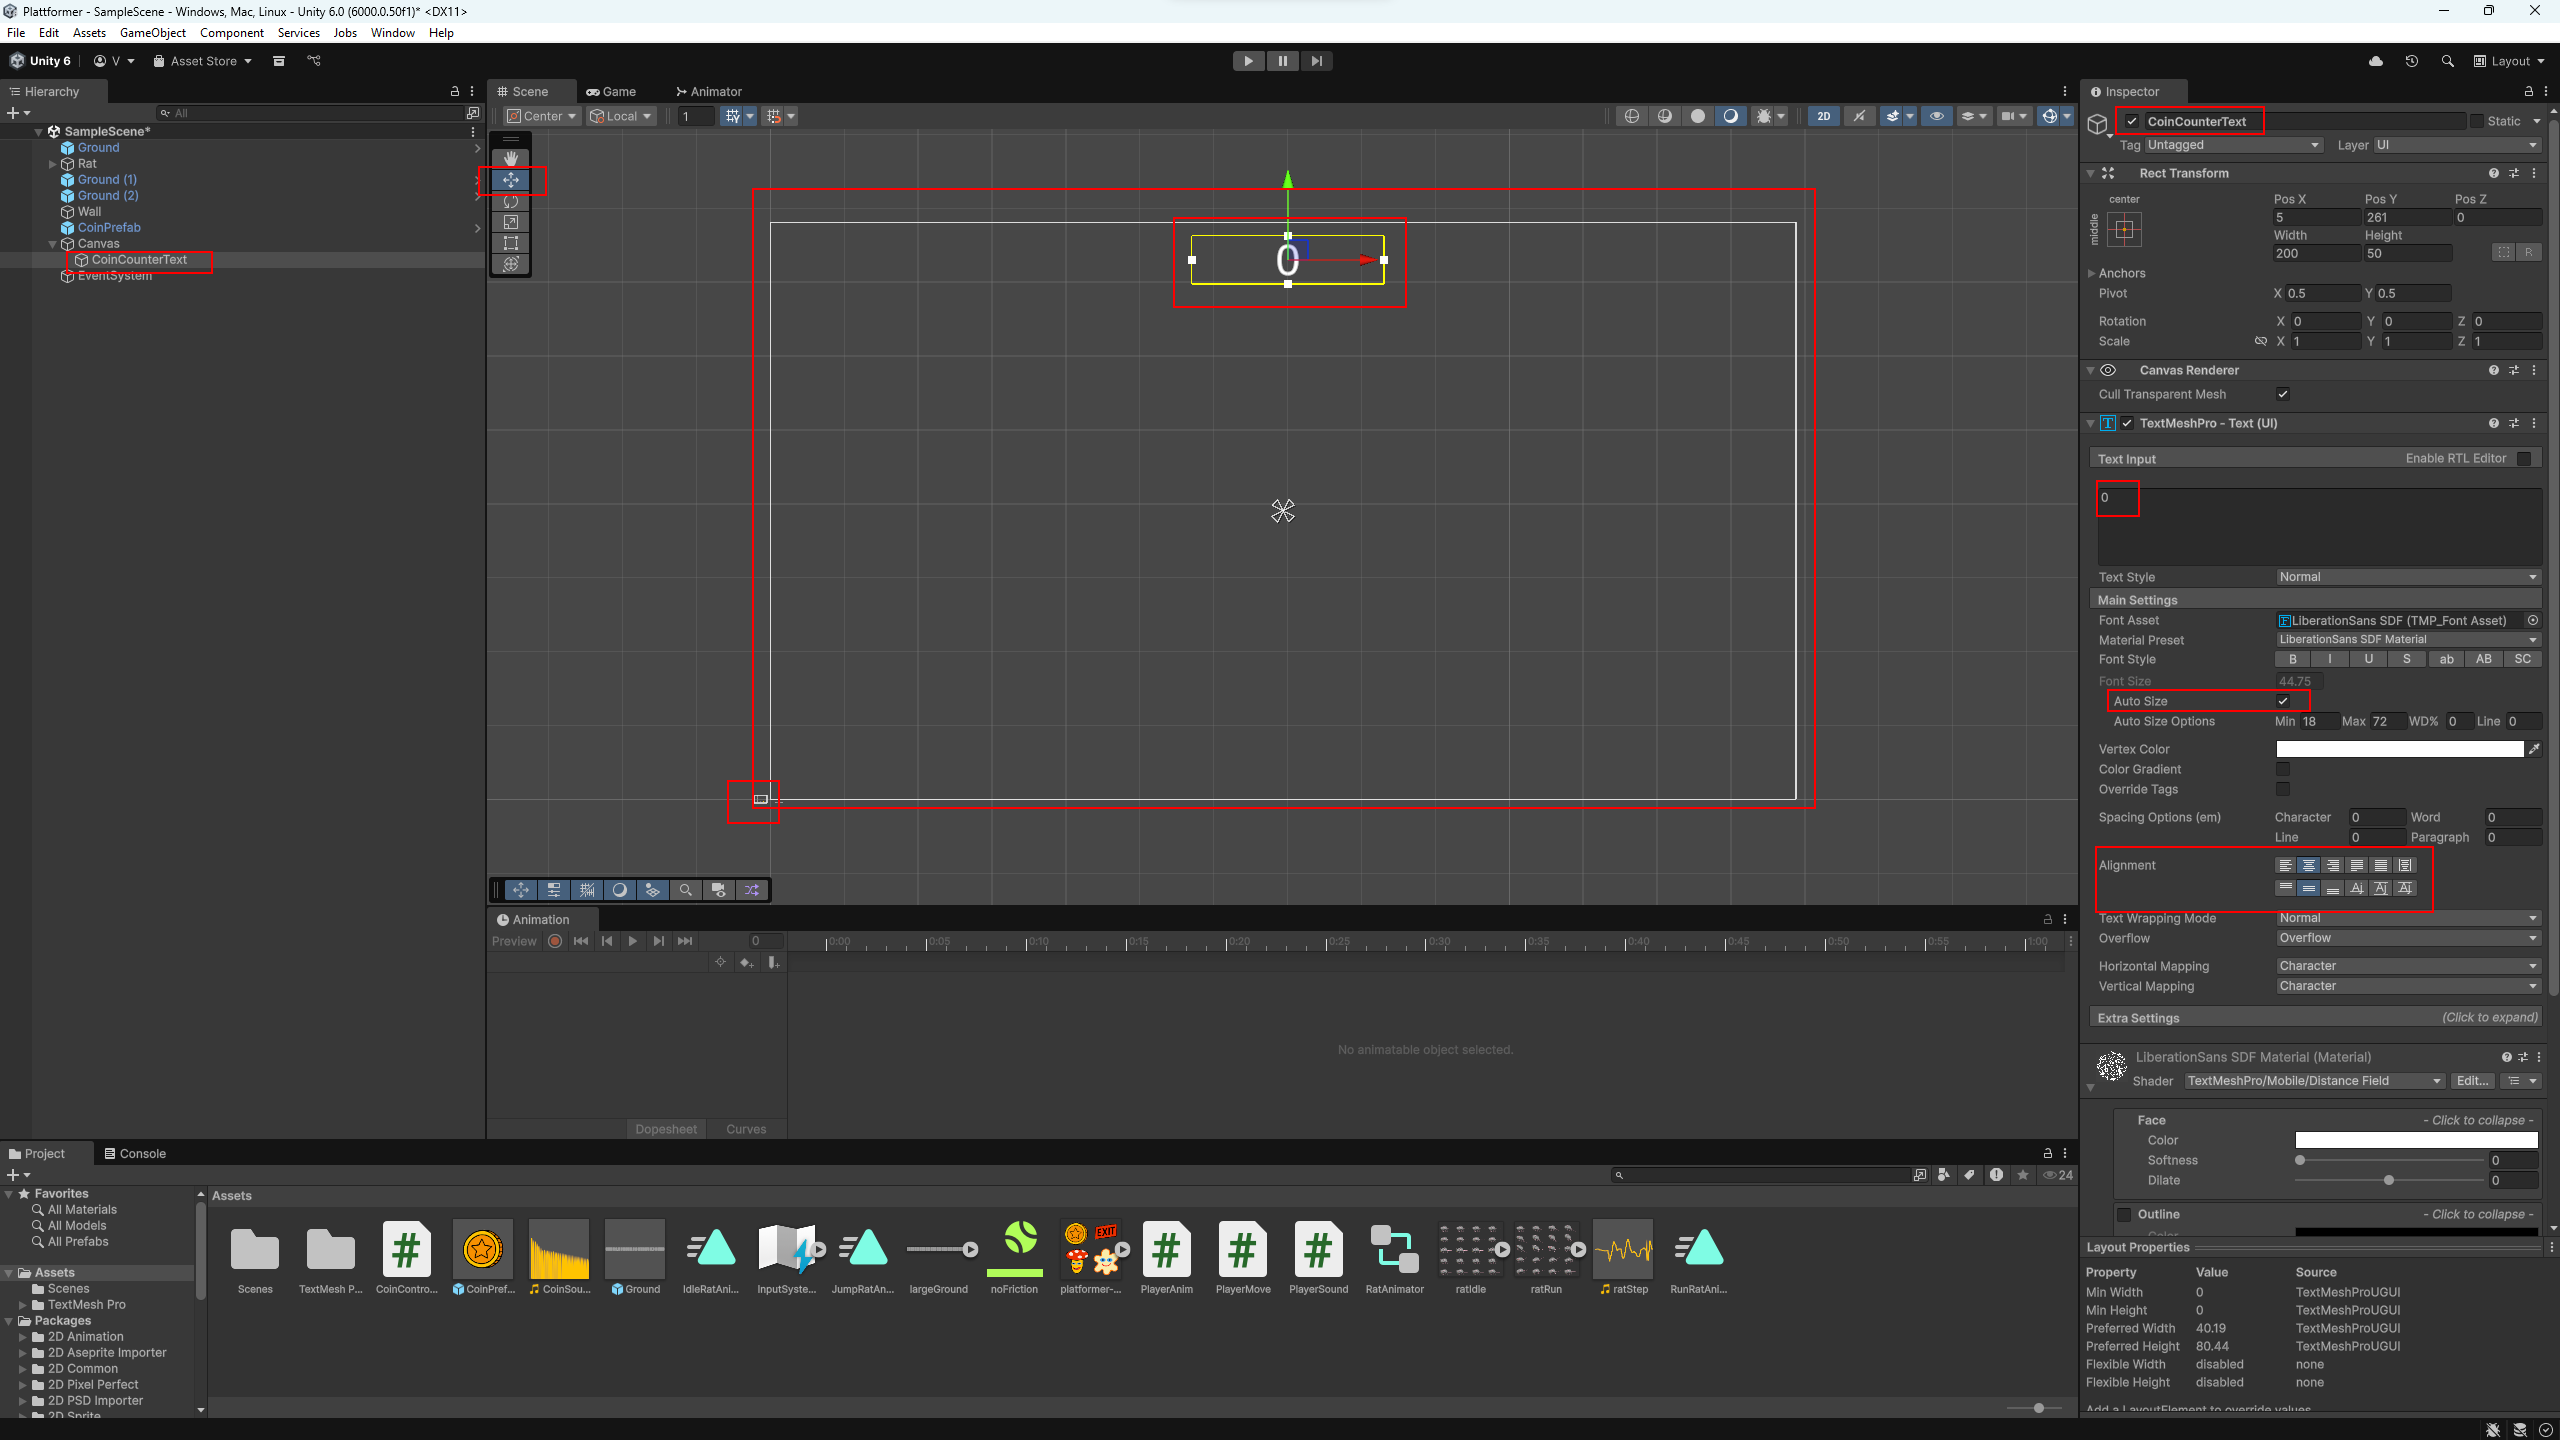
Now let’s update the CoinController script to connect
this text.
using UnityEngine;
using TMPro;

public class CoinController : MonoBehaviour
{
    // coins pick up sound
    public AudioClip CoinSound;

    // coin counter
    public int coin;

    // link to TextMeshPro counter
    public TMP_Text CoinCounterText;

    void OnTriggerEnter2D(Collider2D other)
    {
        // check, if the object has tag Coin
        if (other.tag == "Coin")
        {
            coin = coin + 1;

            // play the pickup sound
            AudioSource.PlayClipAtPoint(CoinSound, transform.position);

            // update the text
            CoinCounterText.text = coin.ToString();

            // remove coin from scene
            Destroy(other.gameObject);
        }
    }
}
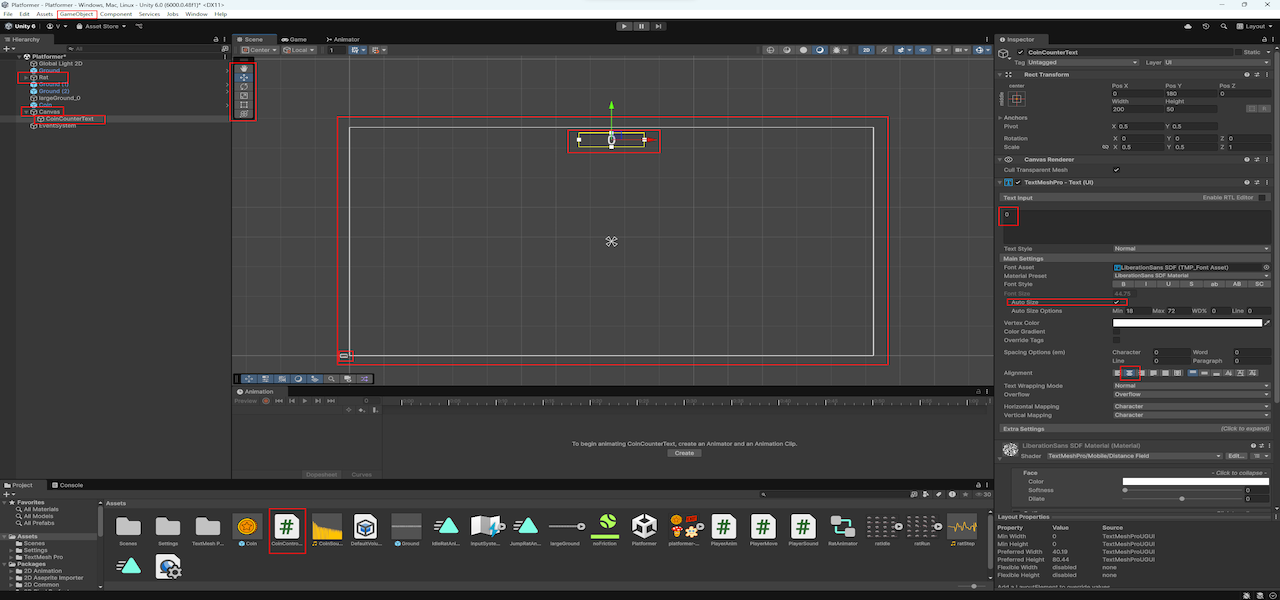
Select the Rat in the Hierarchy. In
the CoinController component, drag the
CoinCounterText GameObject into the
Coin Counter Text field.
Now press Play — as you collect coins, the UI will update in real-time.
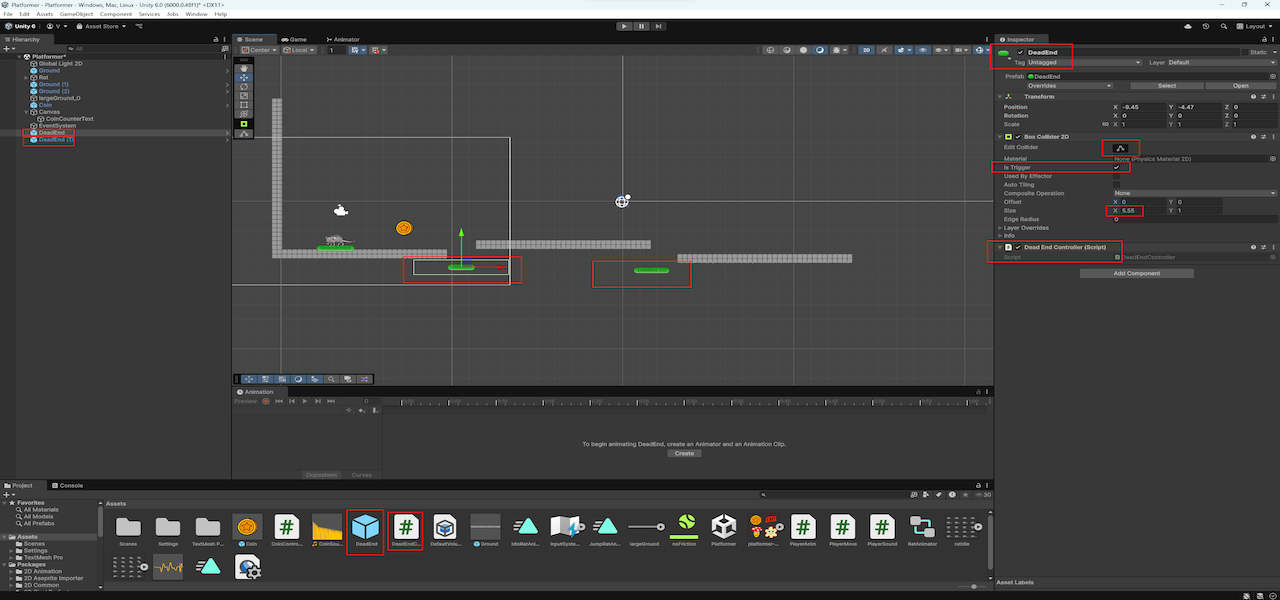
Let’s add a simple challenge: a hole the player can fall into.
Move one of the platforms to create a gap in the floor — this will become a fall zone.
Now right-click in the Hierarchy and choose:
Create Empty. Rename the new object to
DeadEnd.
In the Inspector, do the following:
0.
Now create a new MonoBehaviour script and name it
DeadEndController. Paste in the following code:
using UnityEngine;
using UnityEngine.SceneManagement; // allows scene reloading

// This script is attached to a "dead zone" object (like a pit)
// It restarts the level if the player falls in
public class DeadEndController : MonoBehaviour
{
    // Called when something enters the trigger collider
    void OnTriggerEnter2D(Collider2D other)
    {
        // Check if the object has the "Player" tag
        if (other.tag == "Player")
        {
            // Reload the current scene
            SceneManager.LoadScene(SceneManager.GetActiveScene().name);
        }
    }
}
Select the DeadEnd object and attach the
DeadEndController script to it. Then create a prefab by
dragging DeadEnd from the Hierarchy into
the Assets folder.
When the rat falls into the trigger area, the scene reloads — it's a simple way to reset the level without extra setup.
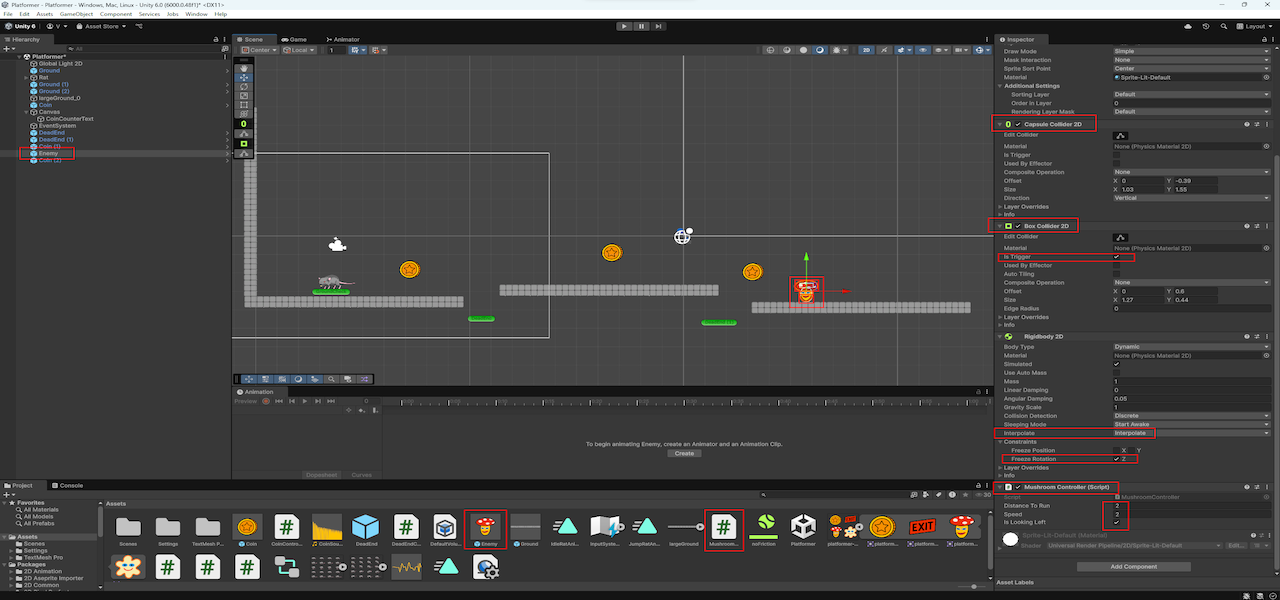
Time to add a moving obstacle: a mushroom enemy that walks back and forth. If the rat jumps on its head — it disappears. If the rat touches it from the side — the level resets.
Place a Ground prefab and a DeadEnd below
it. Then drag the mushroom sprite from the assets into the scene, onto
the last platform. Rename the new object to Enemy.
In the Inspector for the Enemy:
0.Interpolate.
Now create a new script and name it MushroomController.
Paste in this code:
using System.Collections;
using System.Collections.Generic;
using UnityEngine;
using UnityEngine.SceneManagement;

public class MushroomController : MonoBehaviour
{
    // Max distance the mushroom moves from its start position (in Unity units)
    public float distanceToRun = 2f;

    // Movement speed
    public float speed = 2f;

    // Is the mushroom currently looking left?
    public bool isLookingLeft = true;

    // Starting position
    Vector3 startPos;

    // Reference to the Rigidbody2D component
    Rigidbody2D rb;

    void Start()
    {
        rb = GetComponent<Rigidbody2D>();
        startPos = transform.position;

        // Optimize distance check by using squared values
        distanceToRun = distanceToRun * distanceToRun;
    }

    void FixedUpdate()
    {
        // Calculate distance from the start position
        Vector2 dist = transform.position - startPos;

        if (isLookingLeft)
        {
            // If moved too far left — turn around
            if (transform.position.x < startPos.x && dist.sqrMagnitude > distanceToRun)
            {
                TurnTheMushroom();
                rb.linearVelocity = new Vector2(speed, rb.linearVelocity.y);
            }
            else
            {
                rb.linearVelocity = new Vector2(-speed, rb.linearVelocity.y);
            }
        }
        else
        {
            // If moved too far right — turn around
            if (transform.position.x > startPos.x && dist.sqrMagnitude > distanceToRun)
            {
                TurnTheMushroom();
                rb.linearVelocity = new Vector2(-speed, rb.linearVelocity.y);
            }
            else
            {
                rb.linearVelocity = new Vector2(speed, rb.linearVelocity.y);
            }
        }
    }

    // Flip the mushroom visually and logically
    void TurnTheMushroom()
    {
        isLookingLeft = !isLookingLeft;
        transform.localScale = new Vector3(
            transform.localScale.x * -1,
            transform.localScale.y,
            transform.localScale.z
        );
    }

    // Restart the level if the player hits the mushroom from the side
    void OnCollisionEnter2D(Collision2D other)
    {
        if (other.collider.gameObject.tag == "Player")
        {
            SceneManager.LoadScene(SceneManager.GetActiveScene().name);
        }
    }

    // Destroy the mushroom if the player jumps on top (trigger zone)
    void OnTriggerEnter2D(Collider2D other)
    {
        if (other.tag == "Player")
        {
            Destroy(gameObject);
        }
    }
}
Attach the MushroomController script to the
Enemy object. Adjust Speed and
Distance To Run in the Inspector (e.g., both set to
2).
Finally, drag Enemy into your Assets to create a reusable prefab.
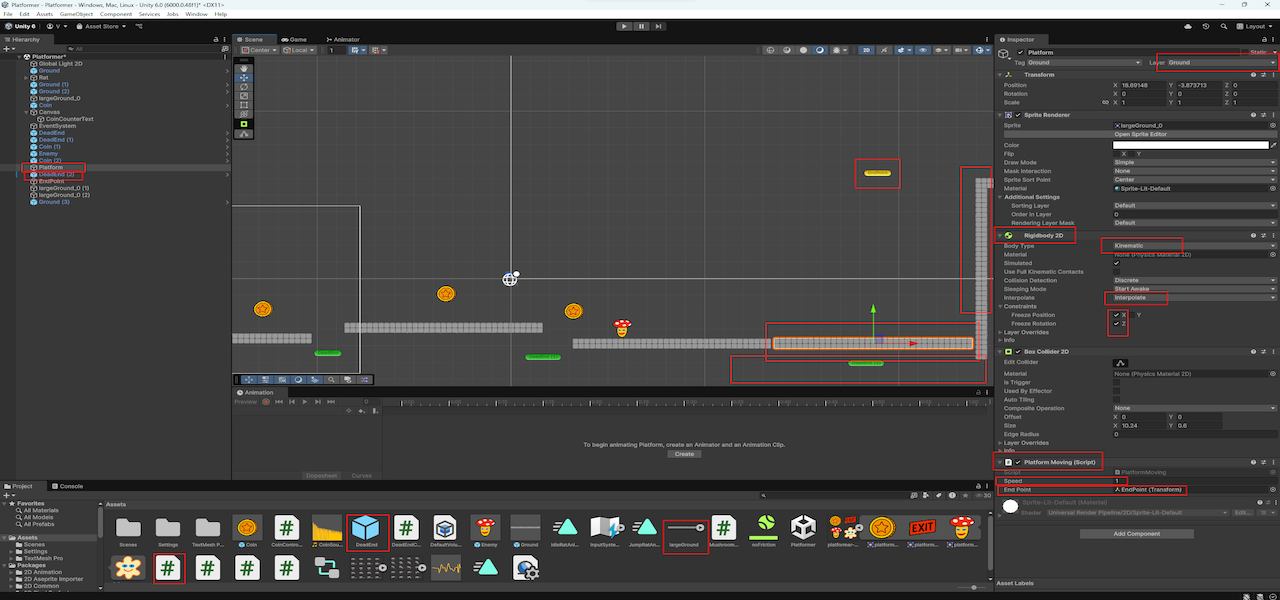
Let's add a vertical moving platform that the rat can ride.
Drag the largeGround sprite into the scene and rename the
new object to Platform.
In the Inspector for Platform:
0.Ground.Kinematic.Interpolate.
Now we’ll give the platform a script that moves it up and down between two points.
Create a new MonoBehaviour script called
PlatformMoving and paste this code:
using System.Collections;
using System.Collections.Generic;
using UnityEngine;

public class PlatformMoving : MonoBehaviour
{
    // Speed of the platform movement
    public float speed;

    // The upper point the platform moves toward
    public Transform endPoint;

    // The starting point (initial position)
    Vector3 startPoint;

    // Reference to Rigidbody2D
    Rigidbody2D rb;

    // Current speed value
    float currentSpeed;

    void Start()
    {
        // Save initial position
        startPoint = transform.position;

        // Get reference to Rigidbody2D
        rb = GetComponent<Rigidbody2D>();

        // Set initial movement direction
        currentSpeed = speed;
    }

    void FixedUpdate()
    {
        // If platform has passed the endpoint, reverse direction
        if (transform.position.y > endPoint.position.y)
            currentSpeed = -speed;

        // If platform has returned to start, reverse again
        if (transform.position.y < startPoint.y)
            currentSpeed = speed;

        // Apply velocity to the Rigidbody
        rb.linearVelocity = new Vector3(0, currentSpeed, 0);
    }
}
In the Hierarchy, create an empty GameObject and name it EndPoint. Optionally assign an icon to make it visible. Place it above the platform using the move tool.
Select the Platform again. Attach the
PlatformMoving script. Set Speed to
1 and assign the EndPoint object to the
corresponding field.
Play the scene and observe how the platform moves vertically between two positions.
Add a wall to the right of the platform and assign a Box Collider 2D to it. Then place a DeadEnd prefab below the moving platform and adjust its size.
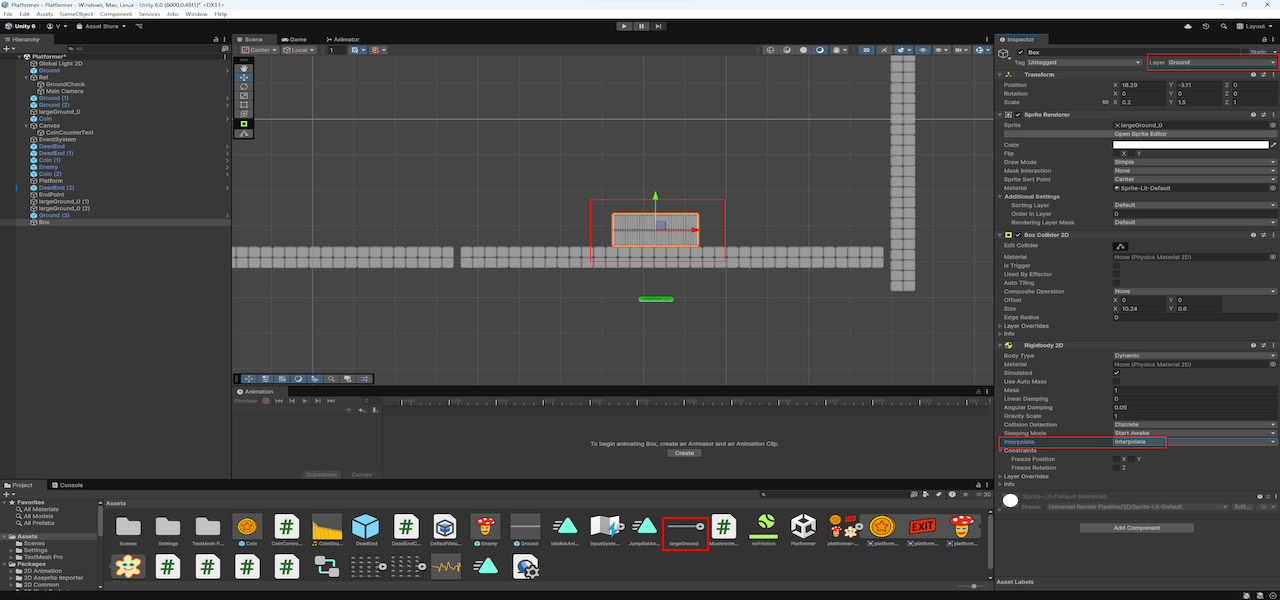
Let’s add a box that can interact with the rat and other objects using real physics.
Drag the imageGround sprite into the scene and rename the
new object to Box.
In the Inspector for Box:
Ground.0.Scale X = 0.2, Y = 1.5).
Interpolate.
You can now push the box around in the scene — try riding it on the moving platform or using it as a step!
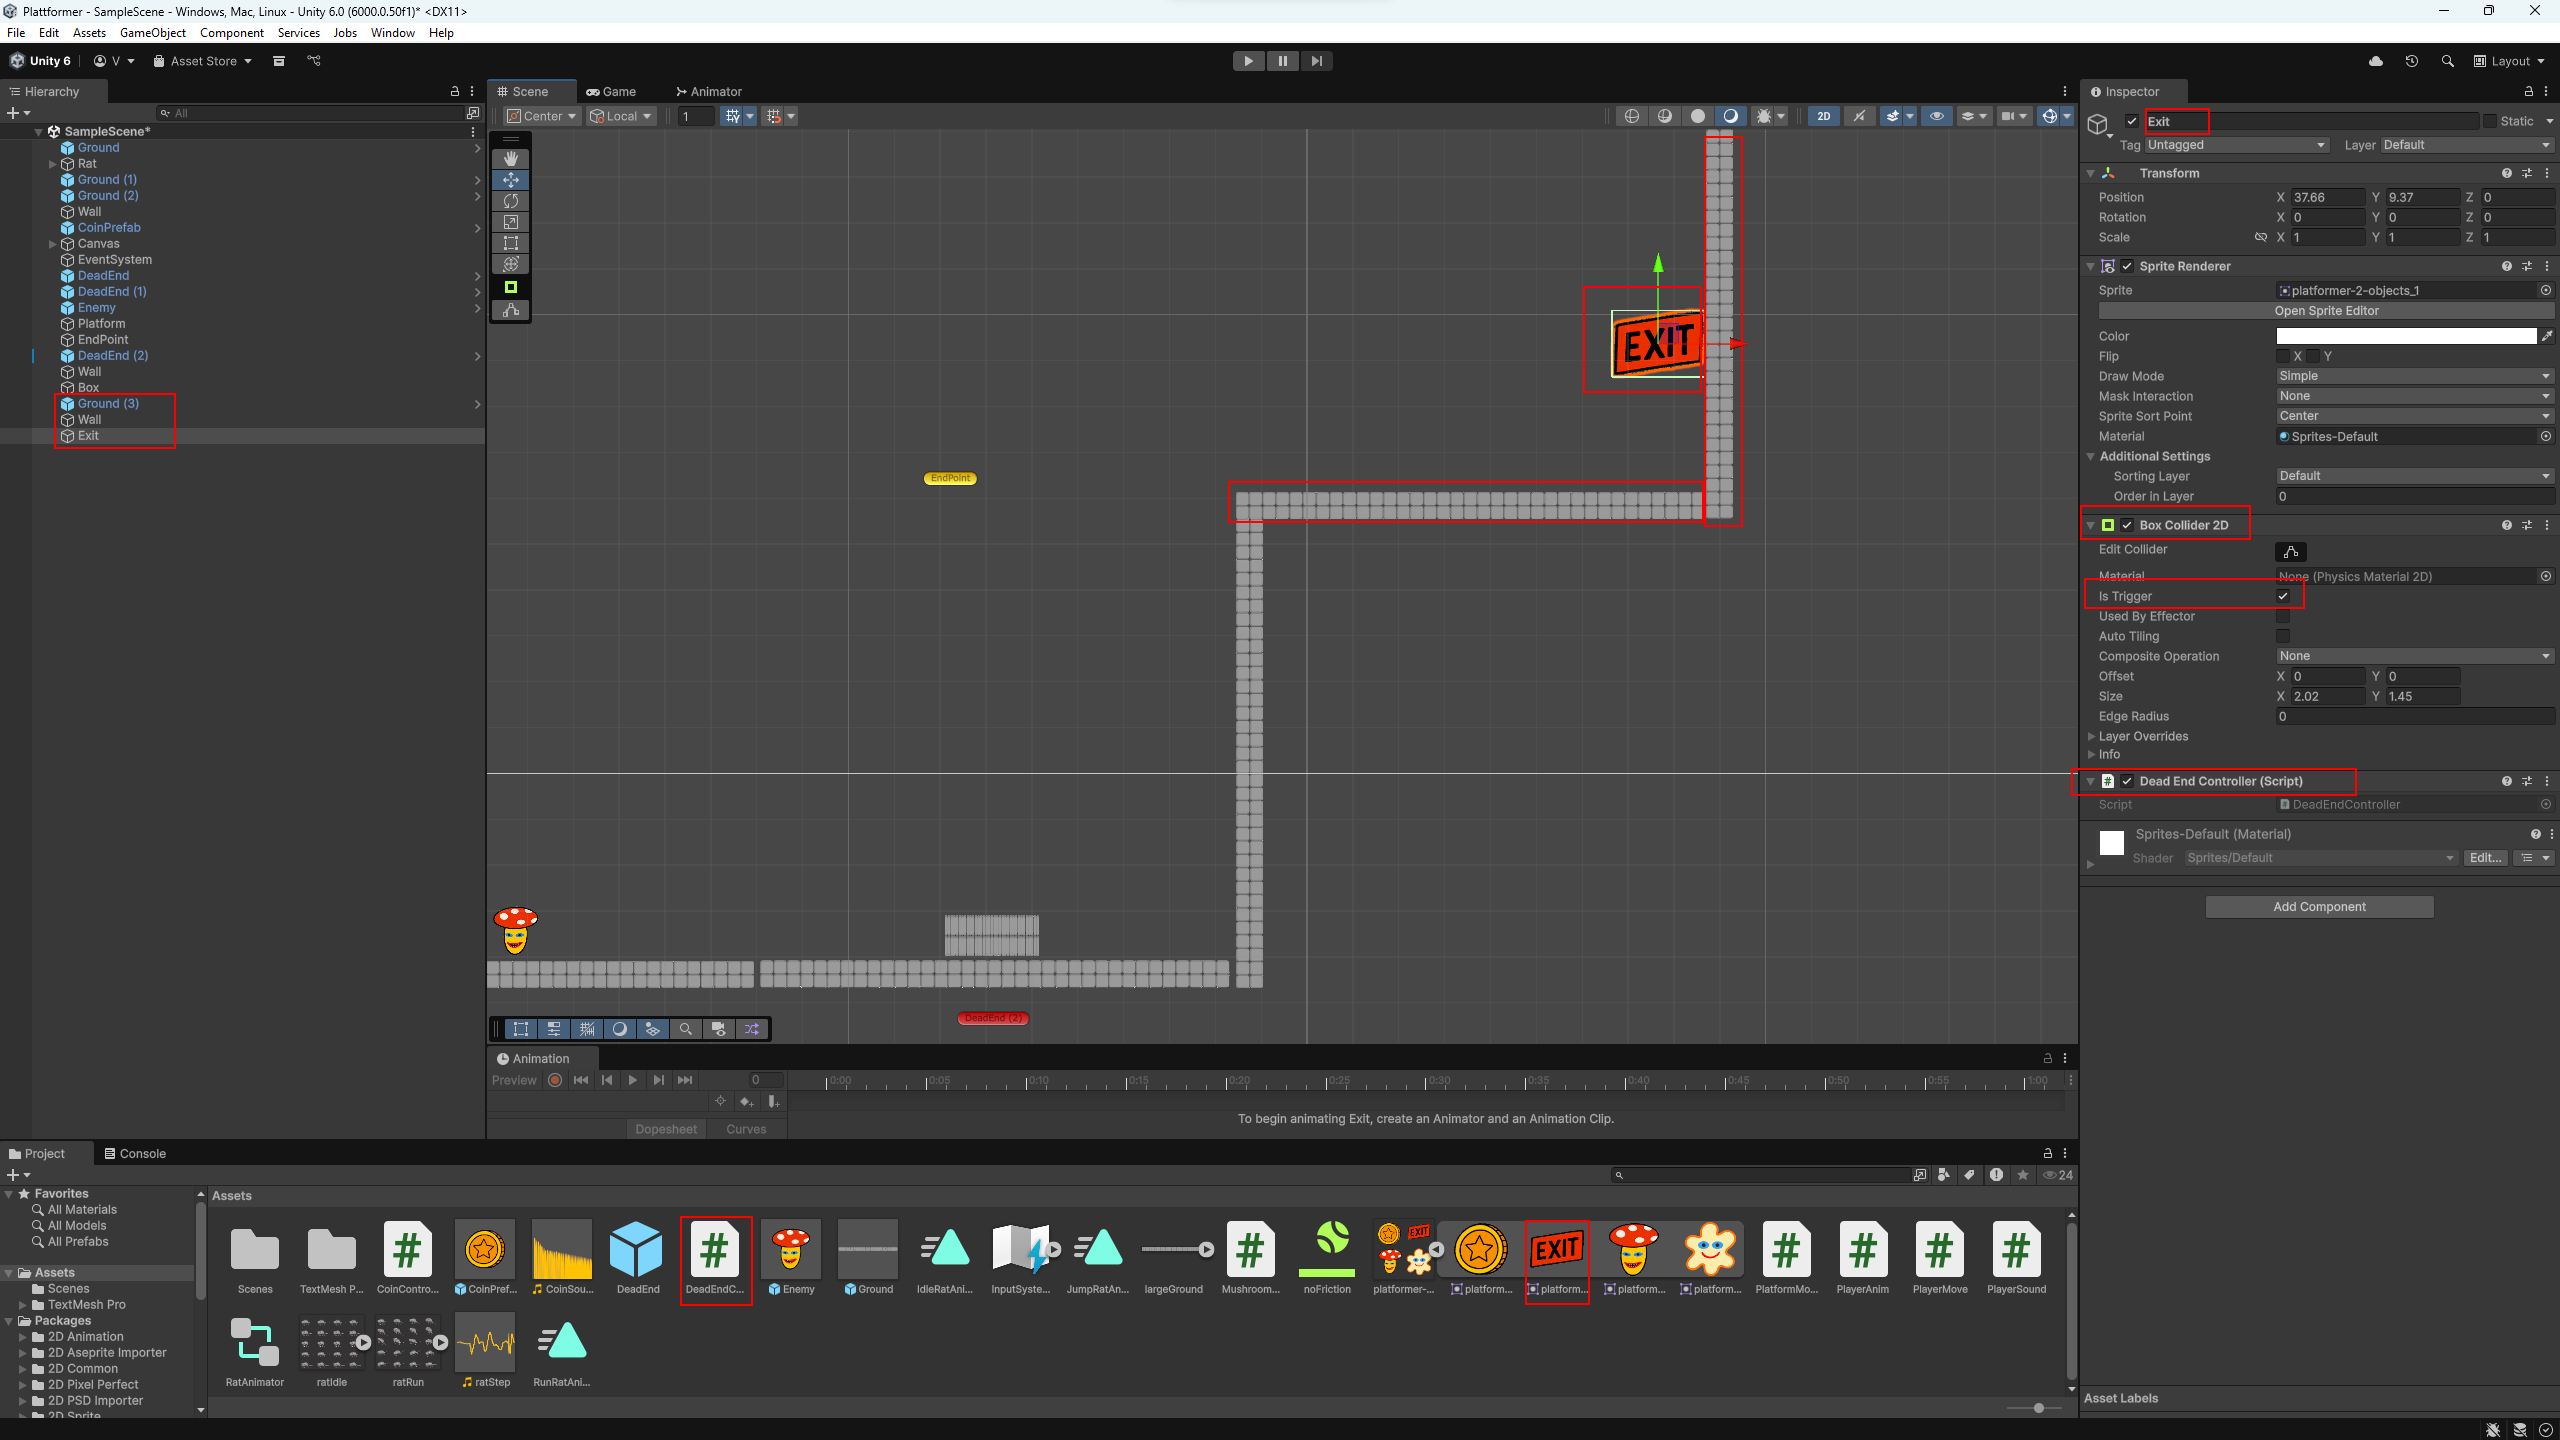
Let’s add an Exit to the level. It won’t load a new scene (yet), but it will act as a finish trigger — if you can reach it.
First, add one more Ground prefab where the moving
platform will stop — near the top of its path. Then place a wall at
the end of the level using the largeGround sprite and add
a Box Collider 2D to it.
Drag the Exit sprite from the
Assets folder into the scene — it's already included
in the project. Place it near the top wall, high enough so the rat
can’t reach it on its own. The player will need a
Box as a step to get to the exit.
In the Inspector for the Exit object:
0.DeadEndController script (we use it to reload
the scene).
Now when the rat touches the Exit, the scene restarts — but only if you managed to climb up to it.
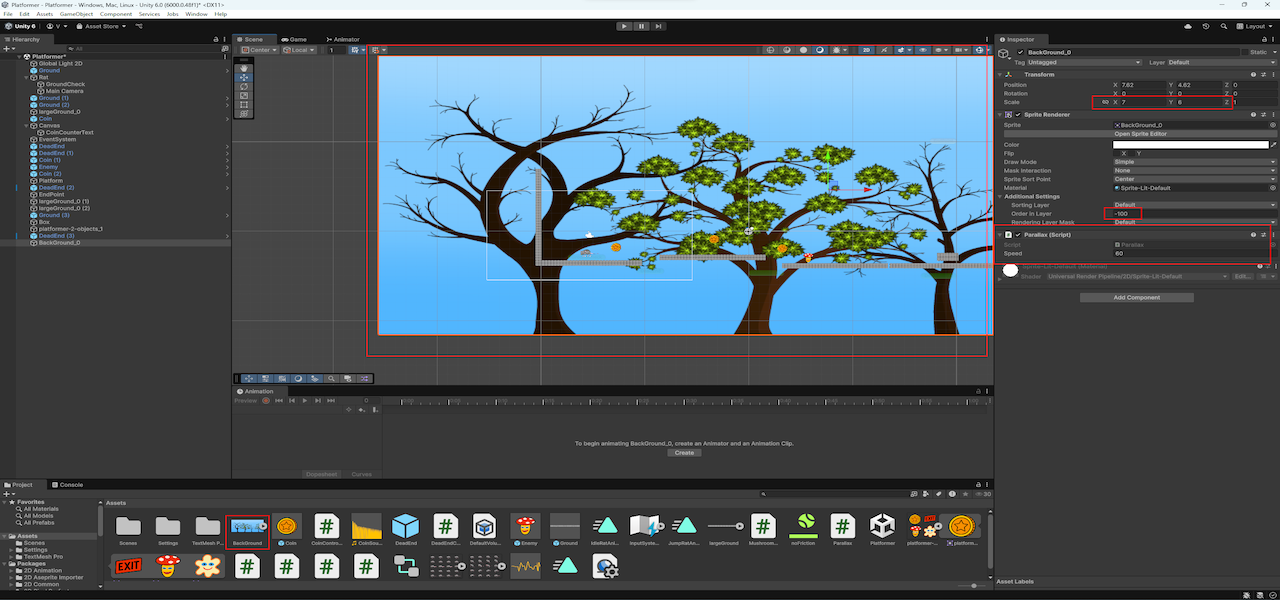
To add a sense of depth, let’s make the background move slightly when the player moves. This is called a parallax effect — it simulates depth by scrolling distant layers more slowly.
You can download the background image here: Download BackGround.png
Import the image into your project and drag it into the scene. In the Inspector:
X: 6,
Y: 6 (adjust as needed).
-100 so it
renders behind everything else.
Create a new MonoBehaviour script and name it
Parallax. Paste this code:
using UnityEngine;

public class Parallax : MonoBehaviour
{
    // The player we want to follow
    private GameObject player;

    // Player's position from the previous frame
    private Vector3 lastPosition;

    // Parallax speed (lower = slower background movement)
    public float speed = 60f;

    void Start()
    {
        // Find the player by tag
        player = GameObject.FindWithTag("Player");

        // Store initial position
        if (player != null)
        {
            lastPosition = player.transform.position;
        }
    }

    void Update()
    {
        // Do nothing if player is missing
        if (player == null) return;

        // Calculate movement difference
        Vector3 offset = player.transform.position - lastPosition;

        // Move the background slower than the player for parallax effect
        transform.Translate(offset * speed * Time.deltaTime);

        // Update position for next frame
        lastPosition = player.transform.position;
    }
}
Attach the script to the background object. Set the
Speed value — 60 is a good starting
point, but you can experiment.
This is the step everything quietly led to. Not the coins, not the mushroom, not even the exit. This — is the reason.
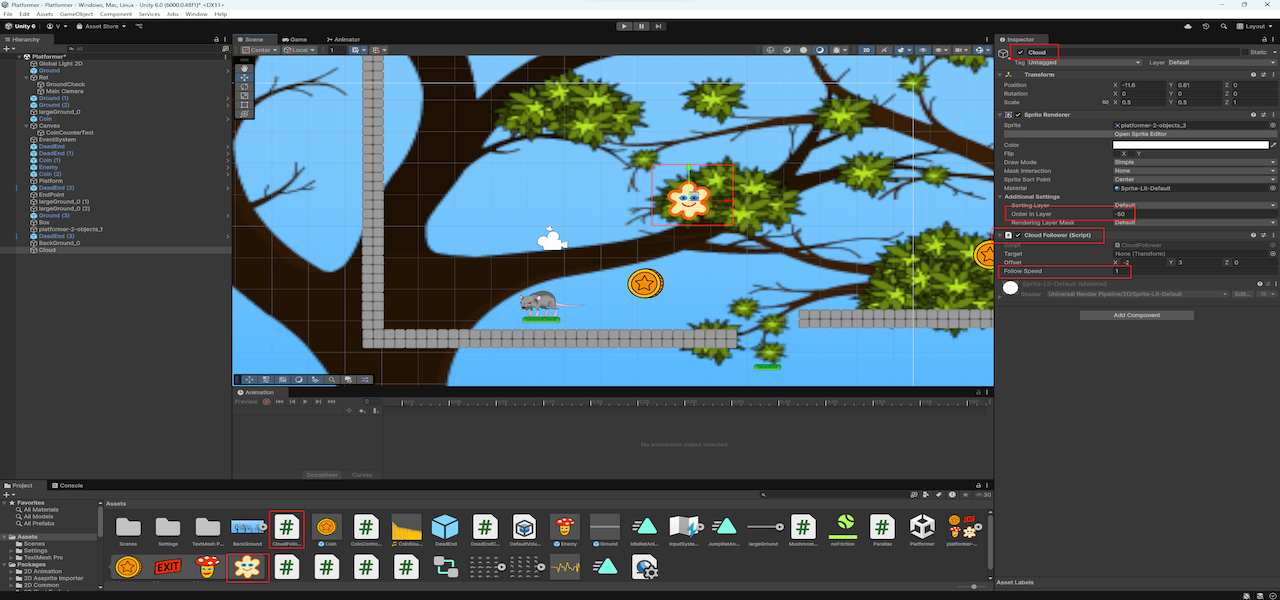
In the assets, there’s a smiling cloud. It doesn’t attack, doesn’t score points. And yet, it’s the only thing that stays with you — always.
Drag the cloud sprite into the scene and name it
Cloud. Set its Z Position to
0 and its Order in Layer to
-50, so it stays behind the rat.
Place it somewhere above and behind the rat — like
(x - 2, y + 3). It doesn’t need precision. It just needs
to be there.
Create a new MonoBehaviour script called
CloudFollower and attach it to the Cloud. Use this code:
using UnityEngine;

public class CloudFollower : MonoBehaviour
{
    // Offset of the cloud relative to the player (left and up)
    public Vector3 offset = new Vector3(-2f, 3f, 0f);

    // Speed at which the cloud follows the player
    public float followSpeed = 1.5f;

    // Reference to the target (the player)
    private Transform target;

    void Start()
    {
        // Find the object with the "Player" tag
        GameObject playerObj = GameObject.FindWithTag("Player");
        if (playerObj != null)
        {
            target = playerObj.transform;
        }
    }

    void Update()
    {
        // If target not found — do nothing
        if (target == null) return;

        // Target position: player's position + offset
        Vector3 desiredPos = target.position + offset;

        // Smoothly move the cloud toward the target position
        transform.position = Vector3.Lerp(
            transform.position,       // current position
            desiredPos,               // target position
            followSpeed * Time.deltaTime // interpolation over time
        );
    }
}
The cloud will now follow the rat — not perfectly, not precisely, but with a soft delay. It doesn’t help. It doesn’t talk. It simply stays.
If you slow down or fall — it waits. If you restart — it returns. You’re never alone on this level. Not really.
Now you can add coins and mushrooms. Drop a box under the platform. And — maybe — stay in this level a bit longer than you planned.
It all feels simple. And that's the beauty of it. Don’t try to build the best game in the world right away. First, get comfortable with the basics: movement, collisions, interactions.
Then — you'll create your own game. The one that truly feels like yours.