Welcome to this friendly, step-by-step Unity 2D tutorial for beginners! Together we’ll build a simple prototype of a game called “Catch!”, where you’ll learn how to:
To get started, you’ll need to install Unity 6.0 LTS or any other version that supports 2D. No prior Unity experience is needed — just bring your curiosity and a bit of free time. Let’s go!
Open Unity Hub and create a new 2D project by selecting the 2D Core (Built-In Render Pipeline) template — a simple, clean foundation for your first 2D game.
To do this, go to the Projects tab in Unity Hub and
click New Project. Find the
2D Core (Built-In Render Pipeline) template (it
already includes basic 2D graphics and physics). Depending on your
Unity version, the name might vary a bit — if you don’t see it, feel
free to pick 2D (URP/SRP) or just plain 2D. Enter
CatchGame (or any name you like) for your project and
choose a folder. Then click Create project and wait a
moment while Unity sets everything up.
💡 Tip: Give your project a clear name and pick an easy-to-find folder — it’ll save time as your game grows.
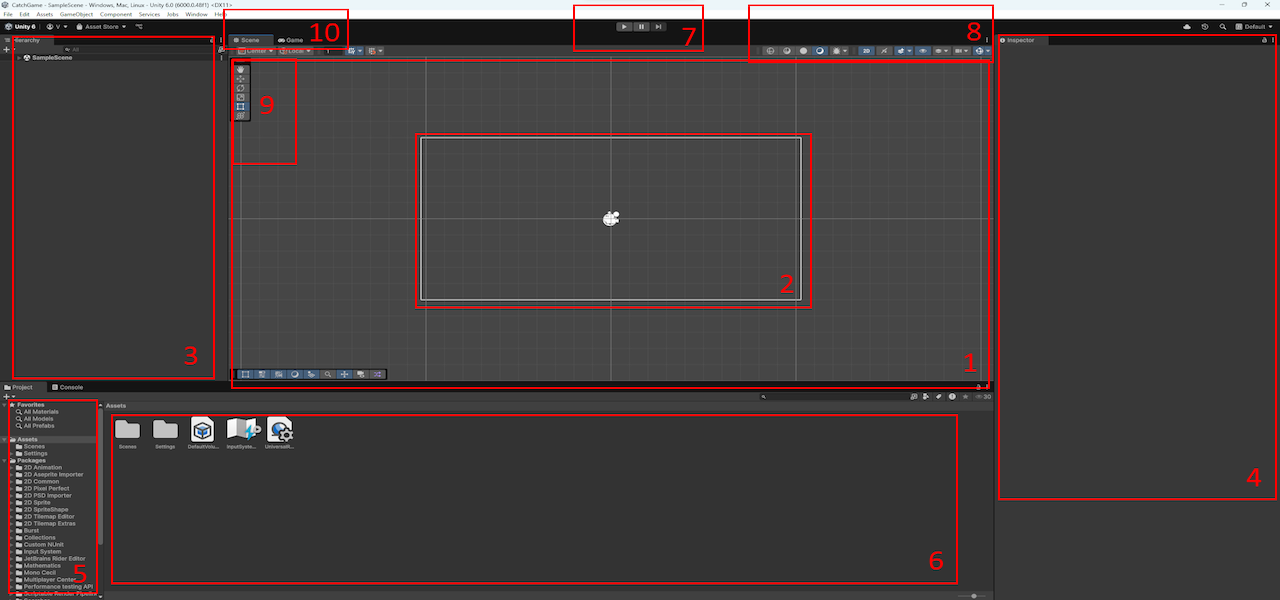
When the Unity Editor opens, here are the panels you’ll be working with:
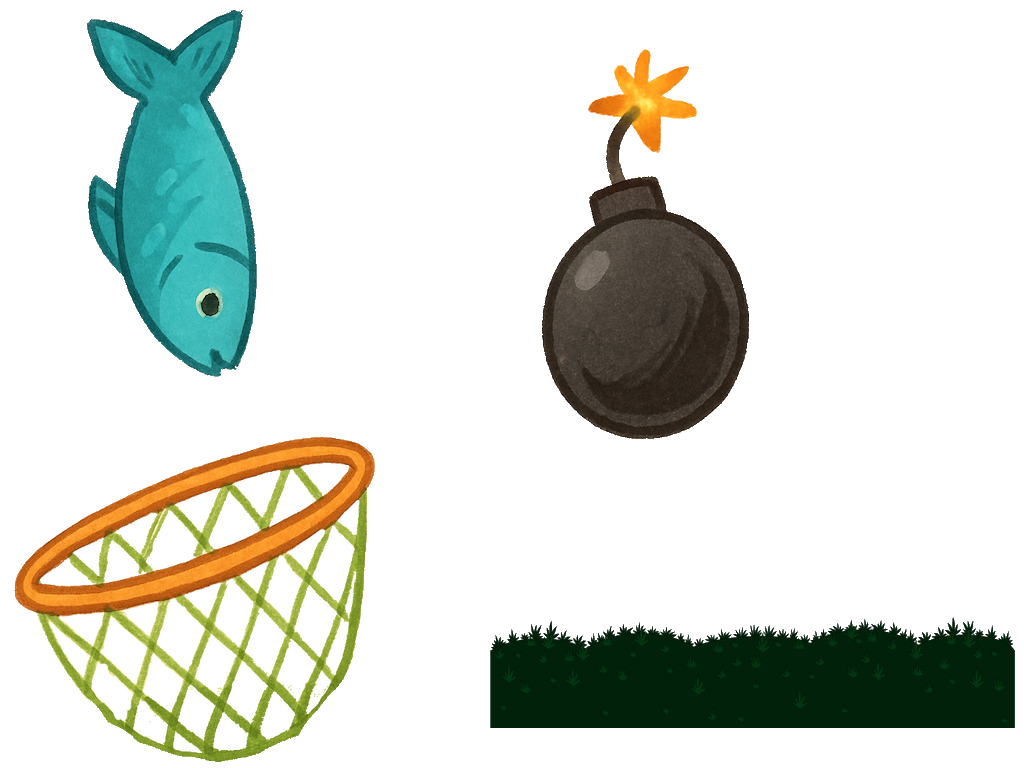
For this game, we’ll need four visuals: the ground, the catcher, the good item, and the bad item.
You can download a single image I’ve drawn that includes all of them. It’s just a starting point — you can improve or replace it later.
To import the image into Unity: right-click in the Assets window, choose Import New Asset..., find the downloaded file, and click Import.
💡 Tip: You can also drag the image file directly into the
Assets window from your folder. Sometimes that’s even
quicker.
💡 Tip: Start simple — you can edit graphics later as the game grows.
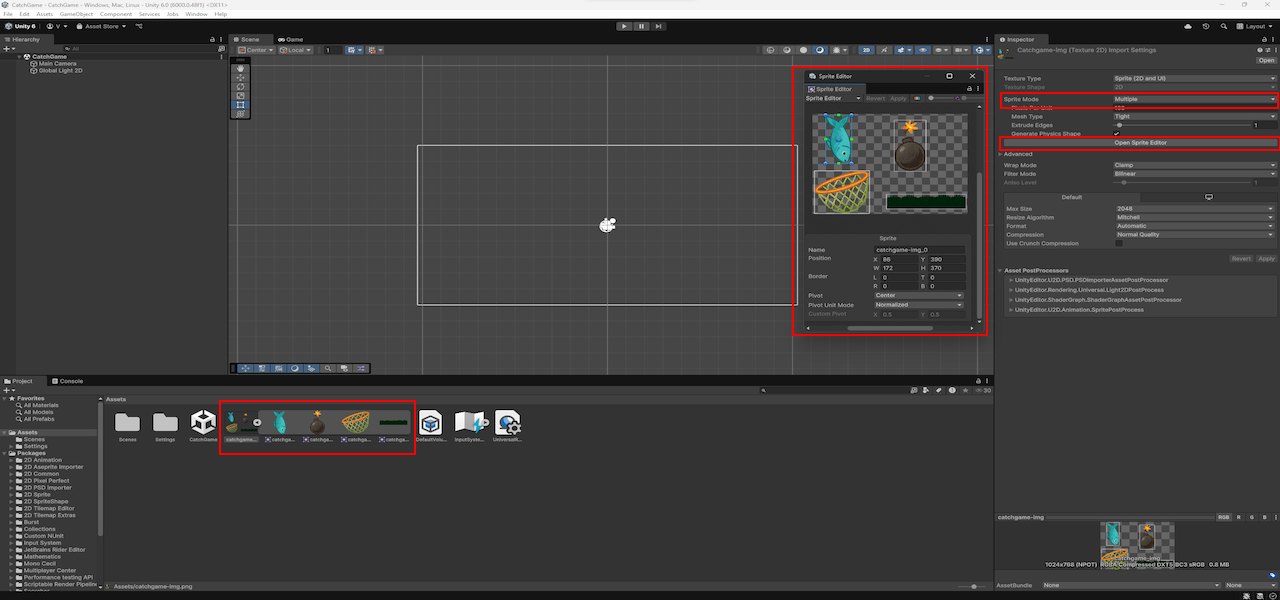
After importing the image
catchgame-img.png, Unity usually sets the mode to
Sprite Mode: Multiple automatically. But it’s always
a good idea to double-check.
💡 Why Multiple? Because this is a sprite sheet — one image that contains several game elements (like ground, catcher, items). By slicing it, you’ll get individual sprites you can drag into your scene.
Select the image in your Assets folder. In the
Inspector, make sure Sprite Mode is set to
Multiple. You can also expand the preview to see if it
contains multiple graphics.
If it’s not set, change it manually and click Apply.
Now open the Sprite Editor from the Inspector. In the window that appears, click Slice in the top-left corner. Keep the default settings and click Slice again, then Apply.
Unity will automatically cut the image into separate sprites. It usually does a pretty good job. If needed, you can adjust the slice boundaries by dragging them directly in the Sprite Editor.
💡 Tip: Want to use your own graphics? Instead of one sheet, you can import four separate images. Just right-click in the Assets window, choose Import New Asset..., select your files, and click Import.
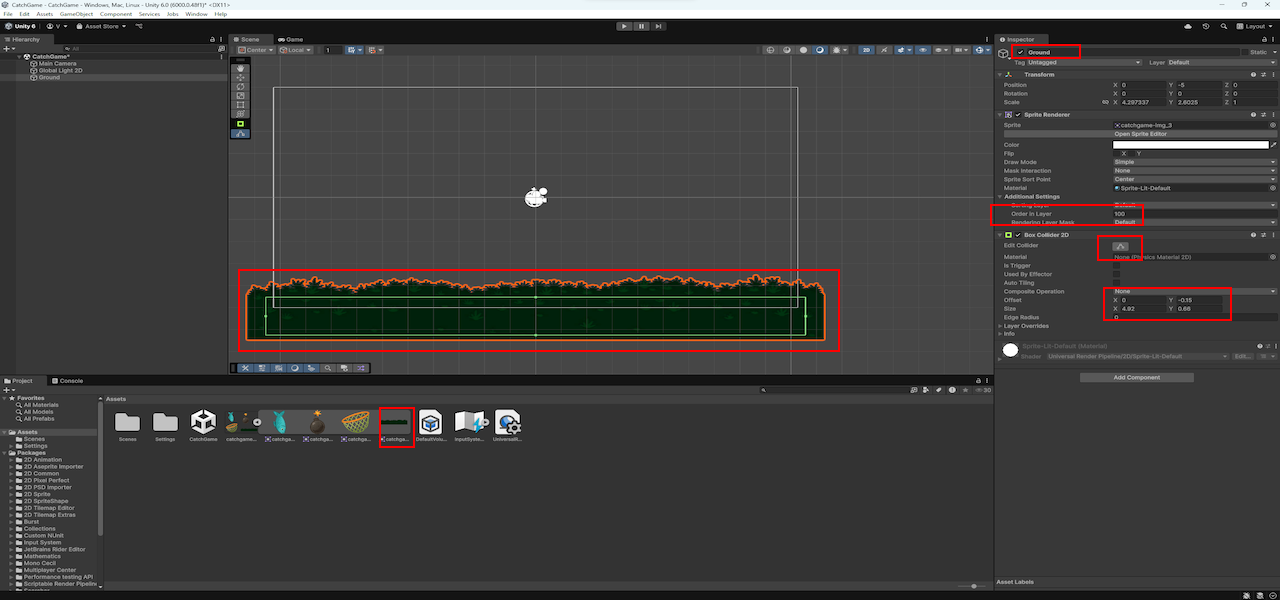
It’s time to add the ground to our scene. In the
Assets folder, find the ground sprite (e.g.
catchgame-img_3) and drag it into the
Scene view.
Make sure the Rectangle Tool is selected, then use it to resize the ground so it stretches across the bottom of the scene. You can adjust the sides by dragging them with the left mouse button.
In the Hierarchy, right-click on the object (e.g.
catchgame-img_3) and rename it to Ground.
Then go to the Inspector and set
Order in Layer to 100. This makes sure it
renders in front of other objects — like placing it on a higher visual
layer in a stack.
-1 or -10 to push objects into the
background.
Click Play to test the scene. The ground should be visible at the bottom. Then click Play again to return to edit mode.
Right now, our ground appears in the scene — but it’s not “solid” yet. Other GameObjects will fall right through it, because it has no Collider.
To fix this, we’ll add a collider component. Select the Ground object in the Hierarchy. In the Inspector, click Add Component → Physics 2D → Box Collider 2D. This adds a physical shape to the ground so other objects can interact with it.
Let’s add the catcher — our player — into the scene. Most steps are similar to what we did with the ground.
XC-catchgame-img_2) in
the Assets folder and drag it into the
Scene view.
Player.
Player selected, go to the
Inspector and click Add Component →
Physics 2D → Box Collider 2D.
Next, let’s make the player react to gravity and other physics by adding a Rigidbody component.
With Player still selected, click
Add Component again and choose Rigidbody 2D.
Then in the Rigidbody settings, set Interpolate to
Interpolate to make movement smoother.
Let’s also tag our player to make it easier to recognize in scripts and logic later.
In the Inspector, set the Tag to
Player (you might need to create it first from the Tag
manager).
The Order in Layer value can stay at 0 —
that’s fine for now.
Click Play to test the scene. The player should fall down and land on the ground. Then click Play again to return to edit mode.

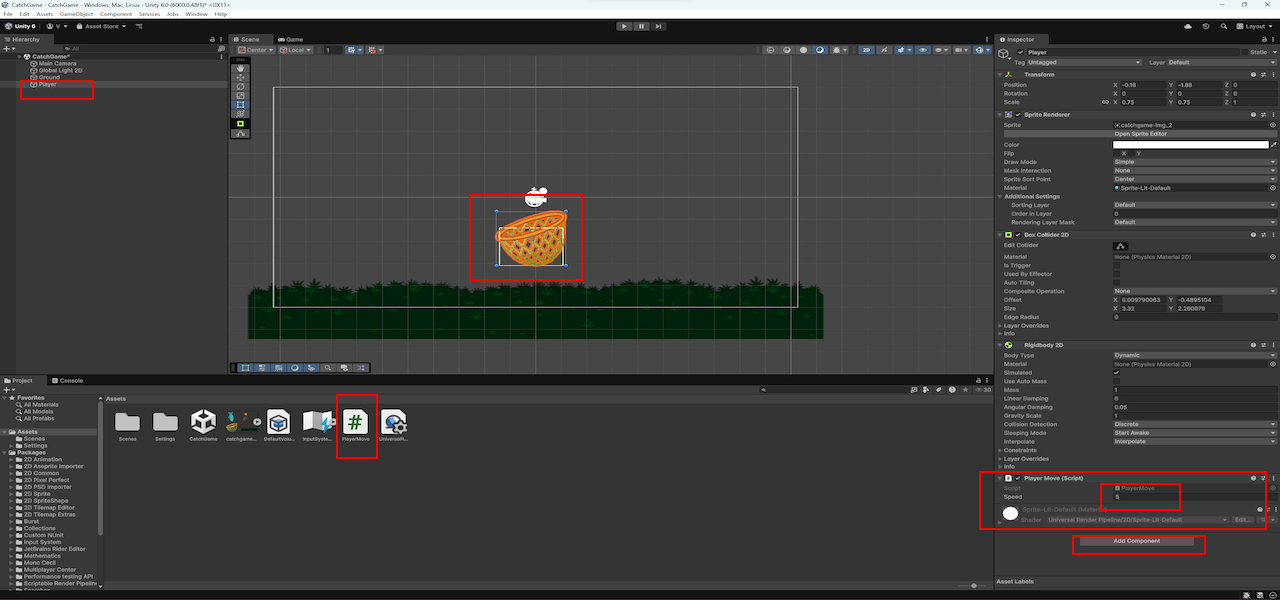
Let’s make our player move! We’ll do this by creating a simple C# script that changes the velocity of the player's Rigidbody2D based on keyboard input.
In this script, using the new Input System, we check
whether a key for moving left or right is pressed.
Then, depending on the result, we’ll change the player’s velocity in
Rigidbody2D, which will make them move in the scene.
Vector2 (or Vector3 in 3D)
that defines speed and direction. Changing the velocity of a
Rigidbody2D makes an object move.
In the Assets folder, right-click and choose
Create → MonoBehaviour Script. Name it PlayerMove (with a capital P and M). Be
careful with the spelling — the file name must match the class name
exactly.
Open the PlayerMove.cs file. At first, you’ll see a
default script template. We’ll replace it with the following logic:
Start() runs once at the beginning.
Update() runs every frame (not needed here).
FixedUpdate() runs at a fixed time step (default: 0.02
sec) and is used for physics.
using UnityEngine;
using UnityEngine.InputSystem;

public class PlayerMove : MonoBehaviour
{
    // Player speed (can be set in the Inspector)
    public float speed = 5f;

    // The Rigidbody2D component
    private Rigidbody2D rb;

    // Horizontal axis value (arrow keys)
    private float x;

    // Movement we’ll apply
    private Vector2 move;

    // Called at the start
    void Start()
    {
        // Get the player's Rigidbody2D
        rb = GetComponent<Rigidbody2D>();
    }

    // Called every physics step (default 0.02 sec)
    void FixedUpdate()
    {
        float x = 0f;
        // Get keyboard input (left (x < 0) or right (x > 0))
        if (Keyboard.current != null)
      {
        if (Keyboard.current.leftArrowKey.isPressed)
            x = -1f;
        else if (Keyboard.current.rightArrowKey.isPressed)
            x = 1f;
      }

        // Store movement vector, keep falling speed physics-driven
        move = new Vector2(x * speed, rb.linearVelocity.y);

        // Apply movement to the player
        rb.linearVelocity = move;
    }
}
Now go back to Unity. Select the Player object in the Hierarchy. In the Inspector, click Add Component → Scripts → PlayerMove.
PlayerMove script from the
Assets folder directly into the Inspector while the Player is
selected.
Set the Speed field in the script to something like
5 in the Inspector.
Click Play and try moving the player left and right using the arrow keys. Then click Play again to return to the Scene view.
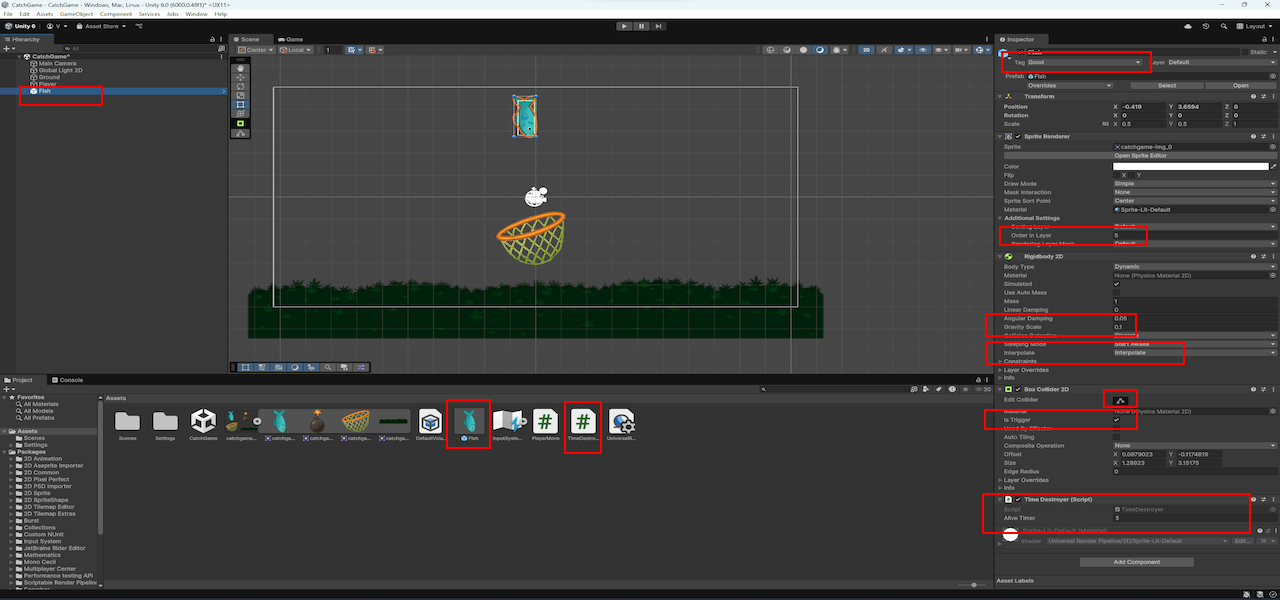
Now let’s add something to catch! We'll start by creating a single falling object — a fish — that we’ll later use as a template for spawning more.
Fish.
Good. If the tag doesn’t exist yet, click
Untagged → Add Tag, create one called
Good, then go back and assign it to the fish object.
5 so the fish
appears above the player catcher.
0.1 and
Interpolate to Interpolate for
smoother motion.
Let’s also make sure our fish doesn’t stay in the scene forever if it’s missed. We’ll create a script to destroy it after a few seconds.
Right-click in the Assets window →
Create → MonoBehaviour Script. Name it TimeDestroyer.
using UnityEngine;

public class TimeDestroyer : MonoBehaviour
{
    // How long the object stays in the scene
    public float aliveTimer = 5f;

    // Called once when the script starts
    void Start()
    {
        Destroy(gameObject, aliveTimer);
    }
}
Attach this script to the Fish object (Add Component
→ Scripts → TimeDestroyer). Set
Alive Timer to 5 in the Inspector.
Finally, let’s make this fish into a Prefab so we can easily clone it later.
To create a prefab, drag the Fish object from the
Hierarchy into the Assets folder.
Unity will generate a blue prefab icon.
Now that we have a good item (Fish), let’s create a bad one — a Bomb — that the player should avoid. We’ll reuse the Fish prefab and make a few changes.
Fish in the Hierarchy and rename it
to Bomb.
Bad.
Bad tag doesn't exist:
BadBomb from the Hierarchy into
the Assets folder to create a new prefab.
Bomb from the scene — we’ll spawn
it later from the prefab.
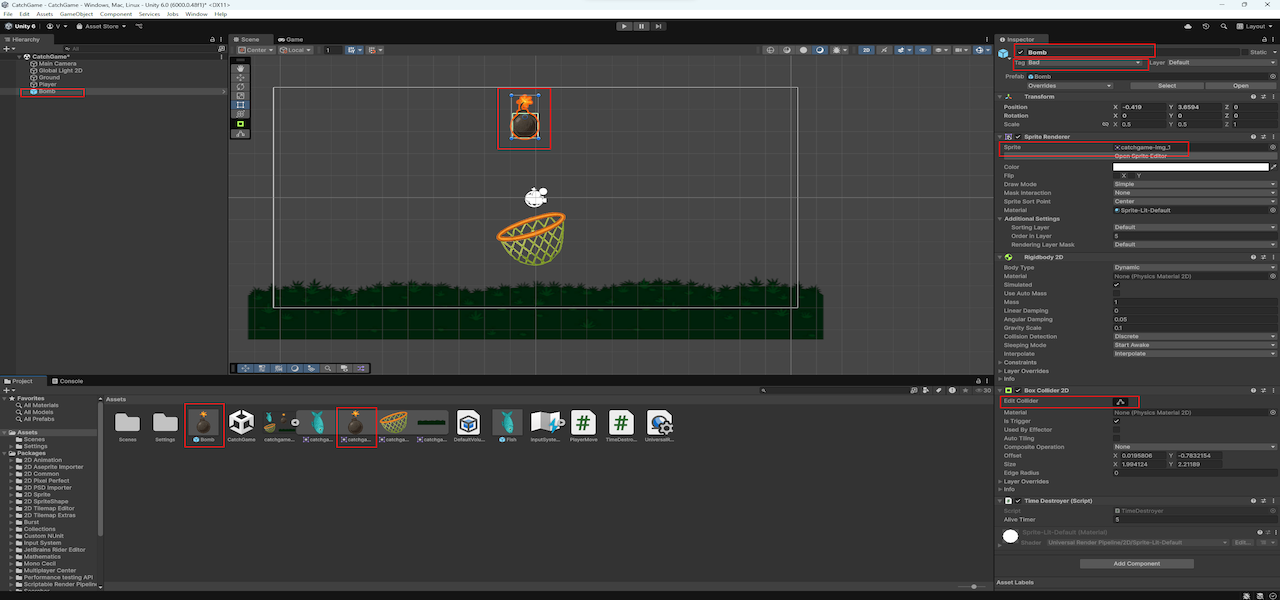
Bad, and saved as a prefab.
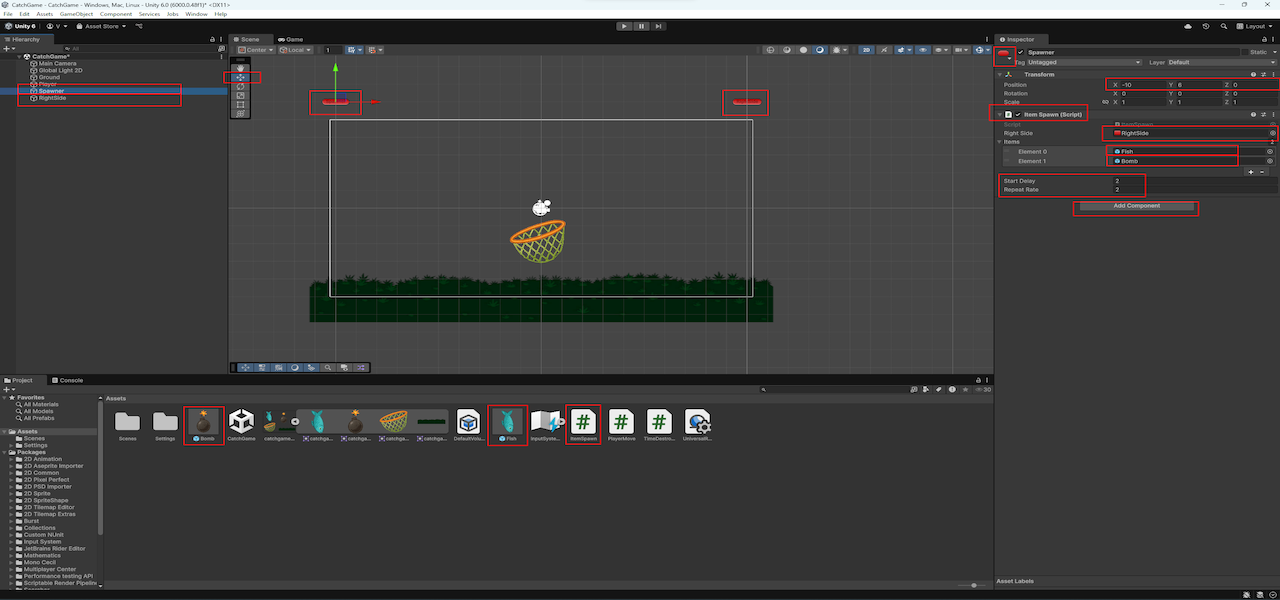
Let’s add some movement from above. In this step, we’ll create a simple item spawner: it will drop random objects (like a fish or a bomb) from above the screen.
We’ll start by placing two invisible GameObjects to define the spawn area. One on the left, one on the right — they’ll mark where items can appear.
In the Hierarchy, right-click and choose
Create Empty. Make sure no objects are selected before, or
Unity might parent it by accident. Rename this object to
Spawner, and move it above the camera view on the left.
Duplicate this object (right-click → Duplicate), move the
copy to the right side, and rename it RightSide. These
two will define our spawn zone.
Select the Spawner and check in the
Inspector that its Z-position is 0. This
makes sure it’s visible in the game view. You can also assign a small
icon to each object to see them better in the scene.
Now let’s write the script. In the Assets window,
right-click →
Create → MonoBehaviour Script and name it
ItemSpawn. Then attach it to the
Spawner object.
This script will spawn a random item (Fish or Bomb) between the X
positions of Spawner and RightSide. The
spawn Y-position will match Spawner's Y, and Z will stay
at 0.
💡 Tip: Even though we’re working in 2D, Unity still uses a three-dimensional space. By default, the camera is at Z = -10 and looks toward positive Z. This means any object with a Z position greater than -10 — for example, Z = 0, 1, or even 100 — will be visible in front of the camera.
using UnityEngine;

public class ItemSpawn : MonoBehaviour
{
    // Right boundary of the spawn area
    public GameObject RightSide;

    // List of prefabs to spawn (e.g. fish, bombs, etc.)
    public GameObject[] items;

    // Delay before the first spawn and interval between the rest
    public float startDelay, repeatRate;

    void Start()
    {
        // Periodically call Spawn() at the specified interval
        InvokeRepeating("Spawn", startDelay, repeatRate);
    }

    void Spawn()
    {
        // Random position on X between the spawner and RightSide
        Vector3 pos = new Vector3(
            Random.Range(transform.position.x, RightSide.transform.position.x),
            transform.position.y,
            0
        );

        // Instantiate a random item from the list at the computed position
        Instantiate(items[Random.Range(0, items.Length)], pos, transform.rotation);
    }
}
After attaching the script, drag the RightSide object
into the script field in the Inspector. Then expand
the Items array and drag in the Fish and
Bomb prefabs. Set both Start Delay and
Repeat Rate to 2 for now (you can tweak this
later).
That’s it! Press Play and see how the items begin to fall. You now have a dynamic spawner — a small step that brings the game to life.
Now let’s make the basket actually “catch” things. Unity has built-in
2D physics, and since our objects have
Collider2D components, we can use trigger-based collision
to react when items touch the player.
We’ll write a script that checks whether a falling object is “good” or “bad” using its tag. If it’s good, we’ll increase the score — if bad, we’ll decrease it. In both cases, the item disappears after touching the player.
Right-click in the Assets window →
Create → MonoBehaviour Script. Name it
ItemChecker and open the file.
This script uses the OnTriggerEnter2D() method. Unity
automatically calls this method when another object with a
Collider2D enters this object’s trigger area. Our falling
objects themselves are triggers — we enabled the
Is Trigger option on their colliders — so when they come into
contact with the player, this method will run.
using UnityEngine;

public class ItemChecker : MonoBehaviour
{
    // The player's score showing the total points earned
    public int score;

    // This method is automatically called by Unity
    // when the basket's collider enters the trigger collider of another object
    void OnTriggerEnter2D(Collider2D other)
    {
        // Check if the object has the "Good" tag
        // If so, add points and destroy the object
        if (other.CompareTag("Good"))
        {
            score += 10;
            Destroy(other.gameObject);
        }

        // Check if the object has the "Bad" tag
        // If so, subtract points and also destroy the object
        if (other.CompareTag("Bad"))
        {
            score -= 10;
            Destroy(other.gameObject);
        }
    }
}
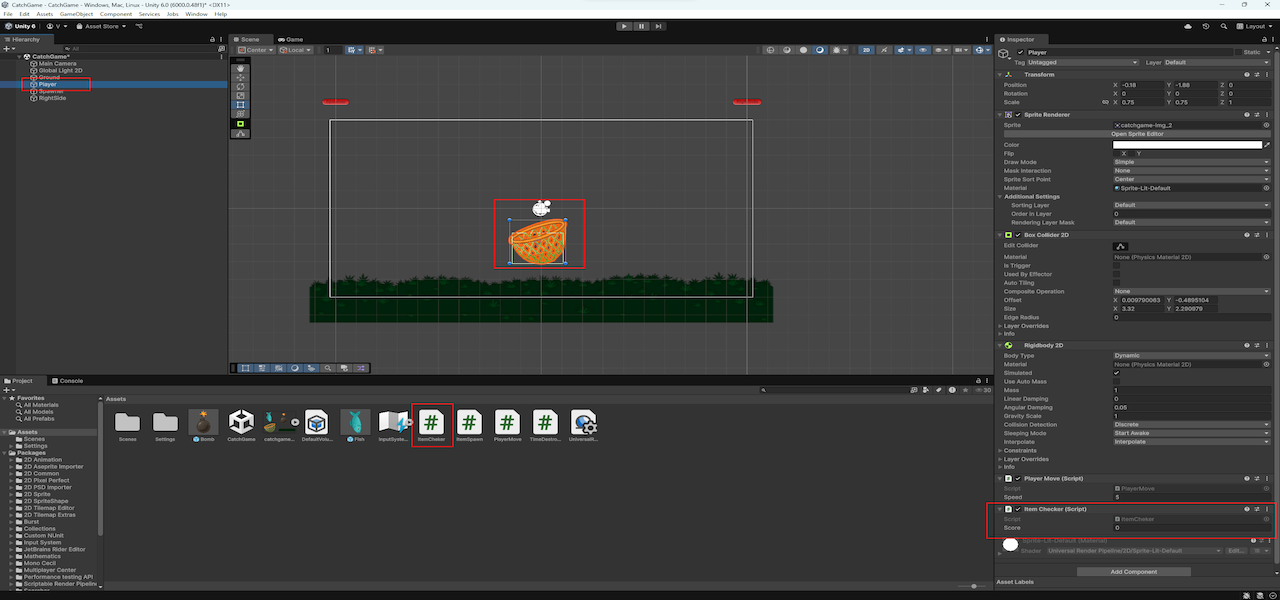
Now attach the ItemChecker script to your player object
(the basket).
Unity will now detect collisions with the trigger and update the score accordingly. You can even see the score change live in the Inspector while the game runs.
That’s it! You’ve built the core of a 2D catch game — items fall, the player moves, collisions are detected, and the score updates. A small prototype — but full of potential.