Welcome to this step-by-step Unity 2D tutorial for beginners! In this guide, we’ll build a simple but exciting game — a classic space shooter. You’ll learn how to move the ship, shoot at enemies, and use Unity’s built-in 2D physics.
No prior experience needed — this tutorial is designed for complete beginners. Just install Unity 6.0 LTS (or any recent version with 2D support) and follow along.
We’ll go through each step calmly and clearly, with explanations and examples. If you’re starting your journey into Unity game development, this tutorial is perfect for you.
Let’s start by creating a new Unity 2D project using the 2D (Built-in Core) template. This will give us a clean scene with built-in support for sprites, colliders, and 2D physics.
💡Tip: You can name your project SpaceShooter or pick
something fun — the name is yours.
Let’s bring our art into Unity.
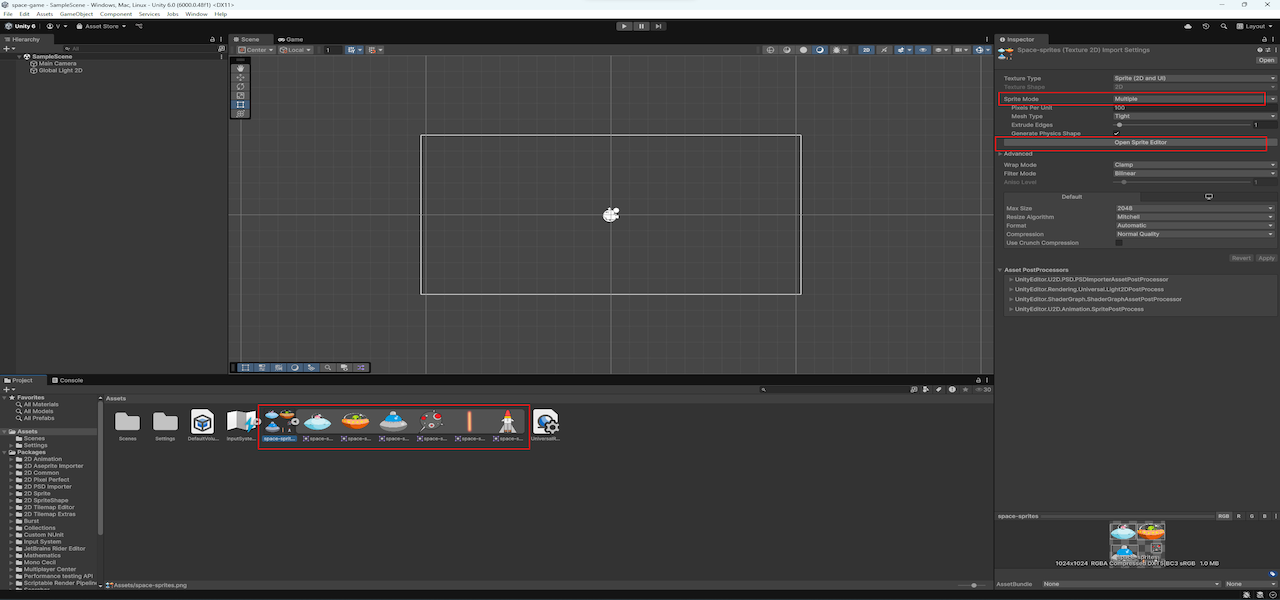
Download the image file called space-sprites.png — it
contains all the graphics we’ll need: enemies, player ship,
projectile, and more.
Open your Unity project and import the file:
Once imported, select space-sprites.png in the Assets window. In the Inspector panel, make sure:
Sprite (2D and UI)
Multiple💡Tip: “Multiple” means the image contains more than one sprite — like a sheet with multiple characters.
Unity should automatically slice the image when imported. If not, click on Open Sprite Editor, then use the Slice button with Type: Automatic selected. Then click Apply.
💡Tip: If automatic slicing fails, you can switch to grid-based slicing or adjust slices manually. Just be sure to click Apply before closing the editor.
Let’s build the ship we’ll be flying. In this game, we won’t use keyboard controls — we’ll use the mouse. The ship should fly toward the point we click.
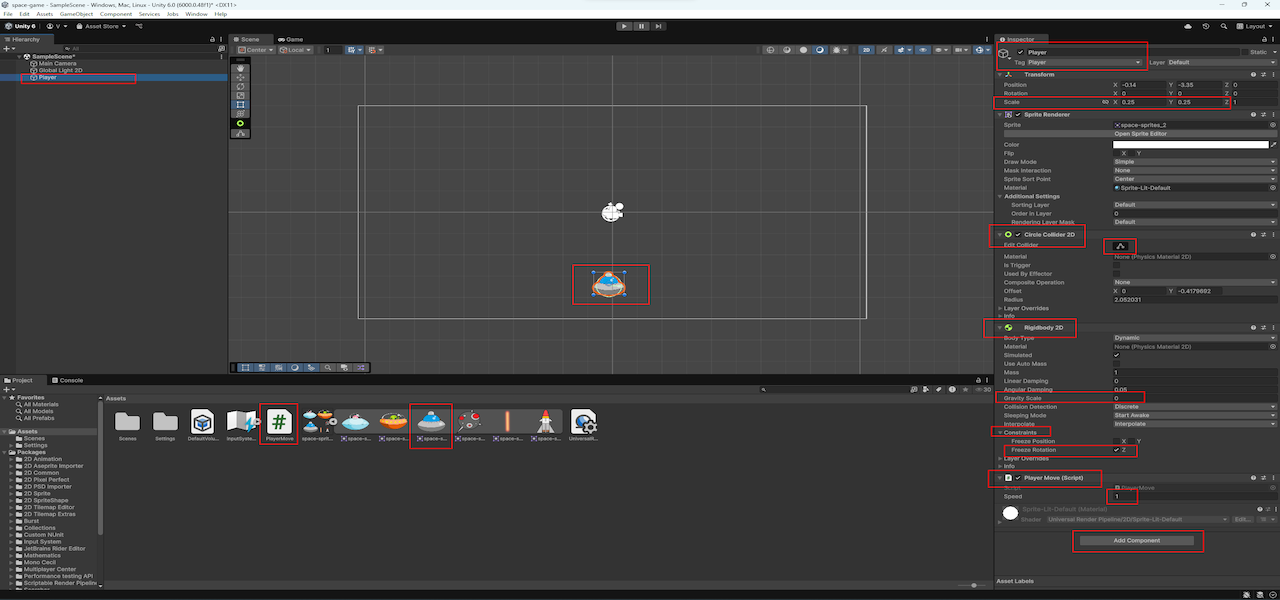
Start by dragging the blue ship sprite into the scene. Unity will
create a new GameObject. Rename it to Player, and set its
tag to Player.
Adjust the size of the ship using the Rect Tool directly in the scene or change the Scale values in the Inspector to make it look just right.
Now we’ll add physics. With Player selected, click
Add Component and add:
In the Rigidbody 2D settings:
0Interpolate
Next, create a new script called PlayerMove and
attach it to the Player object.
Tip: Right-click inside the Assets folder →
Create → C# Script, name it PlayerMove, then
double-click the script to open it in Visual Studio or your preferred
editor.
In this script, we detect where the player clicked with the mouse, convert that point from screen coordinates to world (scene) coordinates, and then move the ship toward that point. Simple — the ship always flies to wherever you click.
using UnityEngine;
using UnityEngine.InputSystem;


public class PlayerMove : MonoBehaviour
{
    // The point where the ship should move (clicked by the player)
    Vector3 clickPos;

    // The vector direction towards the target point
    Vector3 move;

    // Ship movement speed
    public float speed = 1f;

    // Reference to Rigidbody2D
    Rigidbody2D rb;

    void Start()
    {
        rb = GetComponent<Rigidbody2D>();
        // At the start of the game, set the target to current position
        // so the ship doesn't fly off immediately
        clickPos = transform.position;
    }

    void Update()
    {
        // Each frame, check if the left mouse button is pressed,
        // then update the target point
        if (Mouse.current != null && Mouse.current.leftButton.isPressed)
        {
            // Convert mouse position from screen to world coordinates
            Vector3 mousePos = Mouse.current.position.ReadValue();
            clickPos = Camera.main.ScreenToWorldPoint(mousePos);
        }

        // Calculate the direction vector from current to target position
        move = clickPos - transform.position;
    }

    void FixedUpdate()
    {
        // Each physics frame, set the velocity to move toward the target
        rb.linearVelocity = new Vector2(move.x, move.y) * speed;
    }
}
Save the script and return to Unity. In the Inspector, set
Speed to 1. Press Play and test it — the
ship should now move to wherever you click.
💡Tip: The mouse position is given in screen coordinates — in pixels.
To convert it into a usable position in the scene, use
Camera.ScreenToWorldPoint. It returns a point in the
world, but note: the Z-value will match the camera’s
Z-position. Since we’re working in 2D, this is usually fine — we only
care about X and Y.
Now we’ll give our ship something to shoot. Let’s add a laser.
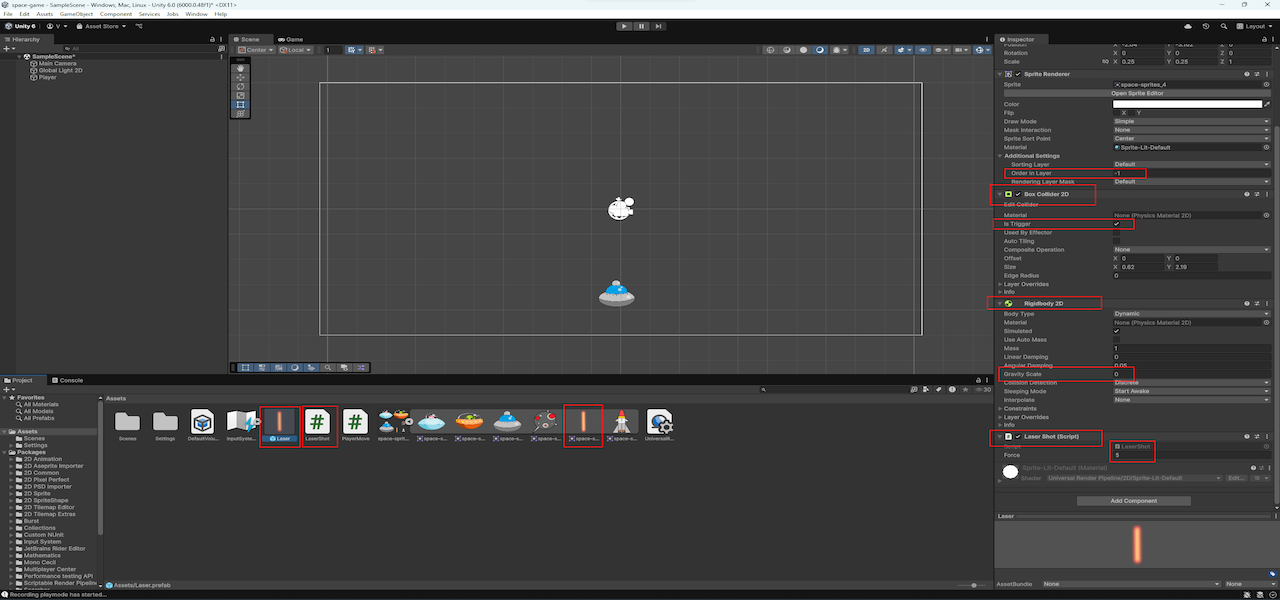
Drag the orange laser sprite into the scene. Unity will create a new
GameObject. Rename it to Laser. In the
Inspector, set its Order in Layer to
-10 so it's drawn behind the ship. Resize it if needed —
just make sure it looks small and clean.
Add the following components and settings to the
Laser object:
0Interpolate
Now create a new MonoBehaviour script named
LaserShot. This script will push the laser upward right
after it’s spawned and destroy it once it leaves the screen.
using UnityEngine;

public class LaserShot : MonoBehaviour
{
    // Reference to Rigidbody2D to apply force
    Rigidbody2D rb;

    // The force that will push the laser upward
    public float force = 5f;

    void Start()
    {
        rb = GetComponent<Rigidbody2D>();

        // Create a vector pointing up (Y) with the given force
        Vector3 direction = new Vector3(0, force, 0);

        // Instantly apply an impulse to make the laser fly upward
        rb.AddForce(direction, ForceMode2D.Impulse);
    }

    void OnBecameInvisible()
    {
        // When the laser leaves the camera view, destroy it
        Destroy(gameObject);
    }
}
Attach this script to the Laser object and set the
Force value to something like 5.
Finally, drag the Laser GameObject into the
Assets window to create a prefab. Unity will generate
it automatically. You can now delete the laser from the scene — we’ll
spawn it later by script.
The laser can fly — now let’s make the ship shoot it.
We’ll use a new script to spawn a laser whenever the player presses the right mouse button. To prevent too many lasers spawning at once, we’ll add a short delay between shots using a coroutine.
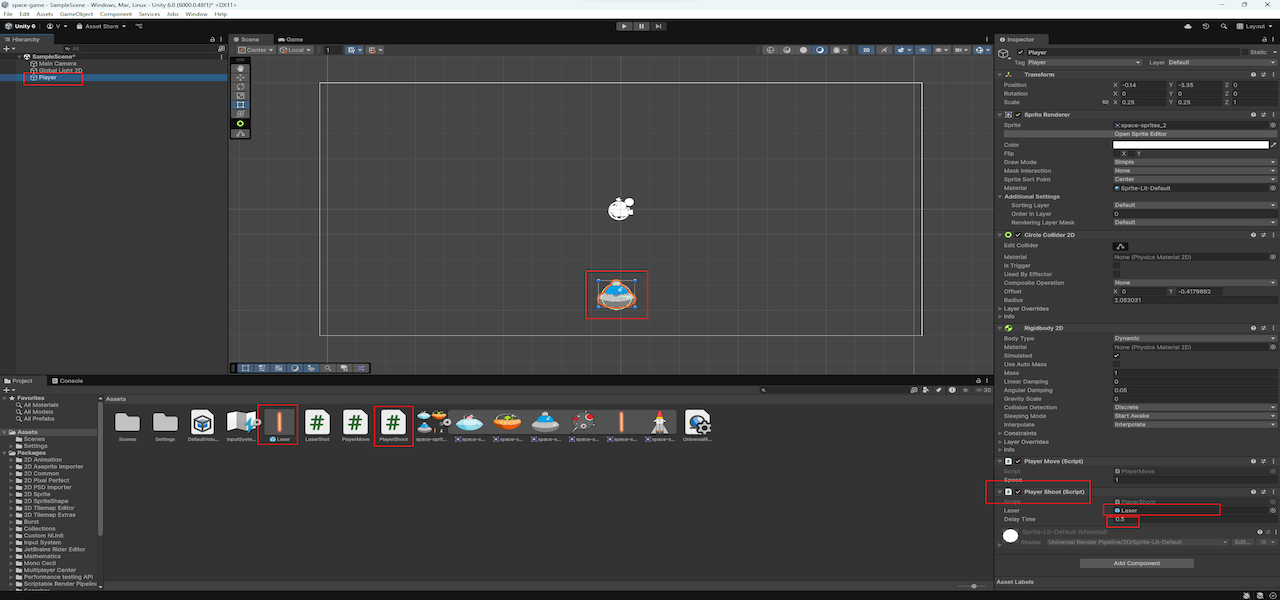
Create a new MonoBehaviour script named
PlayerShoot. It will look like this:
using UnityEngine;
using System.Collections;
using UnityEngine.InputSystem;

public class PlayerShoot : MonoBehaviour
{
    // The laser prefab that we'll spawn when shooting
    public GameObject laser;

    // Delay between shots (reload time)
    public float delayTime = 0.5f;

    // Flag: can we shoot right now?
    bool canShoot = true;

    void Update()
    {
        // Every frame check: if the right mouse button is pressed
        // and we are allowed to shoot (reload is done)
        if (canShoot && Mouse.current != null && Mouse.current.rightButton.isPressed)
        {
            // Block shooting until the cooldown finishes
            canShoot = false;

            // Instantiate (clone) the laser prefab at the player's position
            Instantiate(laser, transform.position, transform.rotation);

            // Start the reload timer
            StartCoroutine(NoFire());
        }
    }

    // Coroutine — waits for delayTime seconds, then allows shooting again
    IEnumerator NoFire()
    {
        yield return new WaitForSeconds(delayTime);
        canShoot = true;
    }
}
Attach the PlayerShoot script to the player object. Drag
the Laser prefab into the script's
Laser field. Set Delay Time to
0.5.
Press Play and try it — your ship should now fire a laser when you right-click!
Now let’s add some danger. We’ll use a small enemy mine that floats downward toward the player.
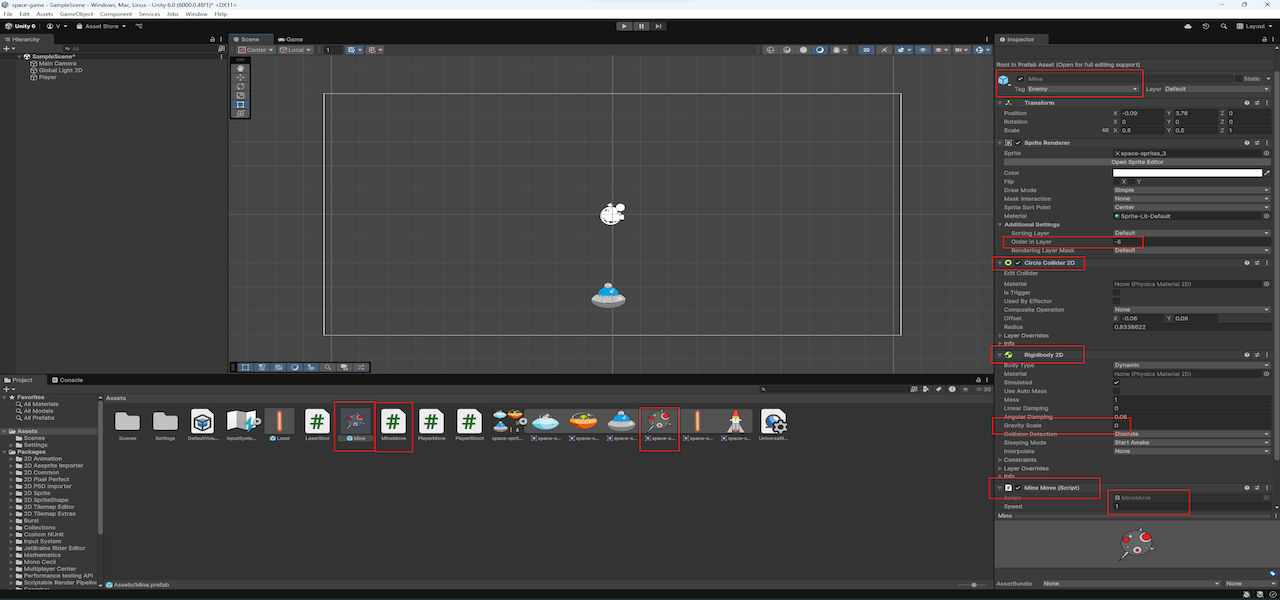
Drag the mine sprite into the scene. Unity will create a new
GameObject — rename it to Mine. Set its
Order in Layer to -5 (between the ship
and laser). Resize it if needed.
Add the following components and settings to the mine:
0Interpolate
Create a new tag named Enemy and assign it to the mine.
Now create a new MonoBehaviour script called
MineMove. It will move the mine downward, destroy it when
it leaves the screen, and restart the scene if it collides with the
player.
using UnityEngine;
using System.Collections;
// This library is needed to manage (reload) scenes
using UnityEngine.SceneManagement;

public class MineMove : MonoBehaviour
{
    // Speed of the mine's movement
    public float speed = 1f;
    Rigidbody2D rb;

    void Start()
    {
        rb = GetComponent<Rigidbody2D>();
        // Create a vector pointing downward (along Y)
        Vector3 move = new Vector3(0, -1, 0);
        // Set the Rigidbody's linear velocity to move the mine downward
        rb.linearVelocity = move * speed;
    }

    void OnBecameInvisible()
    {
        // Destroy the mine if it goes off screen
        Destroy(gameObject);
    }

    void OnCollisionEnter2D(Collision2D collision)
    {
        // Check if the mine collided with something tagged "Player"
        if (collision.gameObject.tag == "Player")
        {
            // Reload the current scene
            SceneManager.LoadScene(SceneManager.GetActiveScene().name);
        }
    }
}
Attach the script to the Mine object. Set
Speed to 1. Then drag the mine into the
Assets window to create a prefab. You can now delete
it from the scene — we’ll spawn it later.
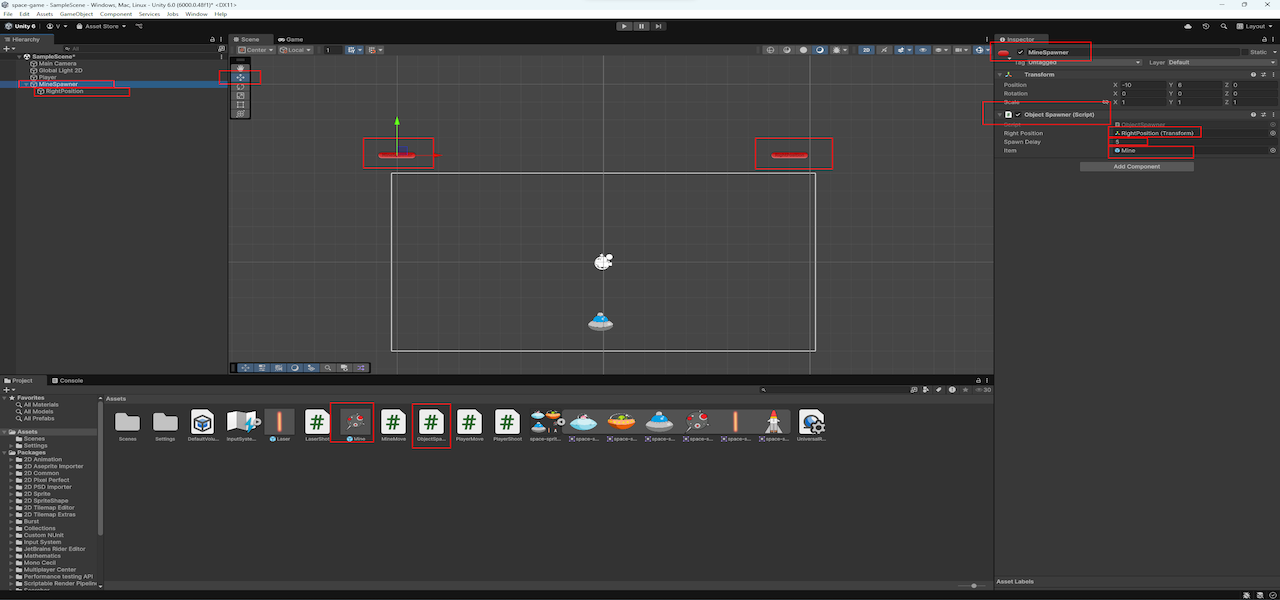
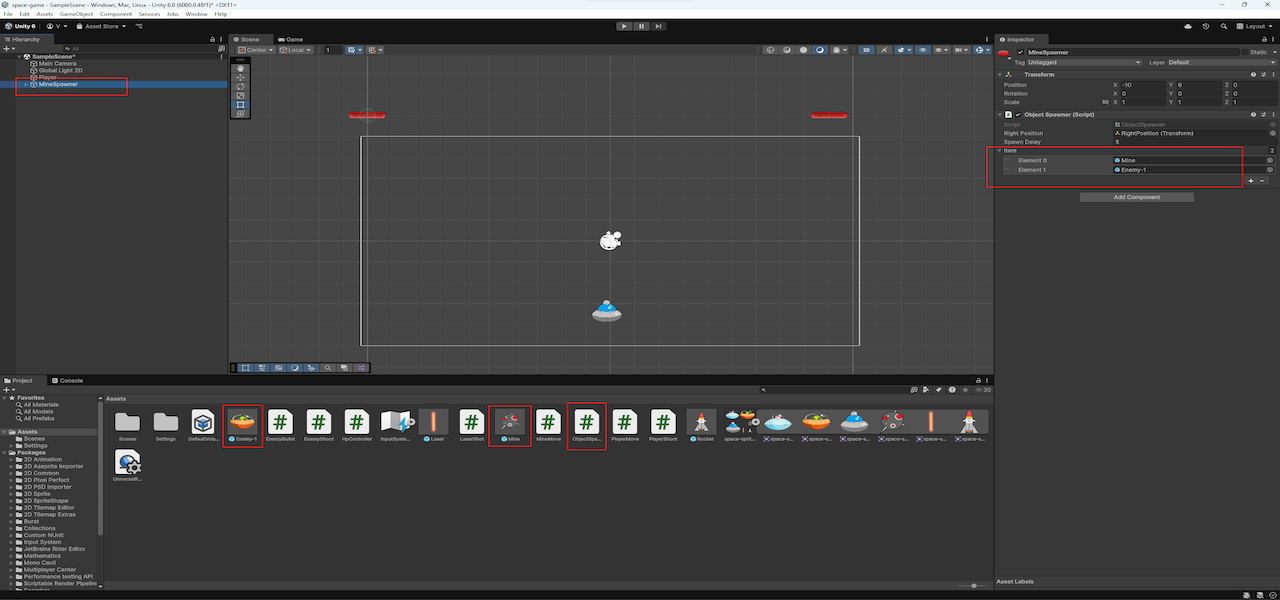
Now let’s automate the enemy waves. We’ll set up a spawner that creates new mines at random positions.
Go to GameObject → Create Empty. Unity will create a
new GameObject in the scene. Rename it to MineSpawner.
You can assign it a custom icon to make it easier to see in the Scene
view.
Move the MineSpawner to the top-left of the visible
screen area. Make sure its Z position is
0, since this is a 2D game.
With MineSpawner selected, press
Ctrl + D (or right-click → Duplicate). Rename the new
object to RightPosition and make it a
child of MineSpawner. Move it to the top-right of the
screen. Set its Z position to 0 as well.
Now create a new MonoBehaviour-script and name it
ObjectSpawner. It will randomly pick an X-position
between the two points and spawn mines there on a delay.
using UnityEngine;
using System.Collections;

public class ObjectSpawner : MonoBehaviour
{
    // Rightmost point used to calculate random X position
    public Transform RightPosition;

    // Delay between spawns
    public float spawnDelay = 5f;

    // The object to spawn
    public GameObject Item;

    void Start()
    {
        // Call the spawn function repeatedly
        InvokeRepeating("Spawn", spawnDelay, spawnDelay);
    }

    void Spawn()
    {
        // Choose a random X position between spawner and right edge
        Vector3 spawnPos = new Vector3(
            Random.Range(transform.position.x, RightPosition.position.x),
            transform.position.y,
            0);

        // Spawn the object at the calculated position
        Instantiate(Item, spawnPos, transform.rotation);
    }
}
Attach this script to the MineSpawner object. Drag
RightPosition into the
Right Position field, and drag the
Mine prefab into the Item field. Set
Spawn Delay to 5.
Press Play — mines will now appear at random positions from the top of the screen.
Right now, lasers fly through the mines without any effect. Let’s fix that by giving mines health points and making lasers deal damage.
Create a new MonoBehaviour script and name it
HpController. This script holds a health value and
removes the object when it reaches zero.
using UnityEngine;

public class HpController : MonoBehaviour
{
    // Amount of health points (HP)
    public int hp = 3;

    // Method that reduces health by the amount of damage taken
    void MakeDamage(int damage)
    {
        // Subtract the incoming damage from the current health
        hp -= damage;

        // If health drops to zero or below — destroy this object
        if (hp <= 0)
        {
            Destroy(gameObject);
        }
    }
}
Select the Mine prefab in the Assets window and add the
HpController script to it. Set hp to
3.
Now open the LaserShot script. We’ll check for collisions
and send damage to the enemy.
using UnityEngine;

public class LaserShot : MonoBehaviour
{
    // Reference to Rigidbody2D to apply force
    Rigidbody2D rb;

    // The force that pushes the laser upward
    public float force = 10f;

    // Amount of damage the laser deals to enemies
    public int damage = 1;

    void Start()
    {
        rb = GetComponent<Rigidbody2D>();
        // Create a vector pointing upward with the given force
        Vector3 direction = new Vector3(0, force, 0);

        // Apply an immediate impulse so the laser flies up
        rb.AddForce(direction, ForceMode2D.Impulse);
    }

    void OnBecameInvisible()
    {
        // Destroy the laser when it leaves the screen
        Destroy(gameObject);
    }

    void OnTriggerEnter2D(Collider2D other)
    {
        // Check if the laser hit an object tagged "Enemy"
        if (other.gameObject.tag == "Enemy")
        {
            // Send a "MakeDamage" message to the enemy, passing in the damage value.
            // If the object doesn't have that method, no error will occur.
            other.gameObject.SendMessage("MakeDamage", damage, SendMessageOptions.DontRequireReceiver);

            // Destroy the laser after it hits
            Destroy(gameObject);
        }
    }
}
Select the Laser prefab and set the
Damage value in the Inspector to 1.
Press Play and test the scene. Mines should now take 3 hits to be destroyed.

Let’s add an enemy that will be able to shoot back.
Drag the enemy ship sprite into the scene. Unity will automatically
create a new object. Rename it to Enemy-1. Change its tag
to Enemy. Set Order in Layer to
-5 so the enemy appears above the lasers. Adjust its size
if needed.
Add the following components and settings to the object:
0Interpolate
Now add the HpController script to the enemy ship and set
its HP to 1. Then add the
MineMove script to the same object and set its
speed to 1
(or any other value you like) so the saucer moves smoothly downward.
Then drag Enemy-1 into the Assets window
to create a new enemy prefab. After creating the prefab, you can
delete Enemy-1
from the scene — it will stay saved in your project as a prefab.
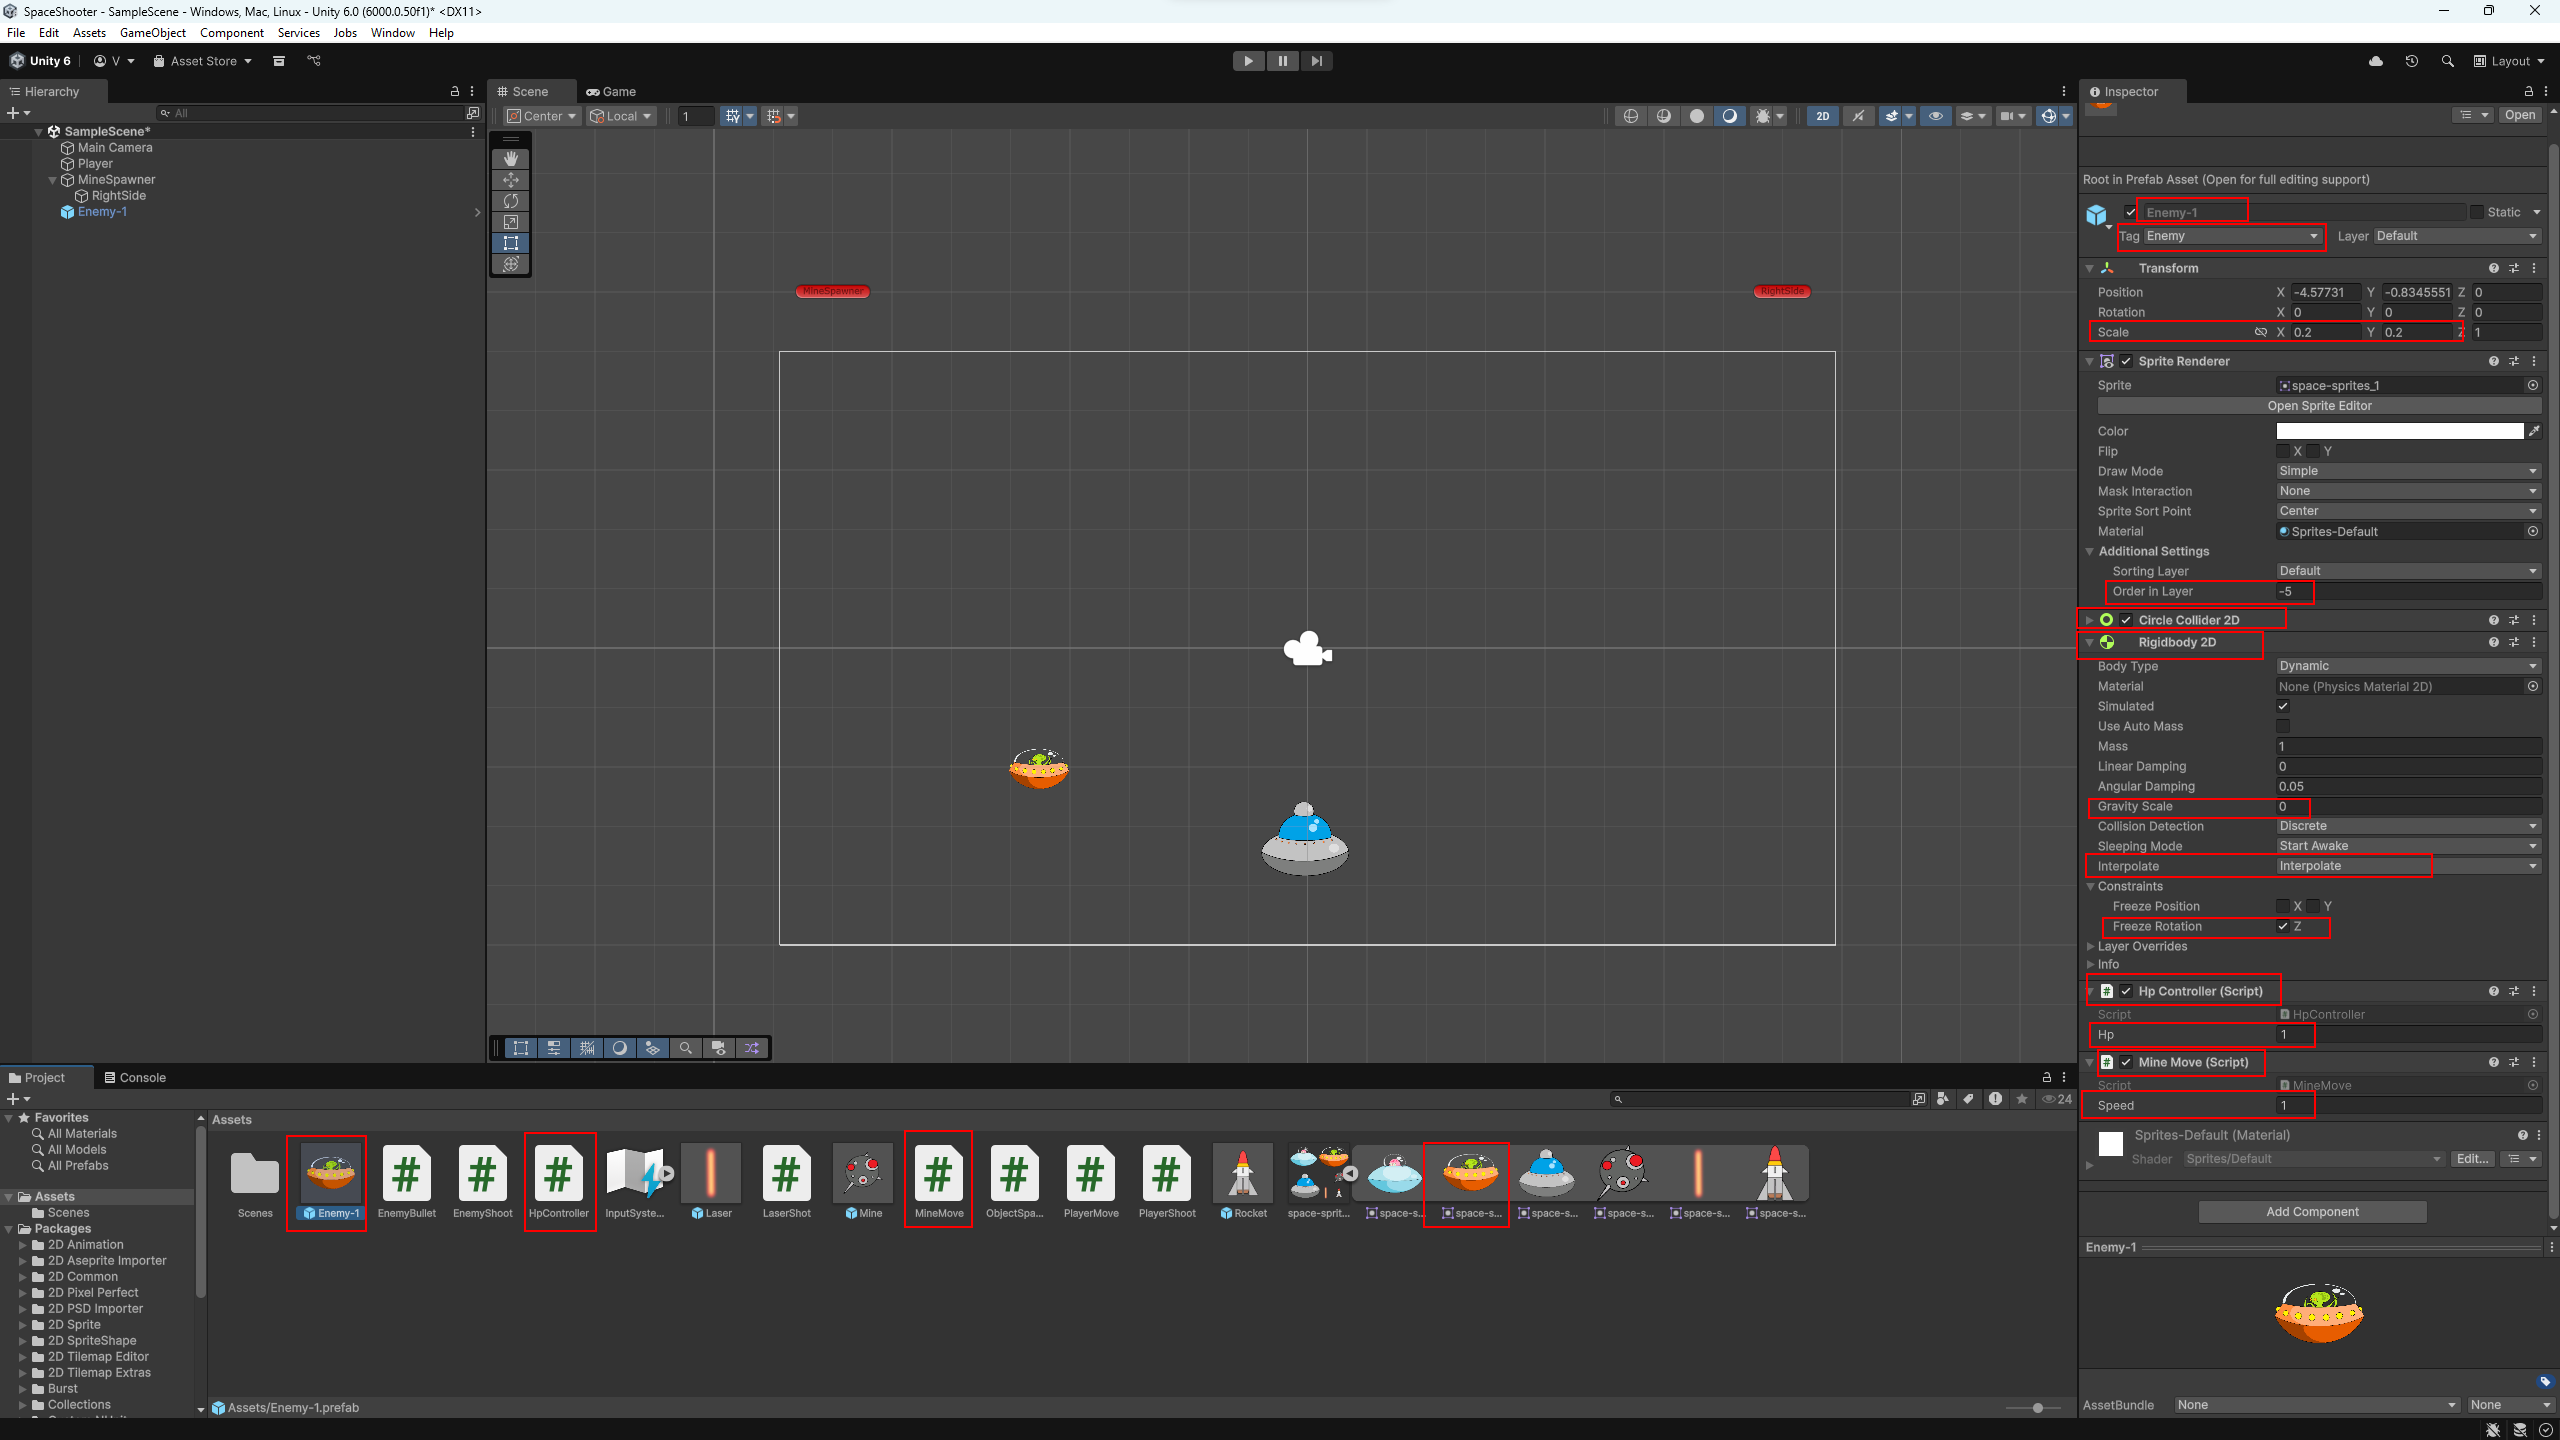
HpController, MineMove script.
Now let’s give this enemy a rocket. Drag the rocket sprite into the
scene and rename it to Rocket. Set its
Order in Layer to -10. Add a
Box Collider 2D and enable
Is Trigger. Add a Rigidbody2D with
Gravity Scale = 0 and
Interpolate = Interpolate.
using UnityEngine;

public class EnemyBullet : MonoBehaviour
{
    // Reference to the player object
    GameObject player;

    // Reference to Rigidbody2D for applying force
    Rigidbody2D rb;

    // The impulse force that will push the missile
    public float force = 3f;

    // The amount of damage the missile deals on hit
    public int damage = 1;

    void Start()
    {
        rb = GetComponent<Rigidbody2D>();
        // Find the player in the scene by its "Player" tag
        player = GameObject.FindWithTag("Player");

        if (player != null)
        {
            // Calculate direction vector from missile to player
            Vector3 dir = player.transform.position - transform.position;

            // Rotate the missile to face the player
            transform.up = dir;

            // Apply an impulse in the missile's local "up" direction
            rb.AddRelativeForce(transform.up * force, ForceMode2D.Impulse);
        }
        else
        {
            // If there is no player, destroy the missile
            Destroy(gameObject);
        }
    }

    void OnTriggerEnter2D(Collider2D other)
    {
        // Check if the missile collided with the player
        if (other.gameObject.tag == "Player")
        {
            // Tell the player to take damage
            other.gameObject.SendMessage("MakeDamage", damage, SendMessageOptions.DontRequireReceiver);

            // Destroy the missile after hitting the player
            Destroy(gameObject);
        }
    }

    void OnBecameInvisible()
    {
        // Destroy the missile if it goes off screen
        Destroy(gameObject);
    }
}
Add the EnemyBullet script to the Rocket.
Set Force to 3 and
Damage to 1. Create a prefab by dragging
it into the Assets window. Then delete the rocket from the scene.

Now it’s time to give the enemy ship some firepower. We’ll add a shooting script that periodically spawns a rocket and lets the rocket handle the rest.
Create a new MonoBehaviour script and name it
EnemyShoot. This is a simple script that will
periodically spawn missiles, as long as there is a player in the
scene.
using UnityEngine;
using System.Collections;

public class EnemyShoot : MonoBehaviour
{
    // The bullet prefab to spawn
    public GameObject bullet;

    // Delay between shots (seconds)
    public float fireDelay = 2f;

    // Reference to the player in the scene
    GameObject player;

    // Flag: can the enemy shoot right now?
    bool canShoot = true;

    void Start()
    {
        // Find the player by tag "Player"
        player = GameObject.FindWithTag("Player");
    }

    void Update()
    {
        // If allowed to shoot and the player exists
        if (canShoot && player != null)
        {
            // Block shooting until after the delay
            canShoot = false;

            // Create a bullet at the enemy's position
            Instantiate(bullet, transform.position, Quaternion.identity);

            // Start the coroutine to wait before next shot
            StartCoroutine(firePause());
        }
    }

    IEnumerator firePause()
    {
        // Wait for fireDelay seconds
        yield return new WaitForSeconds(fireDelay);

        // Allow shooting again
        canShoot = true;
    }
}
Select the Enemy-1 prefab in the Assets window. Add the
EnemyShoot script to it. In the
Bullet field, drag the Rocket prefab.
Set Fire Delay to 2.
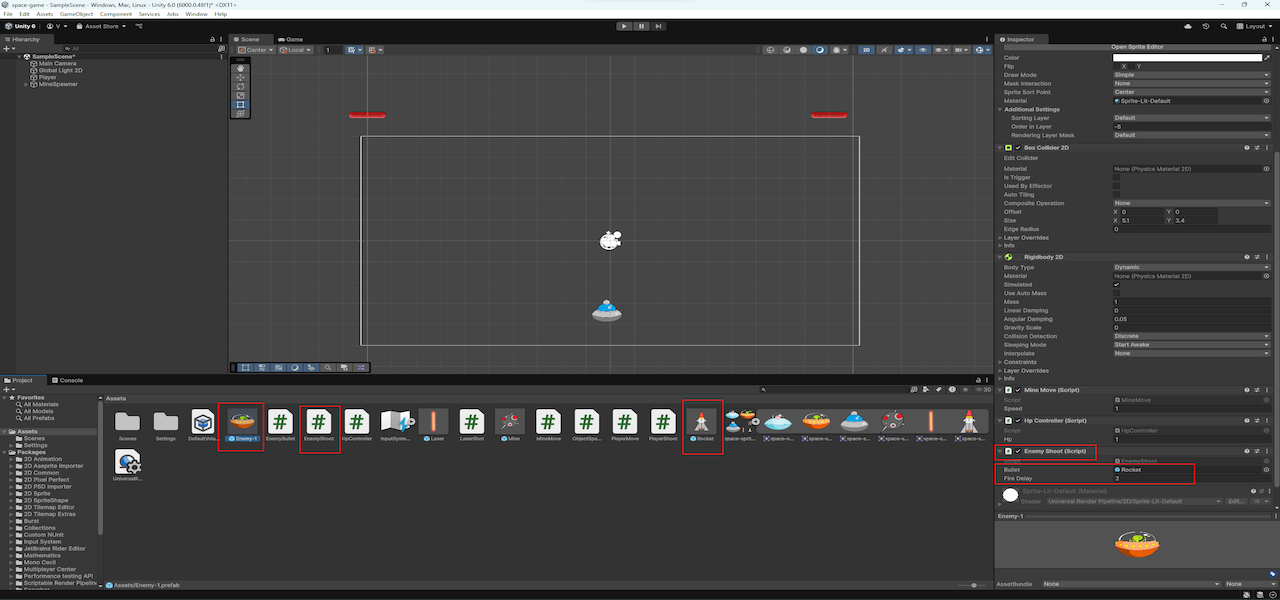
Our Enemy-1 prefab is ready. Now let’s make them appear
in the scene just like the mines. Instead of creating a second
spawner, we’ll improve the existing one and allow it to choose
randomly between multiple objects.
Open the ObjectSpawner script and update it to use an
array of prefabs:
using UnityEngine;

public class ObjectSpawner : MonoBehaviour
{
    // Right boundary for spawning (left is the object with this script)
    public Transform RightPosition;

    // Delay between spawns (seconds)
    public float spawnDelay;

    // Array of prefabs to randomly pick from
    public GameObject[] Item;

    void Start()
    {
        // Repeatedly call the Spawn function with the given delay
        InvokeRepeating("Spawn", spawnDelay, spawnDelay);
    }

    void Spawn()
    {
        // Pick a random point between our position and the right boundary on the X axis
        Vector3 spawnPos = new Vector3(
            Random.Range(transform.position.x, RightPosition.position.x),
            transform.position.y,
            0
        );

        // Randomly select one prefab from the array
        int i = Random.Range(0, Item.Length);

        // Create the selected object at the calculated position
        Instantiate(Item[i], spawnPos, transform.rotation);
    }
}
In the MineSpawner object (in the scene), look at the
updated Item list. Add the Mine and
Enemy-1 prefabs to the array. Unity will handle the size
of the list automatically.
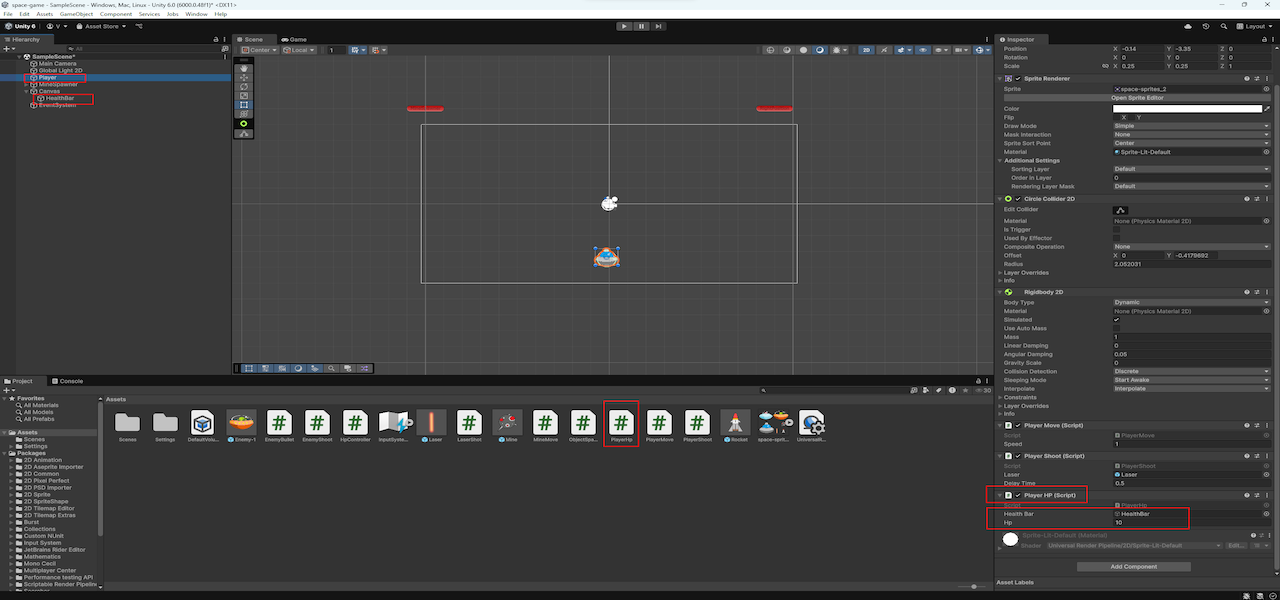
Our player still has no visible health. Let's add a simple UI to show the current health on screen. We’ll create a horizontal health bar using Unity’s built-in UI system.
Go to GameObject → UI → Image. This will create a new
Canvas with an Image object inside it.
Rename the Image to HealthBar.
Select the Canvas. In the Inspector, under the
Canvas Scaler component, set:
UI Scale Mode to Scale With Screen Size.
Now double-click on the Canvas in Hierarchy — the scene
view will zoom out and show the UI area. Select the
HealthBar and use the Rect Tool to
stretch it into a bar shape. You can place it wherever it fits your
layout.
With HealthBar selected:
Background.Filled.Horizontal.Left.

Now let's link the health indicator to the gameplay. We'll write a
script that tracks the player's damage and updates the health bar. The
Image component on the HealthBar object
has a fillAmount property, which controls how full the
sprite appears. By calculating the percentage of remaining health,
we'll adjust fillAmount
to visually represent the current HP on our health bar.
Create a new MonoBehaviour script and name it
PlayerHp:
using UnityEngine;
using UnityEngine.UI;
using UnityEngine.SceneManagement;

public class PlayerHp : MonoBehaviour
{
    // Reference to the health bar UI object (an Image)
    public GameObject HealthBar;
    // Reference to the Image component to change fillAmount
    Image img;

    // Current health
    public int hp;
    // Maximum health (for normalizing the bar)
    float maxHp;

    void Start()
    {
        // Get the Image component from the HealthBar object
        img = HealthBar.GetComponent<Image>();
        // Store the maximum health value
        maxHp = hp;
        // Set initial fill amount of the health bar
        img.fillAmount = hp / maxHp;
    }

    // Method to take damage
    void MakeDamage(int damage)
    {
        // Subtract damage from current health
        hp -= damage;

        // If health drops to zero or below, restart the scene
        if (hp <= 0)
        {
            SceneManager.LoadScene(SceneManager.GetActiveScene().name);
        }

        // Update the fill amount of the health bar
        img.fillAmount = hp / maxHp;
    }
}
Now go to the scene and select your Player object.
Add the PlayerHp script to it. Drag the
HealthBar (from inside the Canvas) into the Health Bar
field. Set the HP value to 10.
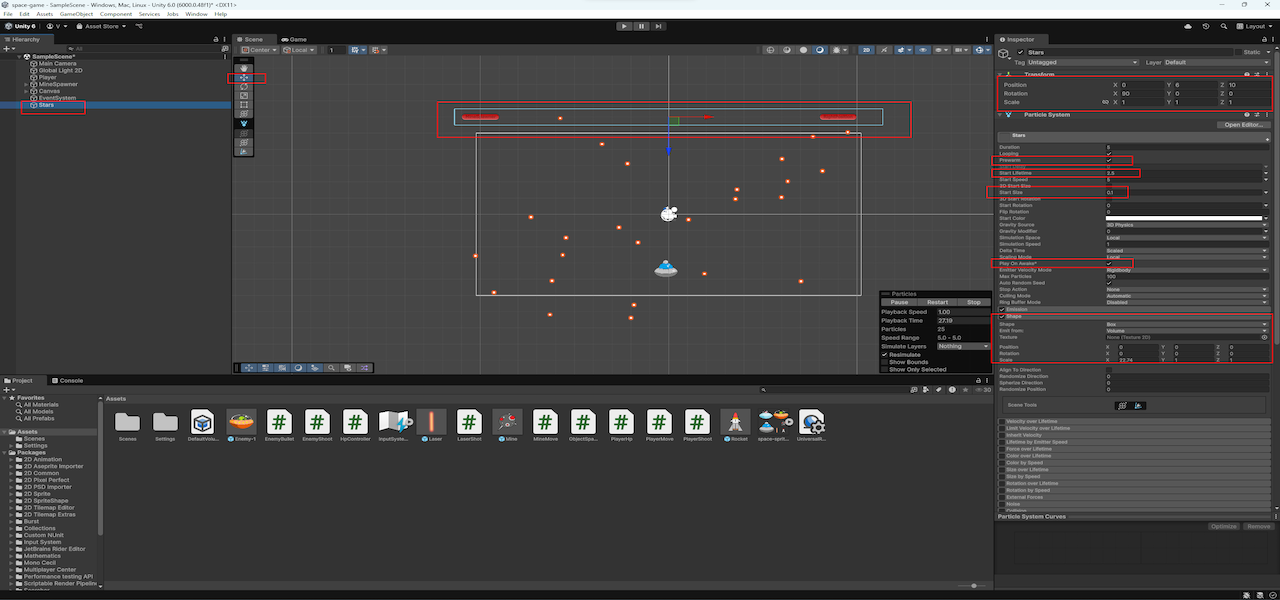
Let’s start by turning the background of our scene to deep space
black. Select Main Camera in the Hierarchy. In the
Inspector, go to the Camera section and set the
Background color to black.
For a nice space effect, we’ll use Unity’s built-in Particle System to simulate moving stars.
Stars.10 and
X Rotation to 90.
0.2 (or as
preferred).
Box.15 — this makes the
starfield wide.
-100 so
stars render far behind the scene.
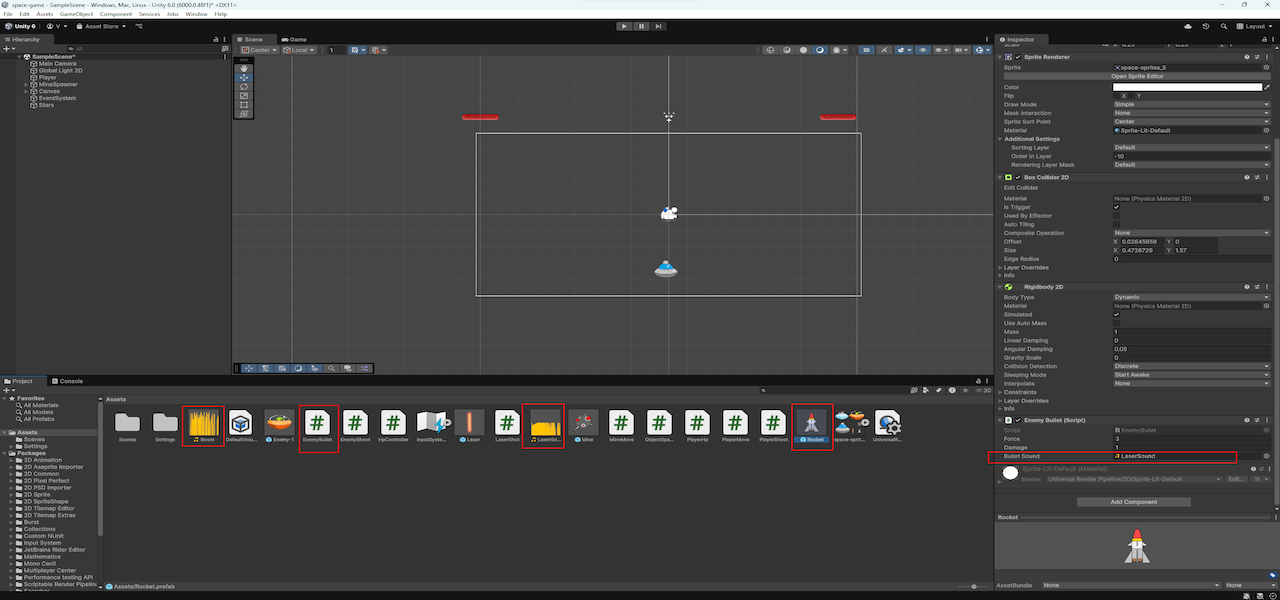
Let’s give the enemy’s rocket a proper shooting sound. When a rocket is spawned, we will play a short sound clip using Unity’s built-in audio system.
You can download the sound effects used in this tutorial here:
Import the downloaded audio files into Unity.
In the EnemyBullet script, we use the
PlayClipAtPoint method to play sounds.
This plays the chosen audio file right when the rocket is launched. It creates a temporary audio object in the scene, which plays the sound and then automatically disappears.
Here is the complete updated EnemyBullet script with
sound support:
using UnityEngine;

public class EnemyBullet : MonoBehaviour
{
    // Reference to the player (found by tag "Player")
    GameObject player;

    // Reference to the Rigidbody2D for physical movement
    Rigidbody2D rb;

    // Force that pushes the bullet
    public float force = 3f;

    // Damage the bullet deals
    public int damage = 1;

    // Sound to play when bullet is fired
    public AudioClip BulletSound;

    void Start()
    {
        // Get the Rigidbody2D component
        rb = GetComponent<Rigidbody2D>();

        // Find the player by tag
        player = GameObject.FindWithTag("Player");

        // If player is found
        if (player != null)
        {
            // Calculate direction to the player
            Vector3 dir = player.transform.position - transform.position;

            // Rotate bullet to look at the player
            transform.up = dir;

            // Apply force to move bullet toward the player
            rb.AddRelativeForce(transform.up * force, ForceMode2D.Impulse);

            // Play shooting sound at bullet position
            AudioSource.PlayClipAtPoint(BulletSound, transform.position);
        }
        else
        {
            // If player not found, destroy the bullet
            Destroy(gameObject);
        }
    }

    void OnTriggerEnter2D(Collider2D other)
    {
        // If the bullet hits the player
        if (other.gameObject.tag == "Player")
        {
            // Send damage message to the player
            other.gameObject.SendMessage("MakeDamage", damage, SendMessageOptions.DontRequireReceiver);

            // Destroy the bullet
            Destroy(gameObject);
        }
    }

    void OnBecameInvisible()
    {
        // Destroy bullet if it goes off-screen
        Destroy(gameObject);
    }
}
Now select the Rocket prefab. Assign
LaserSound to the Bullet Sound field in
the EnemyBullet script.
💡 You can replace this sound with your own by importing any
.wav file and assigning it to the
AudioClip field.
Just like the enemy rockets, we want to add sound to the player's
laser shot. Open the LaserShot script and update it as
follows:
using UnityEngine;

public class LaserShot : MonoBehaviour
{
    // Reference to Rigidbody2D to handle physics
    Rigidbody2D rb;

    // The impulse force to shoot the laser upward
    public float force = 10f;

    // How much damage the laser deals
    public int damage = 1;

    // Audio clip to play when shooting
    public AudioClip LaserSound;

    void Start()
    {
        // Get the Rigidbody2D component on this object
        rb = GetComponent<Rigidbody2D>();

        // Create a vector pointing upward (along Y axis)
        Vector3 direction = new Vector3(0, force, 0);

        // Add impulse force to launch the laser
        rb.AddForce(direction, ForceMode2D.Impulse);

        // Play shooting sound at this position
        AudioSource.PlayClipAtPoint(LaserSound, transform.position);
    }

    void OnBecameInvisible()
    {
        // Destroy the laser when it goes off screen
        Destroy(gameObject);
    }

    void OnTriggerEnter2D(Collider2D other)
    {
        // Check if we hit something tagged as "Enemy"
        if (other.gameObject.tag == "Enemy")
        {
            // Tell the enemy to take damage
            other.gameObject.SendMessage("MakeDamage", damage, SendMessageOptions.DontRequireReceiver);

            // Destroy the laser after hitting
            Destroy(gameObject);
        }
    }
}
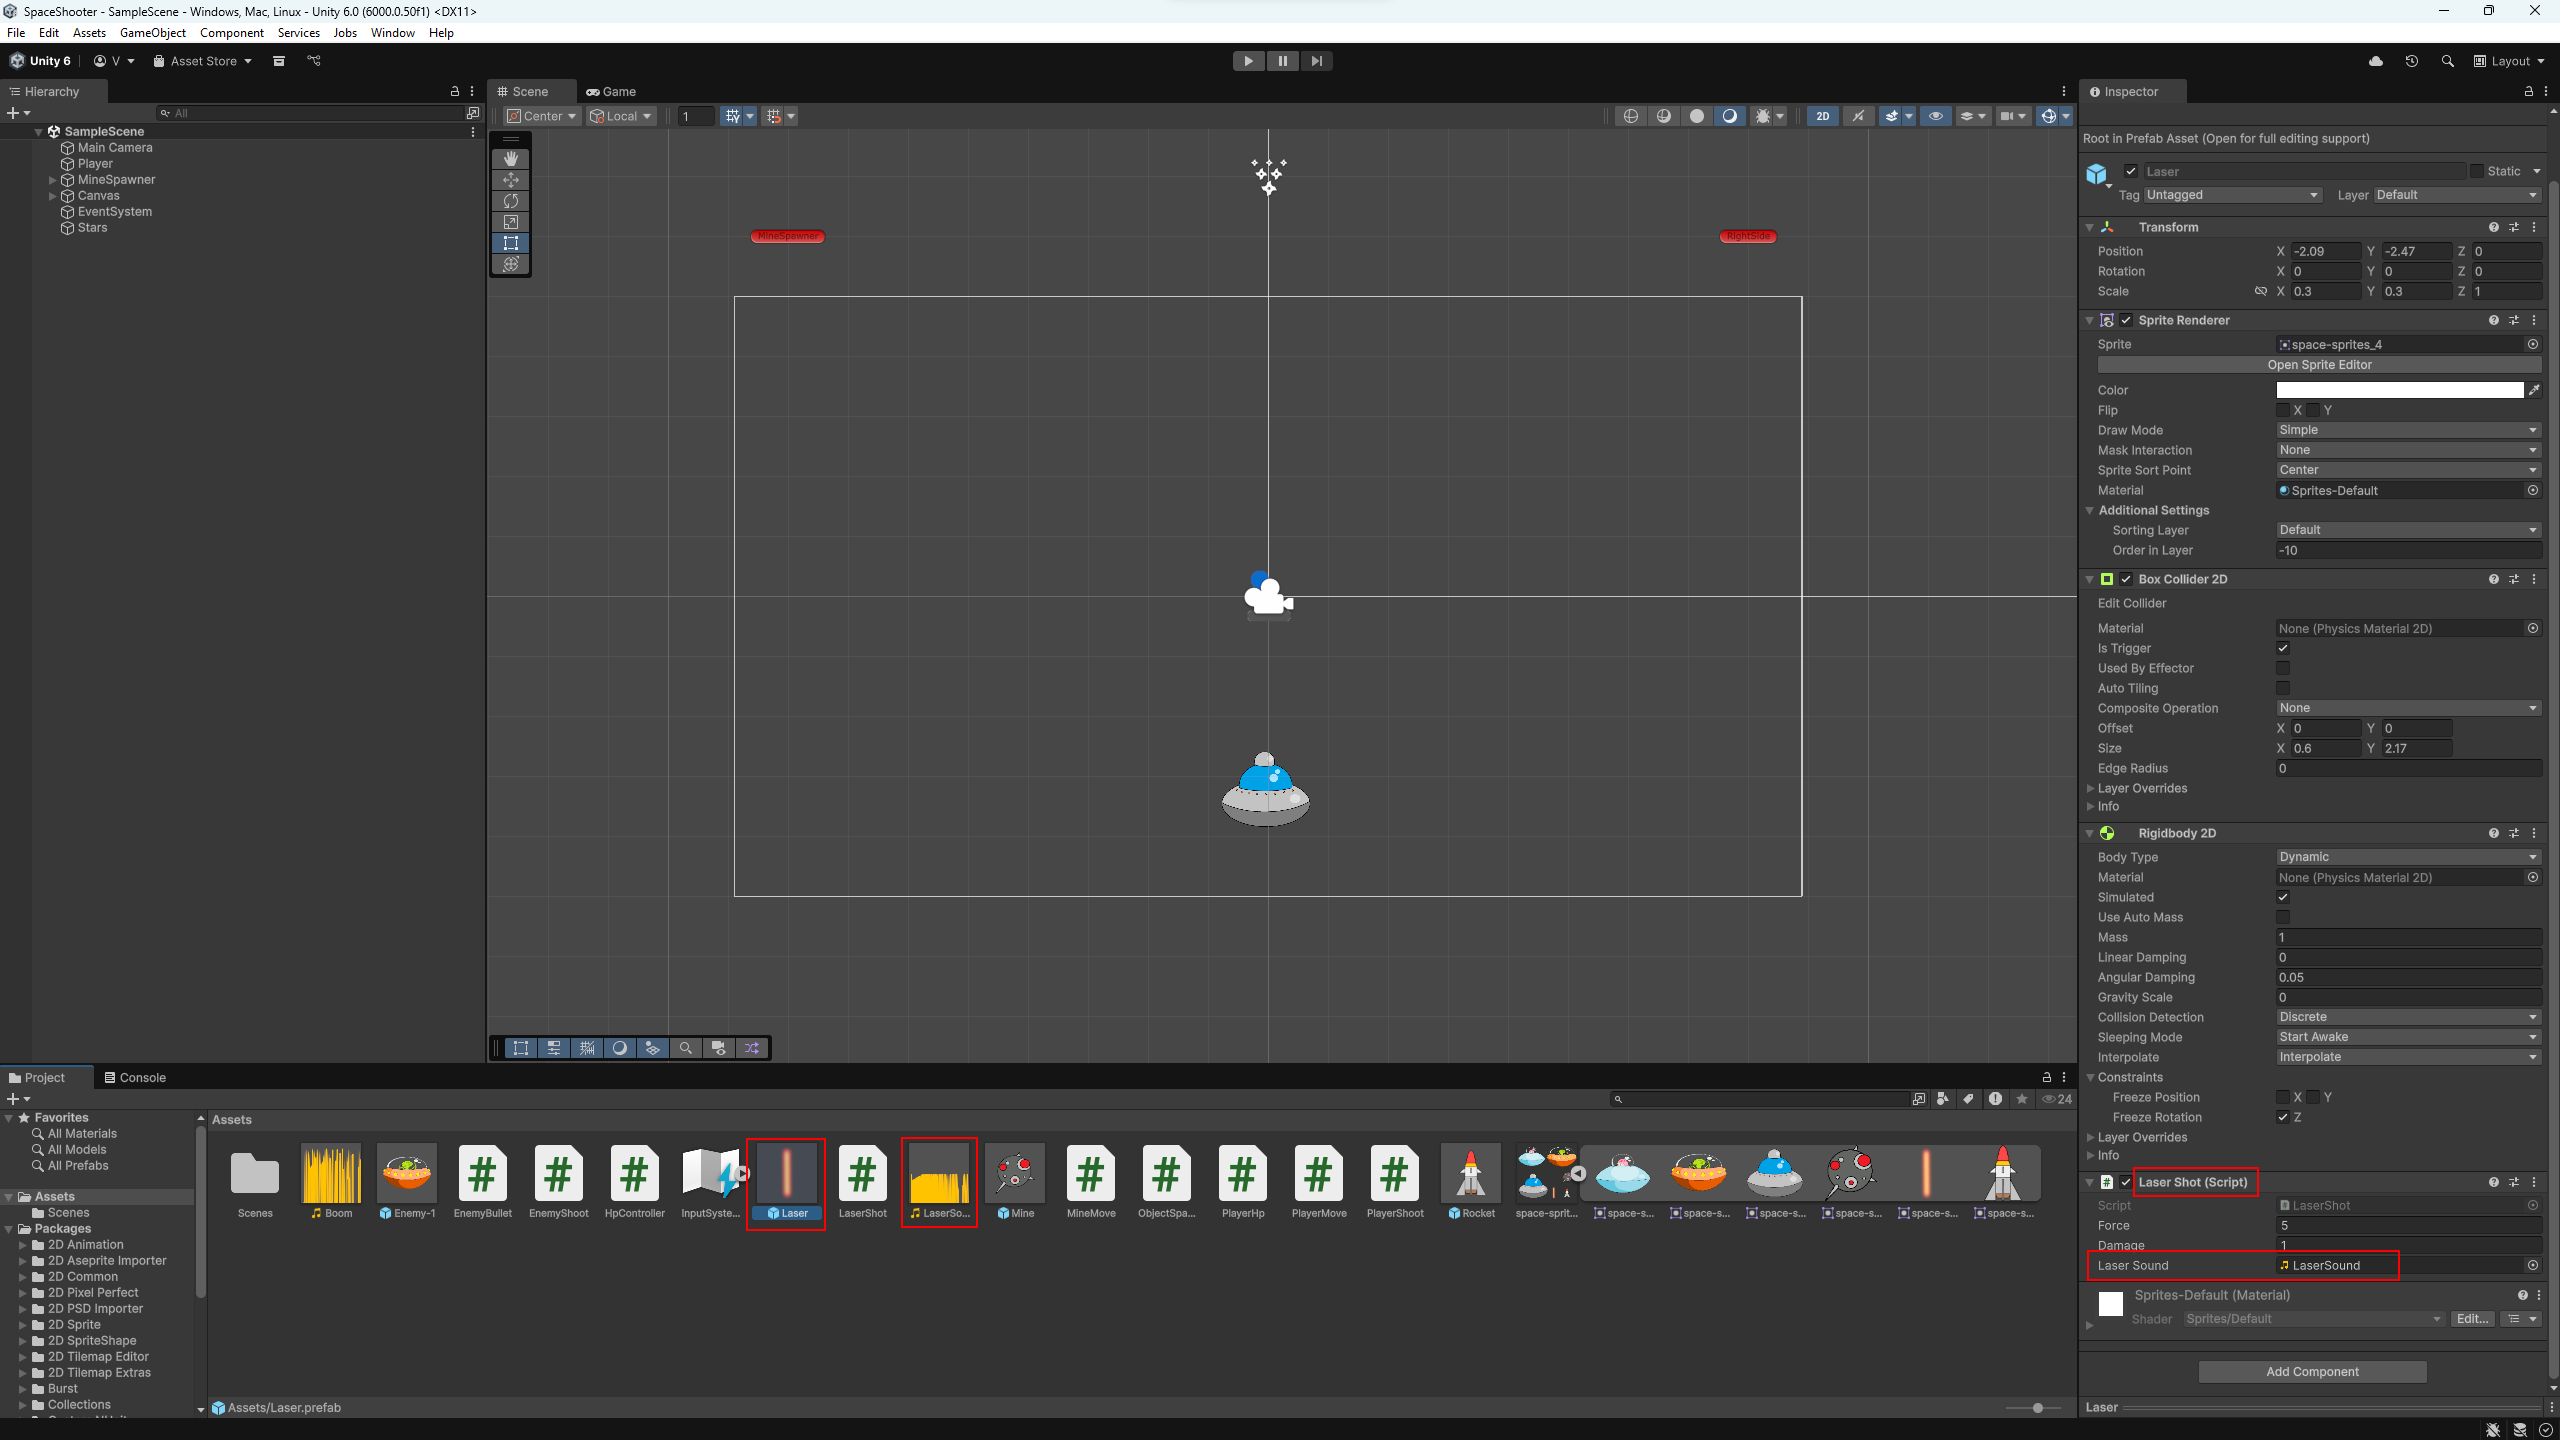
After updating the script, go to the Laser prefab in
the Assets window and assign the LaserSound.wav clip to
the new Laser Sound field.
💡 If you want to use your own sound effects instead of the ones
provided, you can drag your custom .wav file into the
Assets/sound folder and assign it in the same way.
We want destroyed enemies and mines to play a short explosion sound
when they disappear. For this, we'll slightly extend the
HpController script by adding an audio field and playing
it when health reaches zero.
using UnityEngine;

public class HpController : MonoBehaviour
{
    // Health points of the object
    public int hp = 3;

    // Sound effect for explosion
    public AudioClip ExplosionsSound;

    void MakeDamage(int damage)
    {
        // Subtract damage from health
        hp -= damage;

        // If health is depleted
        if (hp <= 0)
        {
            // Play explosion sound
            AudioSource.PlayClipAtPoint(ExplosionsSound, transform.position);

            // Destroy the object
            Destroy(gameObject);
        }
    }
}
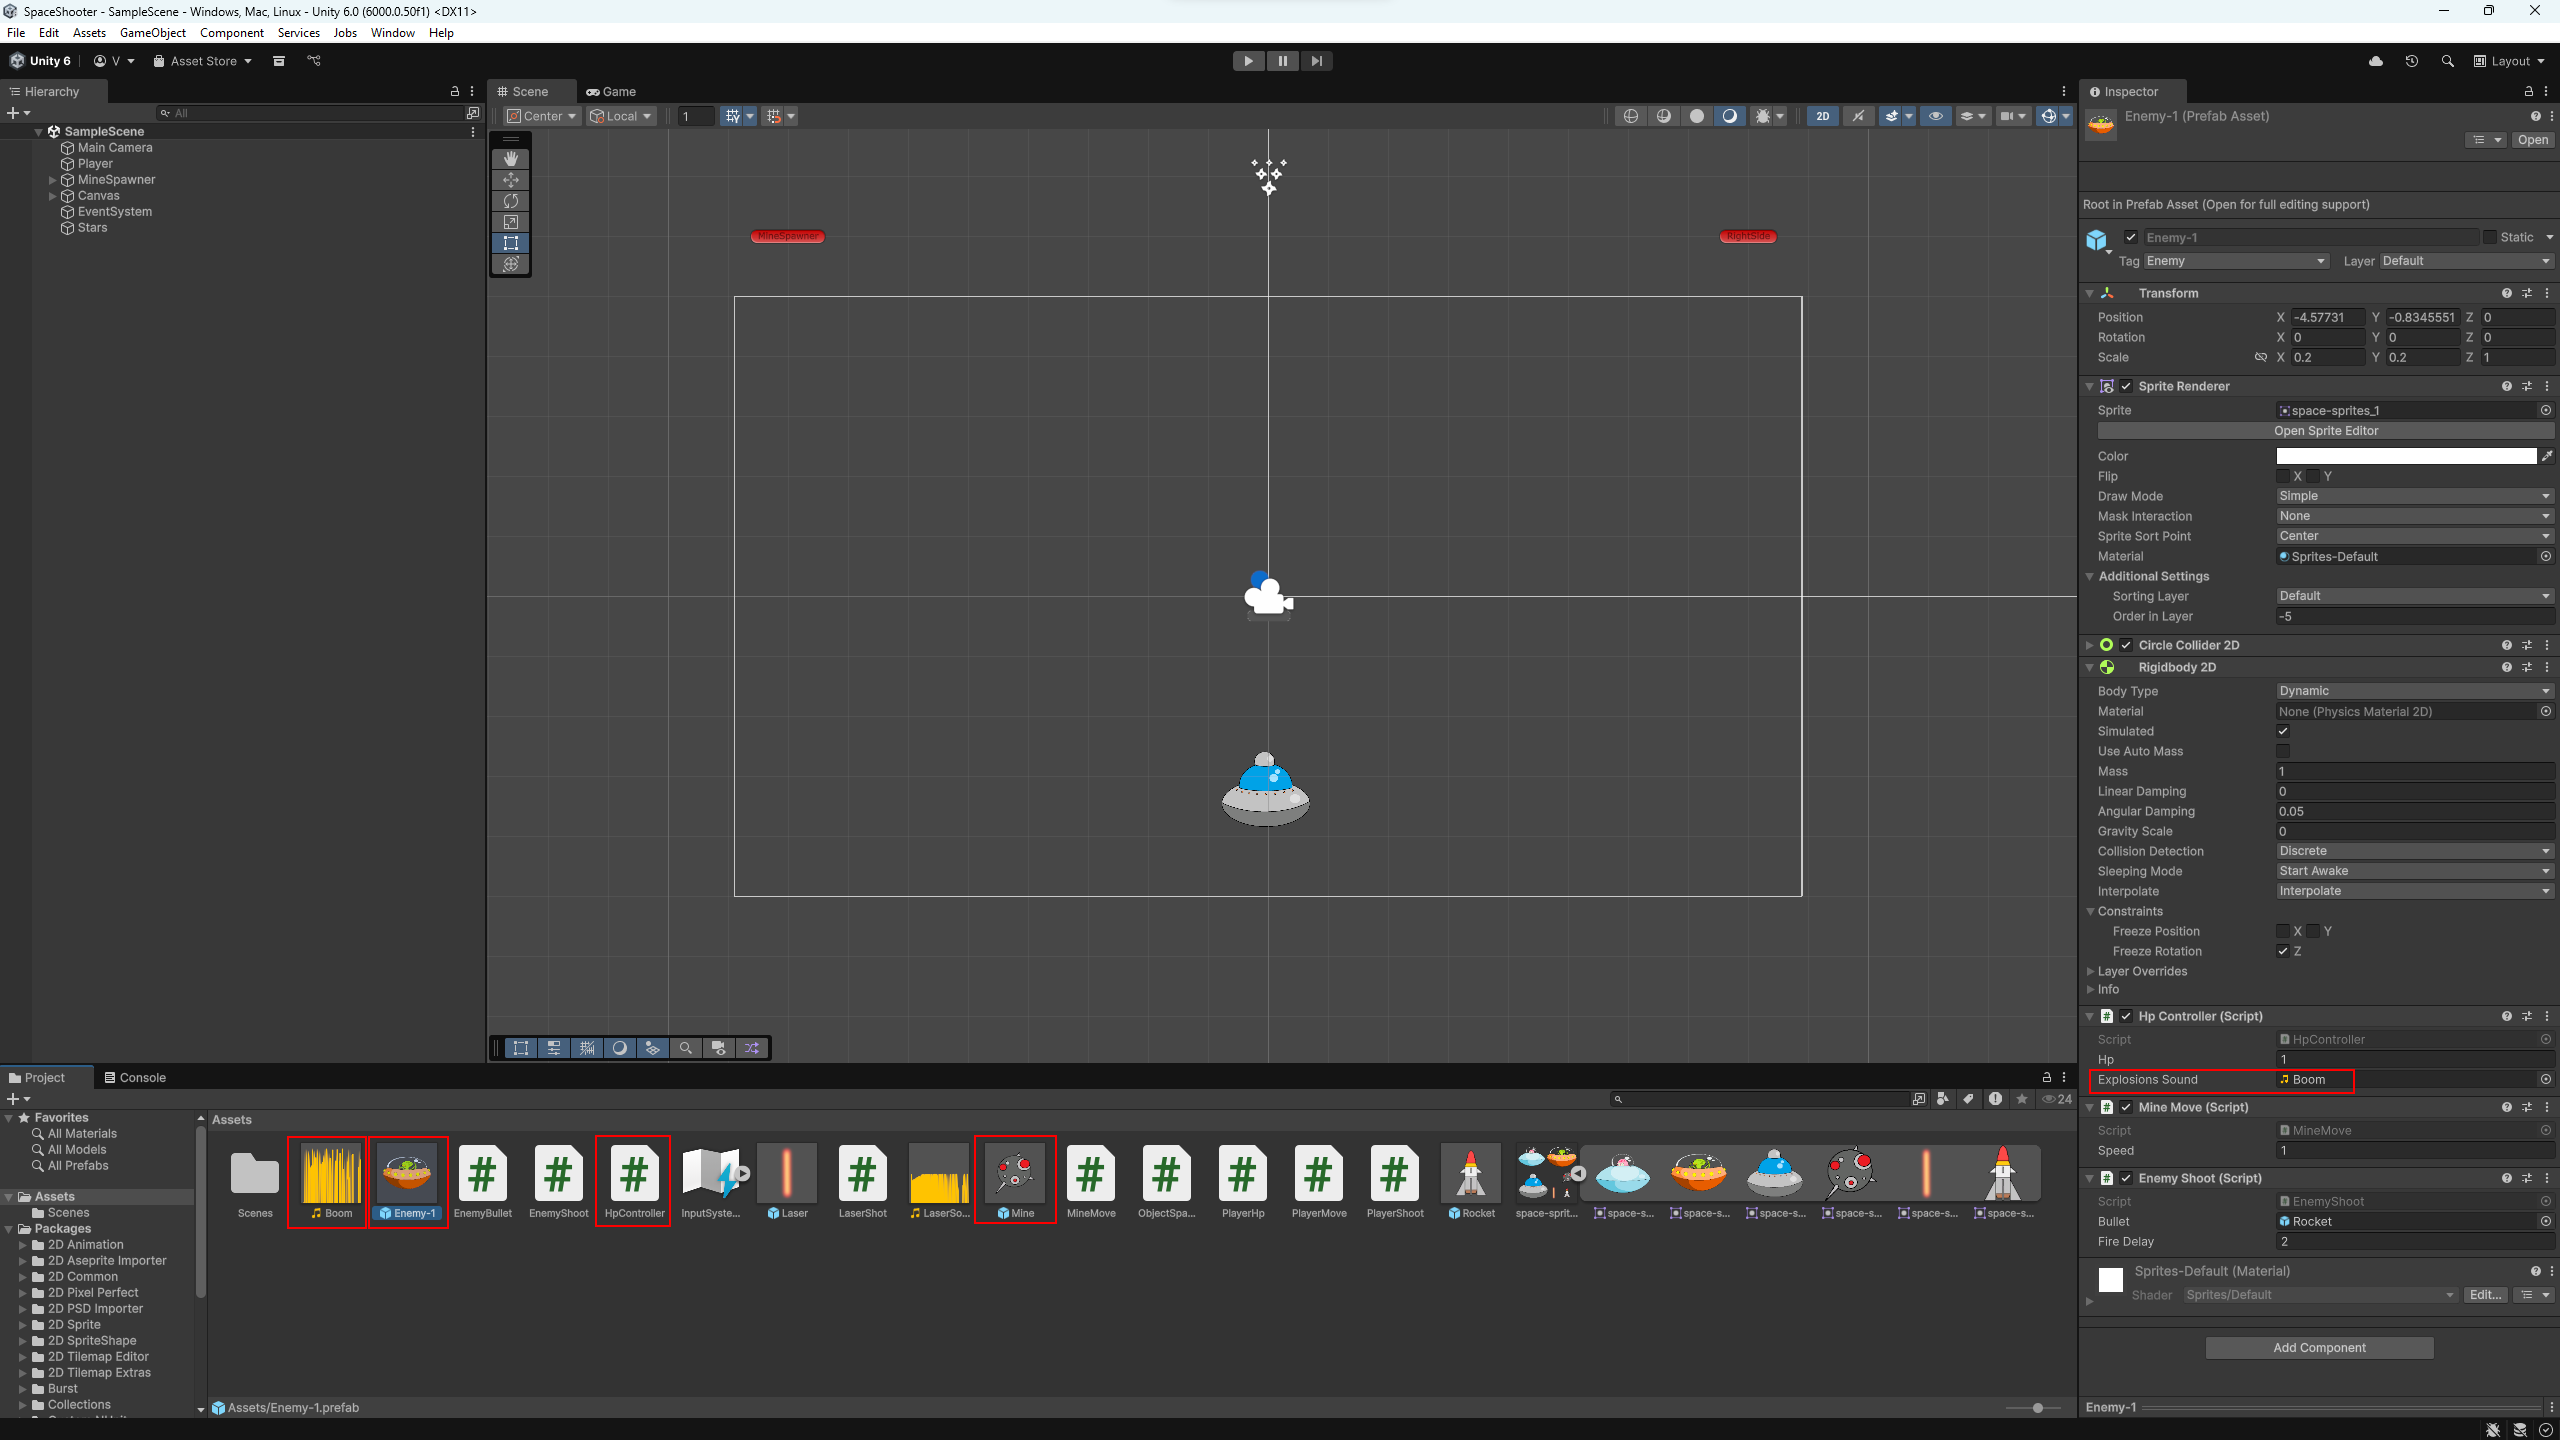
Select both Mine and Enemy-1 prefabs
in the Assets window. In their
HpController component, assign the
Boom.wav file to the
Explosions Sound field.
That's it! Now every time an enemy or mine is destroyed, the game gives you satisfying audio feedback.
💡 You can use your own custom explosion sound too — just drag it into
the Assets/sound folder and assign it the same way.
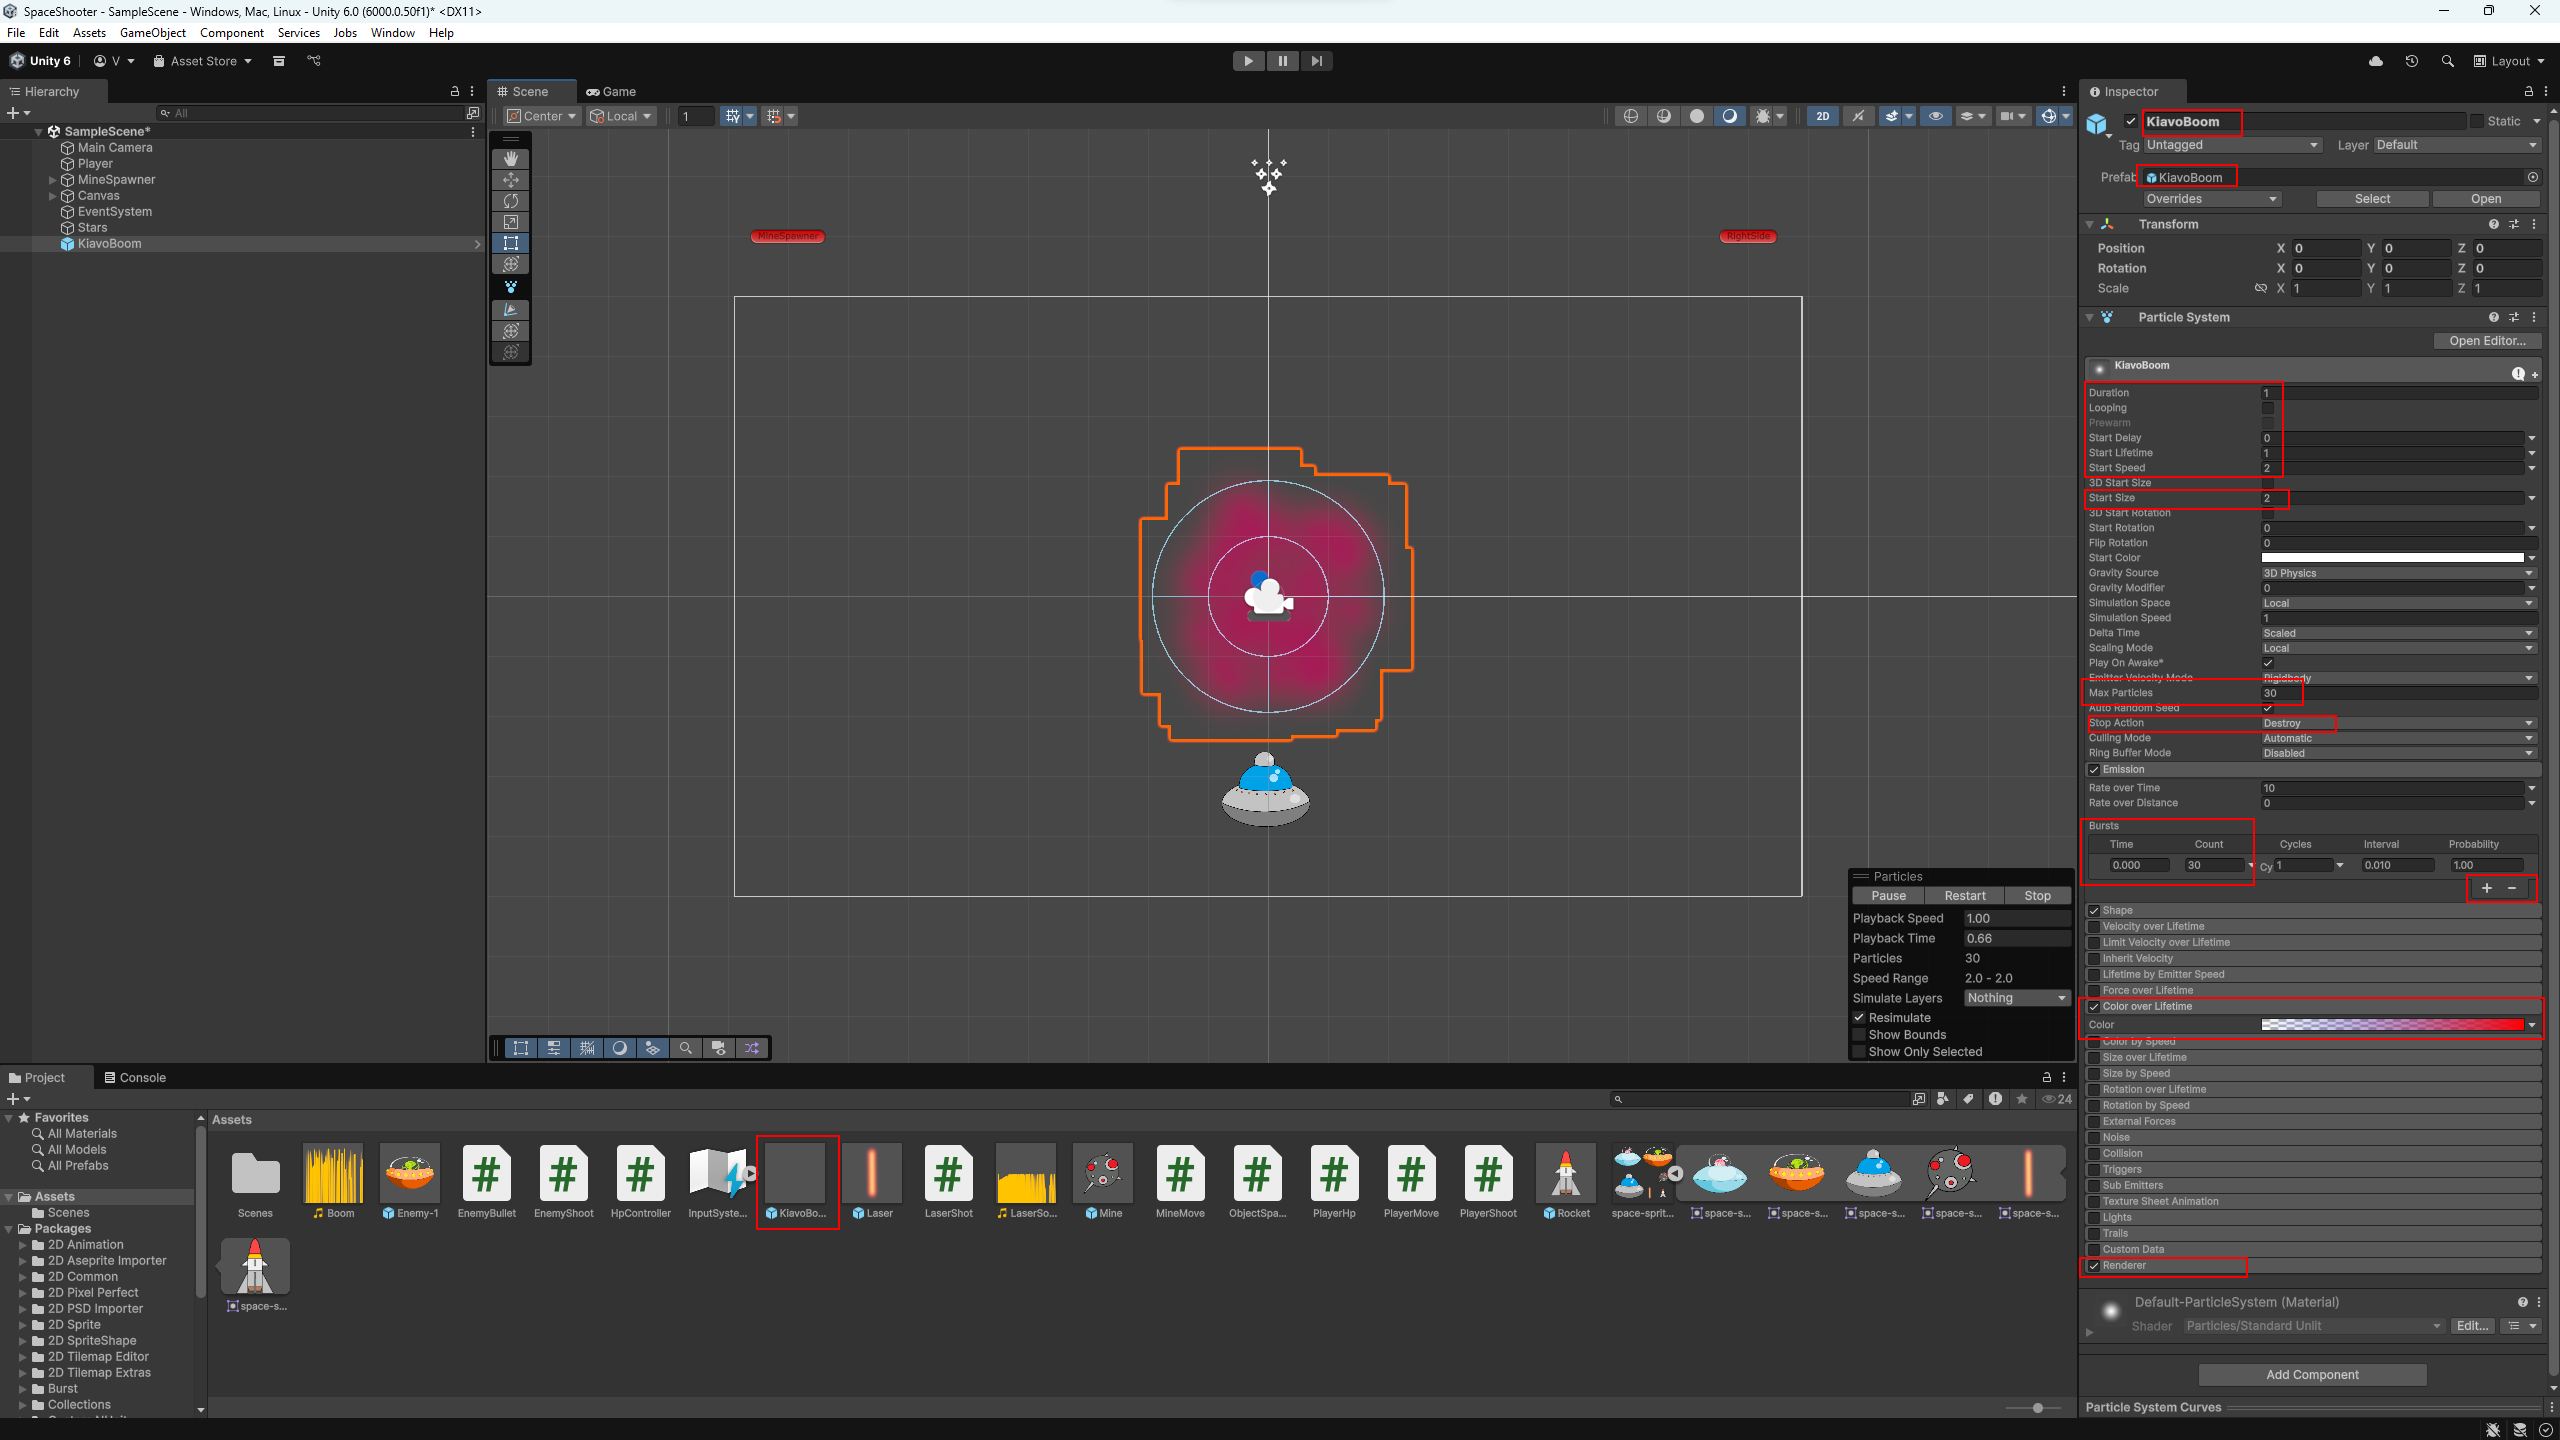
We should add a particle effect when an Enemy (like a Mine or Enemy-1)
is destroyed. Create a new Particle System and rename
it to KiavoBoom. Set Position and
Rotation all to 0. In the Inspector,
make the following adjustments:
Go to the Emission module, add a Burst at
time 0.0 with count 30.
In the Shape module, change Shape to
Circle and Radius to 0.1.
Enable Color over Lifetime. Open the color editor,
set the final Alpha to 0, and choose colors you
like at the start and end. In the Renderer module,
set Order in Layer to 10 (this setting
is in the Renderer section).
In the Main section, set the
Stop Action parameter to Destroy. This
means the object will automatically remove itself after the effect
finishes.
Then create a prefab from KiavoBoom and remove it from
the scene — it will stay in your project ready for spawning.
You can experiment with more dramatic settings or colors later — this is just a basic explosion for now.
We have now an explosion prefab. We should spawn it when an enemy
(like a Mine or Enemy-1) is destroyed. Open the
HpController script and modify it like this:
using UnityEngine;

public class HpController : MonoBehaviour
{
    // Amount of health points
    public int hp = 3;

    // Explosion effect prefab
    public GameObject Explosion;

    // Explosion sound
    public AudioClip ExplosionsSound;

    void MakeDamage(int damage)
    {
        // Subtract damage from health
        hp -= damage;

        // If health is depleted
        if (hp <= 0)
        {
            // Play explosion sound
            AudioSource.PlayClipAtPoint(ExplosionsSound, transform.position);

            // Spawn explosion effect
            Instantiate(Explosion, transform.position, Quaternion.identity);

            // Destroy this object
            Destroy(gameObject);
        }
    }
}
Now select the Mine and
Enemy-1 prefabs. In the
HpController component, assign your explosion prefab
(e.g. KiavoBoom) to the Explosion field.
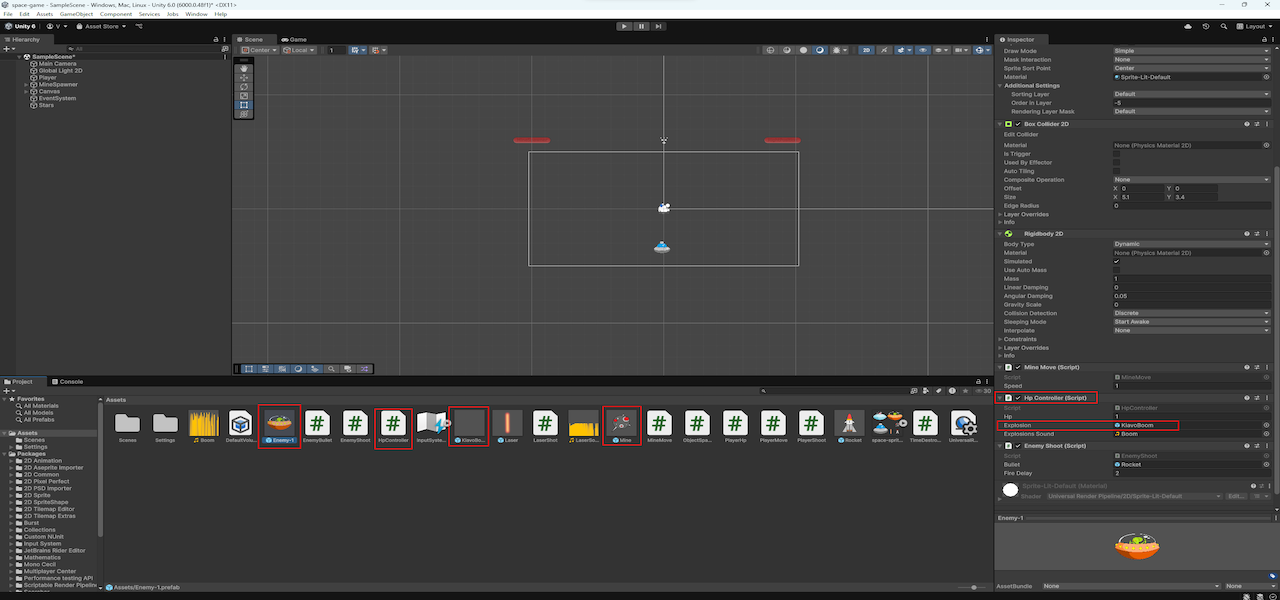
KiavoBoom explosion is now linked in the
HpController of each enemy prefab. When destroyed,
they’ll disappear with sound and particles.
Our game is now complete — it has movement, enemies, shooting, sound, and UI. This tutorial focused on building a simple but working 2D space shooter using core Unity features.
Of course, you can expand it further: add explosions, visual effects, waves of enemies, score, lives, menus, boss fights, background music… even flying chickens or space tea ☕🛸
But our goal was to show you a clean and simple foundation — and now you have it.
💡 Keep experimenting, have fun, and build your own version from here!