Tutorial 5: 2D platform game (for beginners). Part 2.
Introduction:
This is the second part of the tutorial about the 2d platform game. You will need some assets for this tutorial. You can download .zip archive with needed resources here. And you can download the UnityPackage of the first part here. Start Unity with the first part and load the scenePlatformer scene.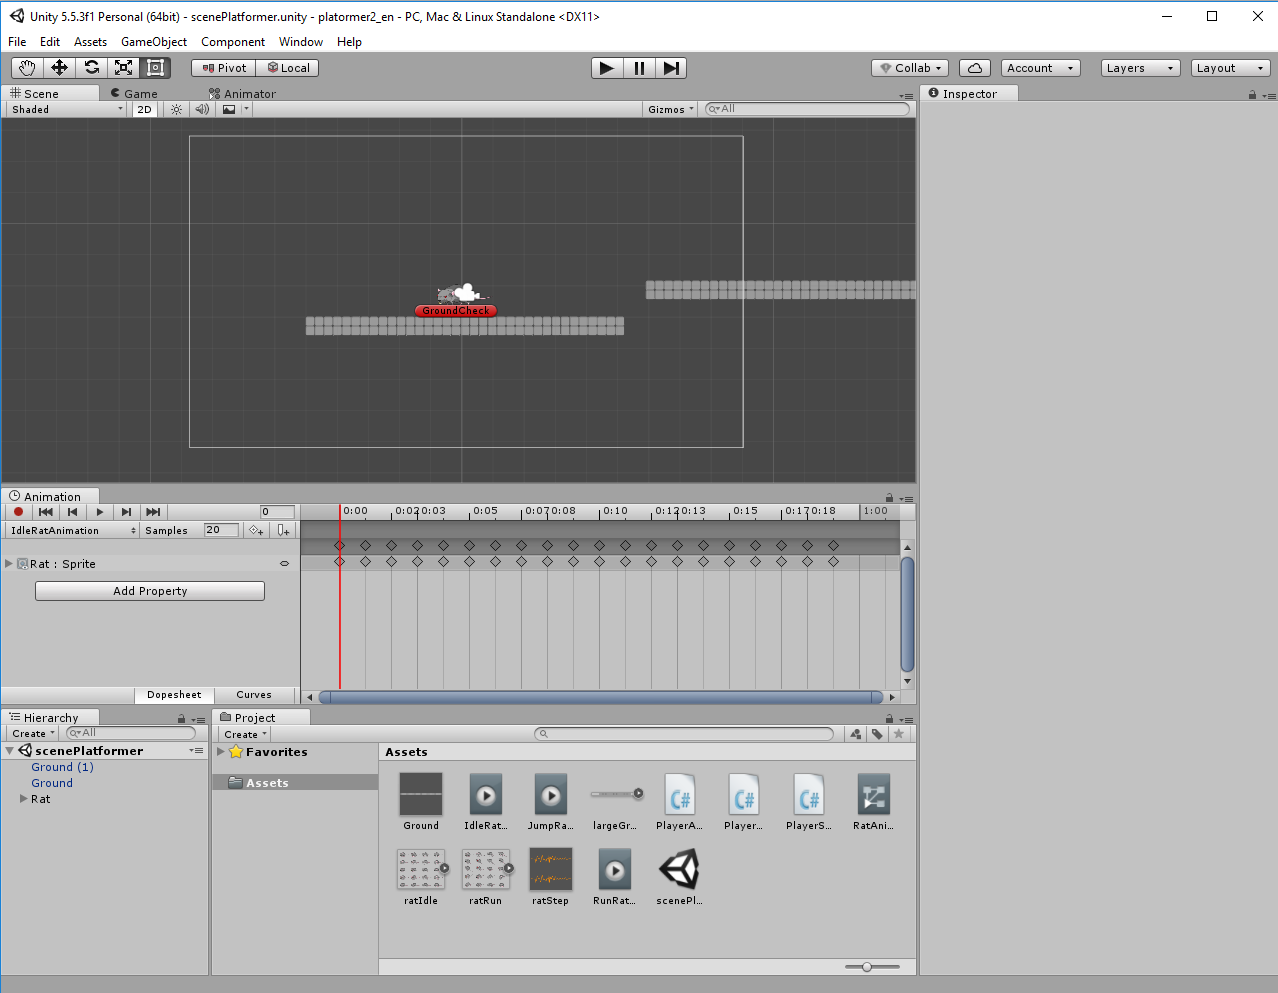
How to make wall:
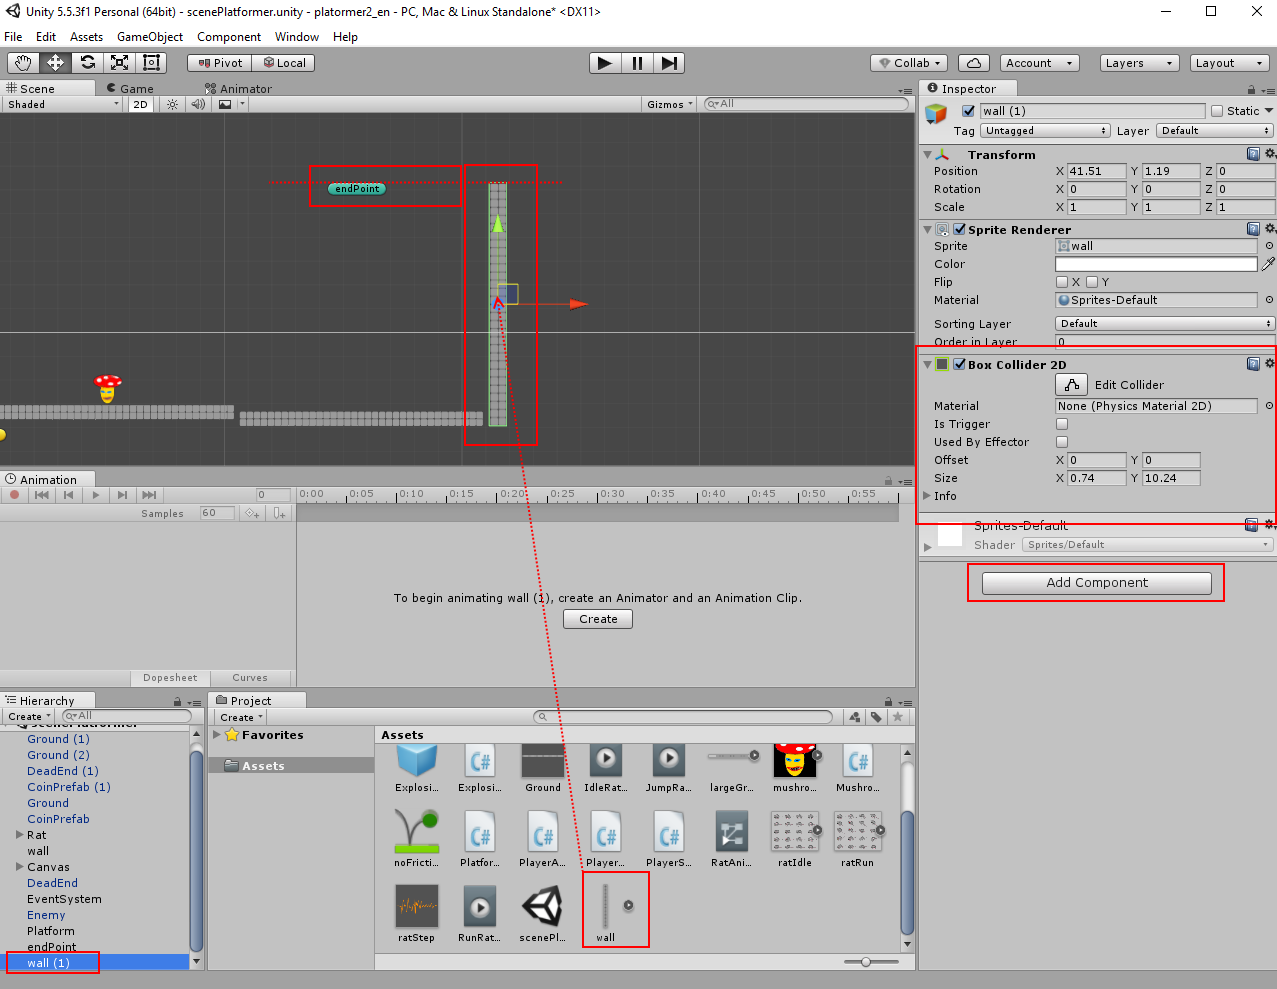
We will start simple. Import the wall image from the downloaded archive.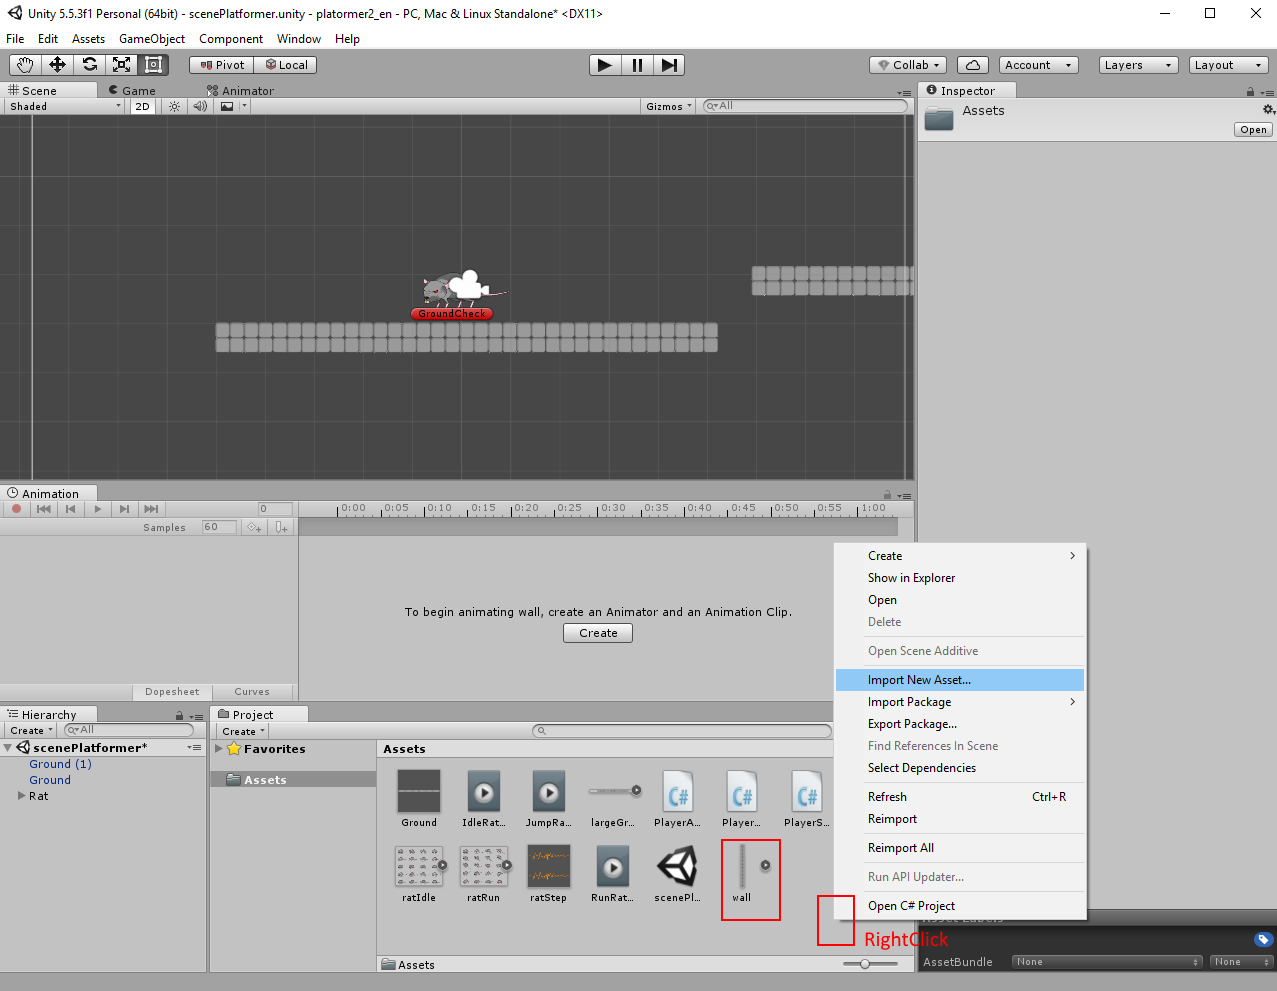
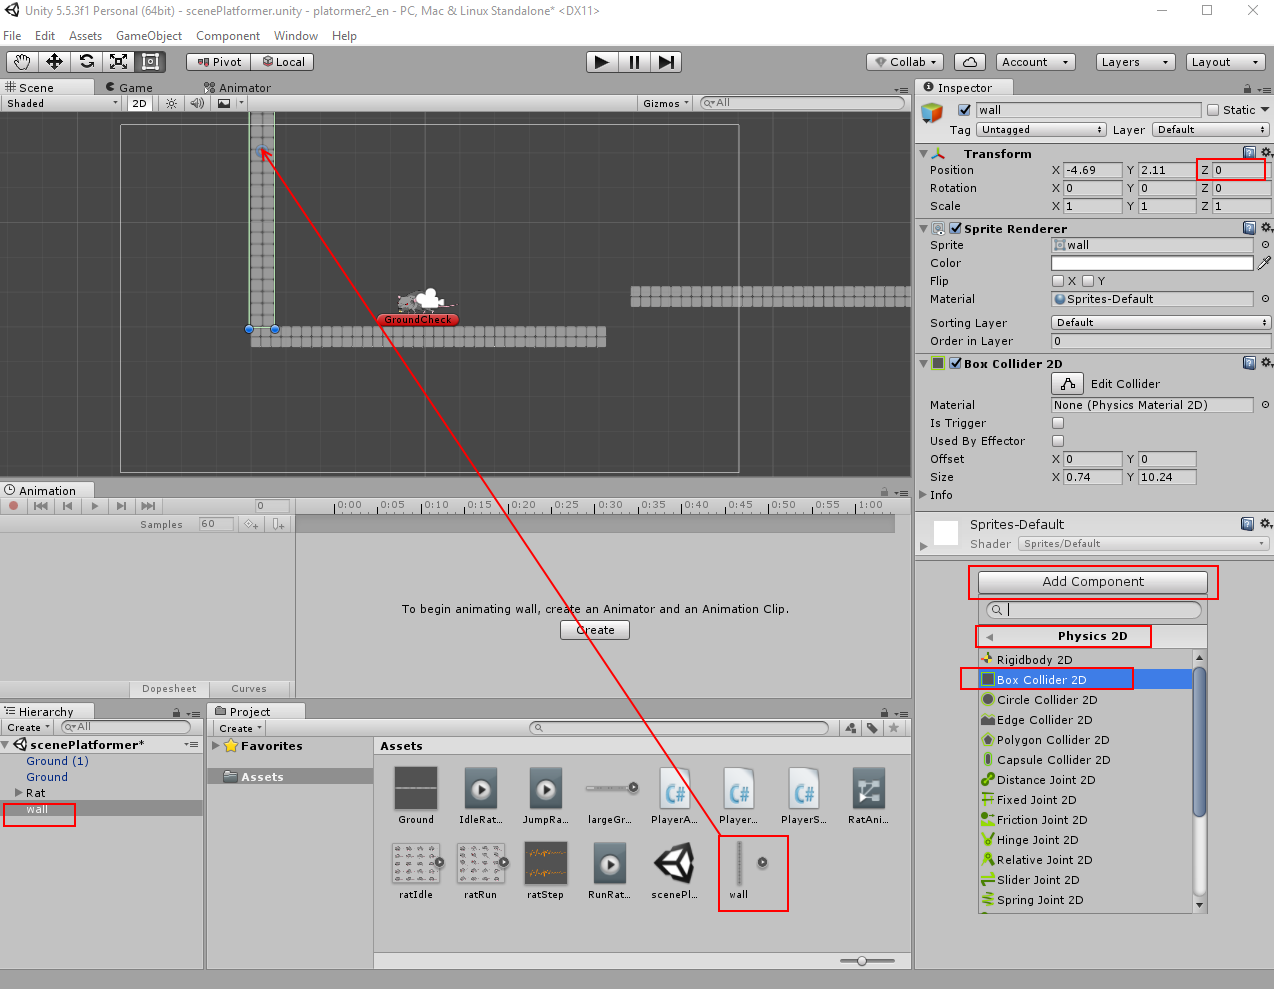
Place the wall in the scene. New gameobject will be created. Change its Z-Position to 0 (if it isn't). Add Box Collider 2D to it.
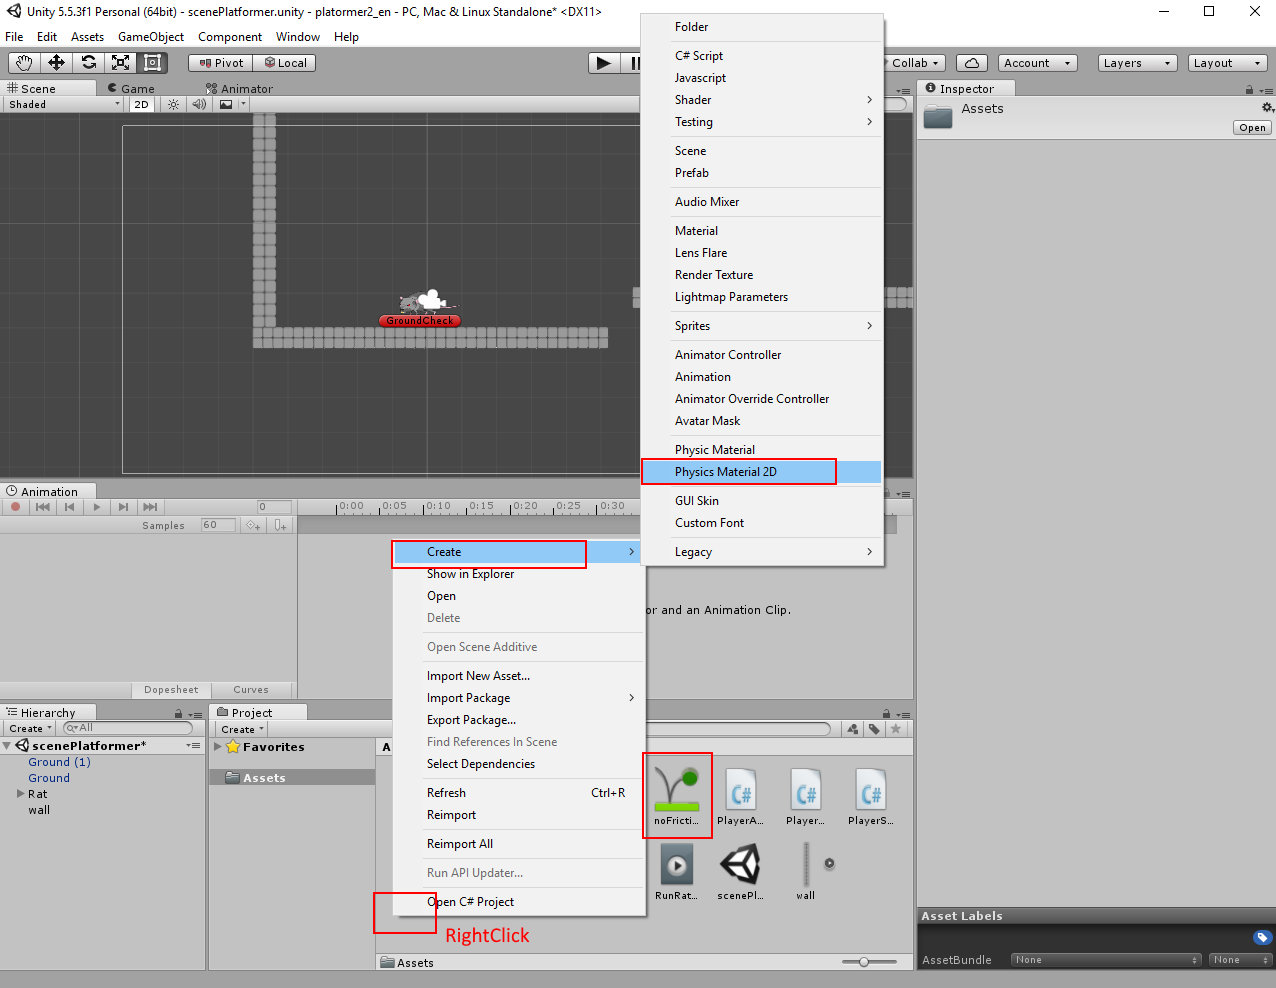
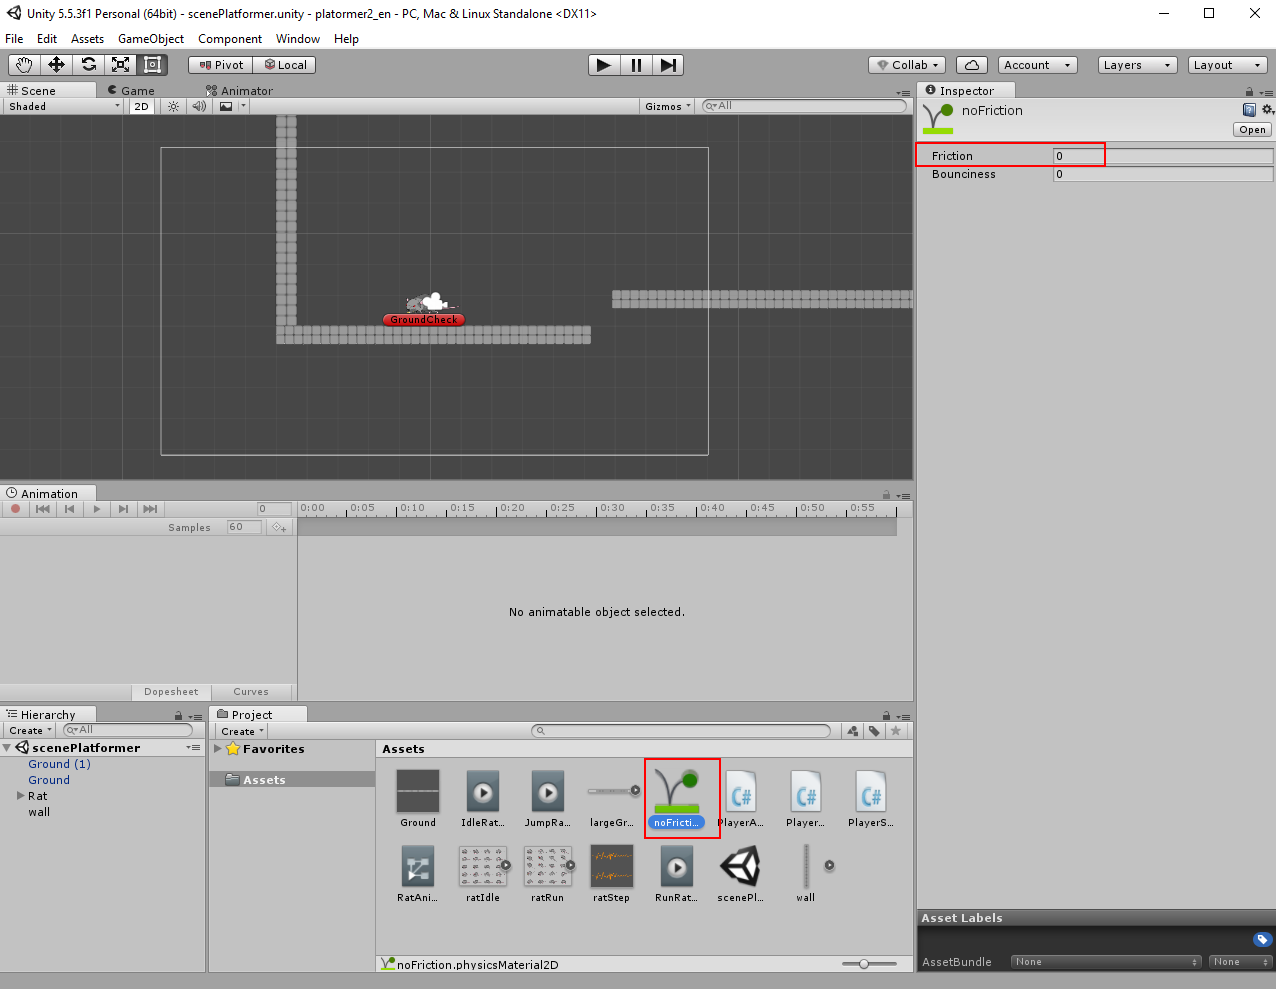
Now let's talk about the glitch often asked by beginners. Start the scene and run towards the wall, then jump on it and hold the moving button. The rat will stay on the wall. This is due to the standard friction. There are many ways to fix this. We can just assign a physic material to the wall (or rat) with zero friction. Create new Physics Material 2D, name it as noFriction.
Select the created noFriction and change Friction to 0.
Select now the Rat in the hierarchy, look at its Inspector and change Material in the Capsule Collider 2D to noFriction.
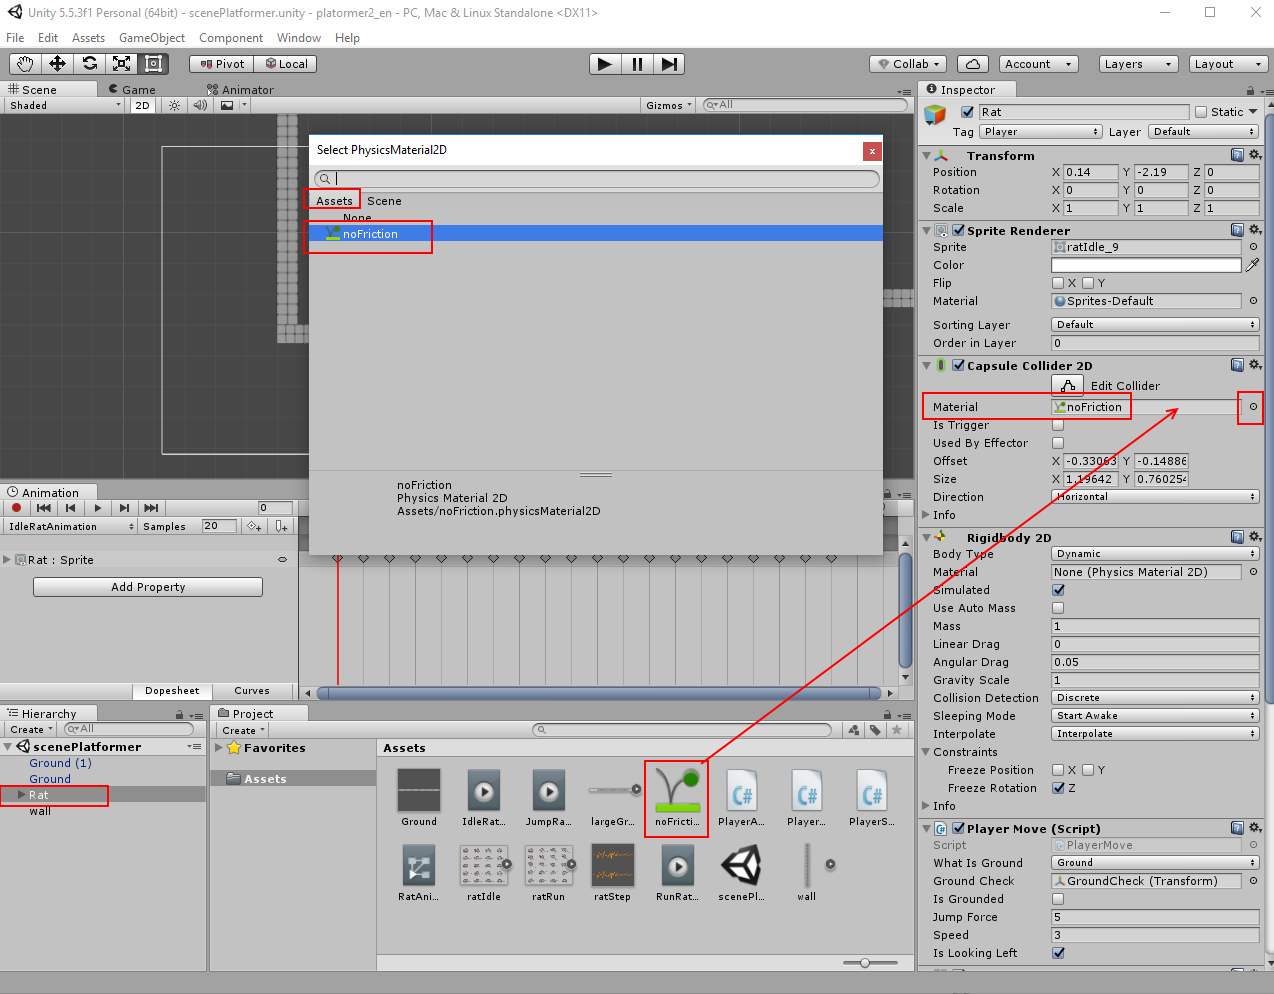
The rat should no longer be stuck on walls and platforms.
How to collect and count coins:
We can add something to collect for the player. Let it be coin. Import coin image into the project. Then place the coin in the scene. A new gameobject will be created. Select the coin gameobject in the hierarchy and look at its Inspector. Set the Z-Position to 0. Change Order in Layer to -10 (the coin should be rendered behind the rat). Add Circle Collider 2D and enable IsTrigger (we will check the collisions later).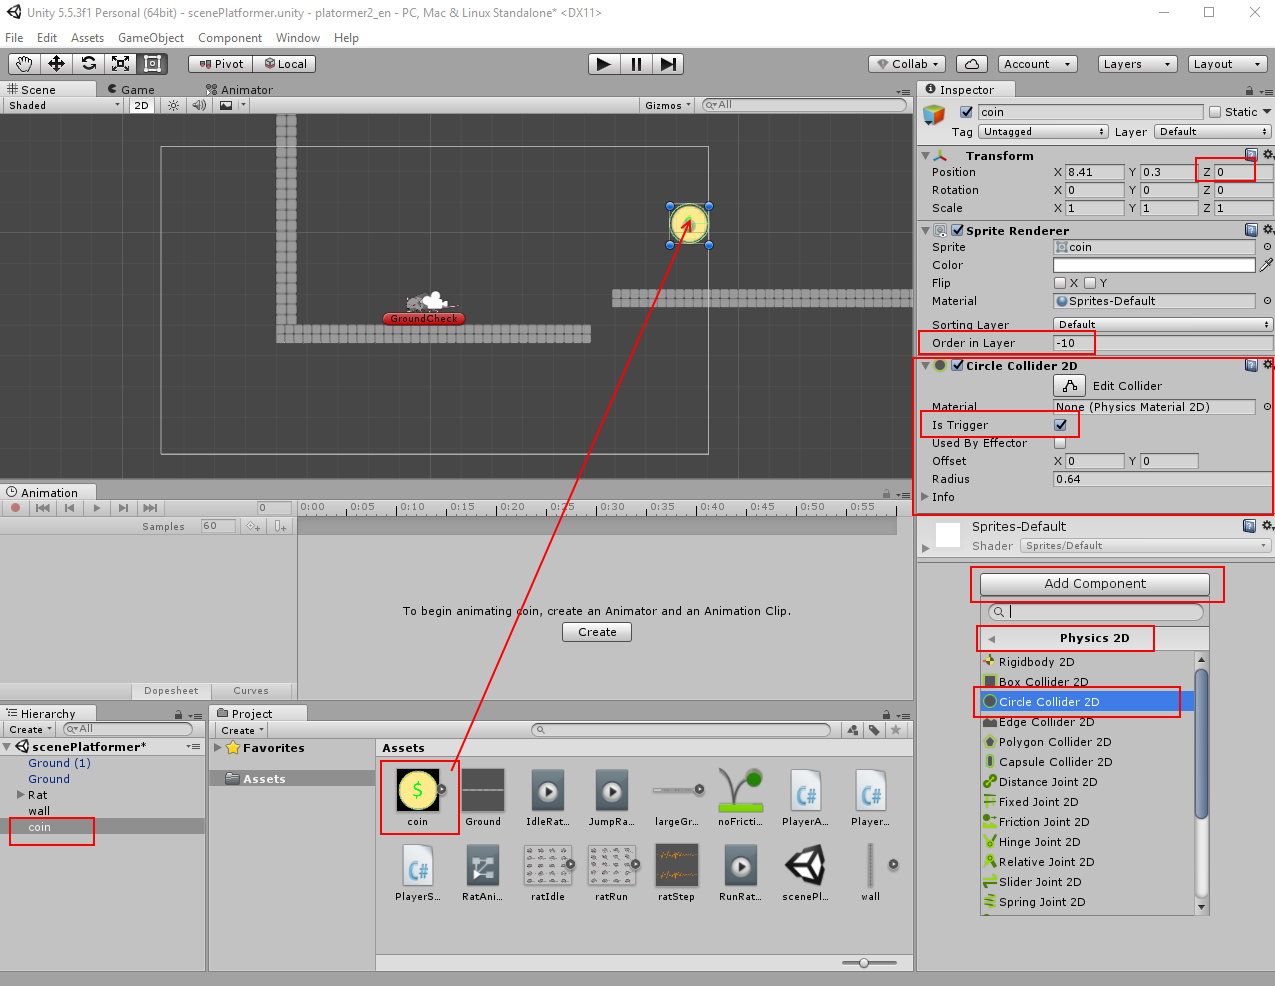
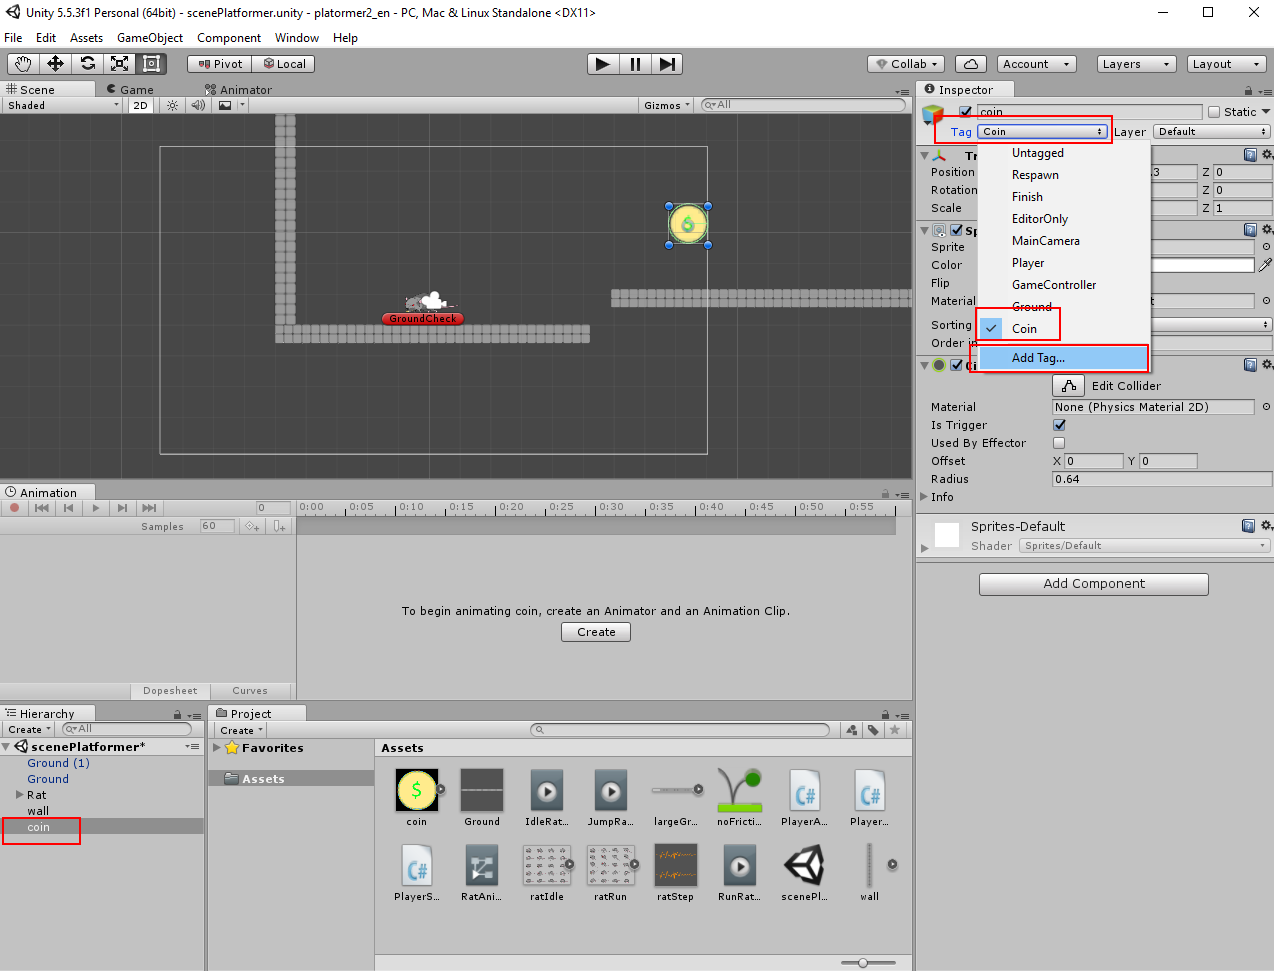
Add new tag Coin and change coins tag to Coin.
Select coin in the hierarchy and rename it to CoinPrefab. Create now prefab from this gameobject (just Drag&Drop CoinPrefab into Assets).

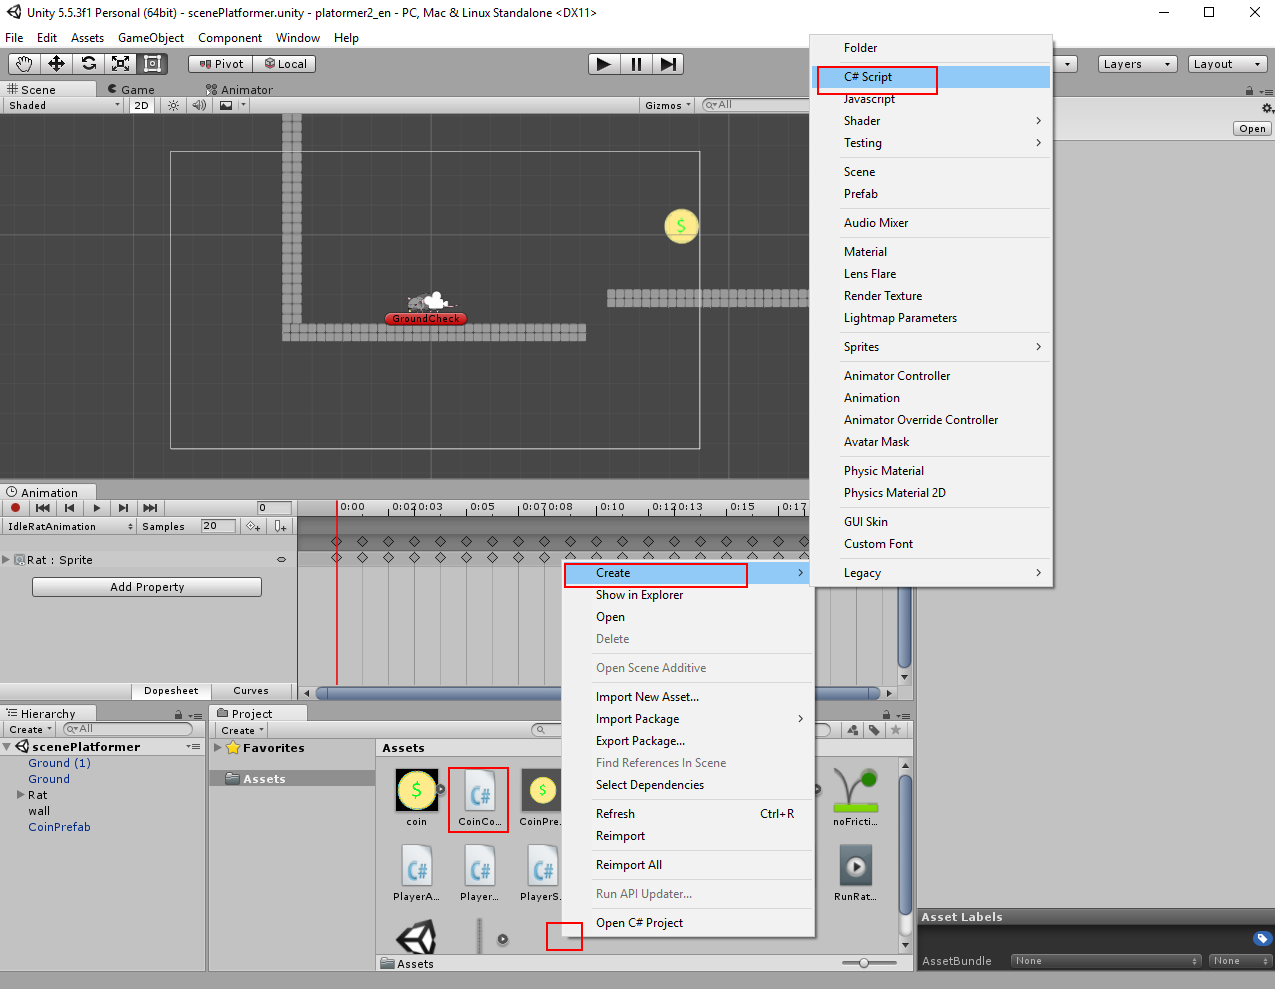
We need a script to collect the coins. Create new C# script (RightClick in Assets). Name it CoinController.
We will use OnTriggerEnter2D to test the collision between the rat and the coin. The script will be:
using System.Collections;
using System.Collections.Generic;
using UnityEngine;
public class CoinController : MonoBehaviour {
//coins pick up sound
public AudioClip CoinSound;
//variable for coin counter
public int coin;
//will be startet, if collider2D went into the trigger
void OnTriggerEnter2D (Collider2D other) {
//check, if gameobject has tag Coin
if (other.tag == "Coin") {
//increment the coin counter variable
coin = coin + 1;
//play the coins pick up sound at the rats position
AudioSource.PlayClipAtPoint (CoinSound, transform.position);
//delete coin gameobject from the scene
Destroy (other.gameObject);
}
}
}
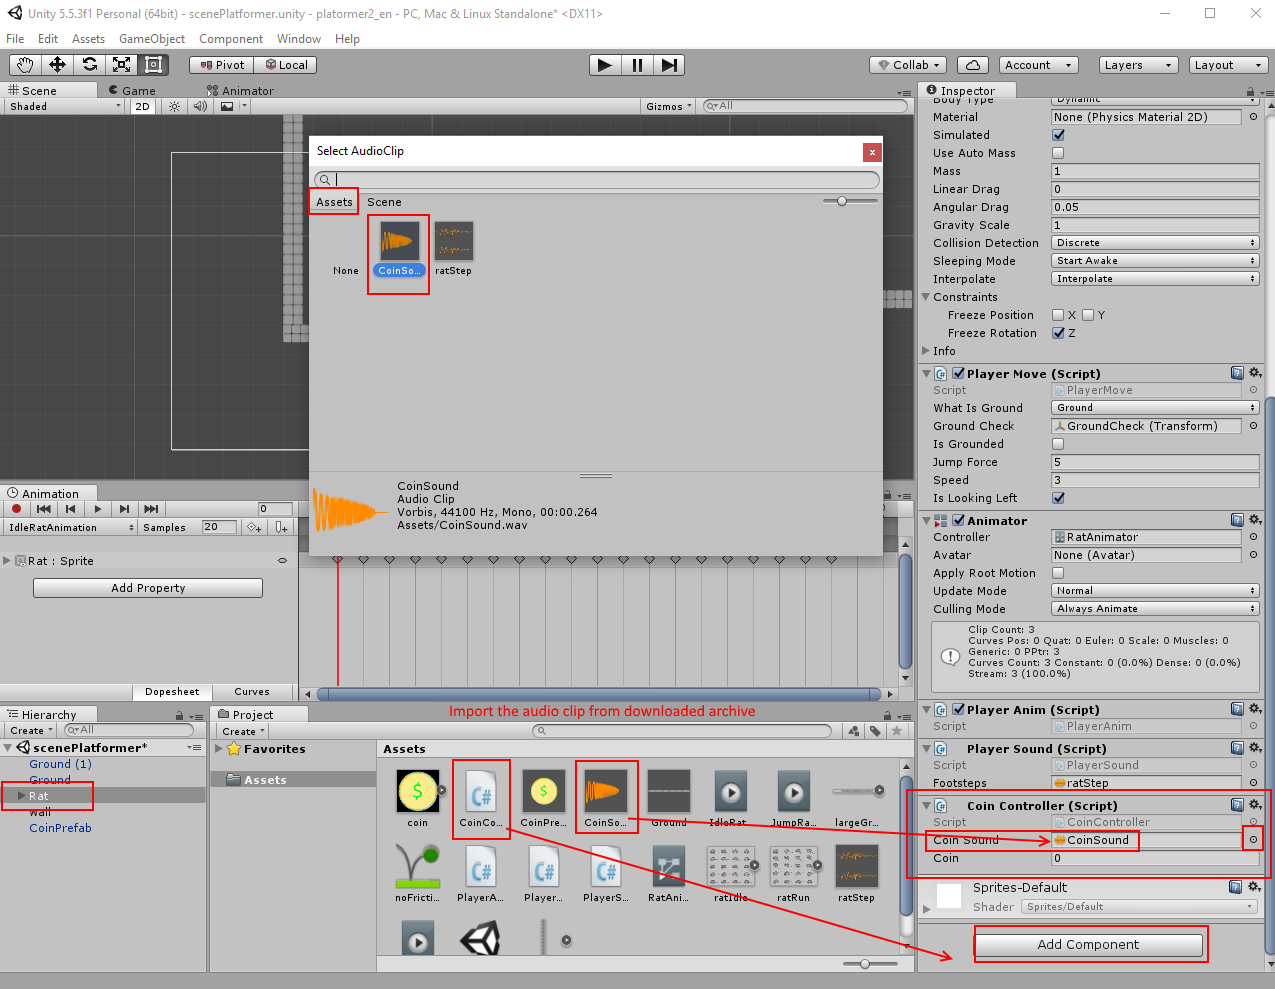
Add this script to the rat. Import the CoinSound into the project. Select the rat in the hierarchy and place CoinSound clip into the field Coin Sound (we are using 3D sound here and now the sound is quiet, because the listener is on the camera. We will adjust Audio Listener later).using System.Collections.Generic;
using UnityEngine;
public class CoinController : MonoBehaviour {
//coins pick up sound
public AudioClip CoinSound;
//variable for coin counter
public int coin;
//will be startet, if collider2D went into the trigger
void OnTriggerEnter2D (Collider2D other) {
//check, if gameobject has tag Coin
if (other.tag == "Coin") {
//increment the coin counter variable
coin = coin + 1;
//play the coins pick up sound at the rats position
AudioSource.PlayClipAtPoint (CoinSound, transform.position);
//delete coin gameobject from the scene
Destroy (other.gameObject);
}
}
}
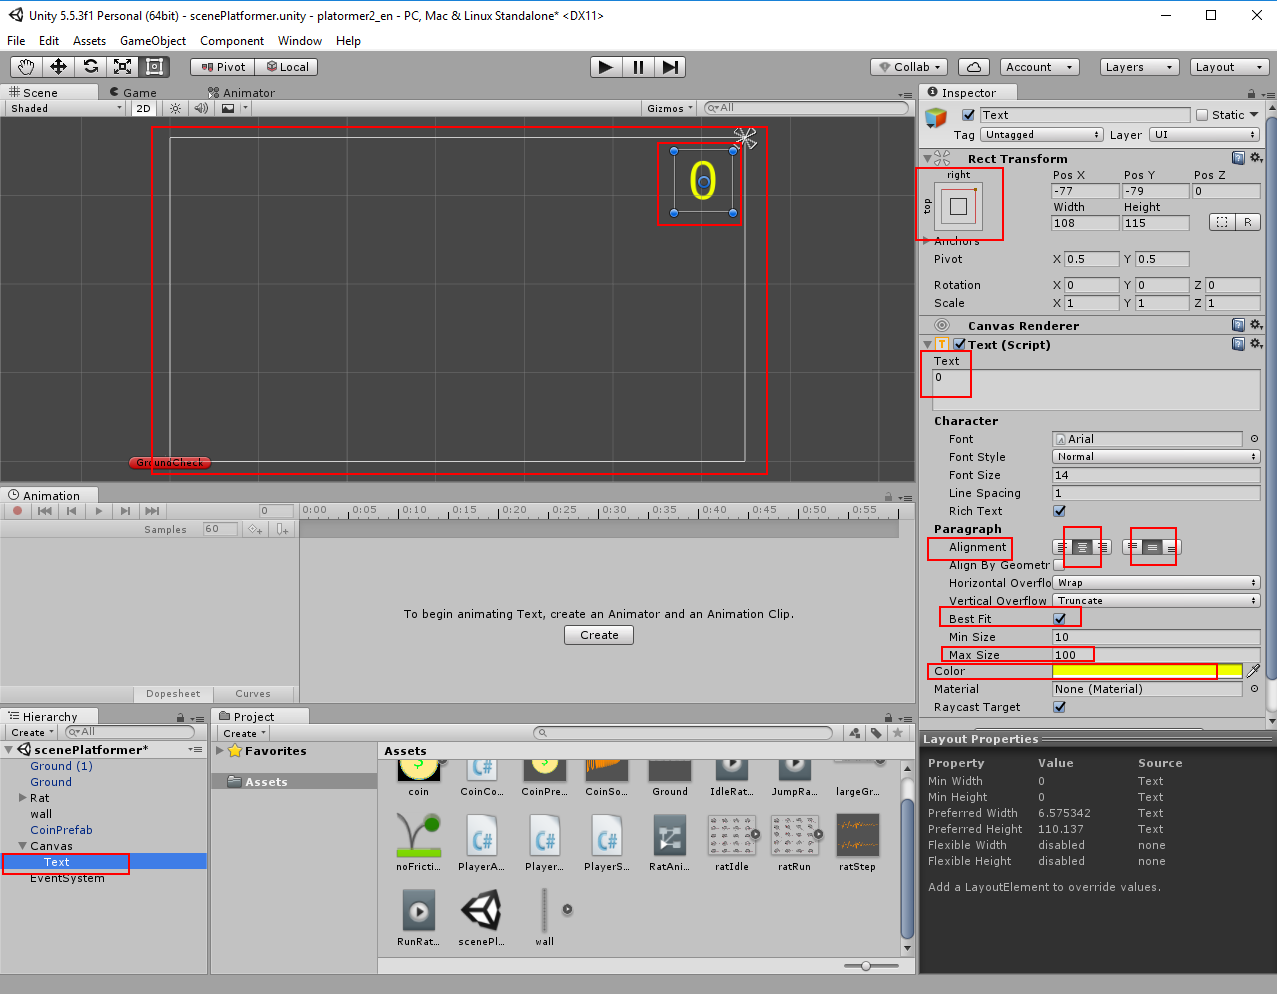
Now we can create simple UI to display the coins counter. Add new UI - Text. Three new gameobject will be created: Canvas, Text, EventSystem.

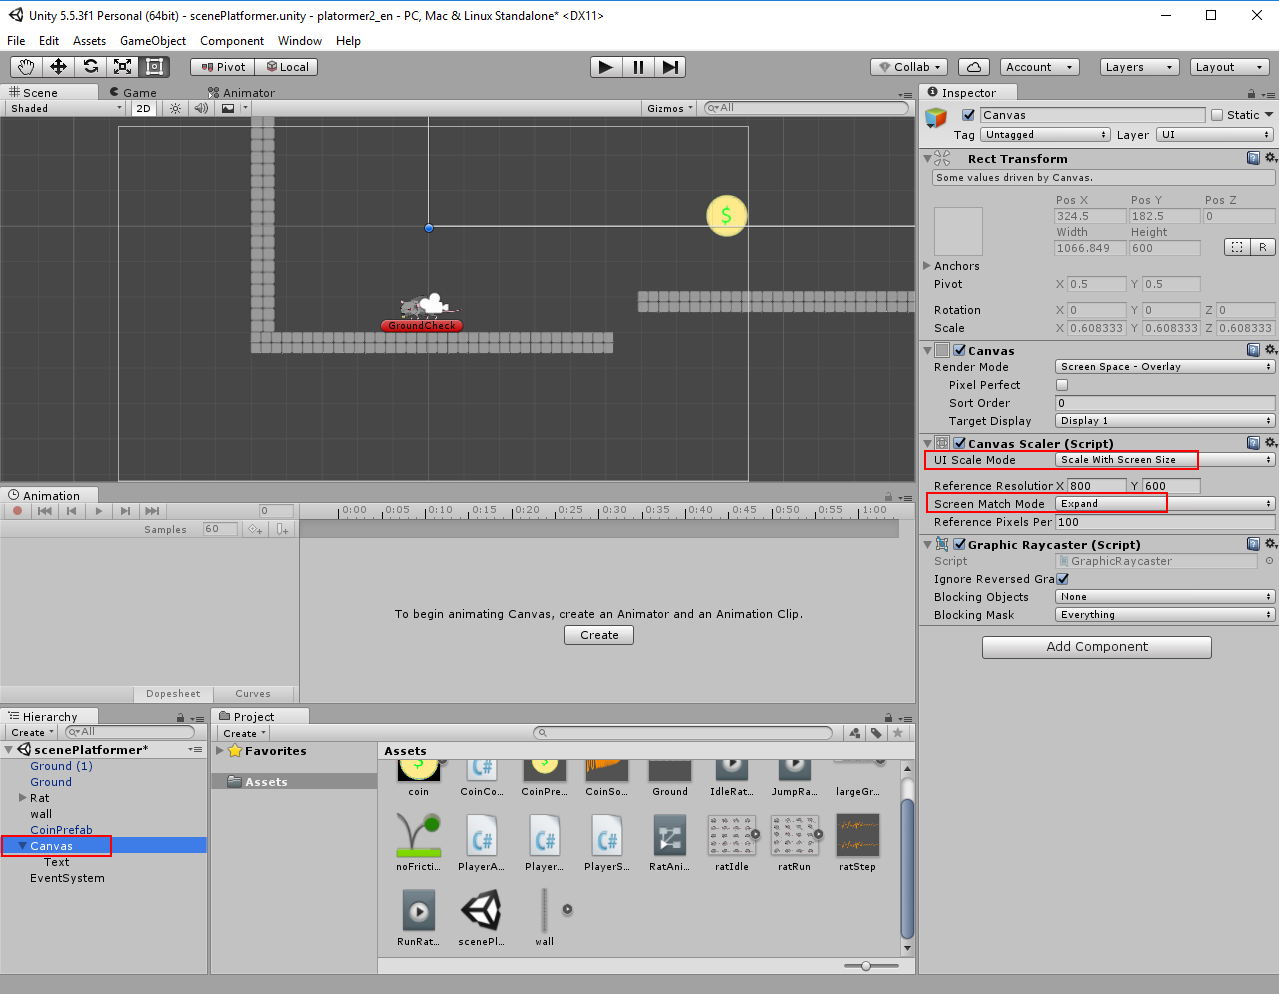
Select Canvas in the hierarchy. Change UI Scale Mode to Scale With Screen Size and Screen Match Mode to Expand. The parameters should be good to automatically change the size of the user interface on different screen sizes.
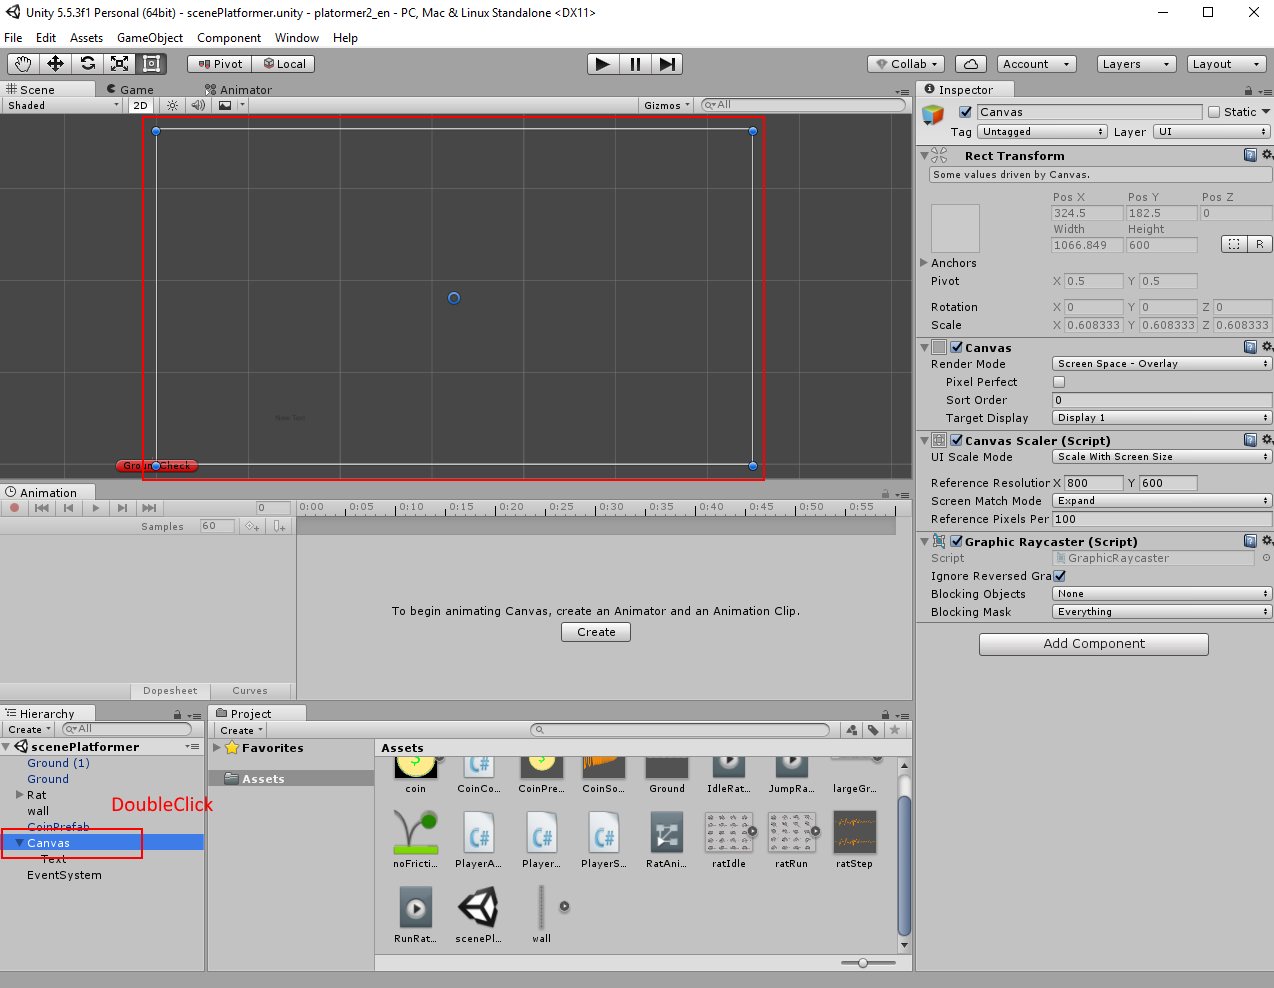
We have now scene-view and UI-view in one window. Double click on Canvas in hierarchy. We will see white box. This box shows how the UI will be on screen in the game.
Select the Text in the hierarchy. Make it bigger and drag it to the place, where it should be shown. Change its anchor to top-right. Change Text to 0. Alignment to middle. Enable Best Fit. Change Max Size to something like 100. Change Color as you like.
We need a script to controll the text. Open the script CoinController again.
using System.Collections;
using System.Collections.Generic;
using UnityEngine;
//we need to add this library if we use UI
using UnityEngine.UI;
public class CoinController : MonoBehaviour {
//referenced variable for gameobject with Text component
public GameObject TextObject;
//referenced variable for Text component
Text textComponent;
//coins pick up sound
public AudioClip CoinSound;
//variable for coin counter
public int coin;
//will be started once at beginn
void Start () {
//make link to the Text component, which is on the Text gameobject
textComponent = TextObject.GetComponent <Text> ();
}
//will be startet, if collider2D went into the trigger
void OnTriggerEnter2D (Collider2D other) {
//check, if gameobject has tag Coin
if (other.tag == "Coin") {
//increment the coin counter variable
coin = coin + 1;
//transform int variable into string variable and assign the result to the text in the Text component
textComponent.text = coin.ToString();
//play the coins pick up sound at the rats position
AudioSource.PlayClipAtPoint (CoinSound, transform.position);
//delete coin gameobject from the scene
Destroy (other.gameObject);
}
}
}
Zoom back into the scene (you can doubleClick the rat in hierarchy). Select the Rat in the hierarchy. The CoinController script has now new field Text Object. Place gameobject Text in this field. UI should display the value of the coin variable. Start the game and check it.using System.Collections.Generic;
using UnityEngine;
//we need to add this library if we use UI
using UnityEngine.UI;
public class CoinController : MonoBehaviour {
//referenced variable for gameobject with Text component
public GameObject TextObject;
//referenced variable for Text component
Text textComponent;
//coins pick up sound
public AudioClip CoinSound;
//variable for coin counter
public int coin;
//will be started once at beginn
void Start () {
//make link to the Text component, which is on the Text gameobject
textComponent = TextObject.GetComponent <Text> ();
}
//will be startet, if collider2D went into the trigger
void OnTriggerEnter2D (Collider2D other) {
//check, if gameobject has tag Coin
if (other.tag == "Coin") {
//increment the coin counter variable
coin = coin + 1;
//transform int variable into string variable and assign the result to the text in the Text component
textComponent.text = coin.ToString();
//play the coins pick up sound at the rats position
AudioSource.PlayClipAtPoint (CoinSound, transform.position);
//delete coin gameobject from the scene
Destroy (other.gameObject);
}
}
}

How to make dead end:
Move the platform so that a hole appears where the rat can fall.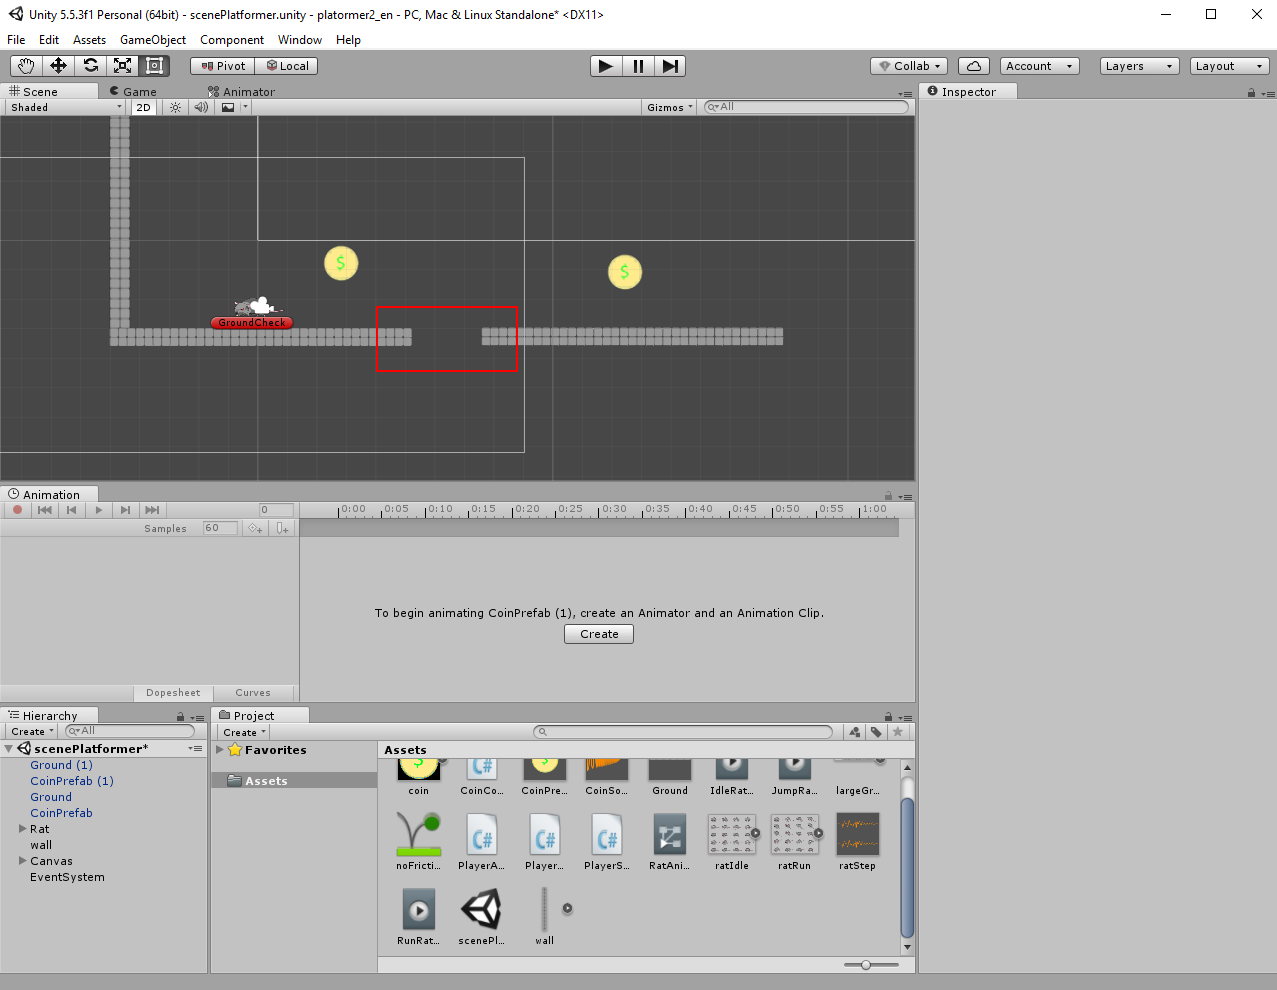
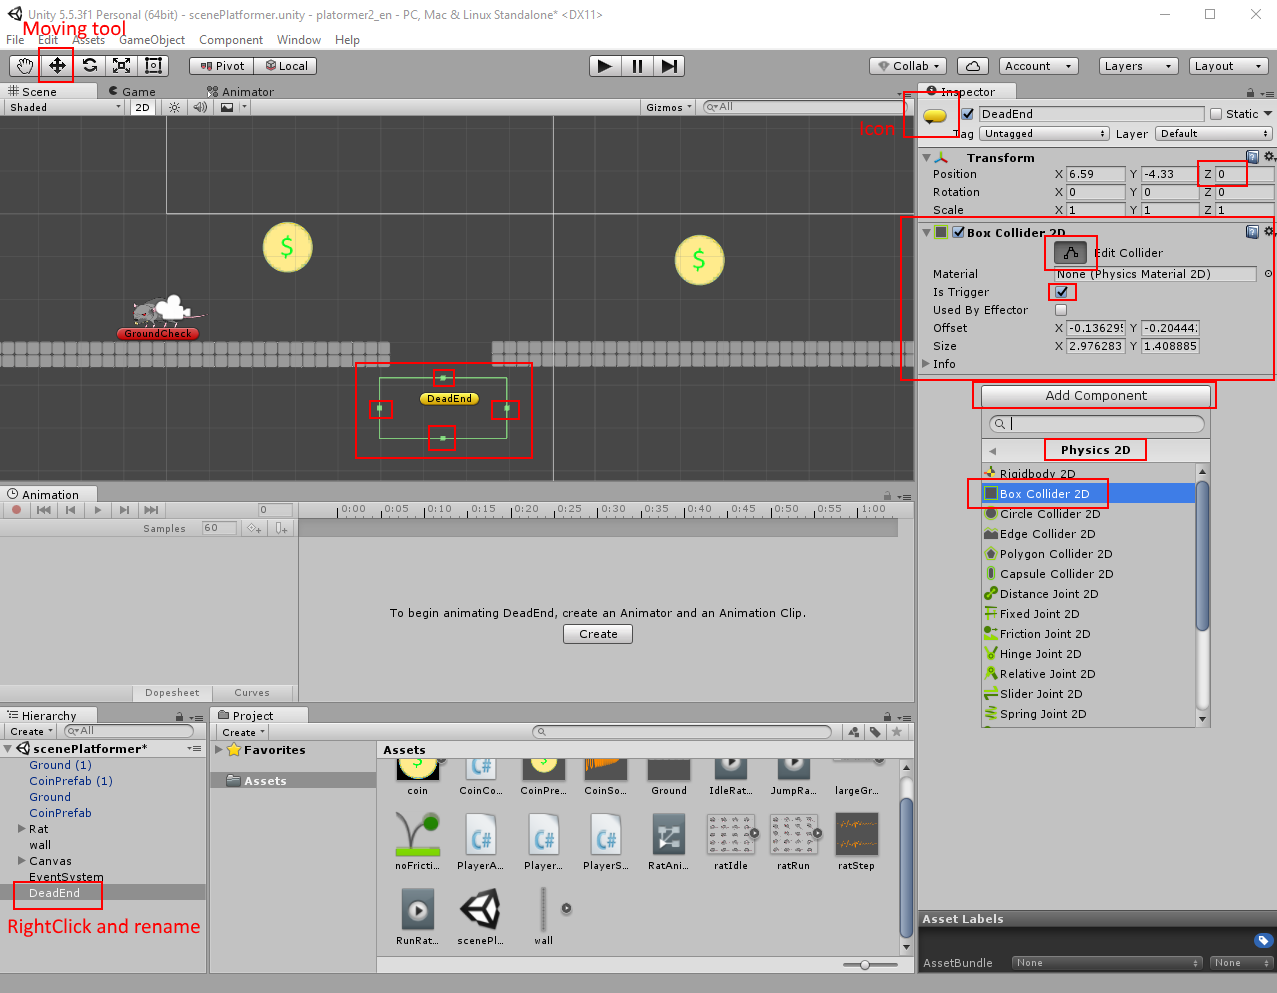
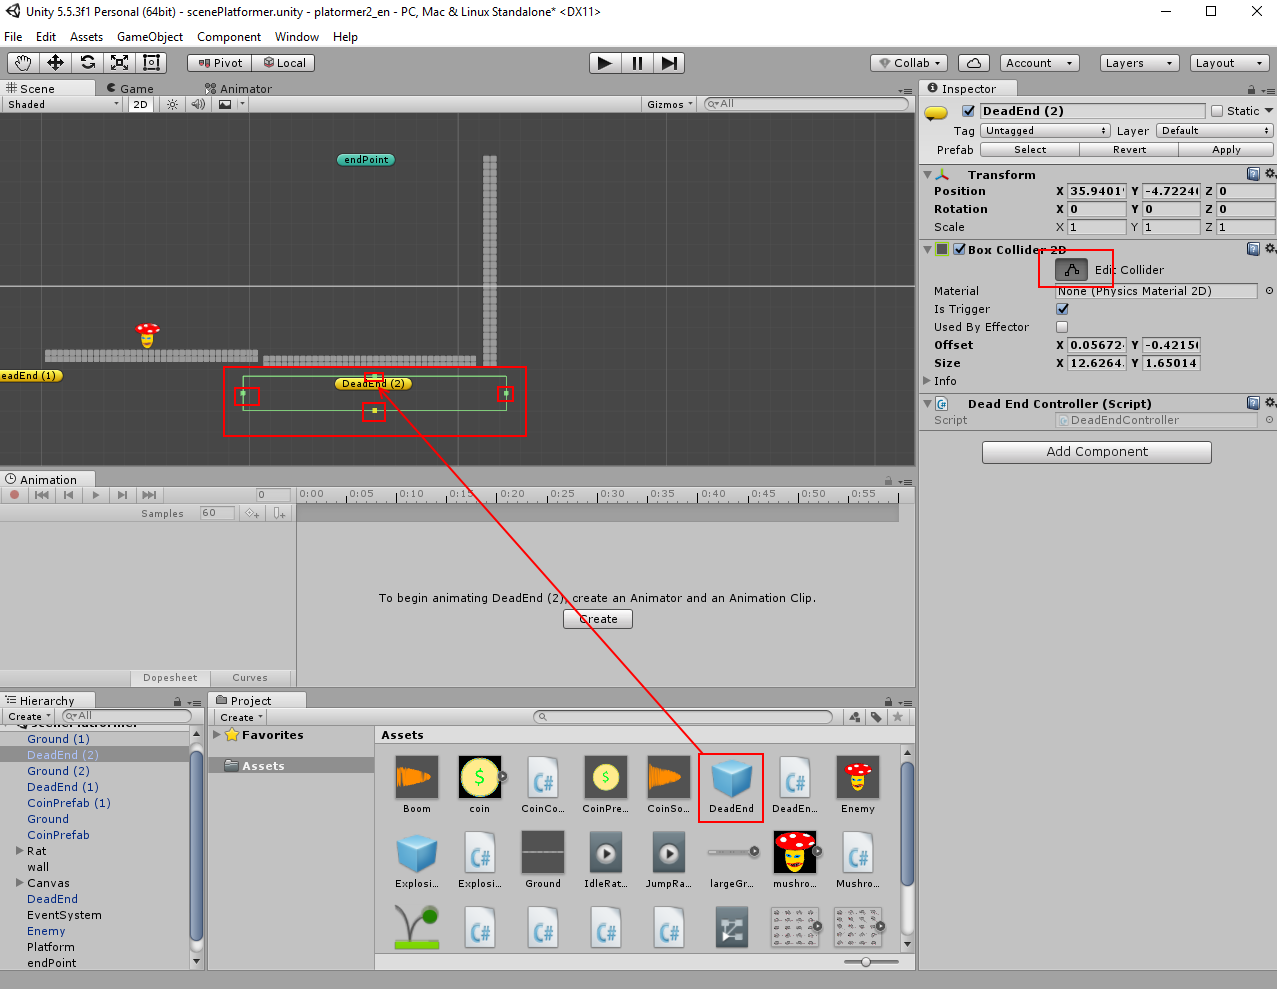
Create new empty gameobject.
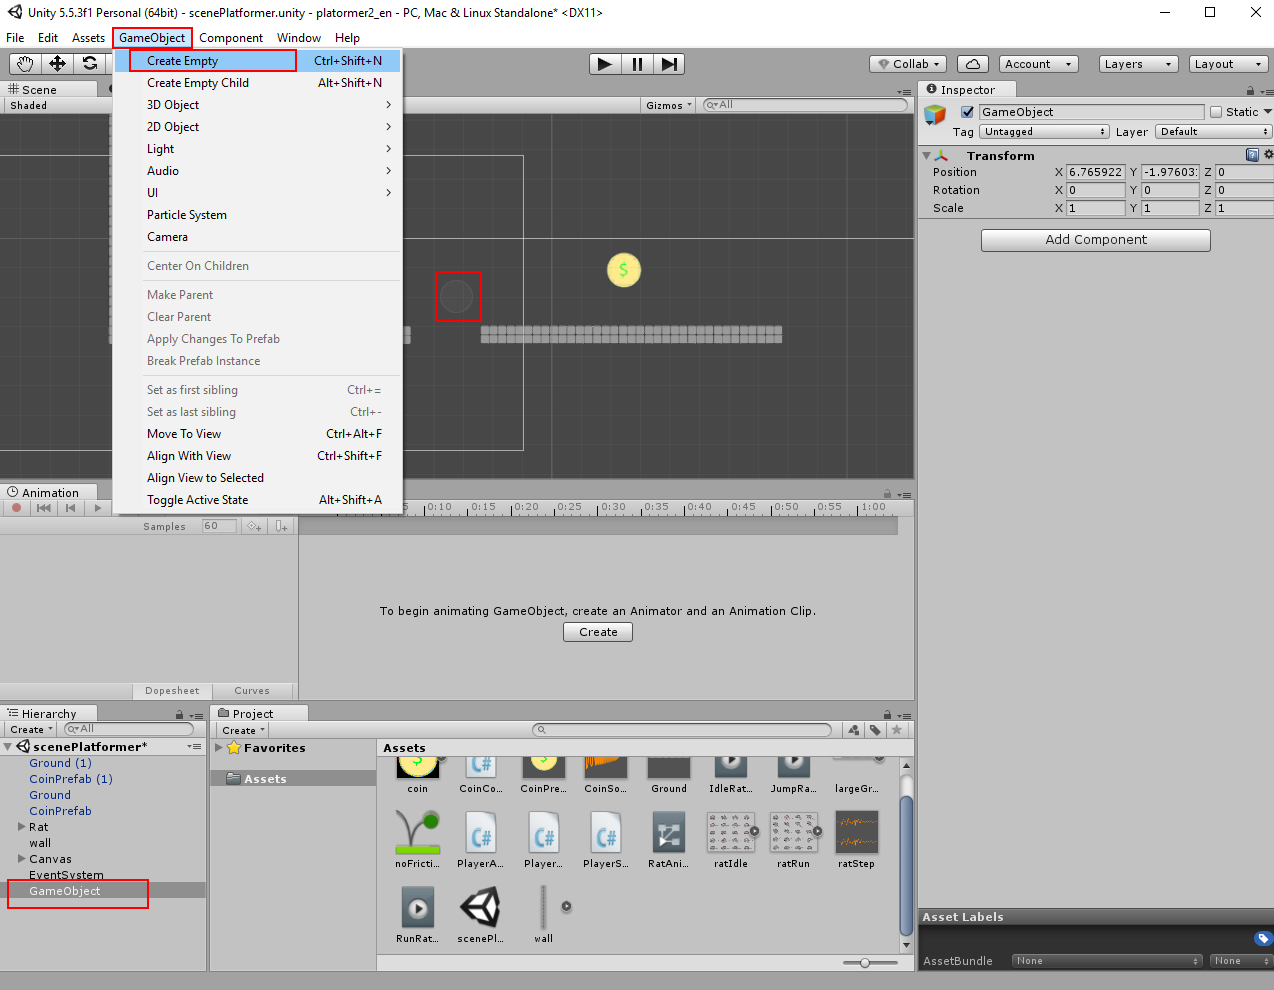
Select the created GameObject and rename it to DeadEnd. Enable an icon for it. Enable moving tool and move the DeadEnd to the bottom of the hole. Change its Z-Position to 0. Add Box Collider 2D. Click on Edit Collider and resize it as hole size (drag the green dots). Enable Is Trigger.
We need a script to controll the DeadEnd. We can check if the rat went into the trigger and just reload the scene. Create new C# script and name it DeadEndController.
using System.Collections;
using System.Collections.Generic;
using UnityEngine;
//we need this library if we use scene manager
using UnityEngine.SceneManagement;
public class DeadEndController : MonoBehaviour {
//will be started if 2D collider went into the trigger
void OnTriggerEnter2D (Collider2D other) {
//check if collided gameobject has tag Player
if (other.tag == "Player") {
//get the loaded scene name and load scene that has this name (reload)
SceneManager.LoadScene (SceneManager.GetActiveScene().name);
}
}
}
Select DeadEnd in the hierarchy and add this script to it. Create DeadEnd prefab (drag&drop DeadEnd from the hierarchy into Assets.)using System.Collections.Generic;
using UnityEngine;
//we need this library if we use scene manager
using UnityEngine.SceneManagement;
public class DeadEndController : MonoBehaviour {
//will be started if 2D collider went into the trigger
void OnTriggerEnter2D (Collider2D other) {
//check if collided gameobject has tag Player
if (other.tag == "Player") {
//get the loaded scene name and load scene that has this name (reload)
SceneManager.LoadScene (SceneManager.GetActiveScene().name);
}
}
}

How to make stupid enemy:
Place in the scene next Ground and DeadEnd prefabs.
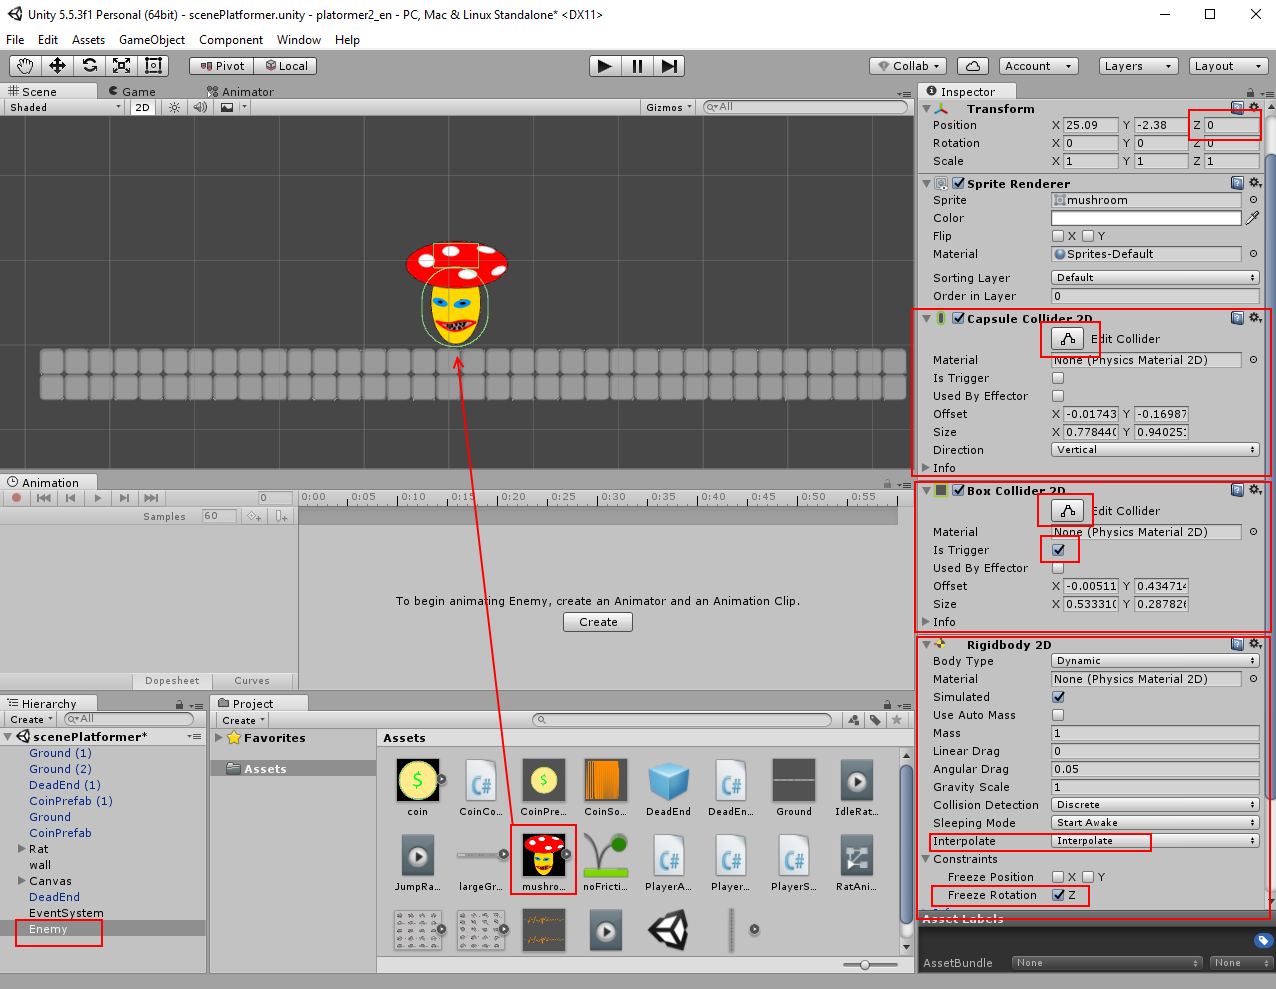
Import the mushroom image from the downloaded archive into the Assets. Drag&drop mushrooms sprite into the scene on the last platorm. New gameobject mushroom will be created. Rename it as Enemy. Select Enemy and look at its Inspector. Change Z-Position to 0. Add Capsule Collider 2D (we will use it as mushrooms body). Click on its Edit Collider button and resize the collider (look at the next screenshot). Add Box Collider 2D (we will use it as a trigger to check that the rat has jumped on the head). Enable Is Trigger. Click on its Edit Collider button and resize the collider (look at the next screenshot). Add Rigidbody 2D. Change Interpolate to interpolate (for more smoth movement). Enable Freeze Rotation Z (to prevent the rotation).
We need a script to control the mushroom. The mushrooms AI will be simple. The mushroom will just move between two points and will die if the rat has jumped on its head. Create new C# script and name it MushroomController.
using System.Collections;
using System.Collections.Generic;
using UnityEngine;
//we need this library if we use scene manager
using UnityEngine.SceneManagement;
public class MushroomController : MonoBehaviour {
//how far the mushroom can move away from the starting point
public float distanceToRun;
//moving speed of the mushroom
public float speed;
//looking direction of the mushroom
public bool isLookingLeft = true;
//start position will be saved here
Vector3 startPos;
//referenced variable for rigidbody2d component
Rigidbody2D rb;
//will be executed once at beginn
void Start () {
//reference to Rigidbody2D component
rb = GetComponent <Rigidbody2D> ();
//save the starting position of the mushroom
startPos = transform.position;
//we will compare squared magnitude against the square of distance
//because magnitude calculation is slow
distanceToRun = distanceToRun * distanceToRun;
}
//will be executed at every fixed timestep
void FixedUpdate () {
//check if the mushroom is looking left
if (isLookingLeft) {
//calculate local vector pointing to the position of the mushroom from the starting point
Vector2 dist = transform.position - startPos;
//check if the mushroom is left from the start position
//and the distance between the mushroom and starting point is more, as distanceToRun
if (transform.position.x < startPos.x && dist.sqrMagnitude > distanceToRun) {
//call the function to turn the mushroom
TurnTheMushroom ();
//start mooving to the right
rb.velocity = new Vector2 (speed, rb.velocity.y);
//if the check returns false
} else {
//continue moving to the left
rb.velocity = new Vector2 (-speed, rb.velocity.y);
}
}
//check if the mushroom is looking right
if (!isLookingLeft) {
//calculate local vector pointing to the position of the mushroom from the starting point
Vector2 dist = transform.position - startPos;
//check if the mushroom is right from the start position
//and the distance between the mushroom and starting point is more, as distanceToRun
if (transform.position.x > startPos.x && dist.sqrMagnitude > distanceToRun) {
//call the function to turn the mushroom
TurnTheMushroom ();
//start mooving to the left
rb.velocity = new Vector2 (-speed, rb.velocity.y);
//if the check returns false
} else {
//continue moving to the right
rb.velocity = new Vector2 (speed, rb.velocity.y);
}
}
}
//function for turning the mushroom
void TurnTheMushroom ()
{
//Switch the variable that shows the direction of the look at the opposite
isLookingLeft = !isLookingLeft;
//turn the enemy
transform.localScale = new Vector3 (transform.localScale.x * -1, transform.localScale.y, transform.localScale.z);
}
//will be started if 2D collider has touched other collider
void OnCollisionEnter2D (Collision2D other) {
//check if collided gameobject has tag Player
if (other.collider.gameObject.tag == "Player") {
//get the loaded scene name and load scene that has this name (reload)
SceneManager.LoadScene (SceneManager.GetActiveScene().name);
}
}
//will be started if 2D collider went into the trigger
void OnTriggerEnter2D (Collider2D other) {
//check if collided gameobject has tag Player
if (other.tag == "Player") {
//destroy the mushroom
Destroy (gameObject);
}
}
}
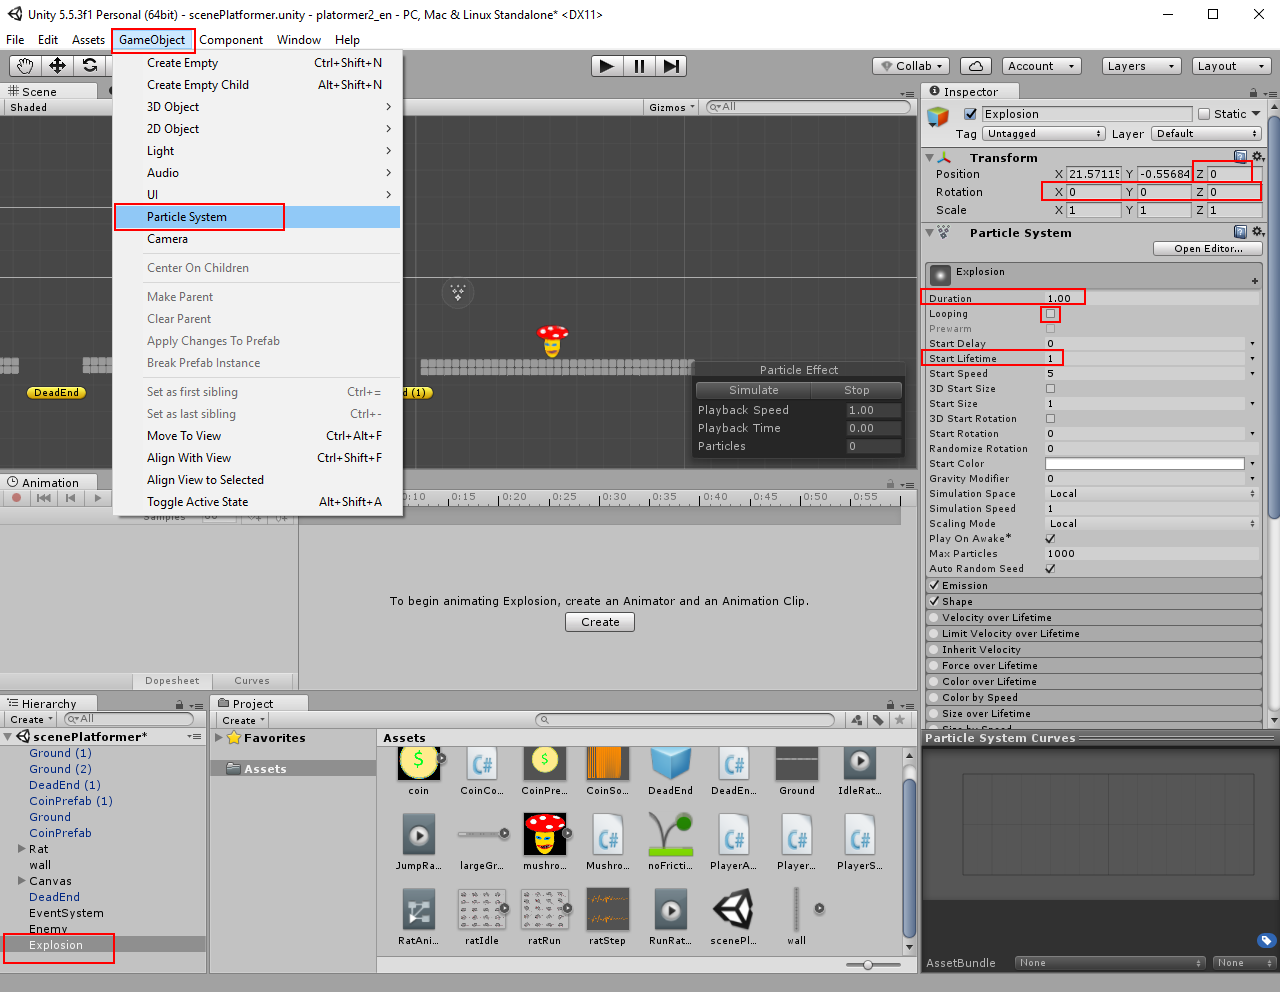
Let's add the explosion effect if the mushroom was destroyed. We can use particle system for that. Add Particle System. Rename it to Explosion. Set Z-Position to 0. Change all Rotation to 0, Duration to 1, disable Looping, Start Lifetime to 1.using System.Collections.Generic;
using UnityEngine;
//we need this library if we use scene manager
using UnityEngine.SceneManagement;
public class MushroomController : MonoBehaviour {
//how far the mushroom can move away from the starting point
public float distanceToRun;
//moving speed of the mushroom
public float speed;
//looking direction of the mushroom
public bool isLookingLeft = true;
//start position will be saved here
Vector3 startPos;
//referenced variable for rigidbody2d component
Rigidbody2D rb;
//will be executed once at beginn
void Start () {
//reference to Rigidbody2D component
rb = GetComponent <Rigidbody2D> ();
//save the starting position of the mushroom
startPos = transform.position;
//we will compare squared magnitude against the square of distance
//because magnitude calculation is slow
distanceToRun = distanceToRun * distanceToRun;
}
//will be executed at every fixed timestep
void FixedUpdate () {
//check if the mushroom is looking left
if (isLookingLeft) {
//calculate local vector pointing to the position of the mushroom from the starting point
Vector2 dist = transform.position - startPos;
//check if the mushroom is left from the start position
//and the distance between the mushroom and starting point is more, as distanceToRun
if (transform.position.x < startPos.x && dist.sqrMagnitude > distanceToRun) {
//call the function to turn the mushroom
TurnTheMushroom ();
//start mooving to the right
rb.velocity = new Vector2 (speed, rb.velocity.y);
//if the check returns false
} else {
//continue moving to the left
rb.velocity = new Vector2 (-speed, rb.velocity.y);
}
}
//check if the mushroom is looking right
if (!isLookingLeft) {
//calculate local vector pointing to the position of the mushroom from the starting point
Vector2 dist = transform.position - startPos;
//check if the mushroom is right from the start position
//and the distance between the mushroom and starting point is more, as distanceToRun
if (transform.position.x > startPos.x && dist.sqrMagnitude > distanceToRun) {
//call the function to turn the mushroom
TurnTheMushroom ();
//start mooving to the left
rb.velocity = new Vector2 (-speed, rb.velocity.y);
//if the check returns false
} else {
//continue moving to the right
rb.velocity = new Vector2 (speed, rb.velocity.y);
}
}
}
//function for turning the mushroom
void TurnTheMushroom ()
{
//Switch the variable that shows the direction of the look at the opposite
isLookingLeft = !isLookingLeft;
//turn the enemy
transform.localScale = new Vector3 (transform.localScale.x * -1, transform.localScale.y, transform.localScale.z);
}
//will be started if 2D collider has touched other collider
void OnCollisionEnter2D (Collision2D other) {
//check if collided gameobject has tag Player
if (other.collider.gameObject.tag == "Player") {
//get the loaded scene name and load scene that has this name (reload)
SceneManager.LoadScene (SceneManager.GetActiveScene().name);
}
}
//will be started if 2D collider went into the trigger
void OnTriggerEnter2D (Collider2D other) {
//check if collided gameobject has tag Player
if (other.tag == "Player") {
//destroy the mushroom
Destroy (gameObject);
}
}
}
Expand Emission tab. Change Rate over Time to 0. Add Burst at 0 time (click on + button). Expand Shape tab and change Shape to Circle.

Expand Renderer tab and change Order in Layer to 100.

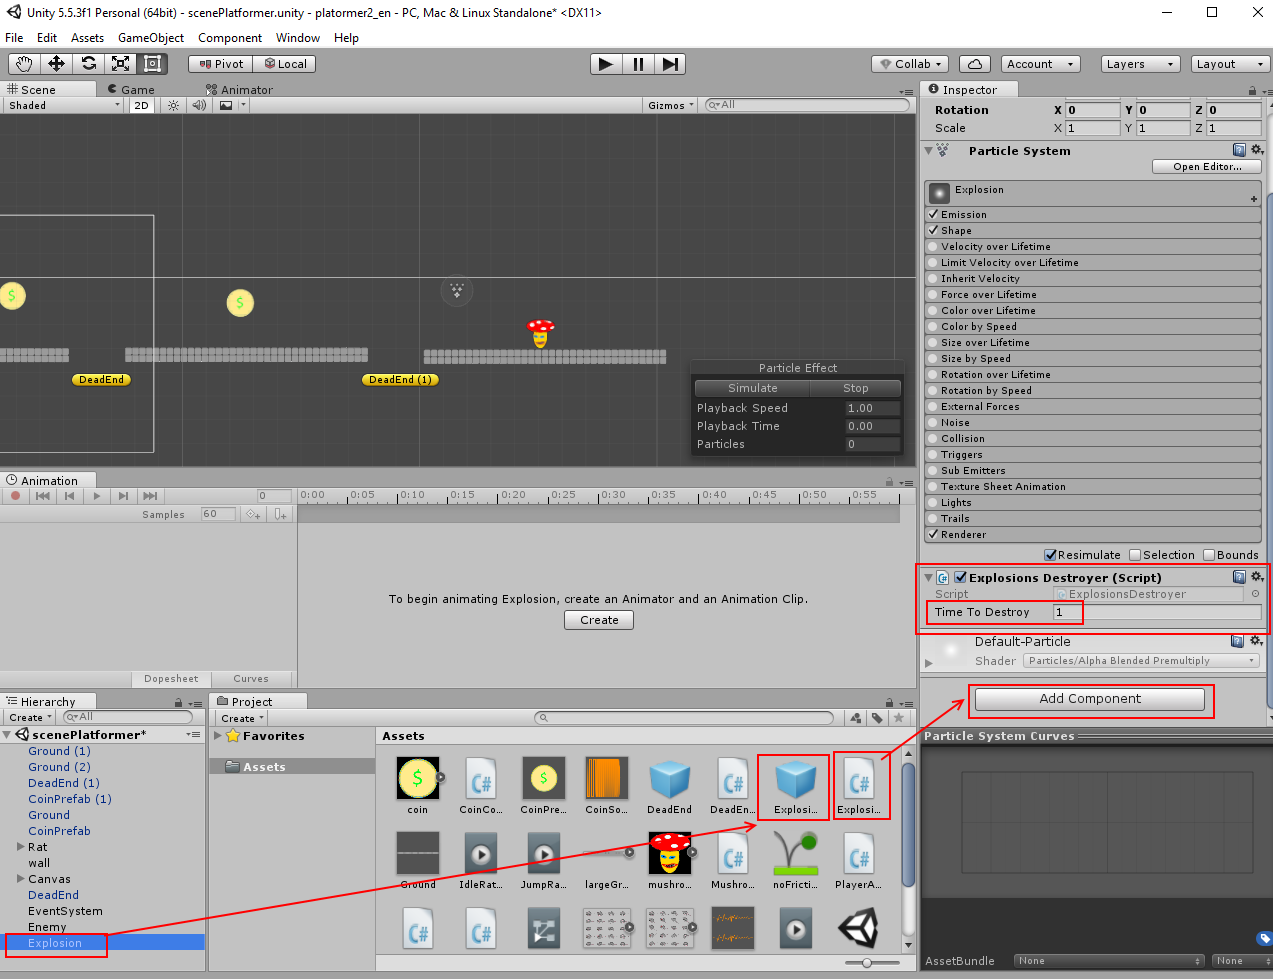
We need to remove Explosion from the scene after it has been played. We can do it with little script. Create new C# script and name it ExplosionsDestroyer.
using System.Collections;
using System.Collections.Generic;
using UnityEngine;
public class ExplosionsDestroyer : MonoBehaviour {
//how long the explosion will stay in the scene
public float timeToDestroy;
//will be executed once at start
void Start () {
//delete explosion from the scene
Destroy (gameObject, timeToDestroy);
}
}
Select Explosion in the hierarchy. Add this script to the Explosion. Set Time To Destroy to 1. Create prefab of Explosion. Delete the explosion, after the prefab was created (RightClick on the Explosion in the hierarchy and select Delete).using System.Collections.Generic;
using UnityEngine;
public class ExplosionsDestroyer : MonoBehaviour {
//how long the explosion will stay in the scene
public float timeToDestroy;
//will be executed once at start
void Start () {
//delete explosion from the scene
Destroy (gameObject, timeToDestroy);
}
}
We should add explosion and its sound to the mushrooms script now. Open the script MushroomController.
using System.Collections;
using System.Collections.Generic;
using UnityEngine;
//we need this library if we use scene manager
using UnityEngine.SceneManagement;
public class MushroomController : MonoBehaviour {
//explosions prefab
public GameObject Explosion;
//exlosions sound
public AudioClip Boom;
//how far the mushroom can move away from the starting point
public float distanceToRun;
//moving speed of the mushroom
public float speed;
//looking direction of the mushroom
public bool isLookingLeft = true;
//start position will be saved here
Vector3 startPos;
//referenced variable for rigidbody2d component
Rigidbody2D rb;
//will be executed once at beginn
void Start () {
//reference to Rigidbody2D component
rb = GetComponent <Rigidbody2D> ();
//save the starting position of the mushroom
startPos = transform.position;
//we will compare squared magnitude against the square of distance
//because magnitude calculation is slow
distanceToRun = distanceToRun * distanceToRun;
}
//will be executed at every fixed timestep
void FixedUpdate () {
//check if the mushroom is looking left
if (isLookingLeft) {
//calculate local vector pointing to the position of the mushroom from the starting point
Vector2 dist = transform.position - startPos;
//check if the mushroom is left from the start position
//and the distance between the mushroom and starting point is more, as distanceToRun
if (transform.position.x < startPos.x && dist.sqrMagnitude > distanceToRun) {
//call the function to turn the mushroom
TurnTheMushroom ();
//start mooving to the right
rb.velocity = new Vector2 (speed, rb.velocity.y);
//if the check returns false
} else {
//continue moving to the left
rb.velocity = new Vector2 (-speed, rb.velocity.y);
}
}
//check if the mushroom is looking right
if (!isLookingLeft) {
//calculate local vector pointing to the position of the mushroom from the starting point
Vector2 dist = transform.position - startPos;
//check if the mushroom is right from the start position
//and the distance between the mushroom and starting point is more, as distanceToRun
if (transform.position.x > startPos.x && dist.sqrMagnitude > distanceToRun) {
//call the function to turn the mushroom
TurnTheMushroom ();
//start mooving to the left
rb.velocity = new Vector2 (-speed, rb.velocity.y);
//if the check returns false
} else {
//continue moving to the right
rb.velocity = new Vector2 (speed, rb.velocity.y);
}
}
}
//function for turning the mushroom
void TurnTheMushroom ()
{
//Switch the variable that shows the direction of the look at the opposite
isLookingLeft = !isLookingLeft;
//turn the enemy
transform.localScale = new Vector3 (transform.localScale.x * -1, transform.localScale.y, transform.localScale.z);
}
//will be started if 2D collider has touched other collider
void OnCollisionEnter2D (Collision2D other) {
//check if collided gameobject has tag Player
if (other.collider.gameObject.tag == "Player") {
//get the loaded scene name and load scene that has this name (reload)
SceneManager.LoadScene (SceneManager.GetActiveScene().name);
}
}
//will be started if 2D collider went into the trigger
void OnTriggerEnter2D (Collider2D other) {
//check if collided gameobject has tag Player
if (other.tag == "Player") {
//spawn explosions prefab
Instantiate (Explosion, transform.position, Quaternion.identity);
//play explosions sound
AudioSource.PlayClipAtPoint (Boom, transform.position);
//destroy the mushroom
Destroy (gameObject);
}
}
}
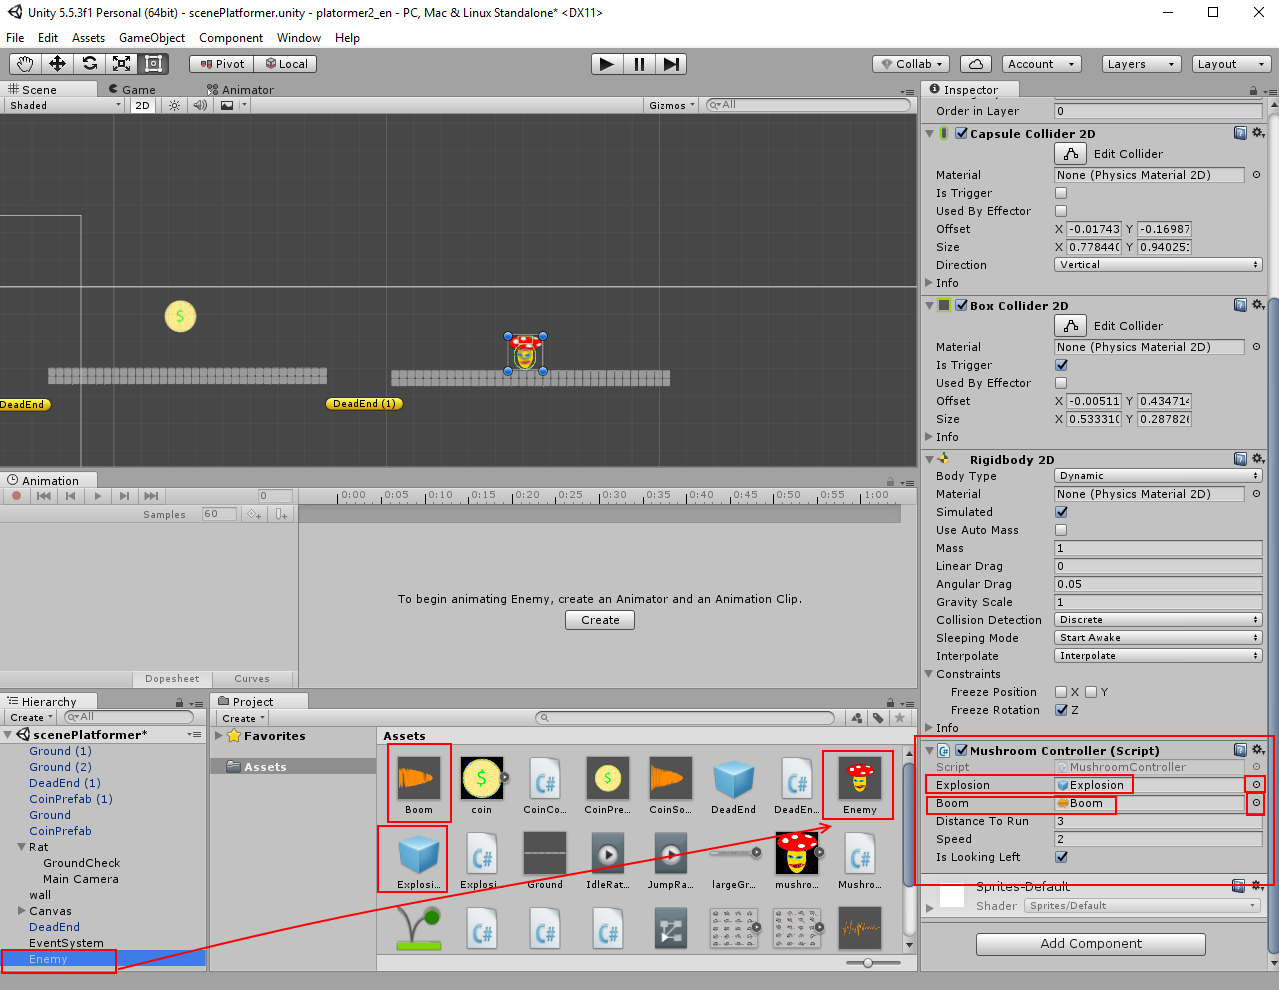
Import Boom audio clip into the Assets. Select Enemy in the hierarchy. The Mushroom Controller has two new fields. Place Explosion prefab into Explosion fiels. Place Boom audio clip into Boom field. Create prefab from the Enemy. You can try the scene.using System.Collections.Generic;
using UnityEngine;
//we need this library if we use scene manager
using UnityEngine.SceneManagement;
public class MushroomController : MonoBehaviour {
//explosions prefab
public GameObject Explosion;
//exlosions sound
public AudioClip Boom;
//how far the mushroom can move away from the starting point
public float distanceToRun;
//moving speed of the mushroom
public float speed;
//looking direction of the mushroom
public bool isLookingLeft = true;
//start position will be saved here
Vector3 startPos;
//referenced variable for rigidbody2d component
Rigidbody2D rb;
//will be executed once at beginn
void Start () {
//reference to Rigidbody2D component
rb = GetComponent <Rigidbody2D> ();
//save the starting position of the mushroom
startPos = transform.position;
//we will compare squared magnitude against the square of distance
//because magnitude calculation is slow
distanceToRun = distanceToRun * distanceToRun;
}
//will be executed at every fixed timestep
void FixedUpdate () {
//check if the mushroom is looking left
if (isLookingLeft) {
//calculate local vector pointing to the position of the mushroom from the starting point
Vector2 dist = transform.position - startPos;
//check if the mushroom is left from the start position
//and the distance between the mushroom and starting point is more, as distanceToRun
if (transform.position.x < startPos.x && dist.sqrMagnitude > distanceToRun) {
//call the function to turn the mushroom
TurnTheMushroom ();
//start mooving to the right
rb.velocity = new Vector2 (speed, rb.velocity.y);
//if the check returns false
} else {
//continue moving to the left
rb.velocity = new Vector2 (-speed, rb.velocity.y);
}
}
//check if the mushroom is looking right
if (!isLookingLeft) {
//calculate local vector pointing to the position of the mushroom from the starting point
Vector2 dist = transform.position - startPos;
//check if the mushroom is right from the start position
//and the distance between the mushroom and starting point is more, as distanceToRun
if (transform.position.x > startPos.x && dist.sqrMagnitude > distanceToRun) {
//call the function to turn the mushroom
TurnTheMushroom ();
//start mooving to the left
rb.velocity = new Vector2 (-speed, rb.velocity.y);
//if the check returns false
} else {
//continue moving to the right
rb.velocity = new Vector2 (speed, rb.velocity.y);
}
}
}
//function for turning the mushroom
void TurnTheMushroom ()
{
//Switch the variable that shows the direction of the look at the opposite
isLookingLeft = !isLookingLeft;
//turn the enemy
transform.localScale = new Vector3 (transform.localScale.x * -1, transform.localScale.y, transform.localScale.z);
}
//will be started if 2D collider has touched other collider
void OnCollisionEnter2D (Collision2D other) {
//check if collided gameobject has tag Player
if (other.collider.gameObject.tag == "Player") {
//get the loaded scene name and load scene that has this name (reload)
SceneManager.LoadScene (SceneManager.GetActiveScene().name);
}
}
//will be started if 2D collider went into the trigger
void OnTriggerEnter2D (Collider2D other) {
//check if collided gameobject has tag Player
if (other.tag == "Player") {
//spawn explosions prefab
Instantiate (Explosion, transform.position, Quaternion.identity);
//play explosions sound
AudioSource.PlayClipAtPoint (Boom, transform.position);
//destroy the mushroom
Destroy (gameObject);
}
}
}
Audio Listener:
By default, the Audio Listener is attached to the Main Camera. Audio Listener acts like the ear. Check Unity Documentation for details. Also we should move it to the position of the rat. Select Main Camera (it is the child object from the rat) and disable Audio Listener in the Inspector (we need only one listener in the scene).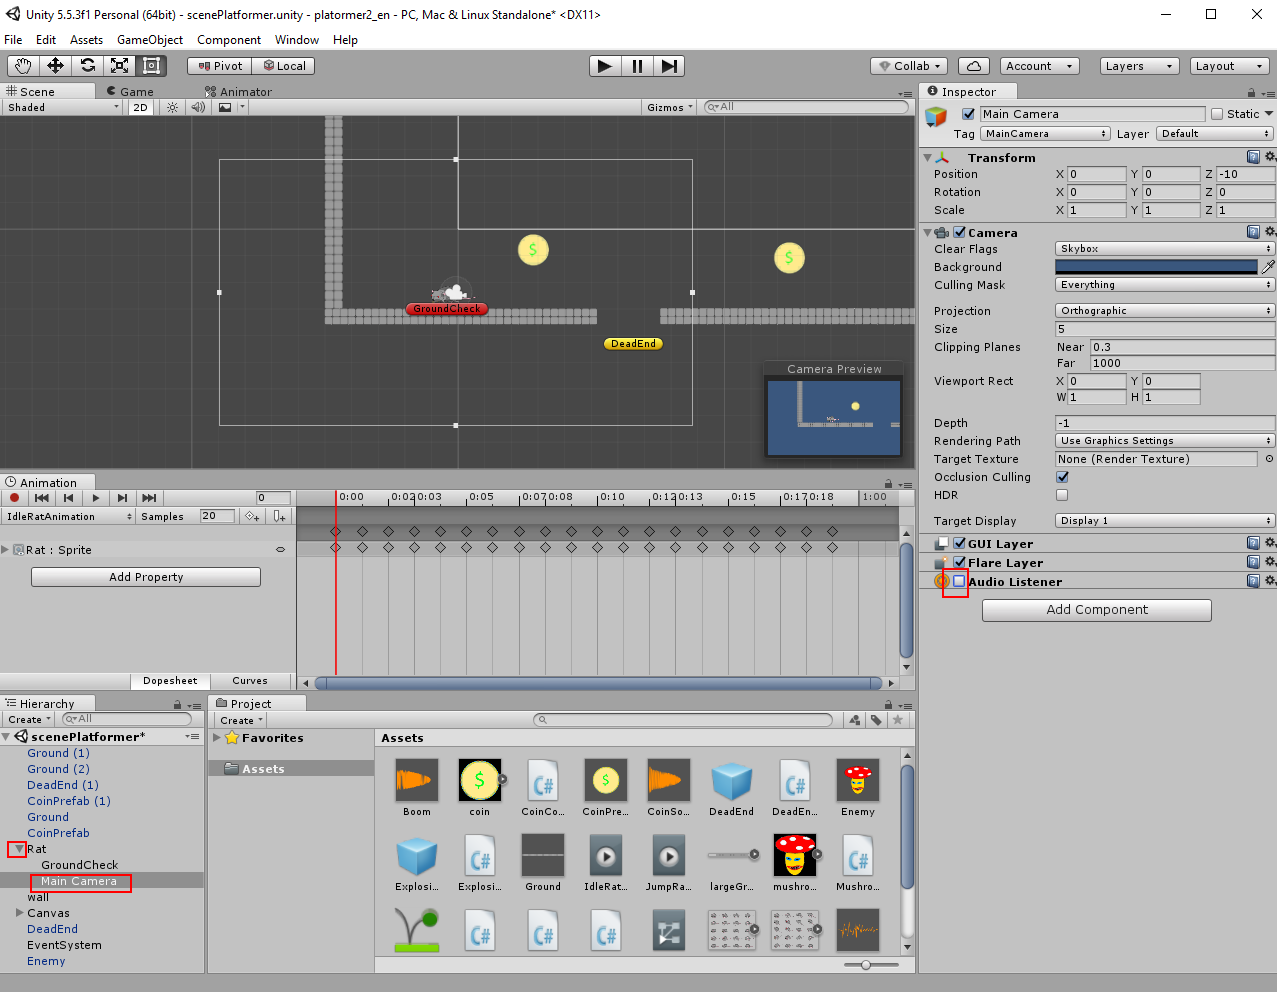
Select the Rat in the hierarchy and add Audio Listener to it.
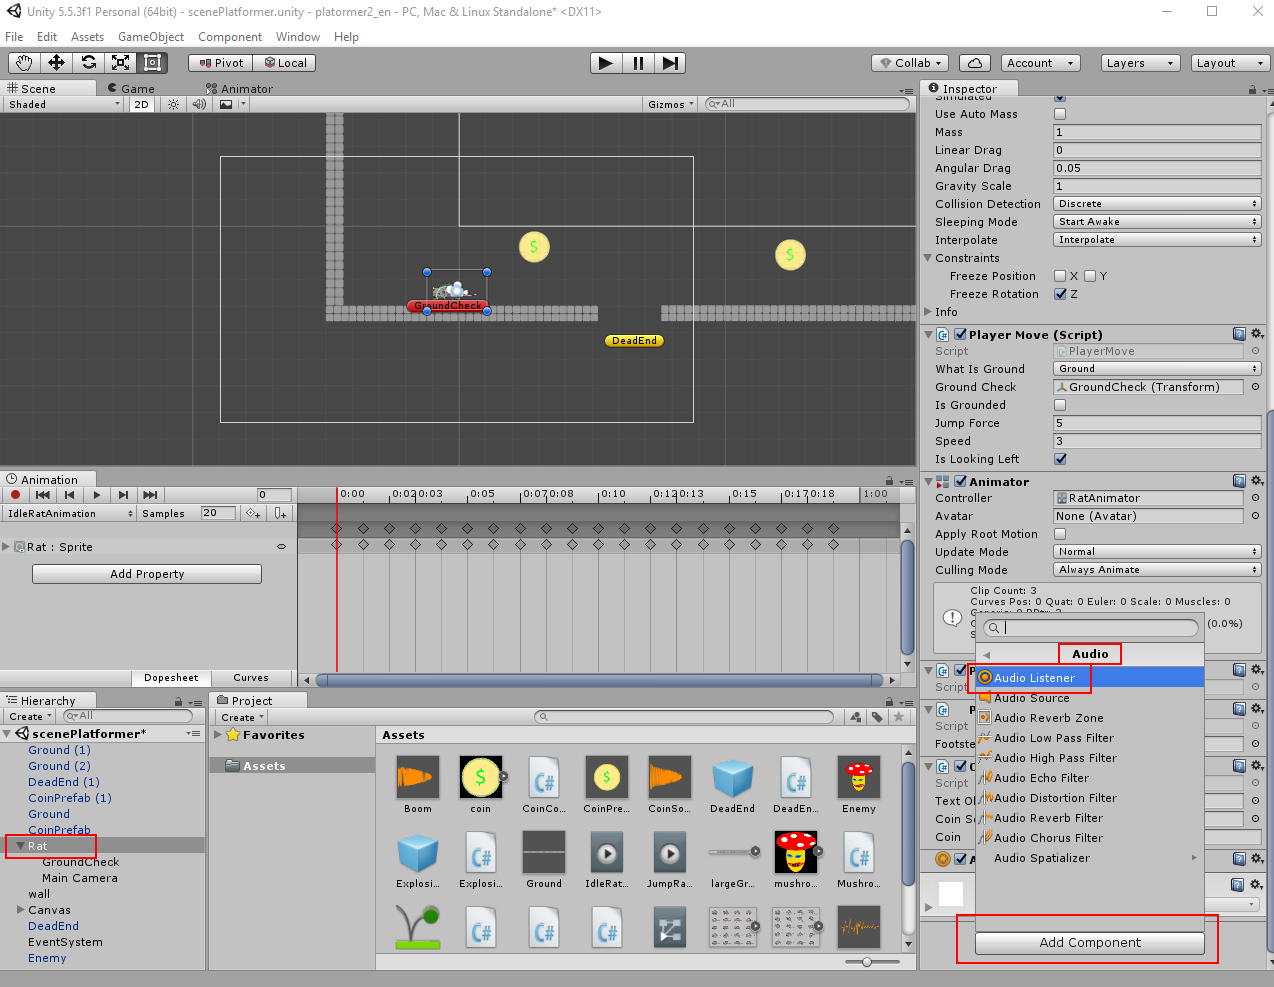
Check the scene.
How to make moving platform:
Now we can make moving platform. Place largePlatform sprite in the scene. New gameobject will be created. Rename it as Platform. Select this Platform in the hierarchy. Change its Z-Position to 0. Change Tag and Layer to Ground. Add Rigidbody 2D to it. Set Body Type to Kinematic. Set Interpolate to Interpolate. Enable Freeze Position X and Freeze Rotation Z. Add Box Collider 2D.
We need a moving script for the platform. Create new C# script and name it PlatformMoving.
using System.Collections;
using System.Collections.Generic;
using UnityEngine;
public class PlatformMoving : MonoBehaviour {
//moving speed of the platform
public float speed;
//position in which the platform should turn back
public Transform endPoint;
//position in which the platform starts its moving
Vector3 startPoint;
//we need a reference to Rigidbody2D component
Rigidbody2D rb;
//this will be the speed of the platform between the start and the end
float currentSpeed;
//will be executed once at beginn
void Start () {
//save the start position of the platform
startPoint = transform.position;
//reference to the Rigidbody2D
rb = GetComponent <Rigidbody2D> ();
//this will be an initial speed of the platform
currentSpeed = speed;
}
//will be executed at every fixed time step
void FixedUpdate () {
//Check if the platform is above the endpoint
if (transform.position.y > endPoint.position.y)
//change the moving vector to down
currentSpeed = -speed;
//Check if the platform is below the start point
if (transform.position.y < startPoint.y)
//change the moving vector to up
currentSpeed = speed;
//move the platform in the direction of moving vector
rb.velocity = new Vector3 (0, currentSpeed, 0);
}
}
Create new empty gameobject.using System.Collections.Generic;
using UnityEngine;
public class PlatformMoving : MonoBehaviour {
//moving speed of the platform
public float speed;
//position in which the platform should turn back
public Transform endPoint;
//position in which the platform starts its moving
Vector3 startPoint;
//we need a reference to Rigidbody2D component
Rigidbody2D rb;
//this will be the speed of the platform between the start and the end
float currentSpeed;
//will be executed once at beginn
void Start () {
//save the start position of the platform
startPoint = transform.position;
//reference to the Rigidbody2D
rb = GetComponent <Rigidbody2D> ();
//this will be an initial speed of the platform
currentSpeed = speed;
}
//will be executed at every fixed time step
void FixedUpdate () {
//Check if the platform is above the endpoint
if (transform.position.y > endPoint.position.y)
//change the moving vector to down
currentSpeed = -speed;
//Check if the platform is below the start point
if (transform.position.y < startPoint.y)
//change the moving vector to up
currentSpeed = speed;
//move the platform in the direction of moving vector
rb.velocity = new Vector3 (0, currentSpeed, 0);
}
}
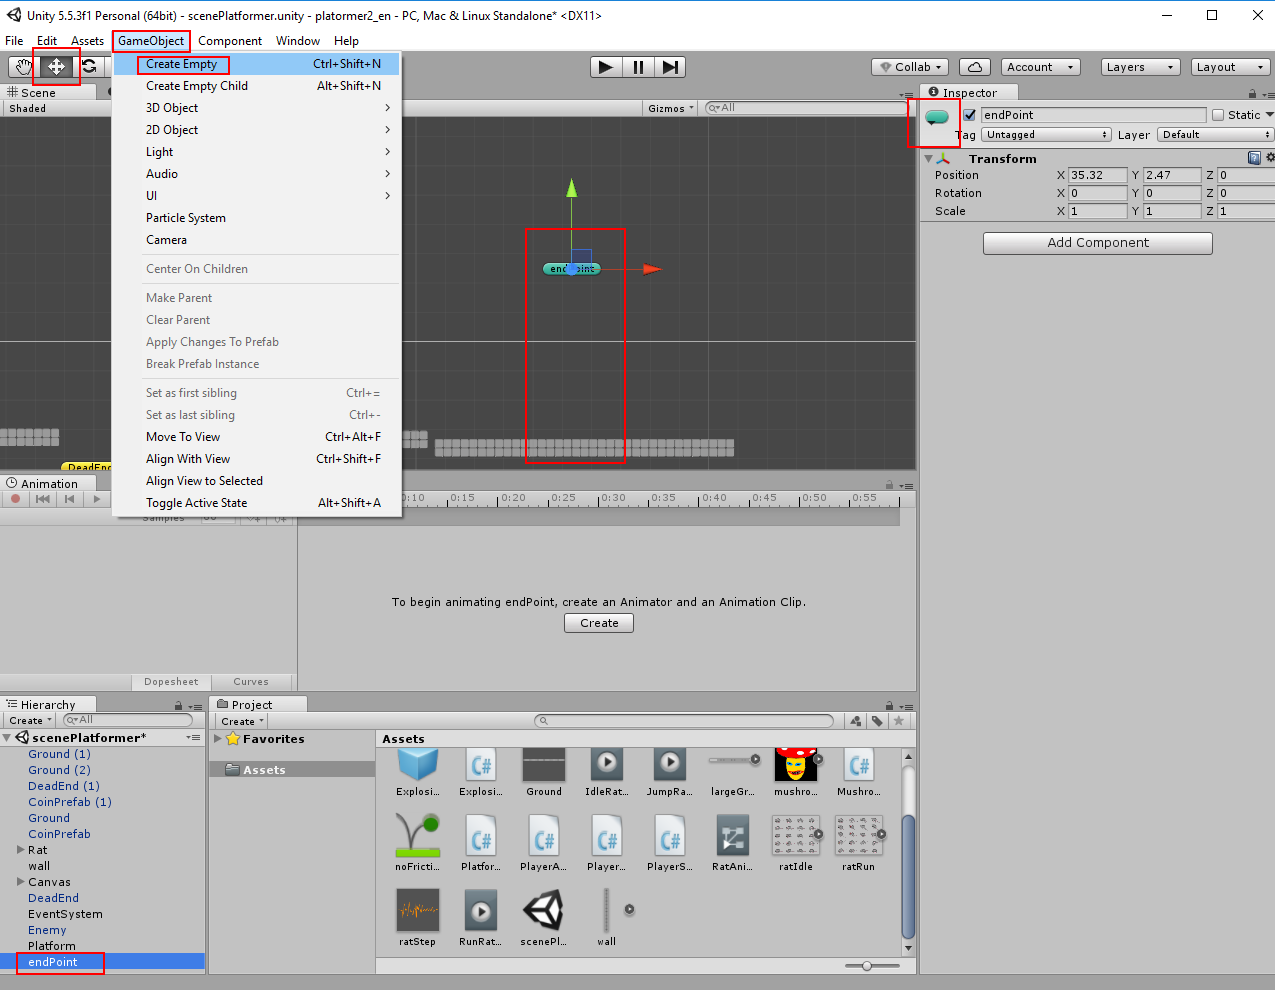
Rename it as endPoint. Assign an icon to it for better view. Place the endPoint above the Platform (you can use moving tool).
Select the Platform in the hierarchy. Add the PlatformMoving script to it. Change Speed to 1. Insert endPoint object into the End Point field.
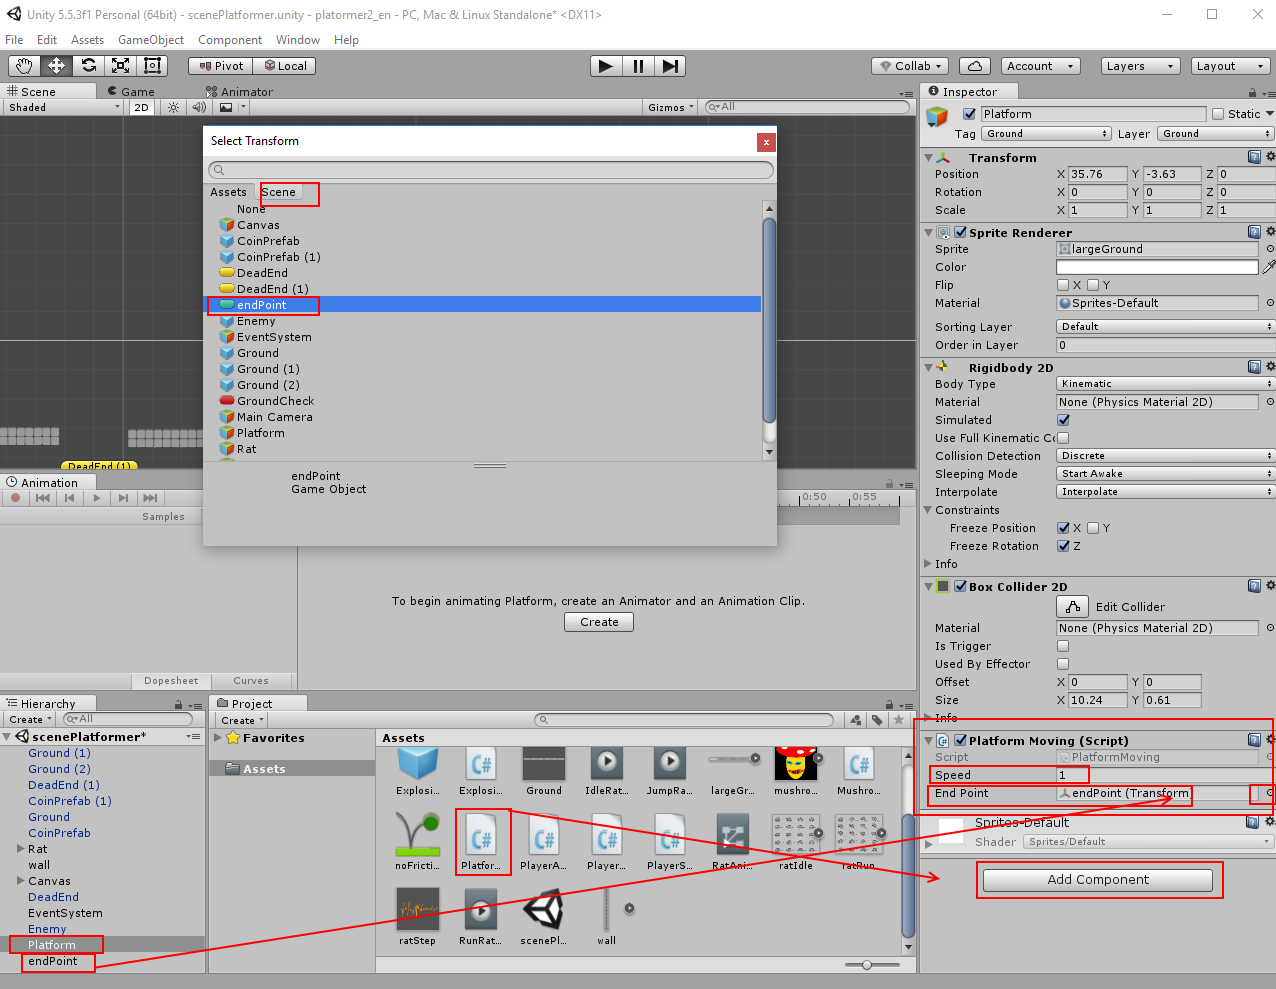
Start the scene and check it (you can switch to scene tab if the game is playing).

Place the wall in the scene to the right of the platform. Select this wall in the hierarchy and add Box Collider 2D to it.
Put next Dead End prefab in the scene below the moving platform. Click on Edit Collider and adjust its size.
How to make a physical object:
Import Box image from the downloaded folder. Put the Box sprite into the scene (place it on the moving platform). Select Box gameobject in the hierarchy. Change its Tag and Layer to Ground. Set Z-Position to 0. Add Rigidbody 2D. Set Interpolate to Interpolate. Add Box Collider 2D.
You can interact with this box in the game.
End of the level:
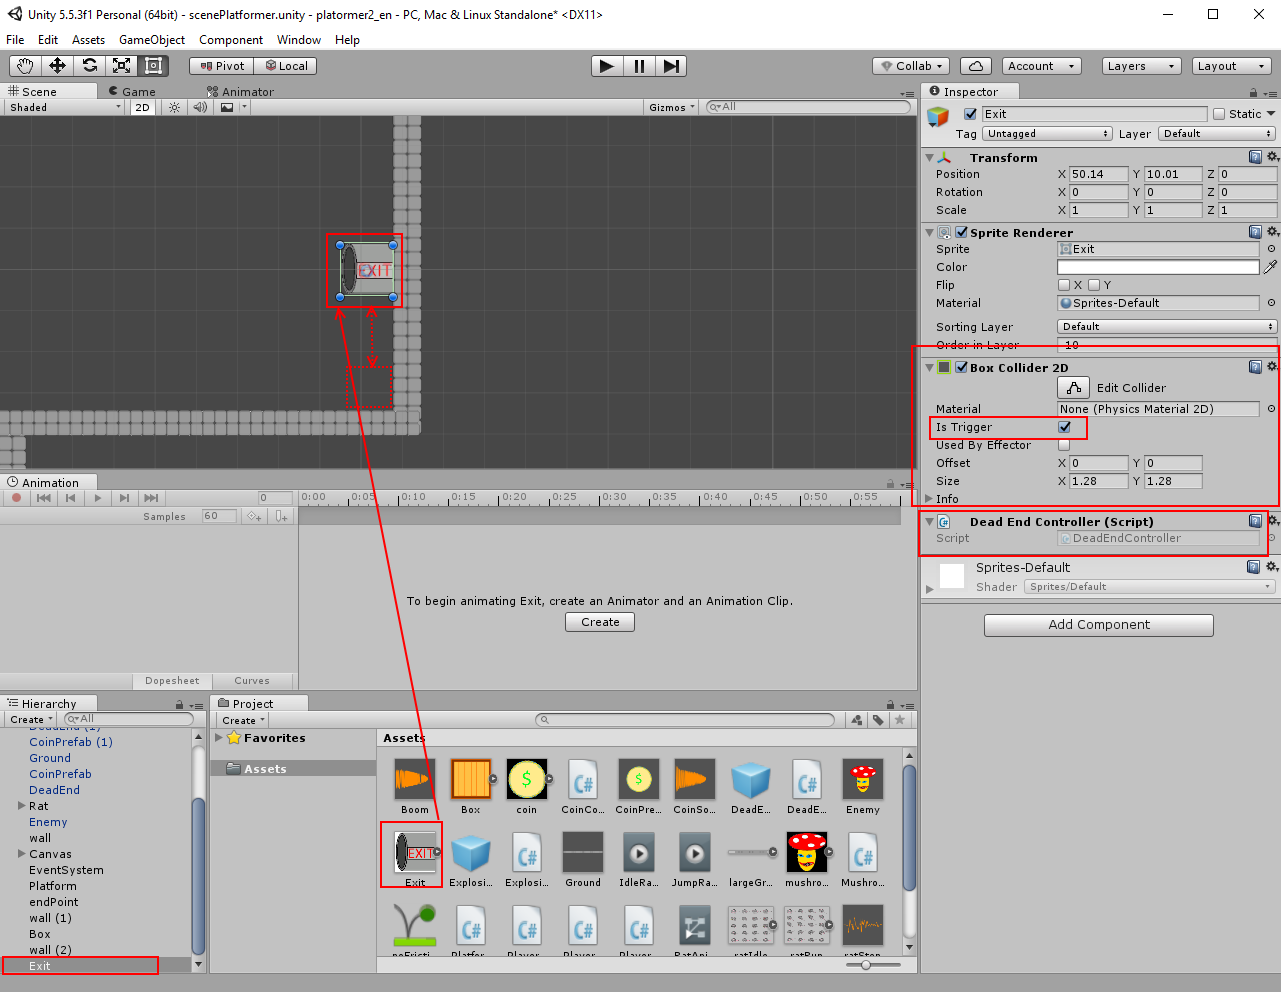
Put the next Ground prefab in the scene, where the moving platform will stop going up (check the screenshot). Make the last wall at the end (place wall sprite in the scene and add Box Collider 2D to it).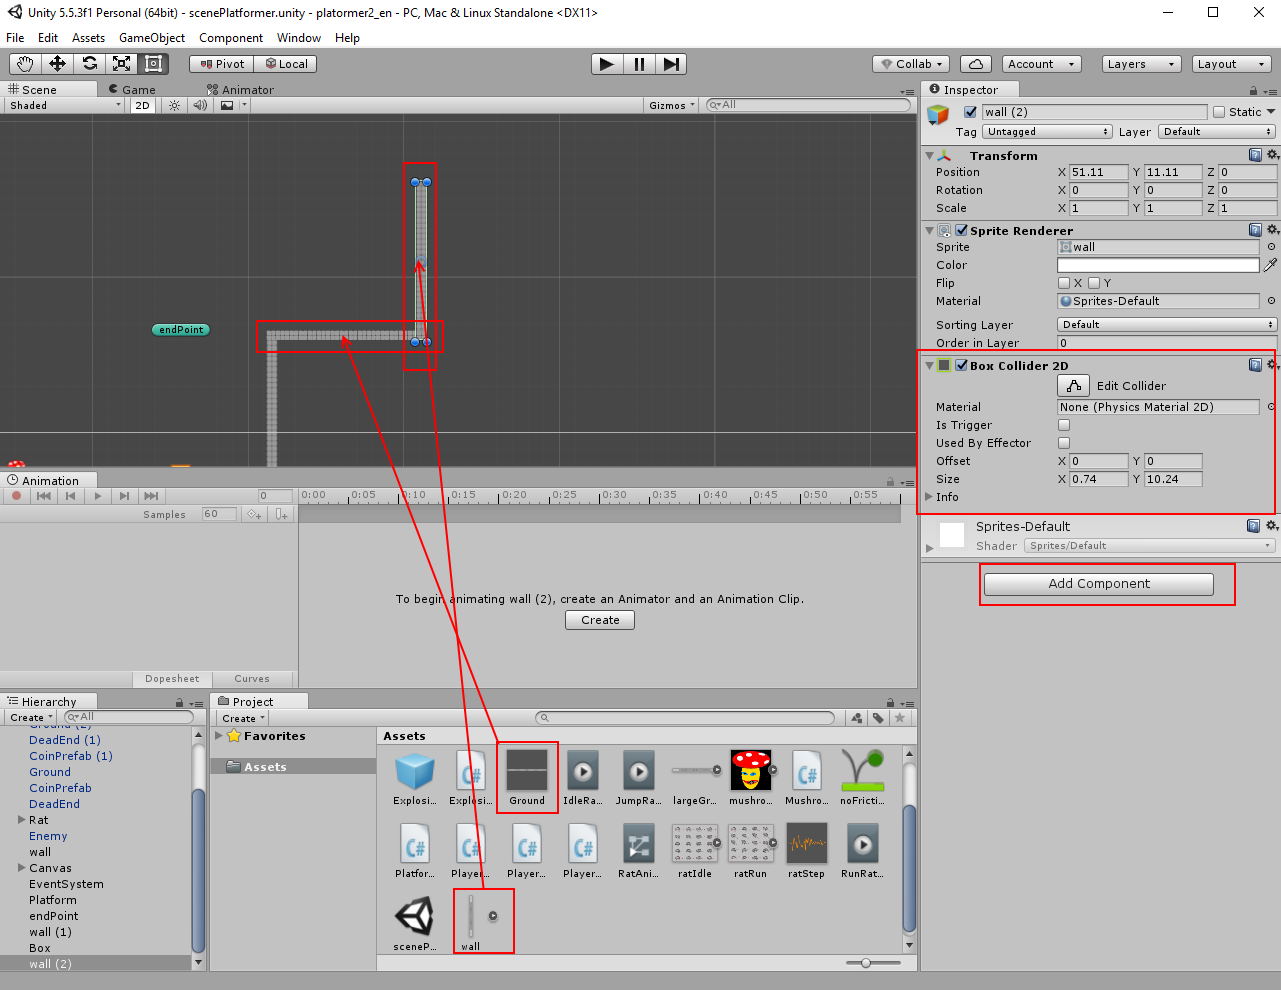
Import Exit image in the Assets. Put the Exit sprite in the scene near the last wall. The rat shouldn't touch this Exit gameobject just by jumping from the ground. The Box will be needed for that. Select Exit in the hierarchy. Add Box Collider 2D. Enable Is Trigger. Add Dead End Controller script to it. We will just reload the scene, because we don't have other scene to load.
How to make moving background with parallax effect:
With parallax effect, we can fake the depth of the scene. Far objects will move slower (or faster, if you will). We need small script for this. Create new C# script and name it Parallax.
using System.Collections;
using System.Collections.Generic;
using UnityEngine;
public class Parallax : MonoBehaviour {
//referenced variable for player
GameObject player;
//position of the player in last frame and
//difference between last and current positions
Vector3 lastPos, offset;
//scrolling speed of the background
public float speed;
//will be executed once at beginn
void Start () {
//make reference to the player
player = GameObject.FindWithTag ("Player");
//save the position of the player, we wiil need it in next frame
lastPos = player.transform.position;
}
//will be executed every frame
void Update () {
//calculate difference between positions of the player in this and last frames
offset = player.transform.position - lastPos;
//change the difference depended on speed and scroll the background
//Time.deltaTime makes it frame independent
transform.Translate (offset * speed * Time.deltaTime);
//resave the position of the player for next frame
lastPos = player.transform.position;
}
}
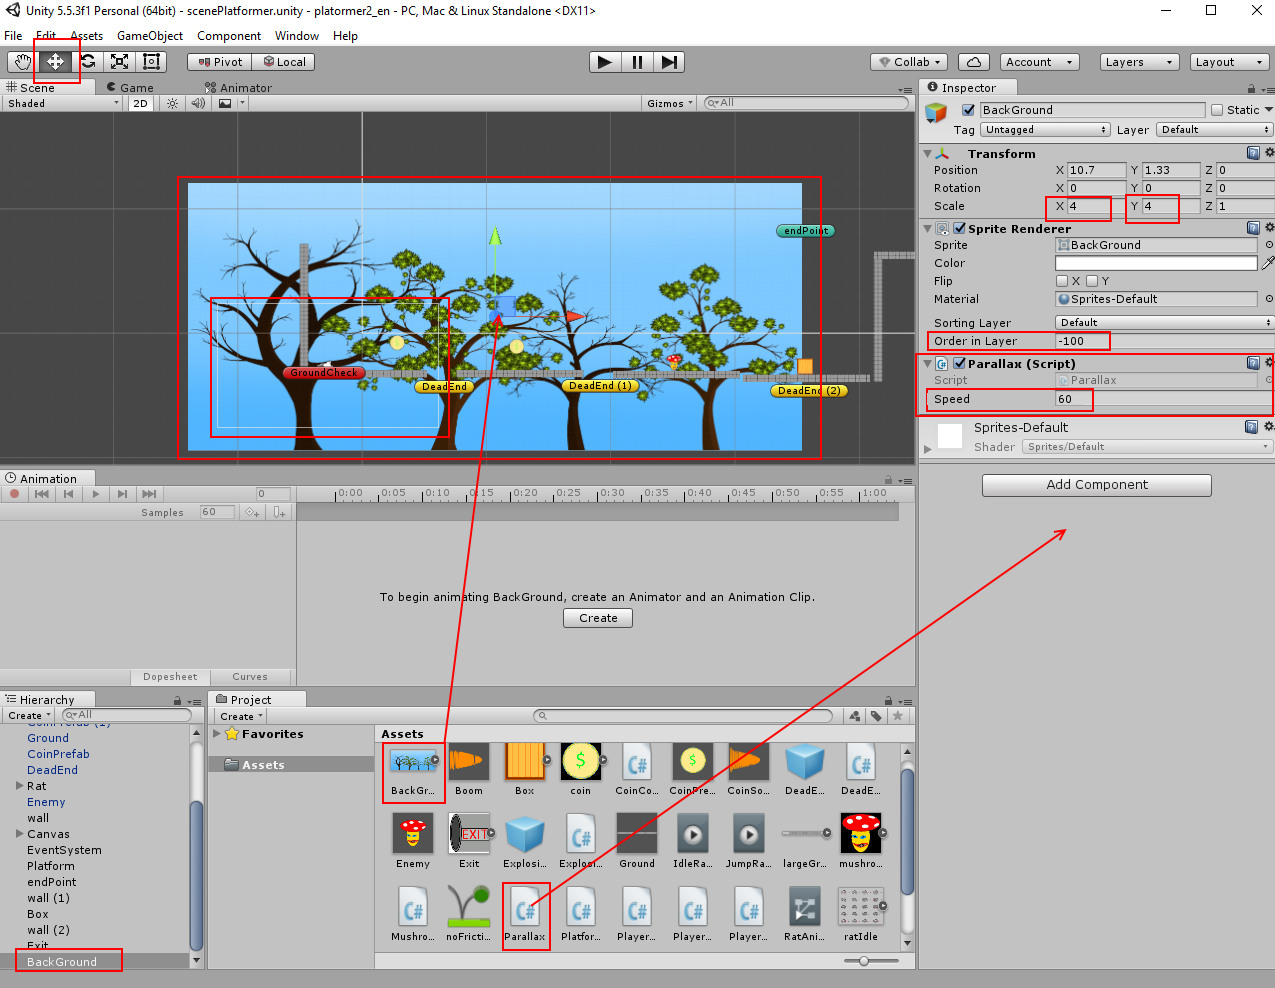
Import BackGround image in the Assets. Put the BackGround sprite in the scene. Set its X and Y Scale to 4. Move it to the position of the rat (check the screenshot). Change Order in Layer to -100. Add Parallax script to it. Set Speed to 60 (try different settings).using System.Collections.Generic;
using UnityEngine;
public class Parallax : MonoBehaviour {
//referenced variable for player
GameObject player;
//position of the player in last frame and
//difference between last and current positions
Vector3 lastPos, offset;
//scrolling speed of the background
public float speed;
//will be executed once at beginn
void Start () {
//make reference to the player
player = GameObject.FindWithTag ("Player");
//save the position of the player, we wiil need it in next frame
lastPos = player.transform.position;
}
//will be executed every frame
void Update () {
//calculate difference between positions of the player in this and last frames
offset = player.transform.position - lastPos;
//change the difference depended on speed and scroll the background
//Time.deltaTime makes it frame independent
transform.Translate (offset * speed * Time.deltaTime);
//resave the position of the player for next frame
lastPos = player.transform.position;
}
}
How to add background music:
Now the easy part. Import Music audio file. Select the Rat in the hierarchy. Drag&Drop Music on the Rat in the hierarchy (or add Audio Source and put Music into the AudioClip field). Enable Loop.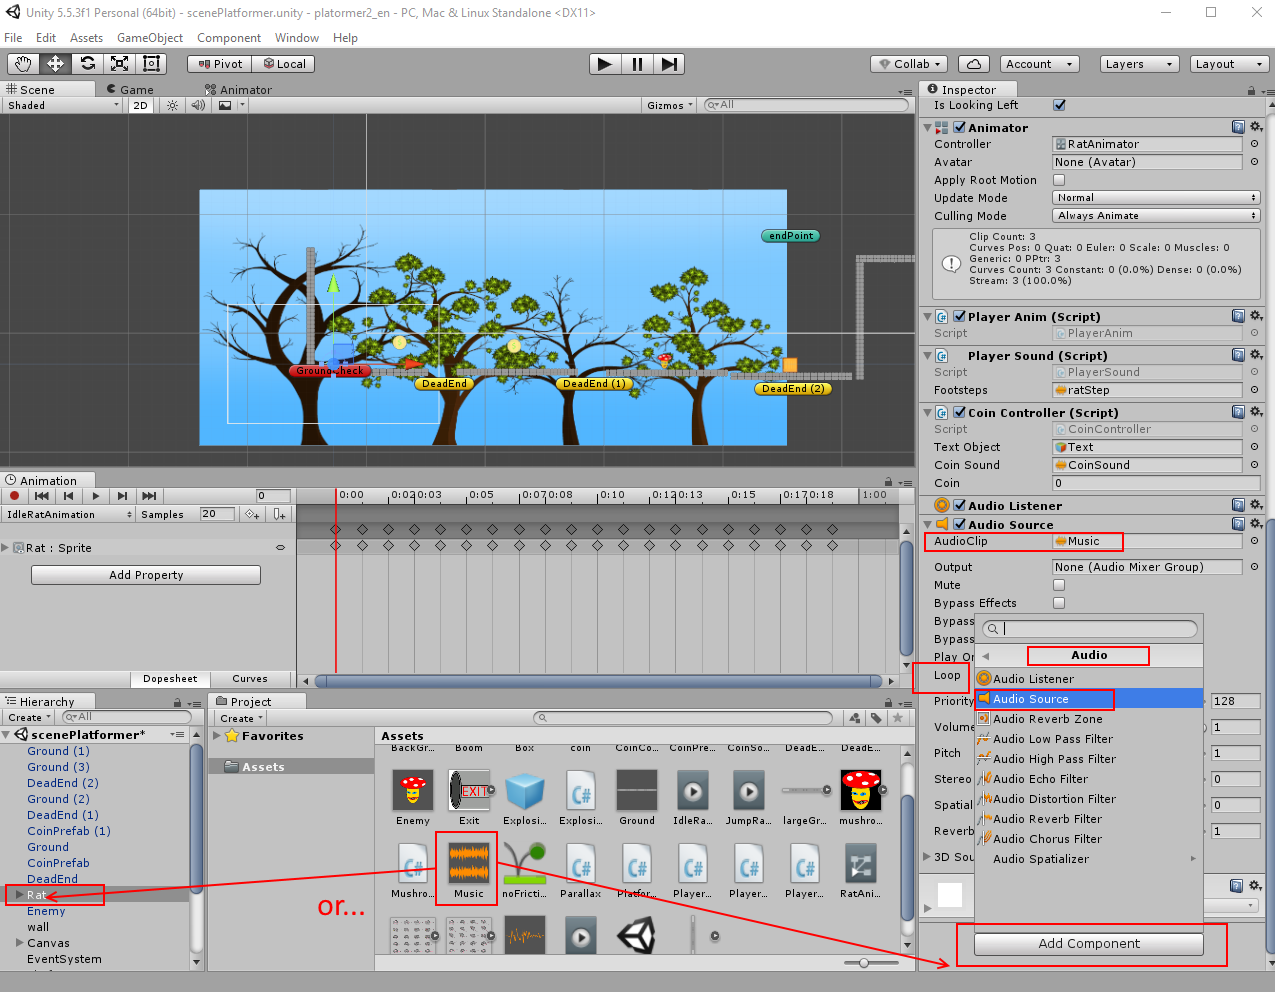
Try now the scene.
This is the end of this tutorial. I know there are a lot of things left that can be improved (as example: jumping animation on the platforms edge. You can try to fix it with: Physics2D.OverlapBox) but every game is different and need its own solution.
 this tutorial as unity package