Tutorial 3: 2D Space Shooter (for beginners)
Introduction:
Here you can see how to do simple 2D space shooter game with Unity 3D engine. I will use built-in 2D physic. You will need some images for this tutorial. You can download it here. * And you should download packed sound files here.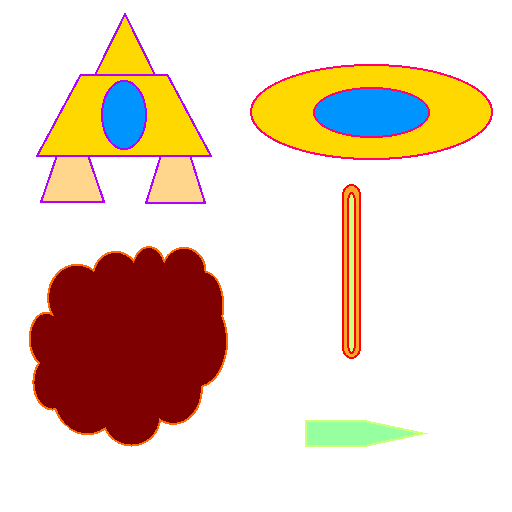
*If your browser just opens the picture, then you should download it manually. Right-click with your mouse on picture and save it. Or right-click on download link and choose save target.
1. Step
Create new Unity 2D project. Import downloaded spaceImage (you can just drag&drop it into Assets window or right-click into Assets window - select Import New Asset - choose downloaded spaceImage and click Import). Select spaceImage in Assets window and set Sprite Mode to Multiple in its Inspector. Click on Apply.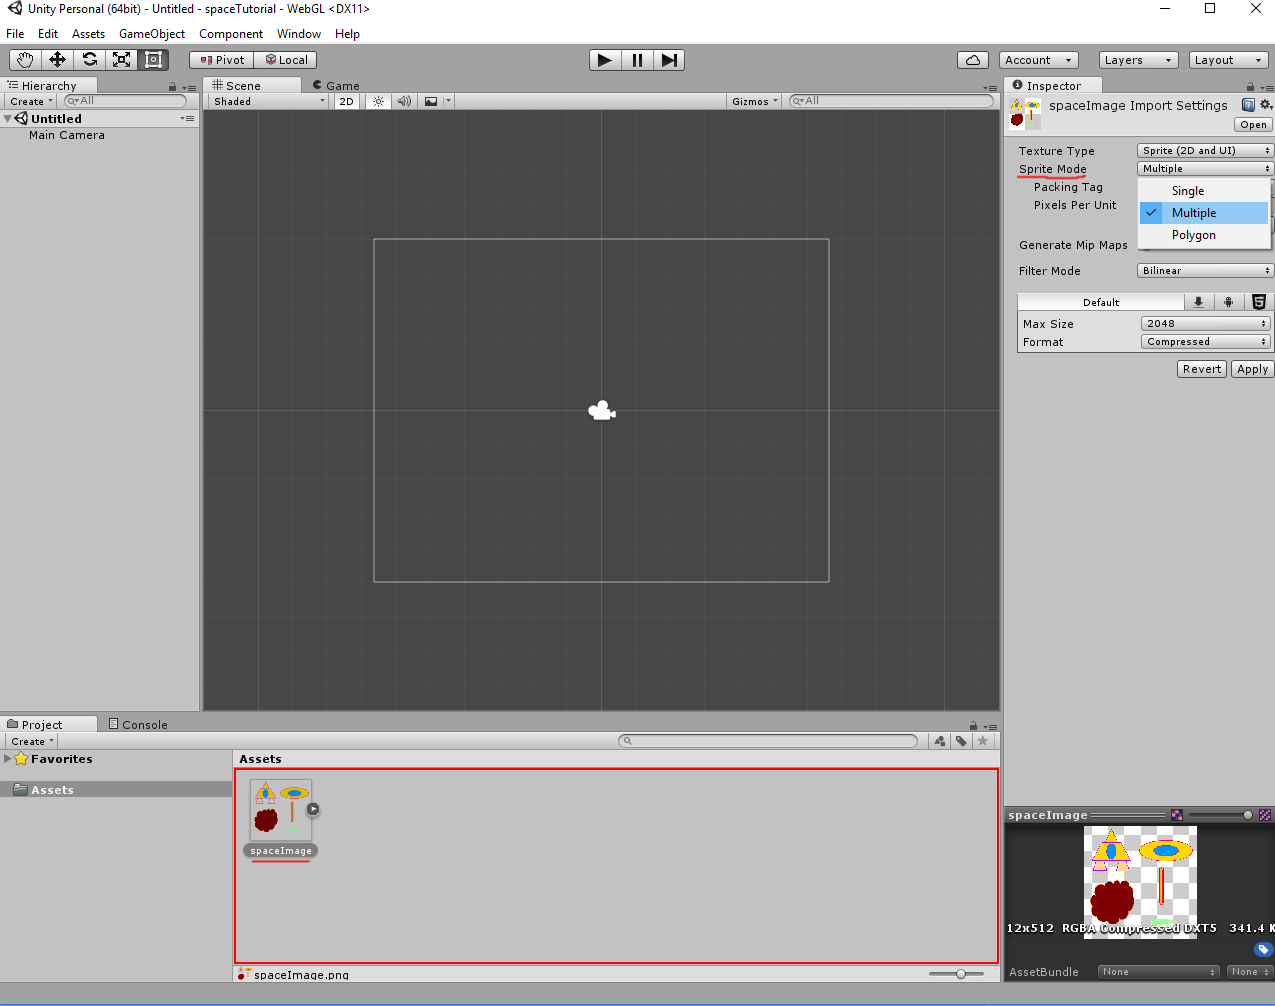
Click now on Sprite Editor. Click on Slice. Check that Type is setted to Automatic and click on Slice Button. Click on Apply and close sprite editor.

2. Step
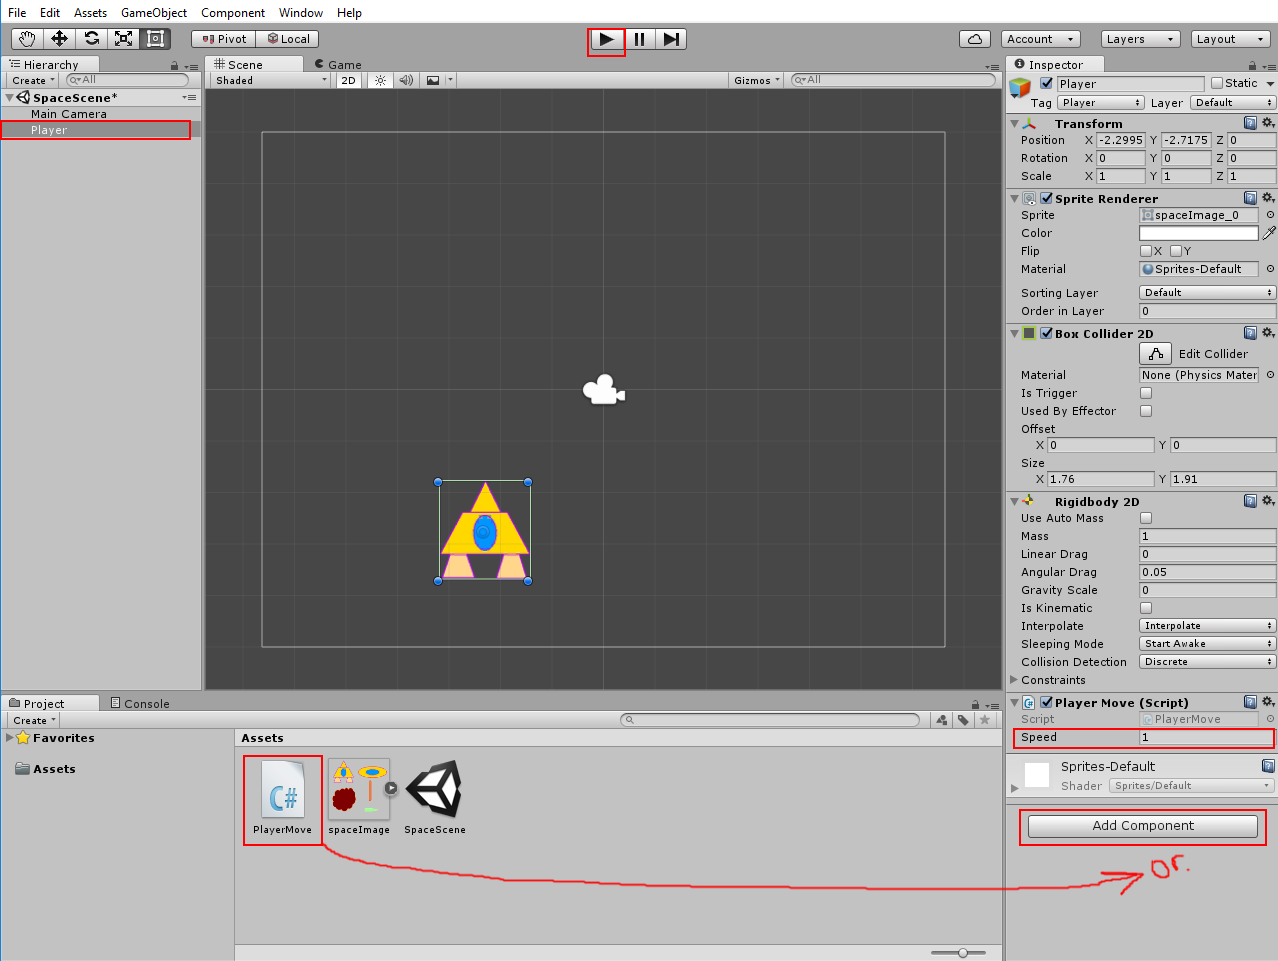
At first we can make players ship. In the Catch Game 2D we have used keybord for moving our player. Now we will use the mouse for moving. Our ship should fly to the point, where we have clicked. Put the ships image into the scene. Unity will create new GameObject. Rename it to Player. And set its Tag to Player.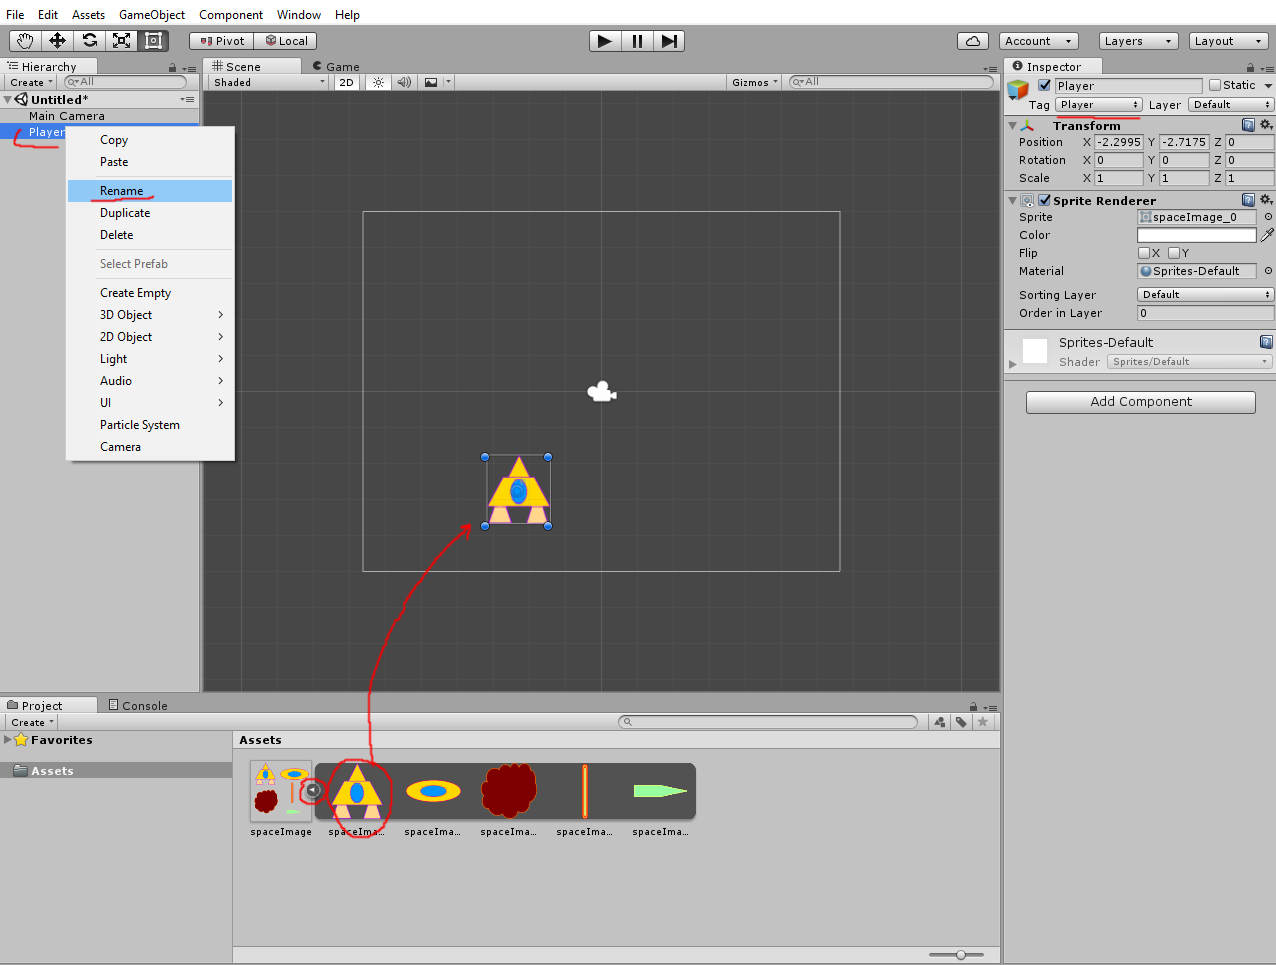
We will use built-in physic 2D. Add to Player: Box Collider 2D and Rigidbody 2D (Add Component - Physics 2D - ...). Set Gravity Scale to zero (we don't need gravity) and Interpolate to Interpolate (for more smooth move). Enable Freeze Rotation Z in Constraints (to prevent rotation of the ship).

3. Step
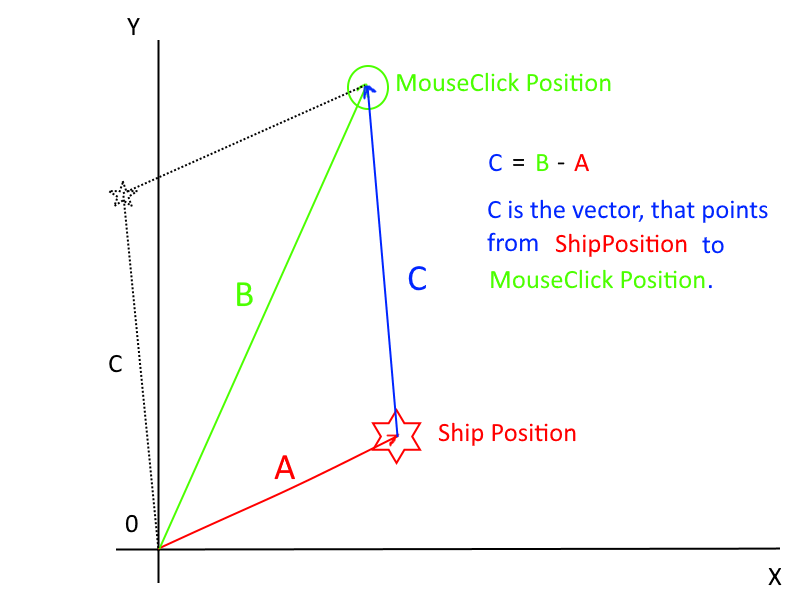
Now we can create a moving script for our player. Create new C# script (right-click into Assets window and select create - C# script). Name it PlayerMove. Now little explain, what we will do:Vector Subtraction:
With vector subtraction we can get direction and distance from one gameobject to another. Check Unity Manual for info. This subtracted vector can be used as direction from players ship to clicked position. We can change ships velocity to this vector and the ship will move to clicked position.* The length of this vector is the distance between ship and clicked position. You can get it with Vector3.magnitude. Square root calculation is cpu-expensiv. So be carefull with it. You can use Vector3.sqrMagnitude instead. Check Unity Manual for info.* Sometimes it is not the best choice to take subtracted vector directly. The ship will fly quick if you have clicked far and slow if close. So you will need only direction from subtracted vector and its length should be 1. This is a normalized vector. You can get it from subtracted vector with Vector3.Normalize. Later you can multiplicate it with your needed speed. We don't need normalized vector for our tutorial.
Camera.ScreenToWorldPoint
The function can transform screen position to world position. Screen position is defined in pixels. Be aware, that the Z-Position will be the same as Cameras Z-Position. Check Unity Manual for info.
using UnityEngine;
using System.Collections;
public class PlayerMove : MonoBehaviour {
//variable for clicked position
Vector3 clickPos;
//we will use this vector as velocity for Rigidbody2D (direction and speed)
Vector3 move;
//variable for players speed
public float speed = 1;
//we will need reference to Players Rigidbody2D
Rigidbody2D rb;
//will be executed once at scripts start
void Start () {
//reference to Players Rigidbody2D
rb = GetComponent < Rigidbody2D > ();
//player should stay on its place at game start (or it will move to clickPos (0,0,0) as default Vector3)
clickPos = transform.position;
}
//will be executed every frame
void Update () {
//check if left mouse button is pressed
if (Input.GetMouseButton (0)) {
//transform mouse screen position to world position
clickPos = Camera.main.ScreenToWorldPoint (Input.mousePosition);
}
//calculate direction vector from ship to clicked point
move = clickPos - transform.position;
}
//will be executed at fixed time steps (0.02 default). Use this for Unity physics
void FixedUpdate () {
//change velocity to calculated moving vector
//z will stay zero. Our ship should not move on Z-Axe
rb.velocity = new Vector2 (move.x, move.y) * speed;
}
}
Add this script to our Player. Set speed to 1. Start the scene and check if all is working. using System.Collections;
public class PlayerMove : MonoBehaviour {
//variable for clicked position
Vector3 clickPos;
//we will use this vector as velocity for Rigidbody2D (direction and speed)
Vector3 move;
//variable for players speed
public float speed = 1;
//we will need reference to Players Rigidbody2D
Rigidbody2D rb;
//will be executed once at scripts start
void Start () {
//reference to Players Rigidbody2D
rb = GetComponent < Rigidbody2D > ();
//player should stay on its place at game start (or it will move to clickPos (0,0,0) as default Vector3)
clickPos = transform.position;
}
//will be executed every frame
void Update () {
//check if left mouse button is pressed
if (Input.GetMouseButton (0)) {
//transform mouse screen position to world position
clickPos = Camera.main.ScreenToWorldPoint (Input.mousePosition);
}
//calculate direction vector from ship to clicked point
move = clickPos - transform.position;
}
//will be executed at fixed time steps (0.02 default). Use this for Unity physics
void FixedUpdate () {
//change velocity to calculated moving vector
//z will stay zero. Our ship should not move on Z-Axe
rb.velocity = new Vector2 (move.x, move.y) * speed;
}
}
4. Step
Our ship will shoot laser. Put the laser image into scene. Unity will create new gameobject. Rename it to Laser. Set it Order in Layers to -10. The laser should be rendered under the ship (we could set it to -1, maybe we will need this value later for other GameObjects). Make it little smaller (scale 0.5 should be ok). Add Box Collider 2D to it. Enable checkbox Is Trigger (we will need it just for collisions check). Add Rigidbody2D. Set Gravity to 0 and Interpolate to Interpolate.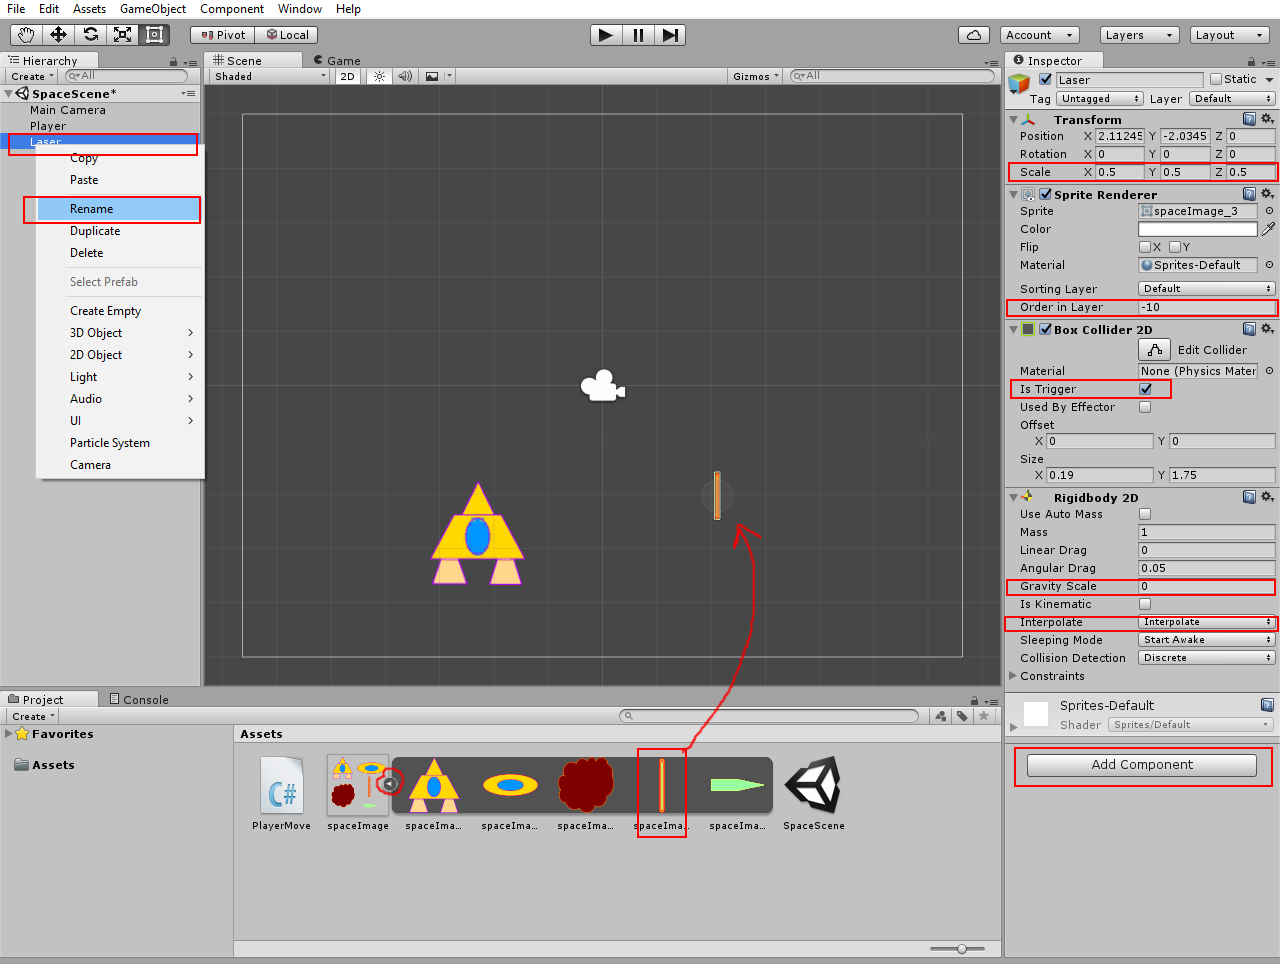
5. Step
The laser should fly up on Y-axe. We need a controll script for them. Create new C# script. Name it LaserShot. This time we will move our laser with AddForce. We will get reference to Rigidbody2D and then use force push with Y-direction on it. We should destroy our laser if it is out of screen. We don't need them flying all the time (because Unity will calculate invisible shots and will get slower). We can use message OnBecameInvisible to call our destroy function. The script should be:
using UnityEngine;
using System.Collections;
public class LaserShot : MonoBehaviour {
//reference variable for Rigidbody2D
Rigidbody2D rb;
//variable for force power
public float force;
//will be executed once
void Start () {
//reference to Rigidbody2D
rb = GetComponent < Rigidbody2D > ();
//declare Vector3 with force value on Y-axe
Vector3 directon = new Vector3 (0, force, 0);
//add force push on rigidbody2D for moving on Y-axe
rb.AddForce (directon, ForceMode2D.Impulse);
}
//will be executed, if the gameobject is not rendering anymore on the screen
void OnBecameInvisible () {
//delete this gameobject from the scene
Destroy (gameObject);
}
}
Add this script to Laser gameobject. And set force to something like 5 (it is force power). using System.Collections;
public class LaserShot : MonoBehaviour {
//reference variable for Rigidbody2D
Rigidbody2D rb;
//variable for force power
public float force;
//will be executed once
void Start () {
//reference to Rigidbody2D
rb = GetComponent < Rigidbody2D > ();
//declare Vector3 with force value on Y-axe
Vector3 directon = new Vector3 (0, force, 0);
//add force push on rigidbody2D for moving on Y-axe
rb.AddForce (directon, ForceMode2D.Impulse);
}
//will be executed, if the gameobject is not rendering anymore on the screen
void OnBecameInvisible () {
//delete this gameobject from the scene
Destroy (gameObject);
}
}
We will spawn many lasers. So we need a prefab (like blueprint) of them. Just drag&drop Laser gameobject into Asstes window. Unity will create prefab automatically. You can delete Laser from Hierarchy window, if you have created laser prefab.

6. Step
The laser shot can now fly. If we will shoot, we should just spawn Laser on ships position. We can use function Instantiate for spawn. As fire button we will use right mouse button. Our script will check if fire button is pressed and place laser in this case. This check will be every frame and to avoid many shots we should make a delay for shooting. We can use coroutine, which can be paused. Check Unity Manual. Create new C# script and name it PlayerShoot. The script will be:
using UnityEngine;
using System.Collections;
public class PlayerShoot : MonoBehaviour {
//variable for laser prefab
public GameObject laser;
//delay between laser shots
public float delayTime;
//boolean, if laser can be spawned
bool canShoot = true;
//will be executed every frame
void Update () {
//check if laser can be spawned and right mouse button is pressed
if (canShoot && Input.GetMouseButton(1)) {
//disable shooting check for next frame
canShoot = false;
//place laser prefab in the scene at ships position (rotate as ship)
Instantiate (laser, transform.position, transform.rotation);
//start function (which will enable shooting) as coroutine
StartCoroutine (NoFire());
}
}
//coroutine function, we can pause it
IEnumerator NoFire () {
//pause function and return to it later in "delayTime" seconds
yield return new WaitForSeconds (delayTime);
//enable shooting for next check
canShoot = true;
}
}
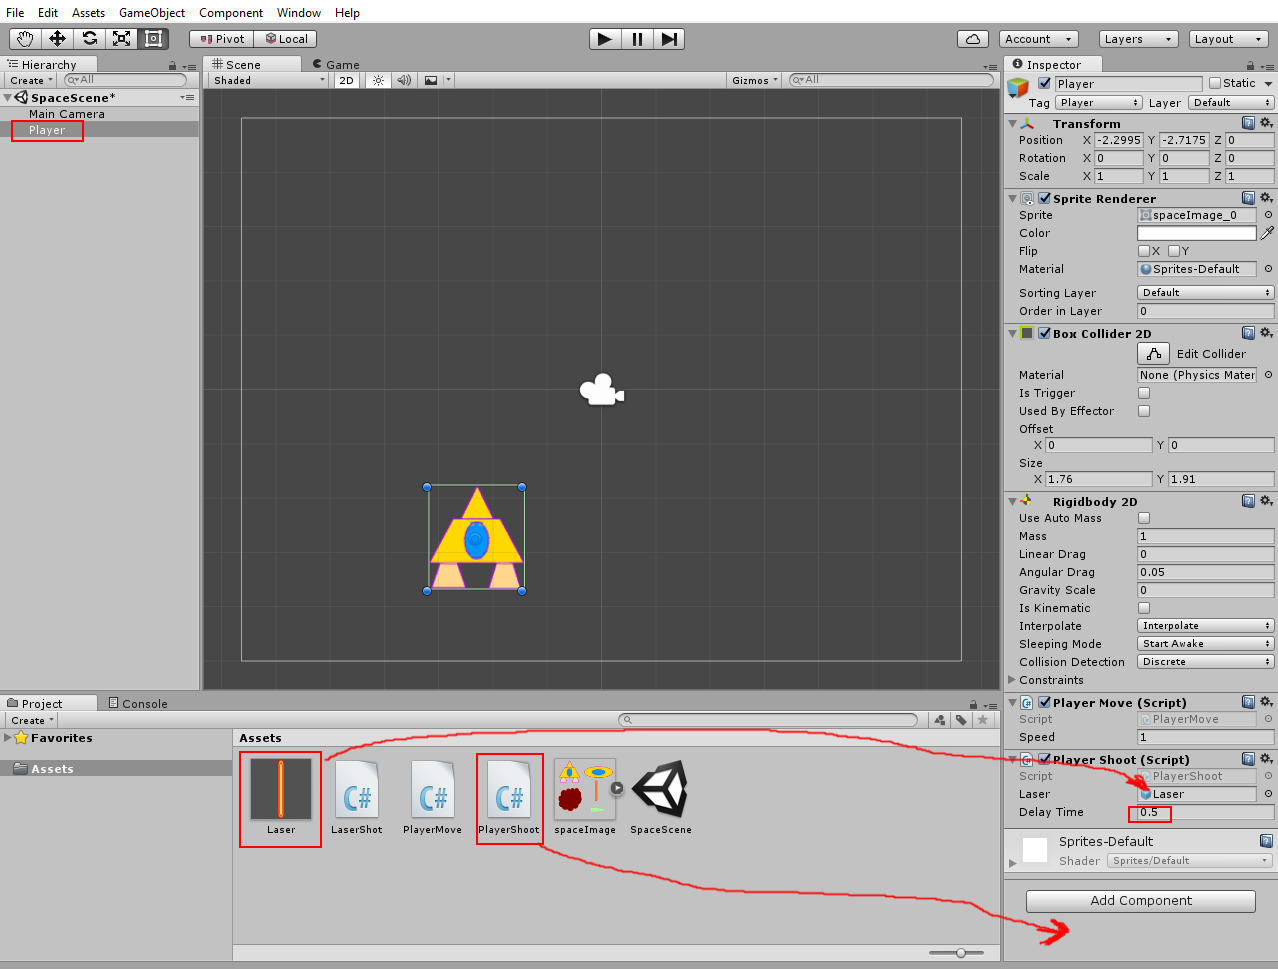
Add this script to players ship. Put Laser prefab in Laser field. Set Delay Time to 0.5. Start the scene and check it. using System.Collections;
public class PlayerShoot : MonoBehaviour {
//variable for laser prefab
public GameObject laser;
//delay between laser shots
public float delayTime;
//boolean, if laser can be spawned
bool canShoot = true;
//will be executed every frame
void Update () {
//check if laser can be spawned and right mouse button is pressed
if (canShoot && Input.GetMouseButton(1)) {
//disable shooting check for next frame
canShoot = false;
//place laser prefab in the scene at ships position (rotate as ship)
Instantiate (laser, transform.position, transform.rotation);
//start function (which will enable shooting) as coroutine
StartCoroutine (NoFire());
}
}
//coroutine function, we can pause it
IEnumerator NoFire () {
//pause function and return to it later in "delayTime" seconds
yield return new WaitForSeconds (delayTime);
//enable shooting for next check
canShoot = true;
}
}
7. Step
Now we can create asteroids. Drag&drop asteroids image into the scene. Rename created gameobject as Asteroid. Set Order in Layer in its Sprite Renderer to -5 (under ship and over laser). Add to it Circle Collider 2D. Add Rigidbody2D. Set Gravity Scale to 0 and Interpolate to Interpolate. Add new tag Enemy and set Asteroids tag to Enemy.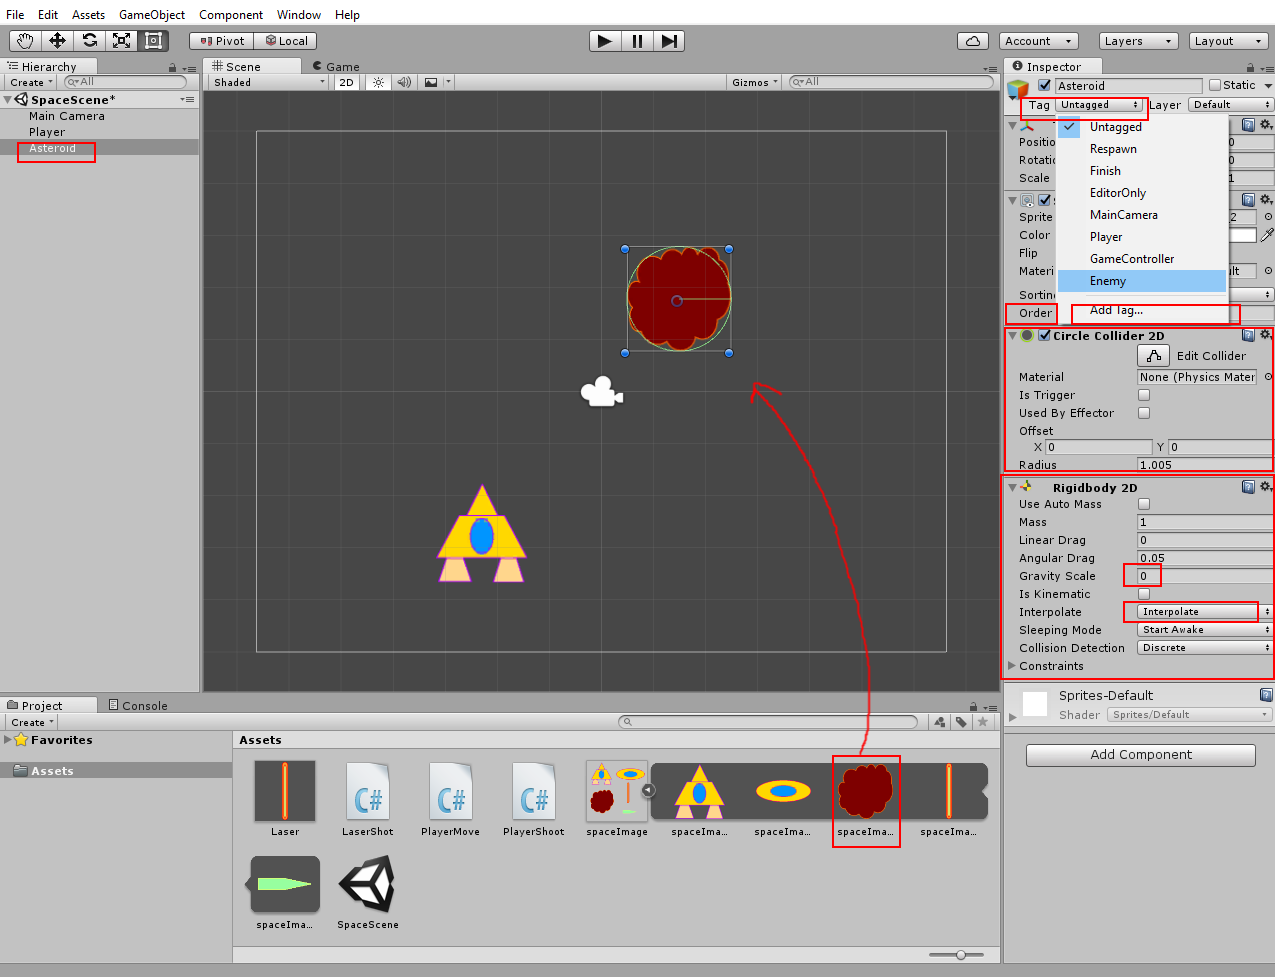
8. Step
The Asteroid need a moving script. Create new C# script and name it AsteroidMove. We will change asteroids velocity on Y-axe. And we should destroy asteroids if they are out of screen. Then we will check, if any asteroids hit the player. We can use OnCollisionEnter2D. This message will be called if gameobjects with Collider2D were collided. Then we can check Tag of collided gameobject and destroy them if it was Player. If player was destroyed we should reload the scene. We should use SceneManager for scenes reload.Create new C# script and name it AsteroidMove.
using UnityEngine;
using System.Collections;
//namespace with different scene controlls
using UnityEngine.SceneManagement;
public class AsteroidMove : MonoBehaviour {
//variable for flying speed
public float speed;
//reference for Rigidbody2D
Rigidbody2D rb;
//will be executed once at script start
void Start () {
//reference to Rigidbody2D
rb = GetComponent < Rigidbody2D > ();
//declare direction vector for moving (this will be along the Y-axe)
Vector3 move = new Vector3 (0, -1, 0);
//change velocity (moving speed and direction)
rb.velocity = move * speed;
}
//will be executed if gameobject is not rendered anymore on screen
void OnBecameInvisible () {
//delete gameobject from scene
Destroy (gameObject);
}
//will be executed if different Collider2D have touched each other
void OnCollisionEnter2D (Collision2D something) {
//check Tag of touched gameobject
if (something.gameObject.tag == "Player") {
//delete gameobject from scene
Destroy (gameObject);
//load the same scene again (reload)
SceneManager.LoadScene (SceneManager.GetActiveScene().name);
}
}
}
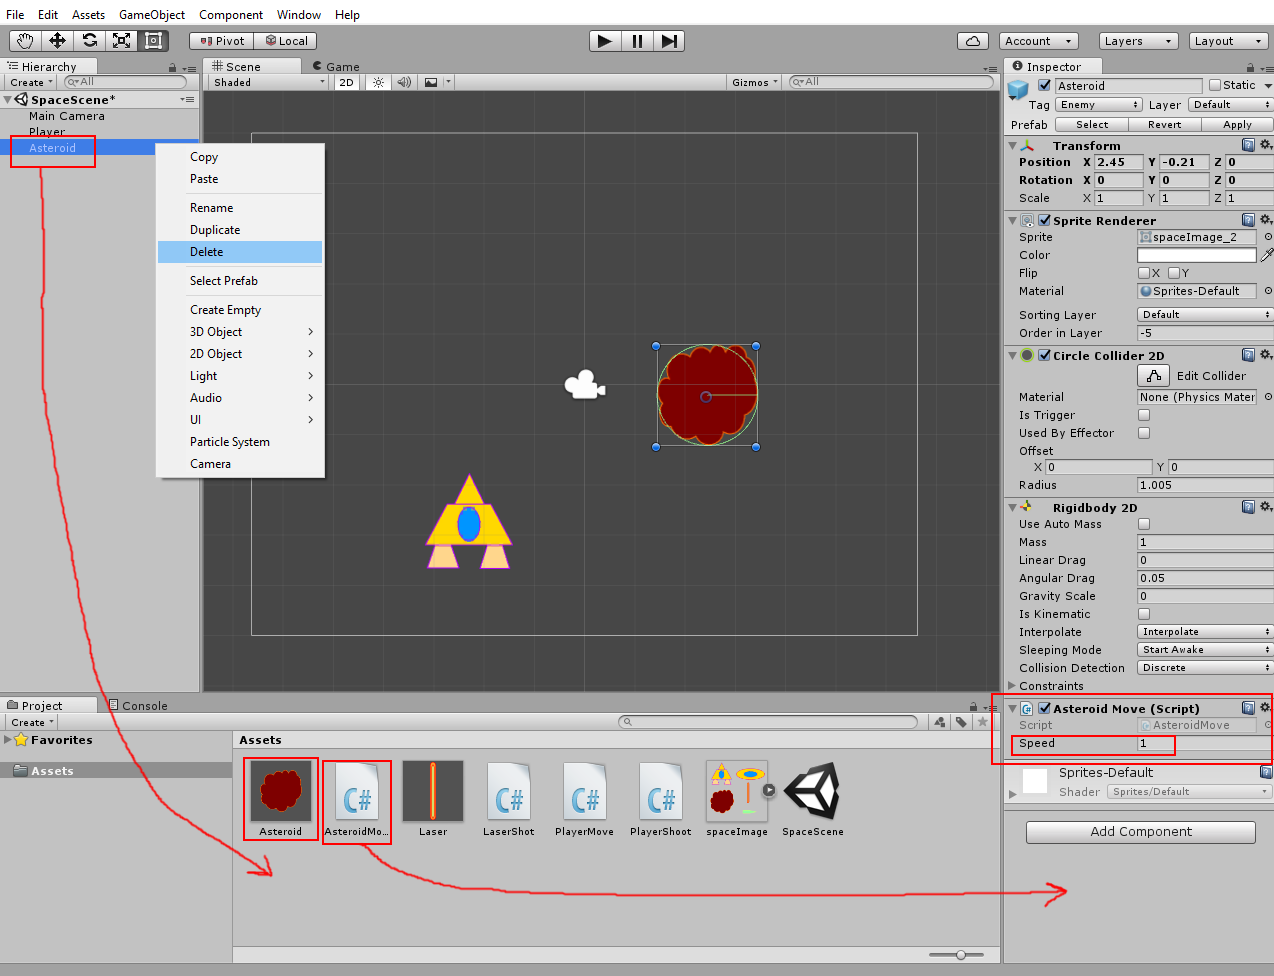
Add this script to Asteroid. Set Speed to 1. Make Asteroids prefab (drag&drop Asteroid from Hierarchy to Assets window). Delete Asteroid from Hierarchy. using System.Collections;
//namespace with different scene controlls
using UnityEngine.SceneManagement;
public class AsteroidMove : MonoBehaviour {
//variable for flying speed
public float speed;
//reference for Rigidbody2D
Rigidbody2D rb;
//will be executed once at script start
void Start () {
//reference to Rigidbody2D
rb = GetComponent < Rigidbody2D > ();
//declare direction vector for moving (this will be along the Y-axe)
Vector3 move = new Vector3 (0, -1, 0);
//change velocity (moving speed and direction)
rb.velocity = move * speed;
}
//will be executed if gameobject is not rendered anymore on screen
void OnBecameInvisible () {
//delete gameobject from scene
Destroy (gameObject);
}
//will be executed if different Collider2D have touched each other
void OnCollisionEnter2D (Collision2D something) {
//check Tag of touched gameobject
if (something.gameObject.tag == "Player") {
//delete gameobject from scene
Destroy (gameObject);
//load the same scene again (reload)
SceneManager.LoadScene (SceneManager.GetActiveScene().name);
}
}
}
9. Step
We need spawner, which can spawn the asteroids randomly. Click on GameObject - Create Empty. Empty GameObject will be created in the scene. Rename it as AsteroidSpawner. Select one Icon for better view (check screenshot). Move it to left side over the Camera View (you can use moving tool). And set it Z-Position to 0 (if different as zero).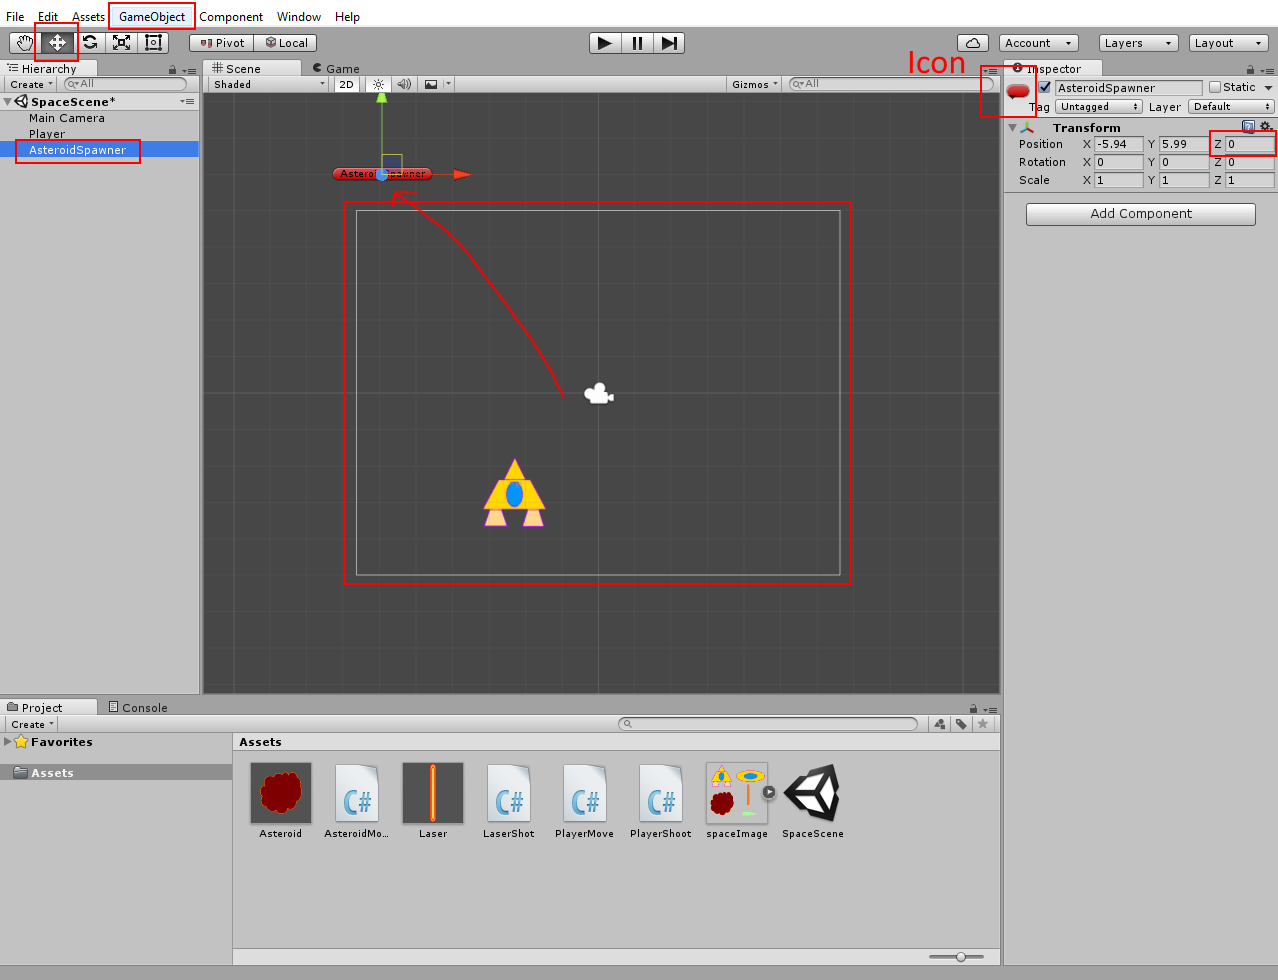
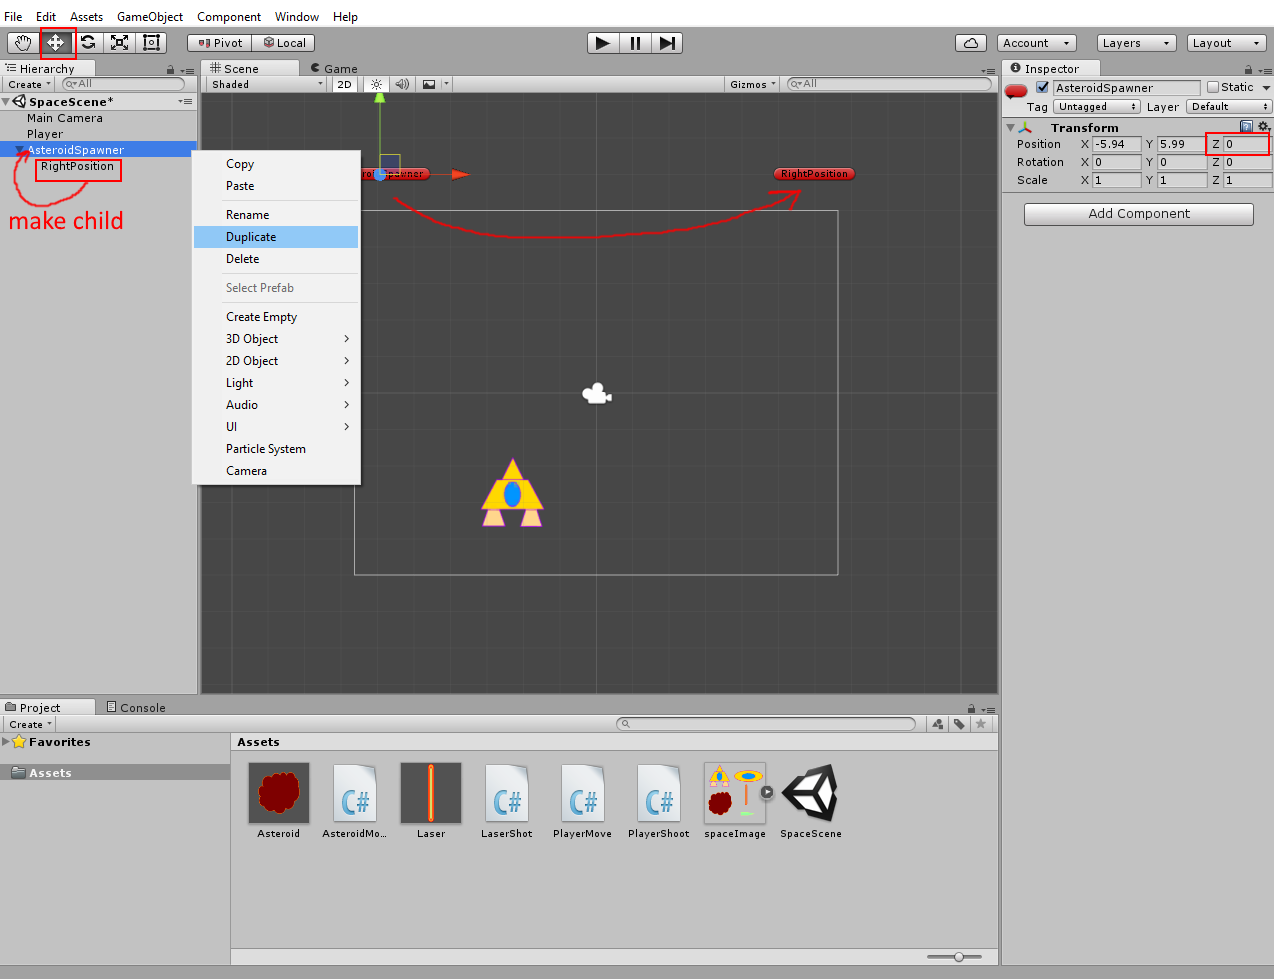
Select AsteroidSpawner in Hierarchy window. Right-click on it and duplicate it. Rename created new gameobject as RightPosition. Make RightPosition child of AsteroidSpawner (just drag&drop RightPosition on AsteroidSpawner in Hierarchy). Move RightPosition on right side and set it Z-Position to zero (if different).
Now create new C# script and name it ObjectSpawner. We will repeatedly call a spawn function. InvokeRepeating will do this job. The script will be:
using UnityEngine;
using System.Collections;
public class ObjectSpawner : MonoBehaviour {
//variable for position, which will be used for calculating random position between two points
public Transform RightPosition;
//delay between spawns
public float spawnDelay;
//variable for prefab, which should be spawn
public GameObject Item;
//will be executed once at start
void Start () {
//"Spawn" function will be called repeatedly
InvokeRepeating ("Spawn", spawnDelay, spawnDelay);
}
//spawn function
void Spawn () {
//calculate random position between AsteroidSpawner and RighPosition
Vector3 spawnPos = new Vector3 (Random.Range (transform.position.x, RightPosition.position.x), transform.position.y, 0);
//place prefab at calculated position
Instantiate (Item, spawnPos, transform.rotation);
}
}
Select AsteroidSpawner in Hierarchy. Add this script to it. Click on select point near Right Position field and select RightPosition. Set Spawn Delay to 5. Click on select point near Item field and select Asteroid prefab. Start the scene and check it. using System.Collections;
public class ObjectSpawner : MonoBehaviour {
//variable for position, which will be used for calculating random position between two points
public Transform RightPosition;
//delay between spawns
public float spawnDelay;
//variable for prefab, which should be spawn
public GameObject Item;
//will be executed once at start
void Start () {
//"Spawn" function will be called repeatedly
InvokeRepeating ("Spawn", spawnDelay, spawnDelay);
}
//spawn function
void Spawn () {
//calculate random position between AsteroidSpawner and RighPosition
Vector3 spawnPos = new Vector3 (Random.Range (transform.position.x, RightPosition.position.x), transform.position.y, 0);
//place prefab at calculated position
Instantiate (Item, spawnPos, transform.rotation);
}
}
10. Step
The lasers can fly through all asteroids. We need script to check collisions and make damage. The objects should have health points and we need health points controll script. As health points we can define int variable hp. For damage we can write method, wich subtract damage variable from health points. Create new C# script and name it HpController.
using UnityEngine;
using System.Collections;
public class HpController : MonoBehaviour {
//variable for health points
public int hp;
//funkton for damage calculation (we will get damage from other functions)
void MakeDamage (int damage) {
//decrease hp variable
hp = hp - damage;
//check if hp is negative or zero
if (hp <= 0) {
//delete gameobject
Destroy (gameObject);
}
}
}
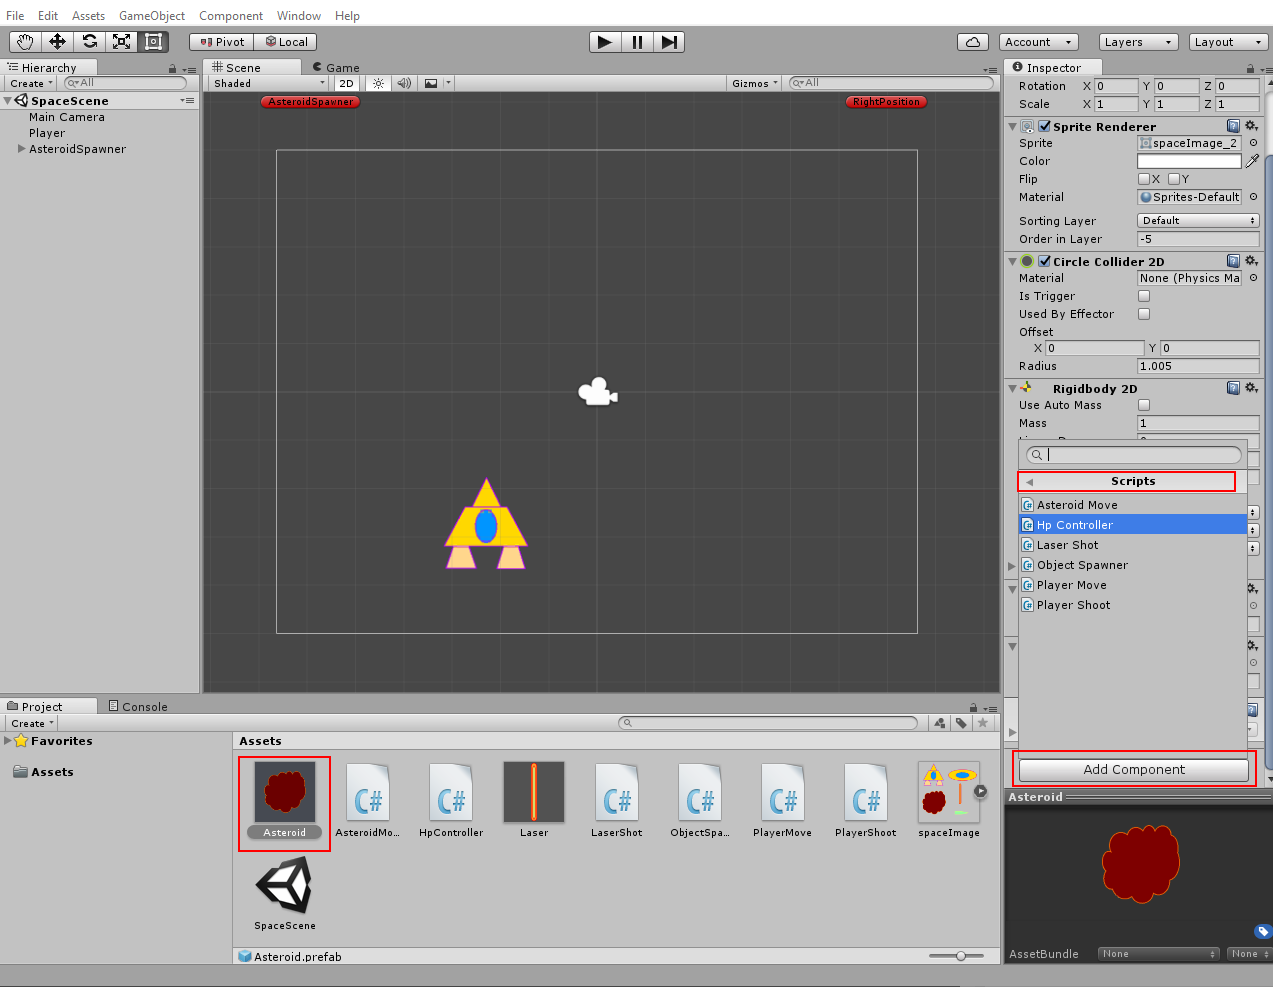
Select Asteroid prefab in Assets window and add HpController script to it. Set HP variable to 3. using System.Collections;
public class HpController : MonoBehaviour {
//variable for health points
public int hp;
//funkton for damage calculation (we will get damage from other functions)
void MakeDamage (int damage) {
//decrease hp variable
hp = hp - damage;
//check if hp is negative or zero
if (hp <= 0) {
//delete gameobject
Destroy (gameObject);
}
}
}
Now open LaserShot script. We will add collision check to it. The Laser has Collider2D as Trigger. We can use Unitys physic for collisions check: OnTriggerEnter2D. If the colided gameobject has tag Enemy, we will use SendMessage. This method checks if any components on other gameobject has method with defined name and calls it. Check Unity Manual.
using UnityEngine;
using System.Collections;
public class LaserShot : MonoBehaviour {
//reference variable for Rigidbody2D
Rigidbody2D rb;
//variable for damage
public int damage;
//variable for force power
public float force;
//will be executed once
void Start () {
//reference to Rigidbody2D
rb = GetComponent < Rigidbody2D > ();
//declare Vector3 with force value on Y-axe
Vector3 directon = new Vector3 (0, force, 0);
//add force push on rigidbody2D for moving on Y-axe
rb.AddForce (directon, ForceMode2D.Impulse);
}
//will be executed, if the gameobject is not rendering anymore on the screen
void OnBecameInvisible () {
//delete this gameobject from the scene
Destroy (gameObject);
}
//will be executed if one other Collider2D went into Trigger
void OnTriggerEnter2D (Collider2D other) {
//check if other gameobject has tag Enemy
if (other.gameObject.tag == "Enemy") {
//try to call MakeDamage on other gameobject, send damage as parameter for it
other.gameObject.SendMessage ("MakeDamage", damage, SendMessageOptions.DontRequireReceiver);
//delete gameobject from scene
Destroy (gameObject);
}
}
}
Select Laser prefab in Assets window. LaserShot script has now new variable damage. Change it to 1. using System.Collections;
public class LaserShot : MonoBehaviour {
//reference variable for Rigidbody2D
Rigidbody2D rb;
//variable for damage
public int damage;
//variable for force power
public float force;
//will be executed once
void Start () {
//reference to Rigidbody2D
rb = GetComponent < Rigidbody2D > ();
//declare Vector3 with force value on Y-axe
Vector3 directon = new Vector3 (0, force, 0);
//add force push on rigidbody2D for moving on Y-axe
rb.AddForce (directon, ForceMode2D.Impulse);
}
//will be executed, if the gameobject is not rendering anymore on the screen
void OnBecameInvisible () {
//delete this gameobject from the scene
Destroy (gameObject);
}
//will be executed if one other Collider2D went into Trigger
void OnTriggerEnter2D (Collider2D other) {
//check if other gameobject has tag Enemy
if (other.gameObject.tag == "Enemy") {
//try to call MakeDamage on other gameobject, send damage as parameter for it
other.gameObject.SendMessage ("MakeDamage", damage, SendMessageOptions.DontRequireReceiver);
//delete gameobject from scene
Destroy (gameObject);
}
}
}
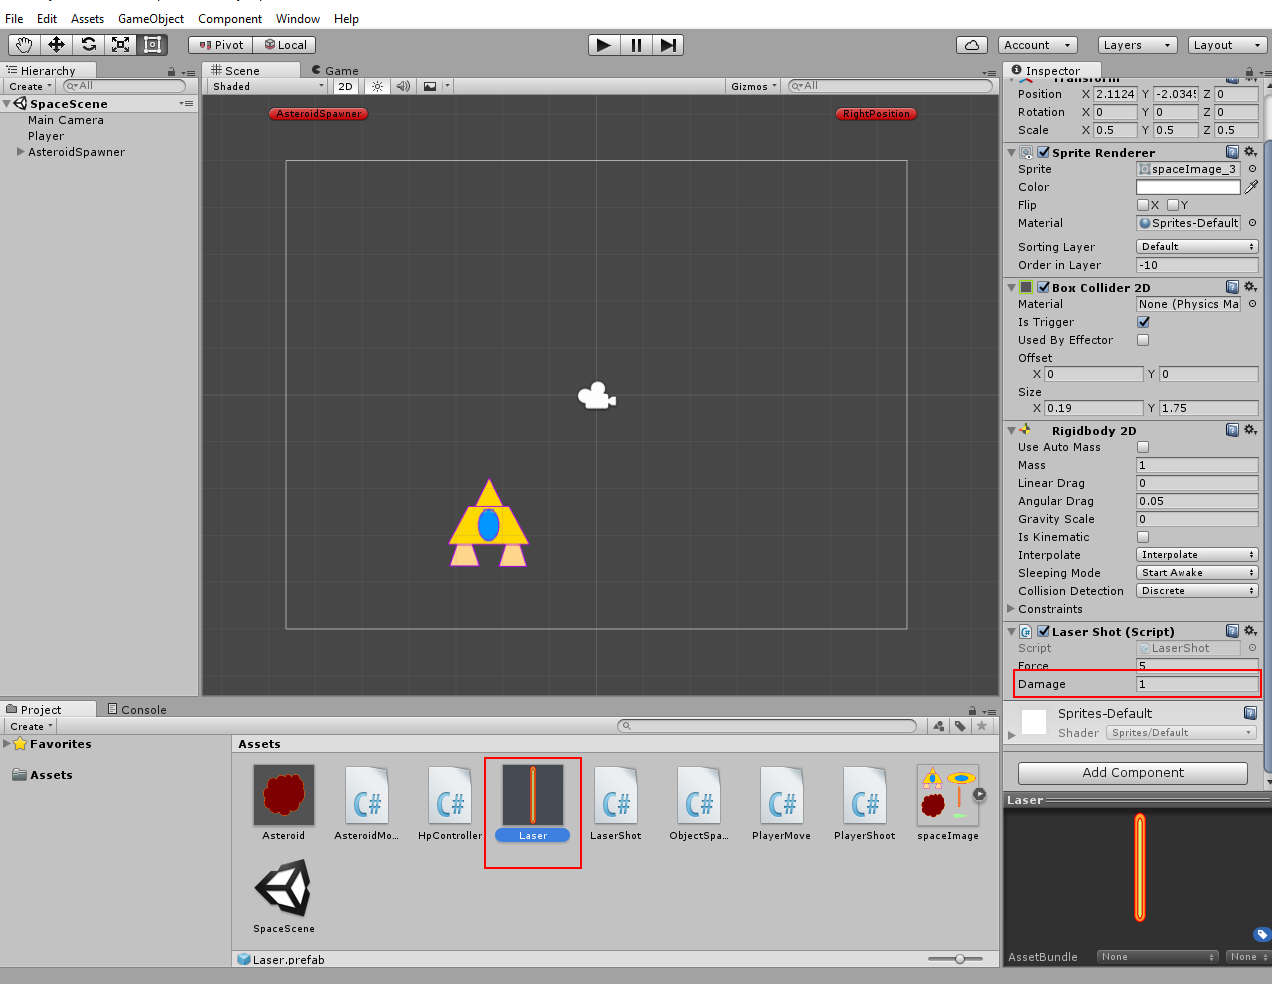
You can start the scene. Asteroids should be destroyable with 3 shots now.
11. Step
We should create enemy ship now. I am bit lazy, so we can just reuse Asteroid prefab. Put Asteroid prefab in the scene (drag&drop it from Assets window into Scene View). Select it in Hierarchy and rename as Enemy. Change HP variable to 1. Change Asteroid sprite to enemy sprite. Delete Circle Collider 2D (right-click on Circle Collider 2D and select Remove Component). Add new Box Collider 2D. Make a prefab from the Enemy (drag&drop Enemy from Hierarchy into Assets window). Delete Enemy from Hierarchy after prefab was created.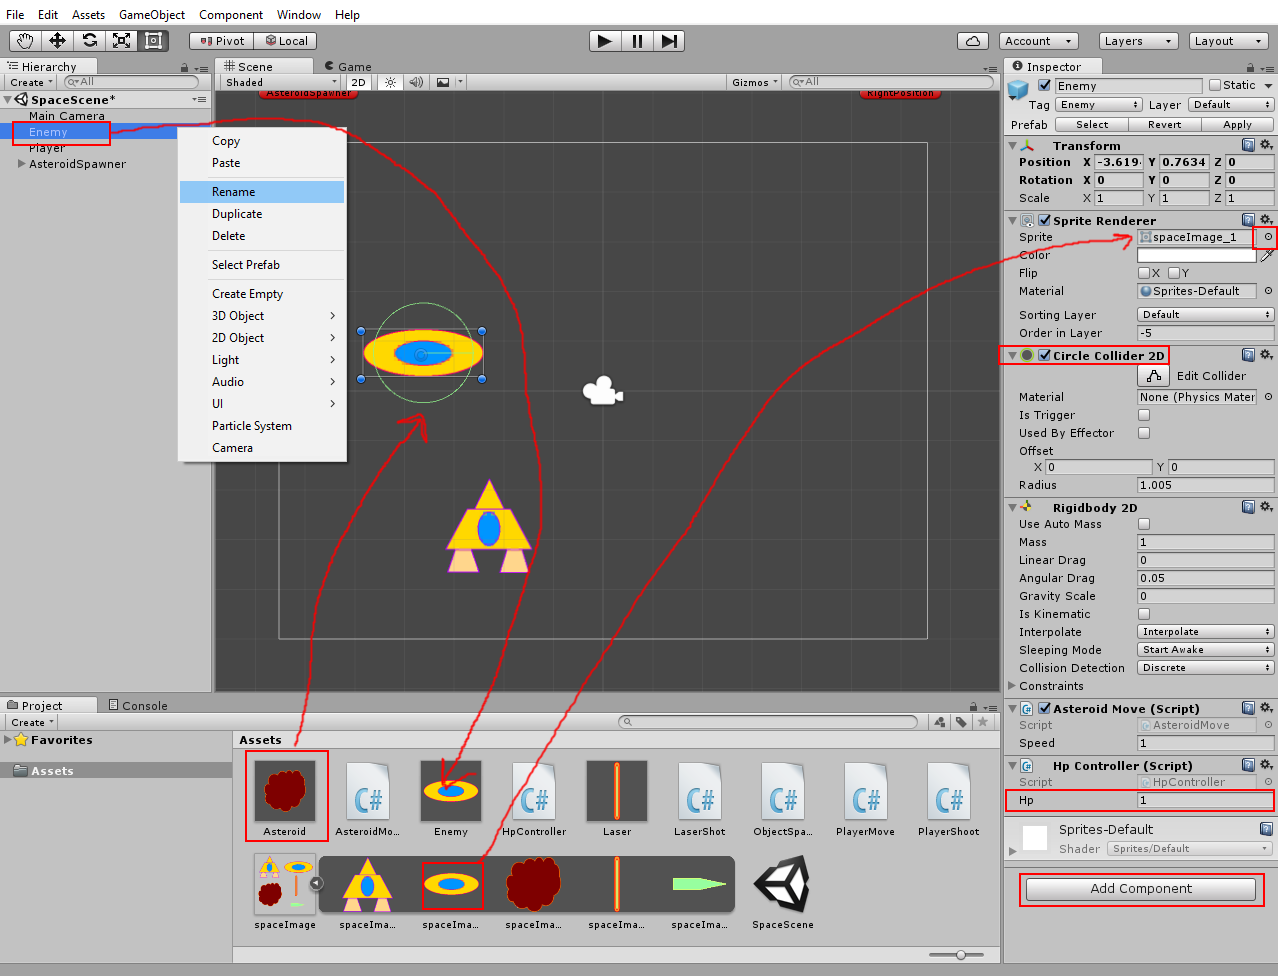
12. Step
The enemy ship needs a shooting script. The enemy should find the player ship after it was spawned and then shoot at them. We can search for a gameobject with GameObject.FindWithTag ("Tag");. Then the enemy will spawn a bullet, which will calcuate direction vector from bullet to player and then fly to the player. At first we will create bullet gameobject. Drag&drop bullet image into scene. Select created gameobject in Hierarchy. Rename it as Bullet. Change its Order in Layer to -6. Add Rigidbody2D. Set Gravity to 0 and Interpolate to Interpolate. Add Box Collider 2D and enable Is Trigger. Now we need script to control the bullets. Create new C# script and name it EnemyBullet.
using UnityEngine;
using System.Collections;
public class EnemyBullet : MonoBehaviour {
//reference variable for Players gameobject
GameObject player;
//reference variable for Rigidbody2D
Rigidbody2D rb;
//variable for force power
public float force;
//variable for damage value
public int damage;
//will be executed once at start
void Start () {
//reference to Rigidbody2D
rb = GetComponent < Rigidbody2D > ();
//search for gameobject with tag Player and reference to them
player = GameObject.FindWithTag ("Player");
//check if Player is in the scene
if (player != null) {
//calculate direction vector to Player
Vector3 dir = player.transform.position - transform.position;
//calculate angle between X-axe and direction vector
float angle = Mathf.Atan2 (dir.y, dir.x) * Mathf.Rad2Deg;
//rotate the bullets gameobject
transform.Rotate (0, 0, angle);
//push bullet on its locale X-axe (it will be forward for this image)
rb.AddRelativeForce (Vector2.right * force, ForceMode2D.Impulse);
//if Player isn't in the scene
} else
//delete bullet from scene
Destroy (gameObject);
}
//will be executed if Collider2D went into Trigger
void OnTriggerEnter2D (Collider2D other) {
//check if collided gameobject has tag Player
if (other.gameObject.tag == "Player") {
//try to execute function "MakeDamage" with parameter "damage" in scripts connected to collided gameobject
other.gameObject.SendMessage ("MakeDamage", damage, SendMessageOptions.DontRequireReceiver);
//delete bullet
Destroy (gameObject);
}
}
//will be executed if bullet is not rendered anymore (out of screen)
void OnBecameInvisible () {
//delete bullet
Destroy (gameObject);
}
}
Add this script to Bullet. Set Force to 3 and Damage to 1. Make now prefab from Bullet (drag&drop Bullet from Hierarchy to Assets). If prefab was created, delete Bullet from Hierarchy. using System.Collections;
public class EnemyBullet : MonoBehaviour {
//reference variable for Players gameobject
GameObject player;
//reference variable for Rigidbody2D
Rigidbody2D rb;
//variable for force power
public float force;
//variable for damage value
public int damage;
//will be executed once at start
void Start () {
//reference to Rigidbody2D
rb = GetComponent < Rigidbody2D > ();
//search for gameobject with tag Player and reference to them
player = GameObject.FindWithTag ("Player");
//check if Player is in the scene
if (player != null) {
//calculate direction vector to Player
Vector3 dir = player.transform.position - transform.position;
//calculate angle between X-axe and direction vector
float angle = Mathf.Atan2 (dir.y, dir.x) * Mathf.Rad2Deg;
//rotate the bullets gameobject
transform.Rotate (0, 0, angle);
//push bullet on its locale X-axe (it will be forward for this image)
rb.AddRelativeForce (Vector2.right * force, ForceMode2D.Impulse);
//if Player isn't in the scene
} else
//delete bullet from scene
Destroy (gameObject);
}
//will be executed if Collider2D went into Trigger
void OnTriggerEnter2D (Collider2D other) {
//check if collided gameobject has tag Player
if (other.gameObject.tag == "Player") {
//try to execute function "MakeDamage" with parameter "damage" in scripts connected to collided gameobject
other.gameObject.SendMessage ("MakeDamage", damage, SendMessageOptions.DontRequireReceiver);
//delete bullet
Destroy (gameObject);
}
}
//will be executed if bullet is not rendered anymore (out of screen)
void OnBecameInvisible () {
//delete bullet
Destroy (gameObject);
}
}

12. Step
Now we can can make Enemy shooting script. The Enemy will check where Player is and periodically spawn one Bullet (wich will calculate direction to Player and fly to them). Create new C# script and name it EnemyShoot.
using UnityEngine;
using System.Collections;
public class EnemyShoot : MonoBehaviour {
//variable for Bullet prefab
public GameObject bullet;
//delay between shots
public float fireDelay;
//variable for Player gameobject
GameObject player;
//boolean for check if Enemy can shoot
bool canShoot = true;
//will be executed once
void Start () {
//search for gameobject with tag "Player" and reference it to player
player = GameObject.FindWithTag ("Player");
}
//will be executed every frame
void Update () {
//check if Player is in the scene and Enemy can shoot
if (canShoot && player != null) {
//Enemy cannot shoot in next check
canShoot = false;
//place Bullet prefab in the scene at Enemys position (default rotation)
Instantiate (bullet, transform.position, Quaternion.identity);
//start firePause function as coroutine, which can be paused
StartCoroutine (firePause());
}
}
//coroutine function
IEnumerator firePause () {
//pause funktion for fireDelay seconds
yield return new WaitForSeconds (fireDelay);
//Enemy can shoot in next check
canShoot = true;
}
}
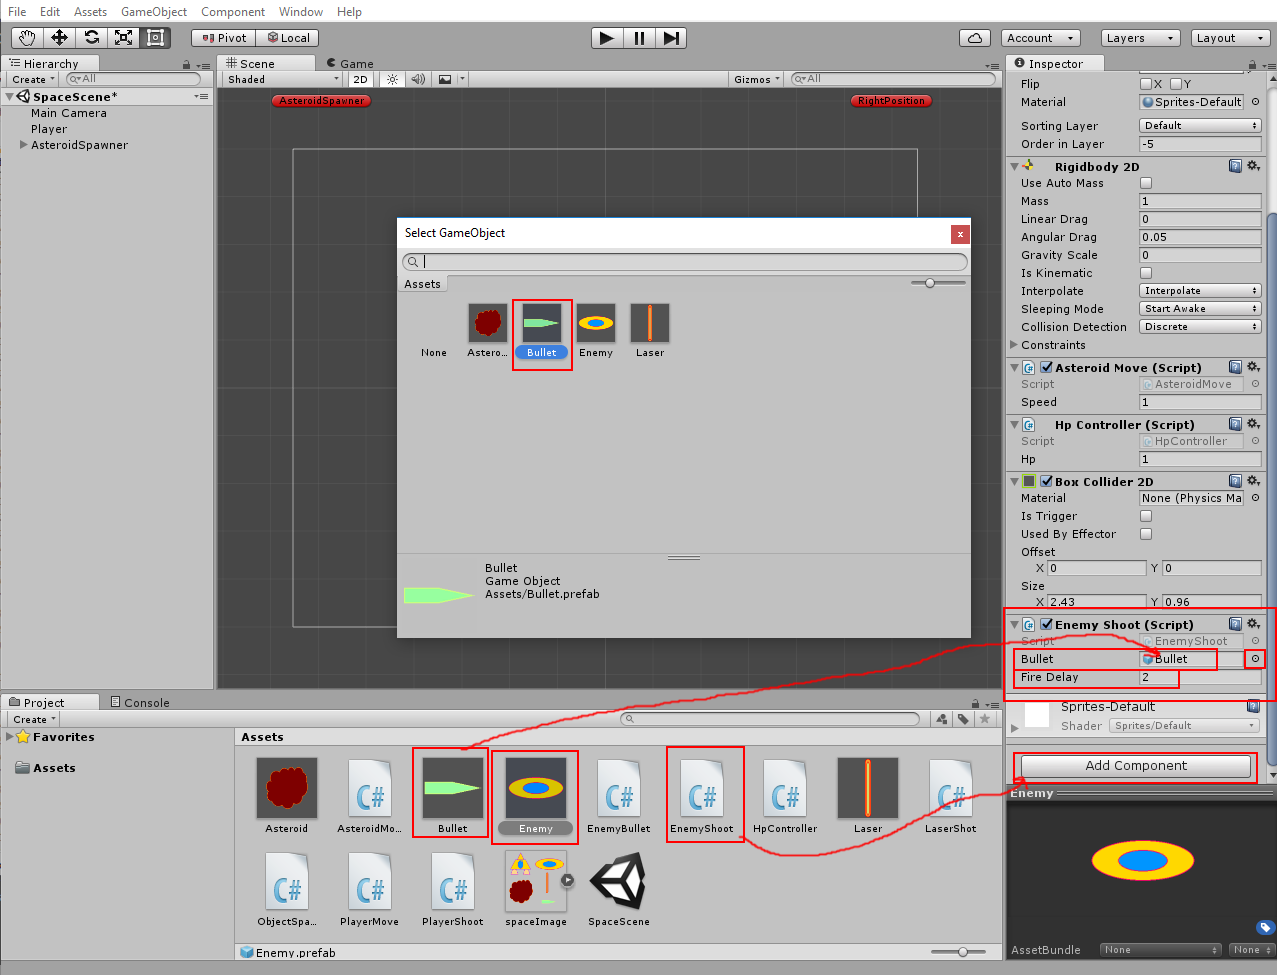
Select Enemy prefab in the Assets window and add this EnemyShoot script to it. Add Bullet prefab into the Bullet field (you can drag&drop the Bullet from Assets into this field or click on select point near the field and choose Bullet). Set Fire Delay to 2. using System.Collections;
public class EnemyShoot : MonoBehaviour {
//variable for Bullet prefab
public GameObject bullet;
//delay between shots
public float fireDelay;
//variable for Player gameobject
GameObject player;
//boolean for check if Enemy can shoot
bool canShoot = true;
//will be executed once
void Start () {
//search for gameobject with tag "Player" and reference it to player
player = GameObject.FindWithTag ("Player");
}
//will be executed every frame
void Update () {
//check if Player is in the scene and Enemy can shoot
if (canShoot && player != null) {
//Enemy cannot shoot in next check
canShoot = false;
//place Bullet prefab in the scene at Enemys position (default rotation)
Instantiate (bullet, transform.position, Quaternion.identity);
//start firePause function as coroutine, which can be paused
StartCoroutine (firePause());
}
}
//coroutine function
IEnumerator firePause () {
//pause funktion for fireDelay seconds
yield return new WaitForSeconds (fireDelay);
//Enemy can shoot in next check
canShoot = true;
}
}
13. Step
We have now ready Enemy prefab. Now we should start to spawn enemys like asteoids in the scene. We can rework our ObjectSpawner script (or we could make an other spawner gameobject for enemys). We can add an array for GameObjects and then just randomly spawn something from this array. Open ObjectSpawner C# script and change it:
using UnityEngine;
using System.Collections;
public class ObjectSpawner : MonoBehaviour {
//variable for position, which will be used for calculating random position between two points
public Transform RightPosition;
//delay between spawns
public float spawnDelay;
//array for prefabs, which should be spawn
public GameObject [] Item;
//will be executed once at start
void Start () {
//"Spawn" function will be called repeatedly
InvokeRepeating ("Spawn", spawnDelay, spawnDelay);
}
//spawn function
void Spawn () {
//calculate random position between AsteroidSpawner and RighPosition
Vector3 spawnPos = new Vector3 (Random.Range (transform.position.x, RightPosition.position.x), transform.position.y, 0);
//calculate random variable i between 0 and array length (number of members)
int i = Random.Range (0, Item.Length);
//place prefab at calculated position
Instantiate (Item [i], spawnPos, transform.rotation);
}
}
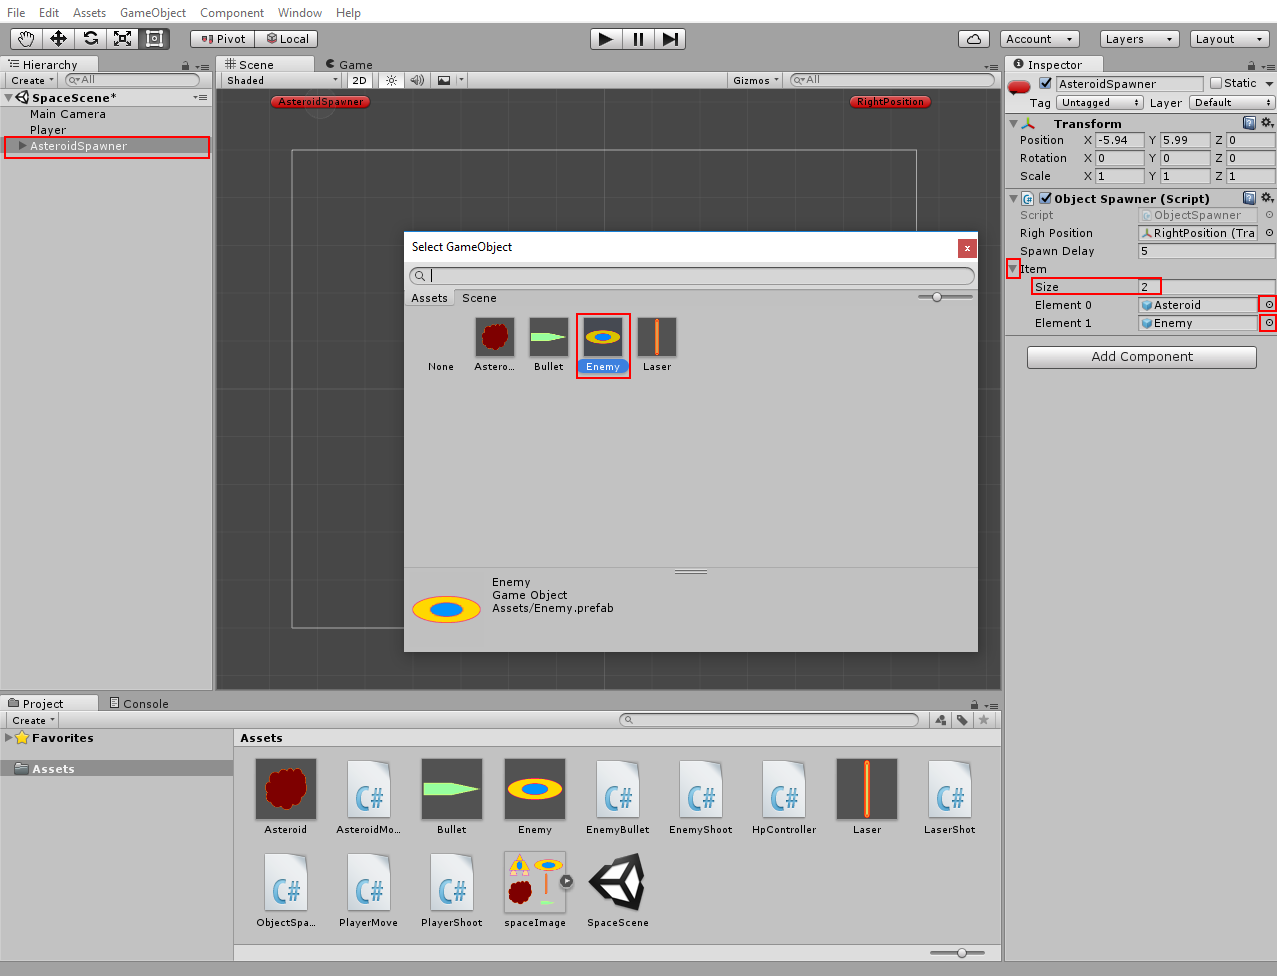
Select now AsteroidSpawner in Hierarchy. We should fill the array with gameobjects. Set Size of Item to 2 (Asteroid and Enemy). Put the Asteroid and Enemy prefabs in the arrays fields. And check the scene. using System.Collections;
public class ObjectSpawner : MonoBehaviour {
//variable for position, which will be used for calculating random position between two points
public Transform RightPosition;
//delay between spawns
public float spawnDelay;
//array for prefabs, which should be spawn
public GameObject [] Item;
//will be executed once at start
void Start () {
//"Spawn" function will be called repeatedly
InvokeRepeating ("Spawn", spawnDelay, spawnDelay);
}
//spawn function
void Spawn () {
//calculate random position between AsteroidSpawner and RighPosition
Vector3 spawnPos = new Vector3 (Random.Range (transform.position.x, RightPosition.position.x), transform.position.y, 0);
//calculate random variable i between 0 and array length (number of members)
int i = Random.Range (0, Item.Length);
//place prefab at calculated position
Instantiate (Item [i], spawnPos, transform.rotation);
}
}
14. Step
The Player doesn't have health points now. We should make hp controller for them. And we can add a simple UI to show it on the screen. We can do health bar with Unity Interface. Click on GameObject -> UI -> and select Image. Canvas with Image will be created. Rename Image as HealthBar. Select Canvas and set UI Scale Mode to Scale with Screen Size.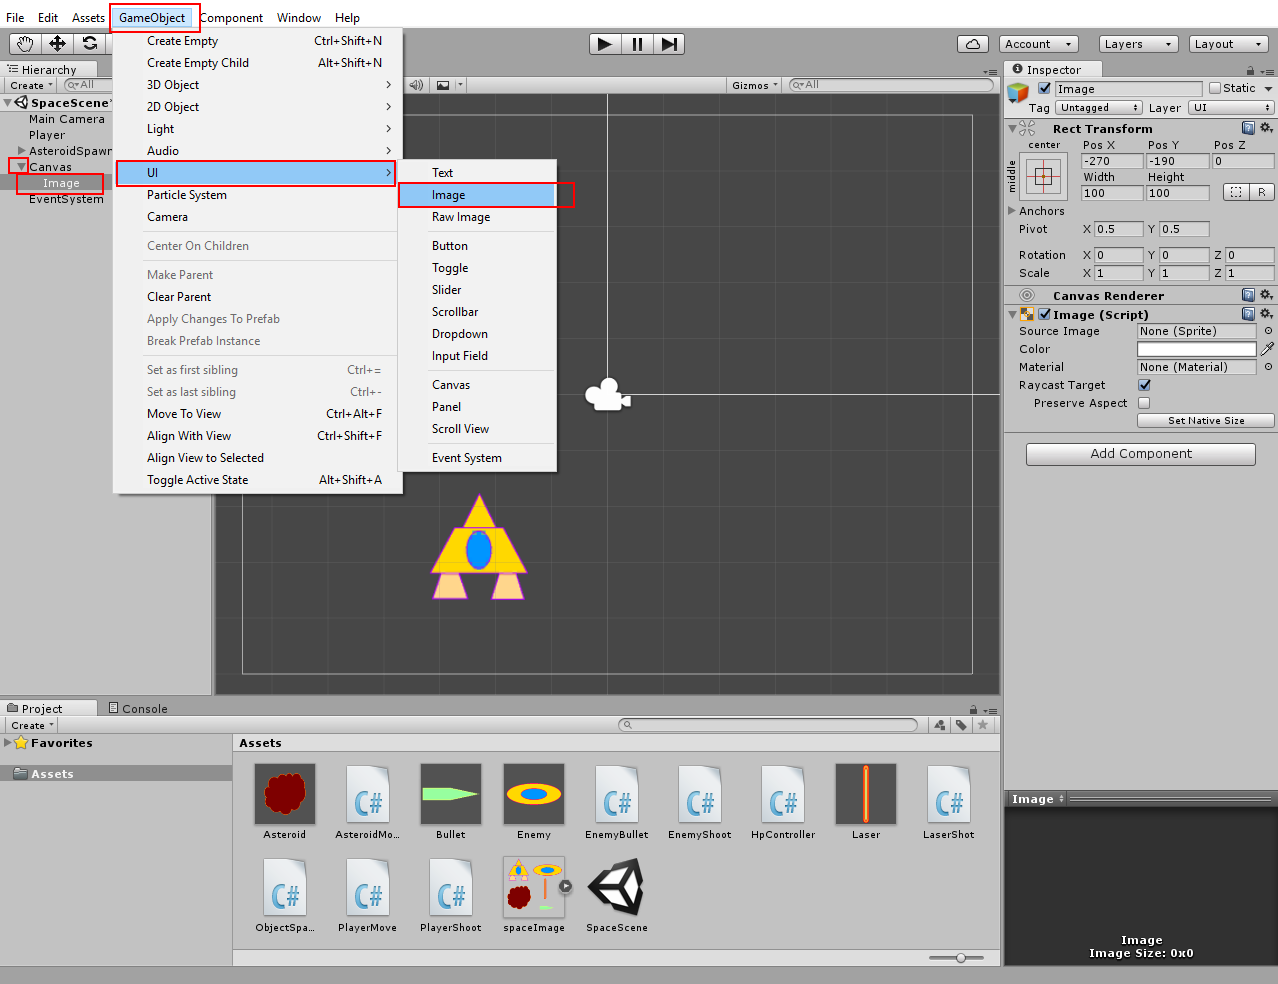
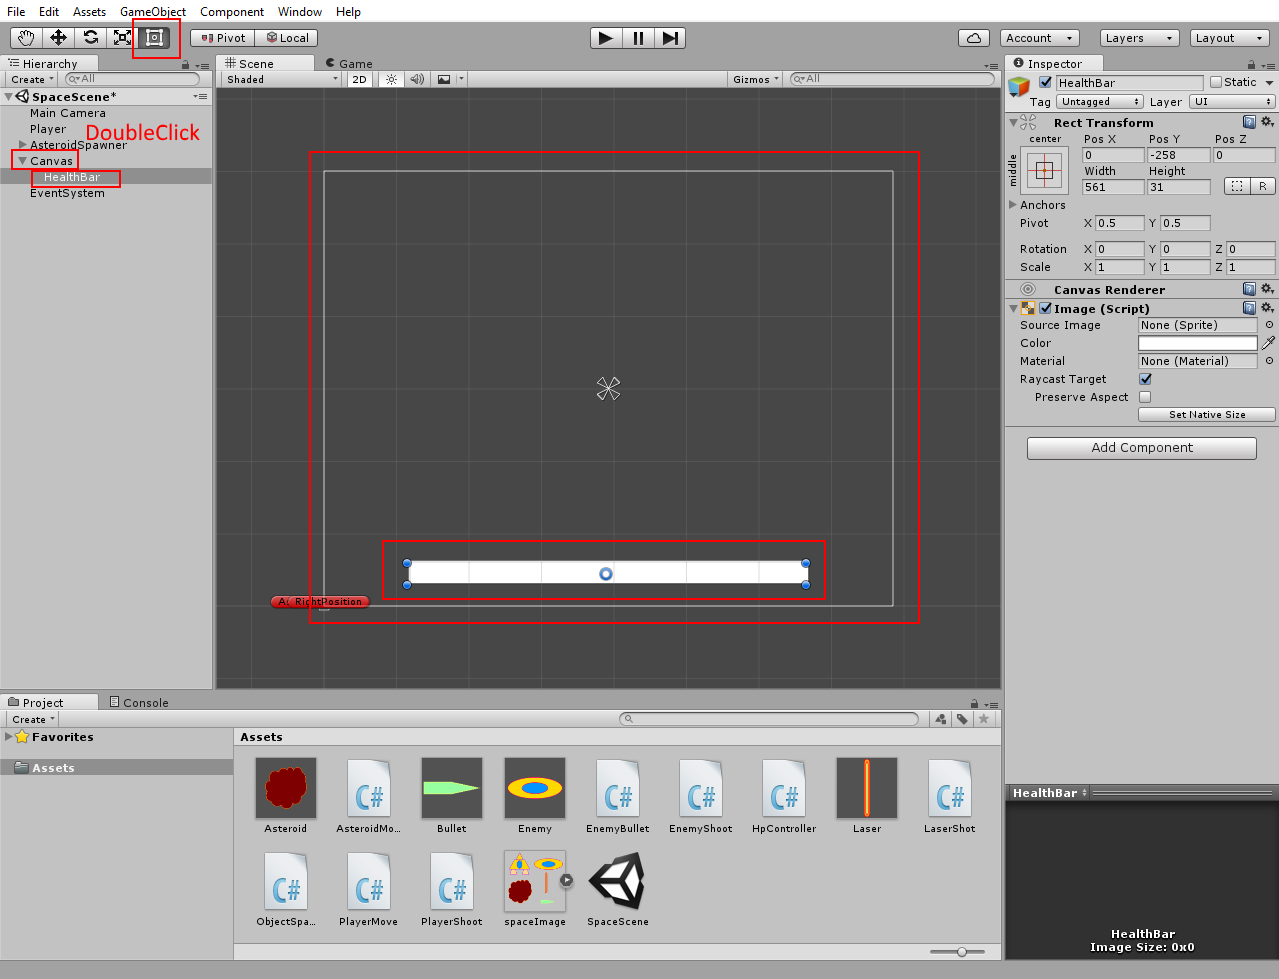
Double click on Canvas. The Scene View will zoom out and you can see white border. It is showing the UI Size on the screen. You should place ui parts in it, if they should be displayed. We have white box already in it (HealthBar (Image)). Select Rectangle Tool (if not selected) and stretch the HealthBar as hp bar.
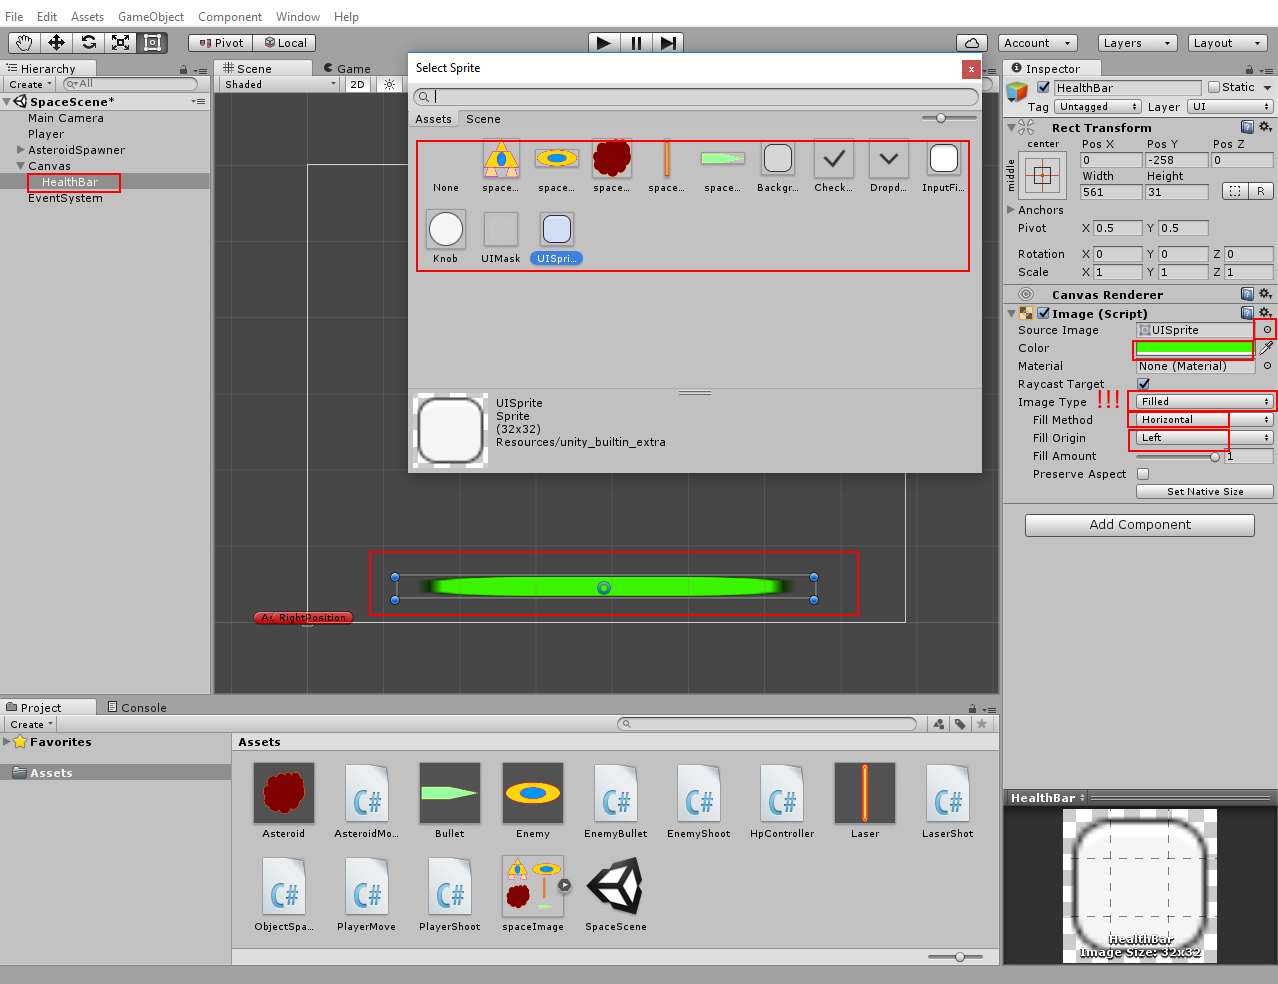
Select HelathBar in Hierarchy. Change Source Image to UISprite (we just need one sprite for our hp bar). You can change its colour. Set Image Typ to Filled. Fill Method to Horizontal. Fill Origin to Left (you can try something different with FillMethod and Fill Origin, but Image Typ should be Filled). You can change Fill Amount to see, how the hp bar will work.
15. Step
Now we can make C# script to controll players HP. Create new C# script and name it PlayerHP.
using UnityEngine;
using System.Collections;
//we need the namespace for access on Unity UI
using UnityEngine.UI;
using UnityEngine.SceneManagement;
public class PlayerHP : MonoBehaviour {
//reference to gameobject HealthBar
public GameObject HealthBar;
//reference variable to Image component in HealthBar
Image img;
//current HP
public int hp;
//maximum HP value, will be used for % count
float maxHp;
//will be executed once
void Start () {
//reference to Image component in PlayerHP
img = HealthBar.GetComponent < Image > ();
//set maximum HP as current HP
maxHp = hp;
//change fill amount between 0 and 1 (here will be 1 or 100%)
img.fillAmount = hp / maxHp;
}
//will be called from the scripts on other gameobjects (like Bullet)
void MakeDamage (int damage) {
//decrease hp value
hp = hp - damage;
//check if hp is zero or negative
if (hp <= 0) {
//load current scene (reload)
SceneManager.LoadScene (SceneManager.GetActiveScene().name);
}
//change fill amount between 0 and 1
img.fillAmount = hp / maxHp;
}
}
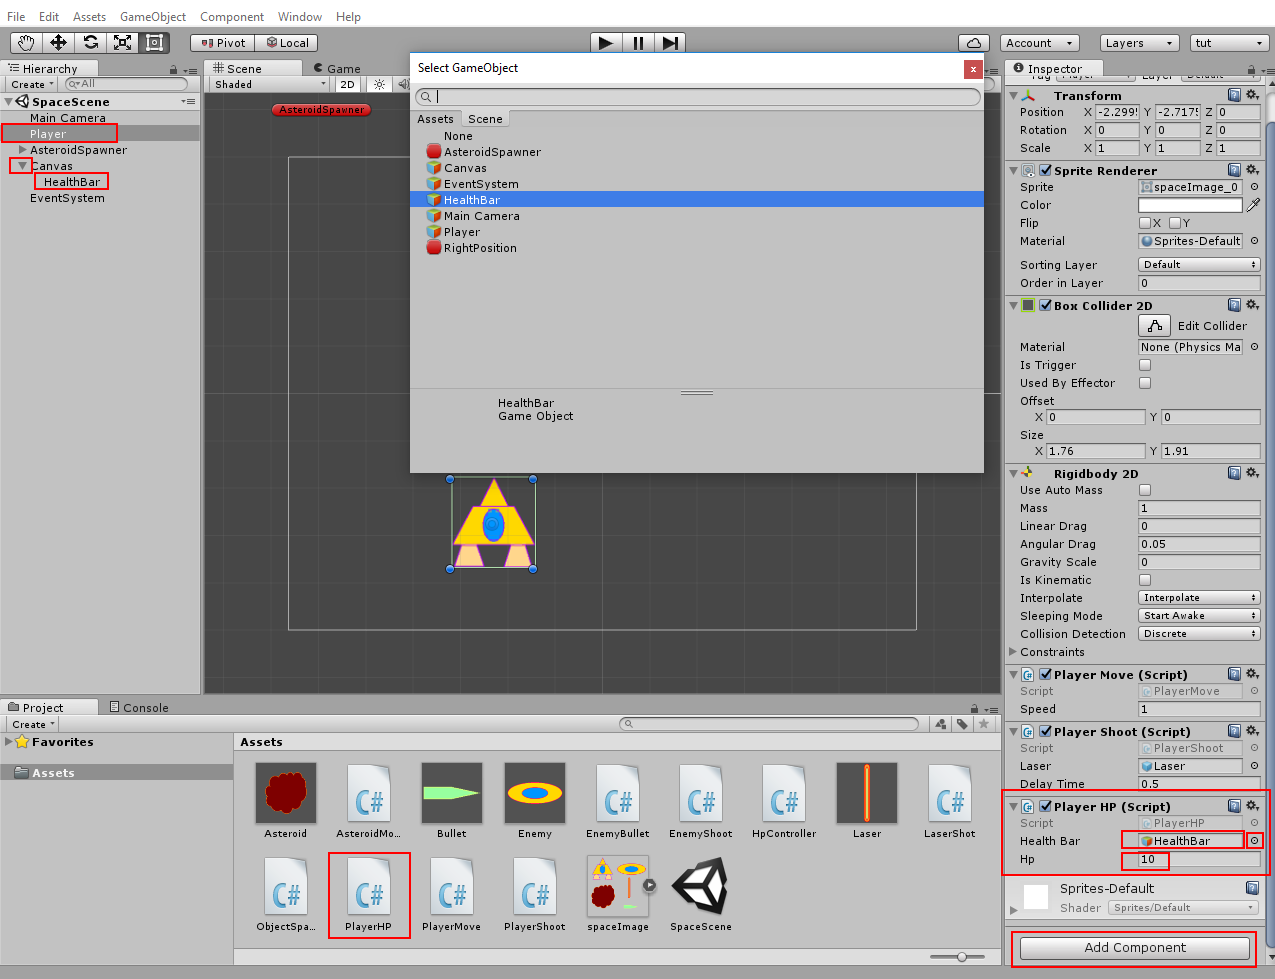
Double click on Main Camera in Hierarchy to return to the camera view. Select Player. Add PlayerHP script to the Player. Put HealthBar into Health Bar field (you can drag&drop it from Hierarchy (expand Canvas if not visible), or click select point near Healt Bar field and choose HealthBar). Set variable HP to 10. using System.Collections;
//we need the namespace for access on Unity UI
using UnityEngine.UI;
using UnityEngine.SceneManagement;
public class PlayerHP : MonoBehaviour {
//reference to gameobject HealthBar
public GameObject HealthBar;
//reference variable to Image component in HealthBar
Image img;
//current HP
public int hp;
//maximum HP value, will be used for % count
float maxHp;
//will be executed once
void Start () {
//reference to Image component in PlayerHP
img = HealthBar.GetComponent < Image > ();
//set maximum HP as current HP
maxHp = hp;
//change fill amount between 0 and 1 (here will be 1 or 100%)
img.fillAmount = hp / maxHp;
}
//will be called from the scripts on other gameobjects (like Bullet)
void MakeDamage (int damage) {
//decrease hp value
hp = hp - damage;
//check if hp is zero or negative
if (hp <= 0) {
//load current scene (reload)
SceneManager.LoadScene (SceneManager.GetActiveScene().name);
}
//change fill amount between 0 and 1
img.fillAmount = hp / maxHp;
}
}
Ok, the game scene should be done now. We can tweak it little.
16. Step
Select Main Camera. Click on Background in Inspector and change it to black.
17. Step
We should add moving stars. Unity particles are good for this. Click GameObject and select Particle System. Select it in Hierarchy and rename as Stars. Set Z-Position to 10. And X-Rotation to 90. Move it up over the Camera View. Enable Prewarm. Adjust Start Lifetime (particle should fly over the camera view). Adjust Start Speed as you like. Set Start Size to 0.2 (to something what you like). Click on Shape menu and set Shape to Box. Change X value to 15 (particle box should be bigger as camera view on X-Axe). Click on Renderer menu and set Order in Layer to -100.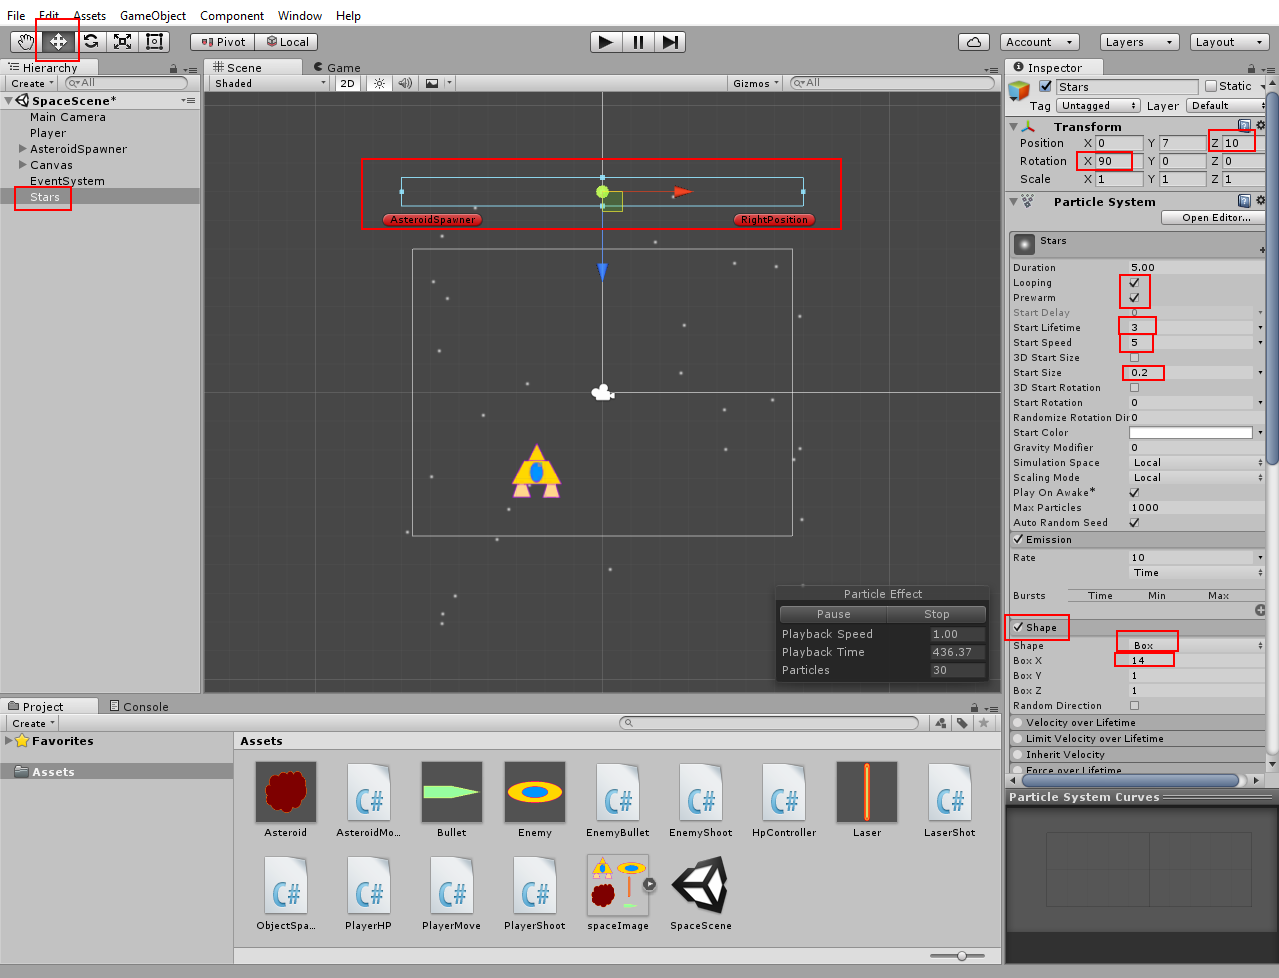
18. Step
Entpack now downloaded SpaceSound archives ( SpaceSound ). Import the 3 sound files into Unity (You can drag&drop them into Assets window or right-click into Assets window -> Import New Asset ... select the sound files in your ordner and click Import). Now we can make background music. Select Main Camera. Add Space Music to it. Unity will create new component Audio Sorce (or Add this component manually and set Audio Clip to SpaceMusic). Enable Loop.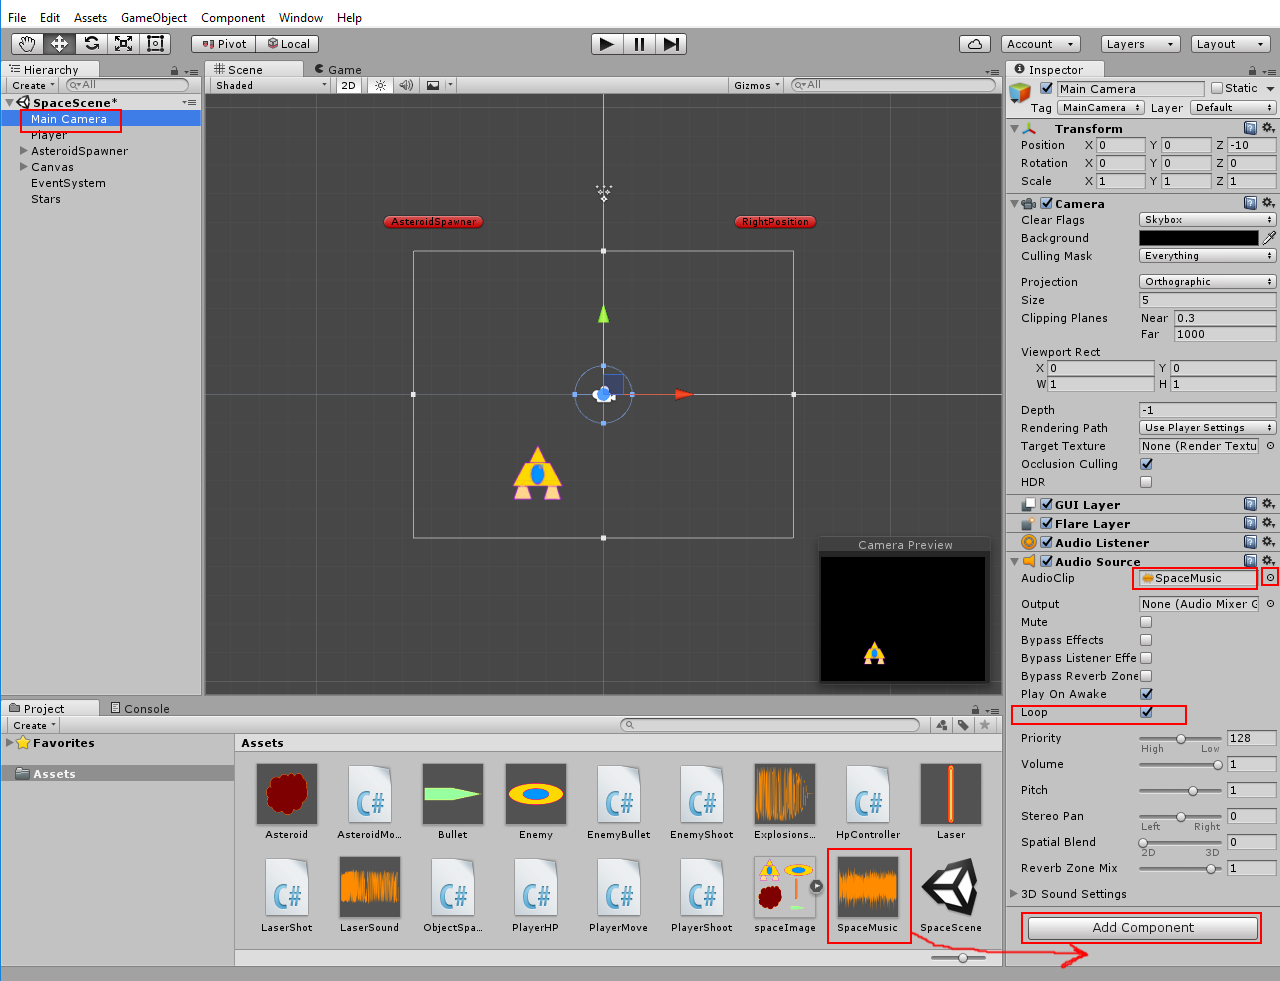
18. Step
We should make shooting sounds. We can play audioclip if Bullet was spawned. Open EnemyBullet script. AudioClip should be declared. And we can play this sound with AudioSource.PlayClipAtPoint.
using UnityEngine;
using System.Collections;
public class EnemyBullet : MonoBehaviour {
//reference variable for Players gameobject
GameObject player;
//reference variable for Rigidbody2D
Rigidbody2D rb;
//variable for force power
public float force;
//variable for damage value
public int damage;
//variable for sound clip
public AudioClip BulletSound;
//will be executed once at start
void Start () {
//reference to Rigidbody2D
rb = GetComponent < Rigidbody2D > ();
//search for gameobject with tag Player and reference to them
player = GameObject.FindWithTag ("Player");
//check if Player is in the scene
if (player != null) {
//calculate direction vector to Player
Vector3 dir = player.transform.position - transform.position;
//calculate angle between X-axe and direction vector
float angle = Mathf.Atan2 (dir.y, dir.x) * Mathf.Rad2Deg;
//rotate the bullets gameobject
transform.Rotate (0, 0, angle);
//push bullet on its locale X-axe (it will be forward for this image)
rb.AddRelativeForce (Vector2.right * force, ForceMode2D.Impulse);
//play sound (gameobject will be created at the position, which will play the sound and then destroy itself)
AudioSource.PlayClipAtPoint (BulletSound, transform.position);
//if Player isn't in the scene
} else
//delete bullet from scene
Destroy (gameObject);
}
//will be executed if Collider2D went into Trigger
void OnTriggerEnter2D (Collider2D other) {
//check if collided gameobject has tag Player
if (other.gameObject.tag == "Player") {
//try to execute function "MakeDamage" with parameter "damage" in scripts connected to collided gameobject
other.gameObject.SendMessage ("MakeDamage", damage, SendMessageOptions.DontRequireReceiver);
//delete bullet
Destroy (gameObject);
}
}
//will be executed if bullet is not rendered anymore (out of screen)
void OnBecameInvisible () {
//delete bullet
Destroy (gameObject);
}
}
Select Bullet prefab in Assets window. Its EnemyBullet script has now new field for sound Bullet Sound. Put LaserSound in it. using System.Collections;
public class EnemyBullet : MonoBehaviour {
//reference variable for Players gameobject
GameObject player;
//reference variable for Rigidbody2D
Rigidbody2D rb;
//variable for force power
public float force;
//variable for damage value
public int damage;
//variable for sound clip
public AudioClip BulletSound;
//will be executed once at start
void Start () {
//reference to Rigidbody2D
rb = GetComponent < Rigidbody2D > ();
//search for gameobject with tag Player and reference to them
player = GameObject.FindWithTag ("Player");
//check if Player is in the scene
if (player != null) {
//calculate direction vector to Player
Vector3 dir = player.transform.position - transform.position;
//calculate angle between X-axe and direction vector
float angle = Mathf.Atan2 (dir.y, dir.x) * Mathf.Rad2Deg;
//rotate the bullets gameobject
transform.Rotate (0, 0, angle);
//push bullet on its locale X-axe (it will be forward for this image)
rb.AddRelativeForce (Vector2.right * force, ForceMode2D.Impulse);
//play sound (gameobject will be created at the position, which will play the sound and then destroy itself)
AudioSource.PlayClipAtPoint (BulletSound, transform.position);
//if Player isn't in the scene
} else
//delete bullet from scene
Destroy (gameObject);
}
//will be executed if Collider2D went into Trigger
void OnTriggerEnter2D (Collider2D other) {
//check if collided gameobject has tag Player
if (other.gameObject.tag == "Player") {
//try to execute function "MakeDamage" with parameter "damage" in scripts connected to collided gameobject
other.gameObject.SendMessage ("MakeDamage", damage, SendMessageOptions.DontRequireReceiver);
//delete bullet
Destroy (gameObject);
}
}
//will be executed if bullet is not rendered anymore (out of screen)
void OnBecameInvisible () {
//delete bullet
Destroy (gameObject);
}
}

We can do the same with players laser. Open "LaserShot" script.
using UnityEngine;
using System.Collections;
public class LaserShot : MonoBehaviour {
//reference variable for Rigidbody2D
Rigidbody2D rb;
//variable for damage
public int damage;
//variable for force power
public float force;
//variable for sound clip
public AudioClip BulletSound;
//will be executed once
void Start () {
//reference to Rigidbody2D
rb = GetComponent < Rigidbody2D > ();
//declare Vector3 with force value on Y-axe
Vector3 directon = new Vector3 (0, force, 0);
//add force push on rigidbody2D for moving on Y-axe
rb.AddForce (directon, ForceMode2D.Impulse);
//play sound (gameobject will be created at the position, which will play the sound and then destroy itself)
AudioSource.PlayClipAtPoint (BulletSound, transform.position);
}
//will be executed, if the gameobject is not rendering anymore on the screen
void OnBecameInvisible () {
//delete this gameobject from the scene
Destroy (gameObject);
}
//will be executed if one other Collider2D went into Trigger
void OnTriggerEnter2D (Collider2D other) {
//check if other gameobject has tag Enemy
if (other.gameObject.tag == "Enemy") {
//try to call MakeDamage on other gameobject, send damage as parameter for it
other.gameObject.SendMessage ("MakeDamage", damage, SendMessageOptions.DontRequireReceiver);
//delete gameobject from scene
Destroy (gameObject);
}
}
}
Select Laser prefab. And put LaserSound in Bullet Sound field. using System.Collections;
public class LaserShot : MonoBehaviour {
//reference variable for Rigidbody2D
Rigidbody2D rb;
//variable for damage
public int damage;
//variable for force power
public float force;
//variable for sound clip
public AudioClip BulletSound;
//will be executed once
void Start () {
//reference to Rigidbody2D
rb = GetComponent < Rigidbody2D > ();
//declare Vector3 with force value on Y-axe
Vector3 directon = new Vector3 (0, force, 0);
//add force push on rigidbody2D for moving on Y-axe
rb.AddForce (directon, ForceMode2D.Impulse);
//play sound (gameobject will be created at the position, which will play the sound and then destroy itself)
AudioSource.PlayClipAtPoint (BulletSound, transform.position);
}
//will be executed, if the gameobject is not rendering anymore on the screen
void OnBecameInvisible () {
//delete this gameobject from the scene
Destroy (gameObject);
}
//will be executed if one other Collider2D went into Trigger
void OnTriggerEnter2D (Collider2D other) {
//check if other gameobject has tag Enemy
if (other.gameObject.tag == "Enemy") {
//try to call MakeDamage on other gameobject, send damage as parameter for it
other.gameObject.SendMessage ("MakeDamage", damage, SendMessageOptions.DontRequireReceiver);
//delete gameobject from scene
Destroy (gameObject);
}
}
}

19. Step
At least we need explosions sound. Open "HpController" script.
using UnityEngine;
using System.Collections;
public class HpController : MonoBehaviour {
//variable for health points
public int hp;
//variable for sound clip
public AudioClip ExplosionsSound;
//funkton for damage calculation (we will get damage from other functions)
void MakeDamage (int damage) {
//decrease hp variable
hp = hp - damage;
//check if hp is negative or zero
if (hp <= 0) {
//play sound (gameobject will be created at the position, which will play the sound and then destroy itself)
AudioSource.PlayClipAtPoint (ExplosionsSound, transform.position);
//delete gameobject
Destroy (gameObject);
}
}
}
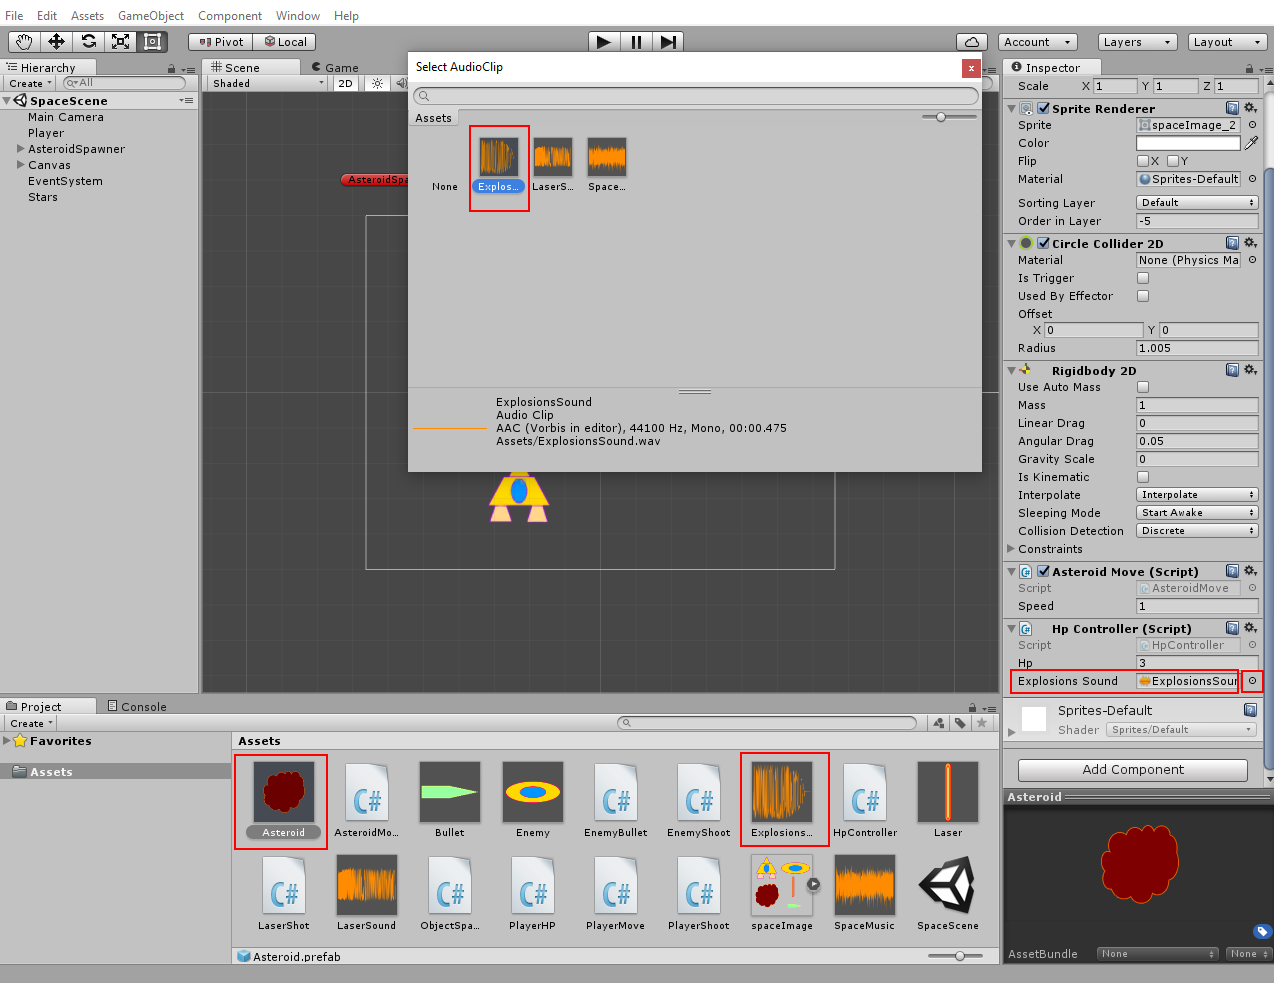
Select Asteroid prefab and put ExplosionsSound in new Explosions Sound field. Select Enemy prefab and put ExplosionsSound in new Explosions Sound field (it is the same as by Asteroid). using System.Collections;
public class HpController : MonoBehaviour {
//variable for health points
public int hp;
//variable for sound clip
public AudioClip ExplosionsSound;
//funkton for damage calculation (we will get damage from other functions)
void MakeDamage (int damage) {
//decrease hp variable
hp = hp - damage;
//check if hp is negative or zero
if (hp <= 0) {
//play sound (gameobject will be created at the position, which will play the sound and then destroy itself)
AudioSource.PlayClipAtPoint (ExplosionsSound, transform.position);
//delete gameobject
Destroy (gameObject);
}
}
}
20. Step
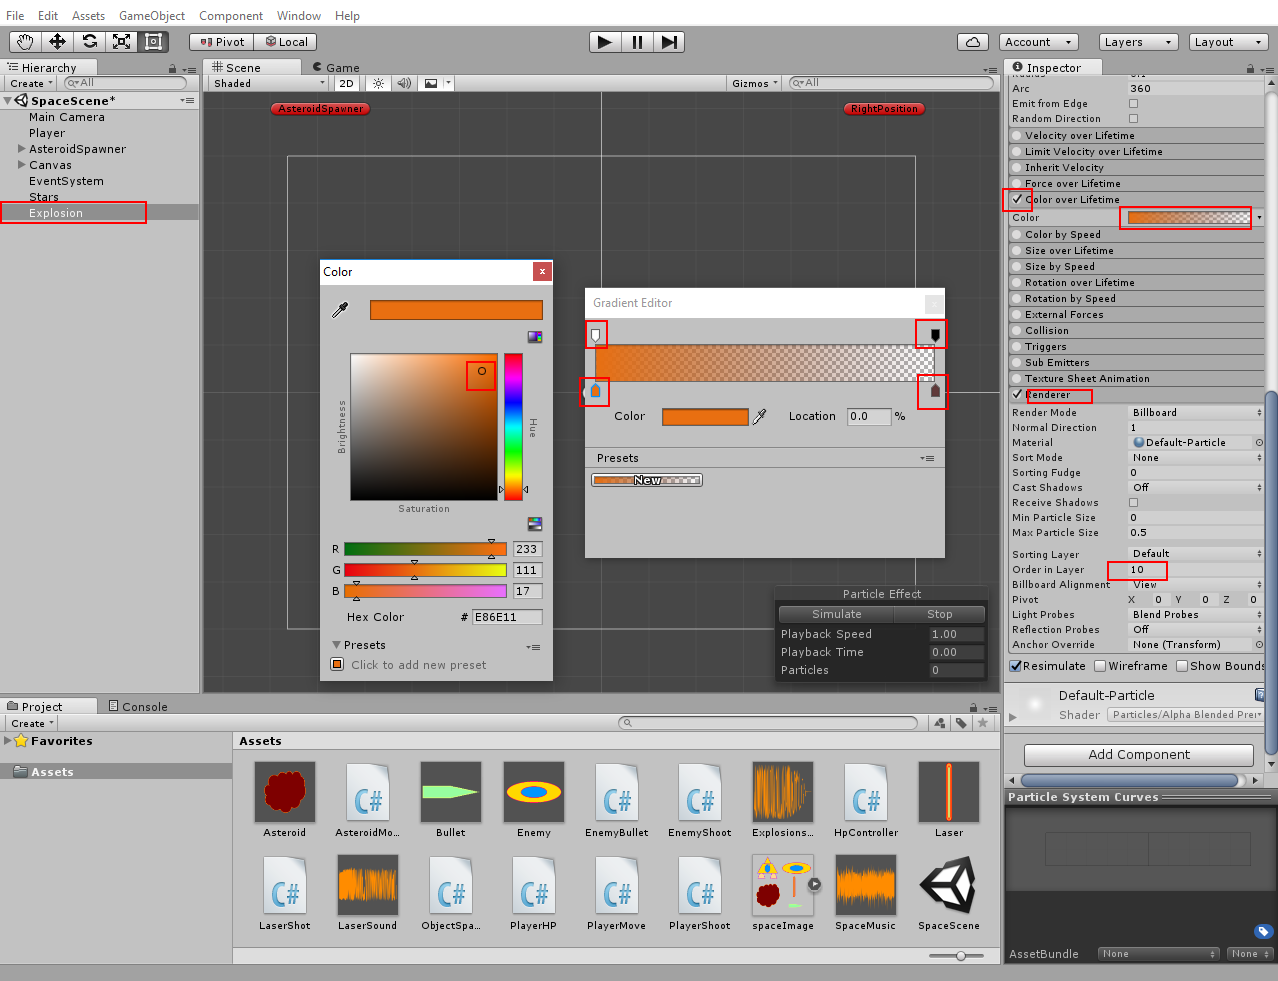
One thing more. We should make explosion if an Enemy (or Asteroid) was destroyed. Again Particle Effects are good for this. Click on GameObject -> select Particle System. Rename created Particle System to Explosion. Set all Rotation to zero. Duration to 1. Disable Looping. Start Lifetime to 1. Start Speed to 2. Start Size to 2. Max Particles to 30. Click on Emission and click on +. Set Min and Max Burst at Time 0.0 to 30. Click on Shape and set Shape to Circle with Radius 0.1.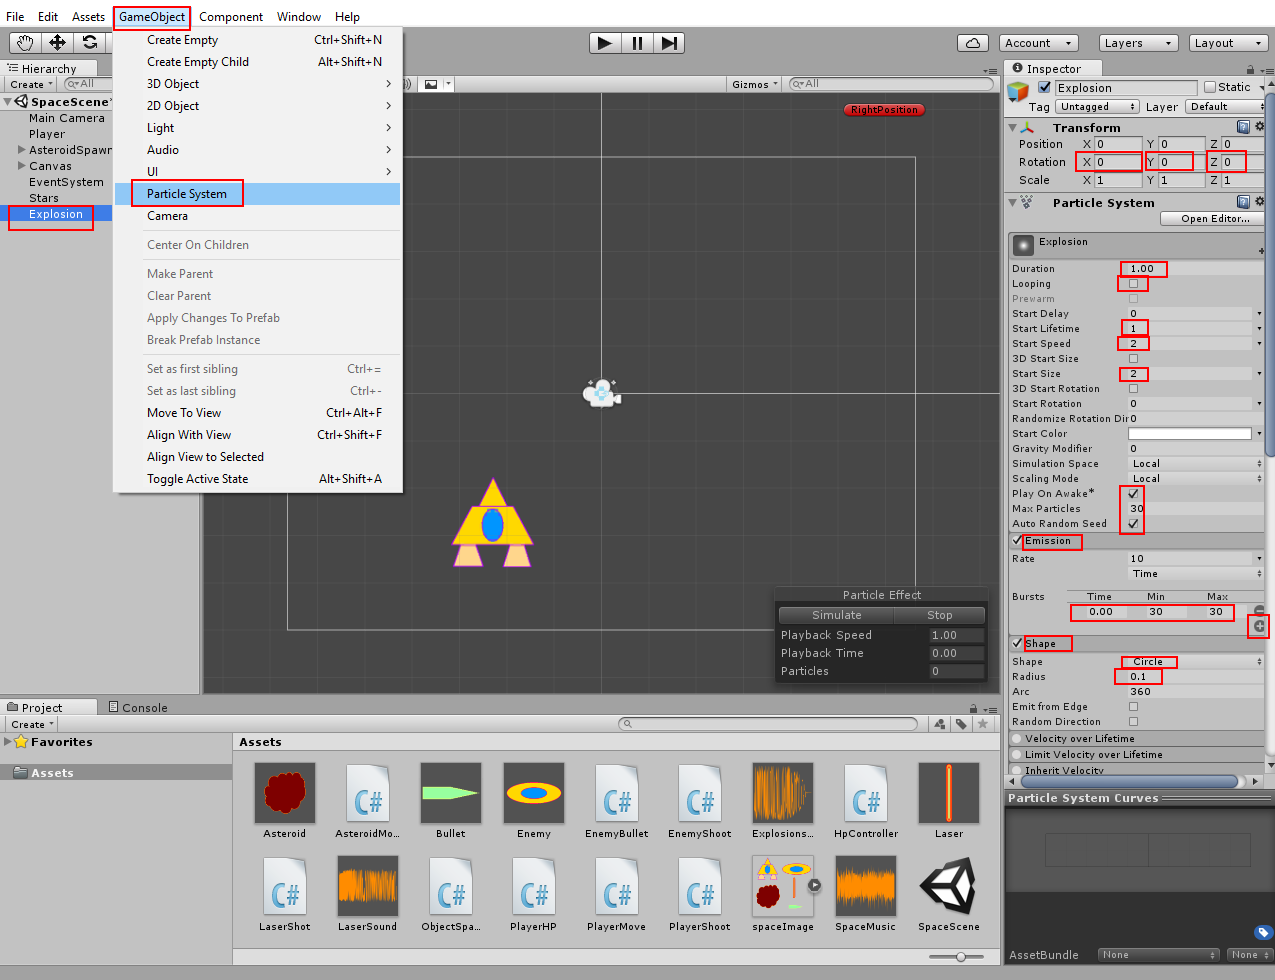
Enable Color over Time. Click on it. Click on Color field. You will see color timeline now. Up is alfa controll (visiblity), below is color. Change last alfa point to 0. Change first and last color points to something what you like. Click on Renderer and set Order in Layer to 10.
It is just example for explosion. Try your own settings. In Unity 5.5 Particle System was reworked. So you can do now much better effects.
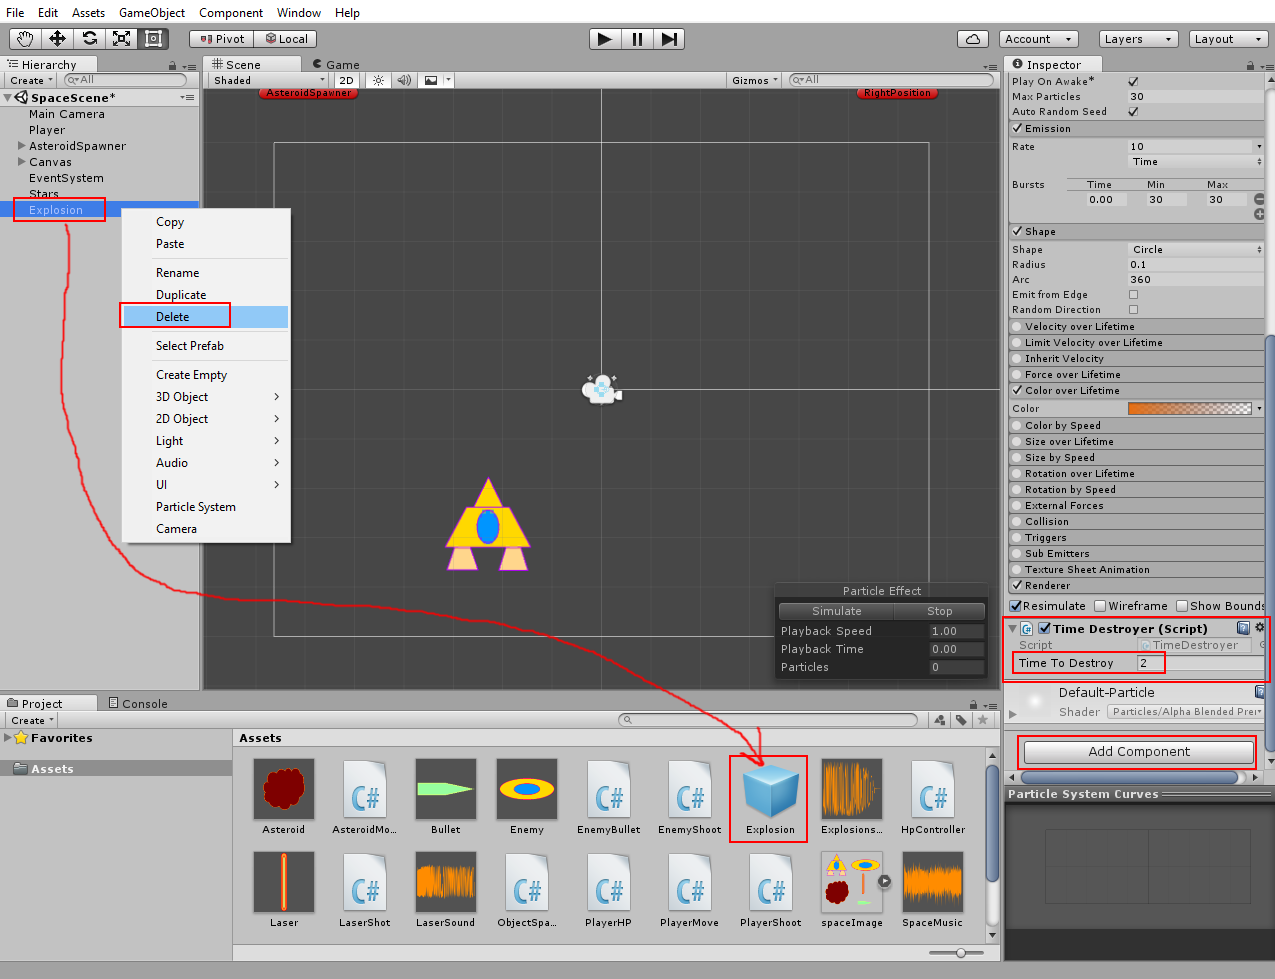
We should make a script to destroy "played" Explosion from the scene. Create new C# script and name it TimeDestroyer.
using UnityEngine;
using System.Collections;
public class TimeDestroyer : MonoBehaviour {
//variable for time befor gameobject will be destroyed
public float timeToDestroy;
//will be executed once at start
void Start () {
//delete gameobject from the scene
Destroy (gameObject, timeToDestroy);
}
}
Select Explosion in hierarchy and add "TimeDestroyer" script to it. Set Time to Destroy to 2. Create Explosion prefab (drag&drop Explosion from hierarchy onto Assets). Delete Explosion from hierarchy. using System.Collections;
public class TimeDestroyer : MonoBehaviour {
//variable for time befor gameobject will be destroyed
public float timeToDestroy;
//will be executed once at start
void Start () {
//delete gameobject from the scene
Destroy (gameObject, timeToDestroy);
}
}
21. Step
We have now Explosion prefab. We should spawn them if one Enemy or Asteroid was destroyed. Open HpController script.
using UnityEngine;
using System.Collections;
public class HpController : MonoBehaviour {
//variable for health points
public int hp;
//variable for sound clip
public AudioClip ExplosionsSound;
//variable for explosion prefab
public GameObject Explosion;
//funkton for damage calculation (we will get damage from other functions)
void MakeDamage (int damage) {
//decrease hp variable
hp = hp - damage;
//check if hp is negative or zero
if (hp <= 0) {
//play sound (gameobject will be created at the position, which will play the sound and then destroy itself)
AudioSource.PlayClipAtPoint (ExplosionsSound, transform.position);
//place explosion on gameobject position
Instantiate (Explosion, transform.position, Quaternion.identity);
//delete gameobject
Destroy (gameObject);
}
}
}
Select Asteroid prefab. HpController script has now new Explosion field. Put Explosion prefab in this field. Do this again with Enemy prefab. Select Enemy prefab and select Explosion for Explosion field. using System.Collections;
public class HpController : MonoBehaviour {
//variable for health points
public int hp;
//variable for sound clip
public AudioClip ExplosionsSound;
//variable for explosion prefab
public GameObject Explosion;
//funkton for damage calculation (we will get damage from other functions)
void MakeDamage (int damage) {
//decrease hp variable
hp = hp - damage;
//check if hp is negative or zero
if (hp <= 0) {
//play sound (gameobject will be created at the position, which will play the sound and then destroy itself)
AudioSource.PlayClipAtPoint (ExplosionsSound, transform.position);
//place explosion on gameobject position
Instantiate (Explosion, transform.position, Quaternion.identity);
//delete gameobject
Destroy (gameObject);
}
}
}

22. Step
We can add engine fire for our Player. Click on GameObject and select Particle System. Rename it as EngineFire. Move it at the ship. And make it child of Player (drag&drop EngineFire on Player in Hierarchy). Set its Z_Position to 0. X_Rotation to 90. Duration to 1. Enable Prewarm. Start Lifetime to 0.5. Start Size to 0.5. Simulation Space to World. Max Particles to 50. Click Emission and set Rate to 50. Change Shape to Box with zero size.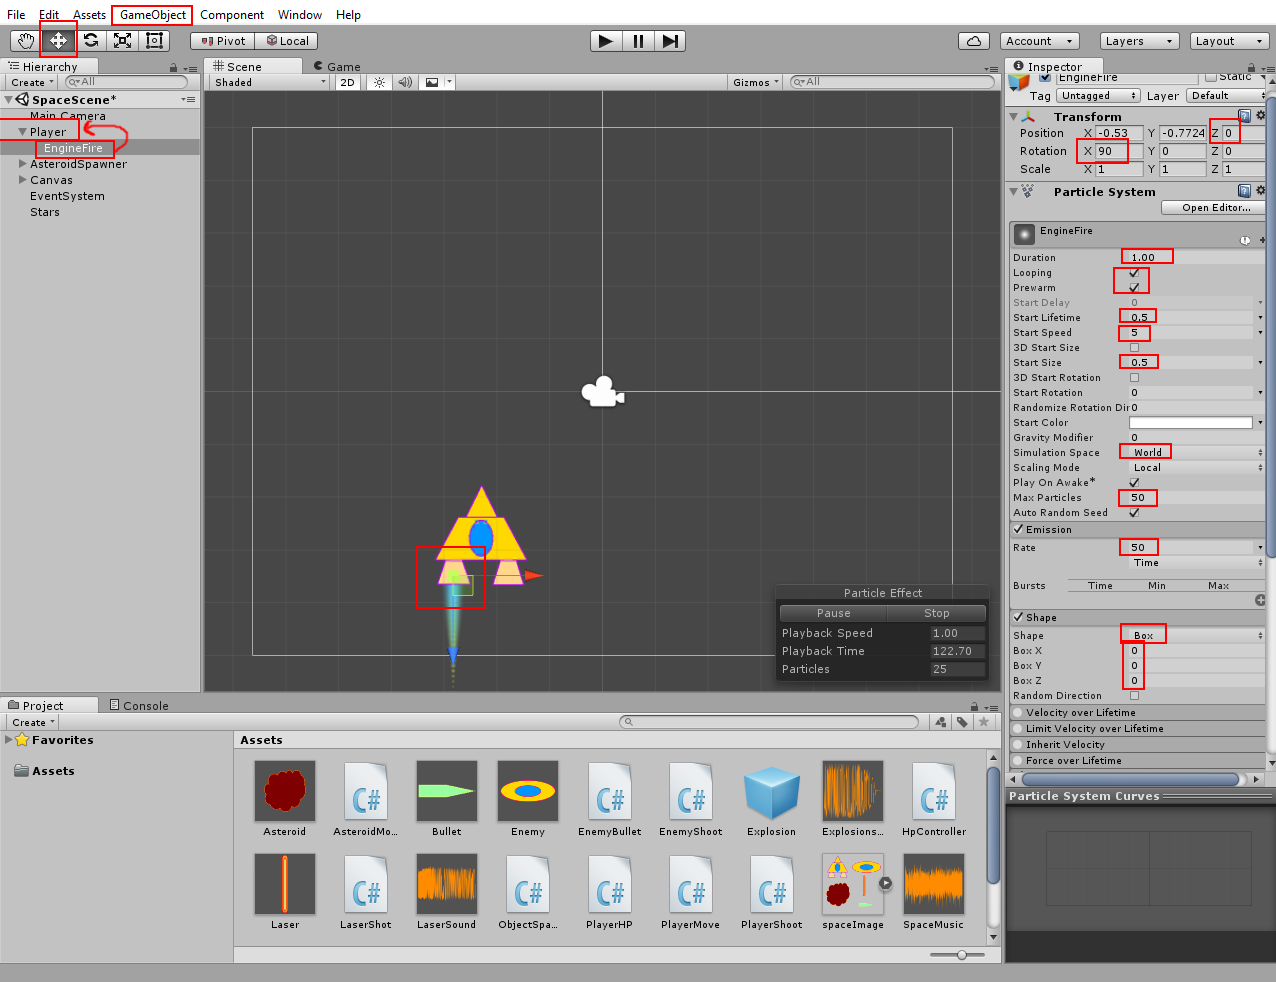
Enable Color over Lifetime. Click on color field and set colors as you like. Enable Size over Lifetime. Set the size curve from 1 to 0. Click on Renderer. Set Order in Layer to -1. One EngineFire should be ready now. Select it, right-click and click on Duplicate. Move the duplicated fire to other ships side.

23. Step
Ok, I think it is enough for simple game. You can build it for one platform. Click on File -> Build Settings. Select the Platform (try windows) and click Build. download unity package of this tutorial.