Tutorial 1: 2D Catch Game (for beginners). Part 1.
Introduction:
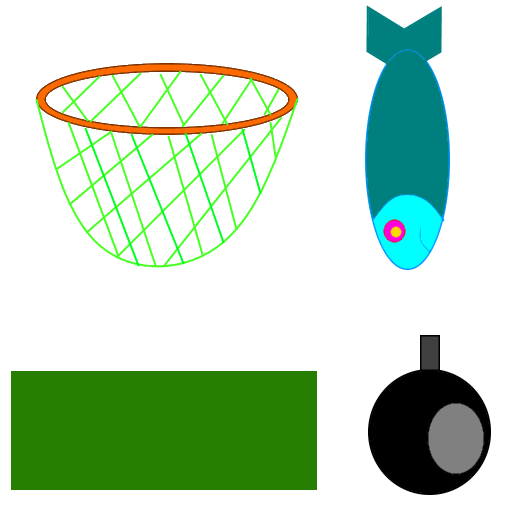
This is Unity 3D tutorial for beginners. There were many tutorials on YouTube as I have started to learn Unity. But it was really hard to understand them for me (as you know, my english skill is bad). There were not so much tutorials, which I could understand with zero knowlege about Unity. So I will try to make easy tutorial for beginners. The tutorial should be easy (as one tutorial can be). The first tutorial will be one small 2D catch game. We will use built-in Physic2D. You should have installed Unity 5 (I advise you to use the latest Unity version for learn). This tutorial was made with Unity 5.3.5. I have updated the UnityPackage with 5.5.1.You will need some images for this tutorial. I have painted simple picture that you can use. Download it here.*
*If your browser just opens the picture, then you should download it manually. Right-click with your mouse on picture and save it. Or right-click on download link and choose save target.
1. Step
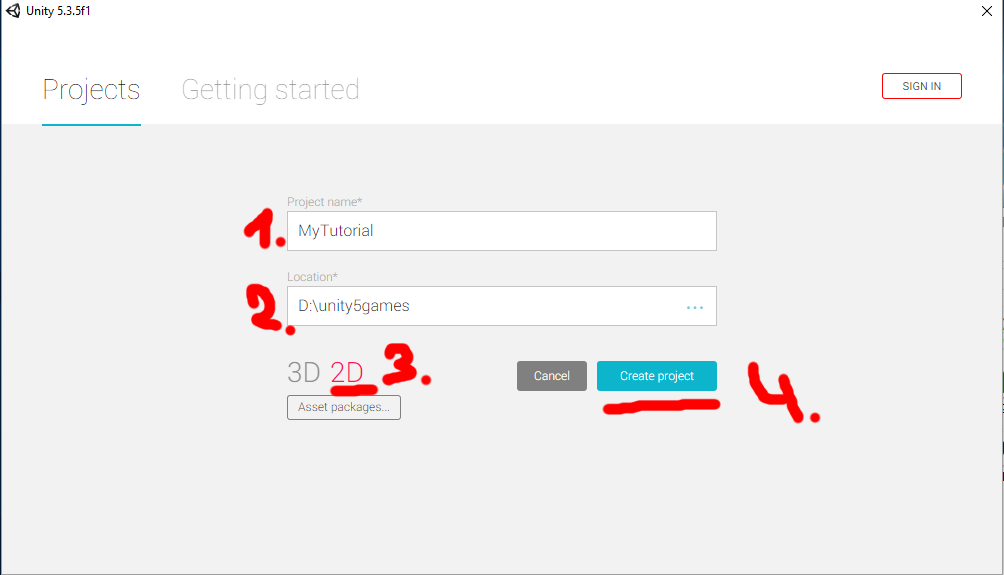
- Start Unity. In start window click on New
- Name the project (as you want)
- Choose location on your PC for save (or leave it as default)
- Choose 2D
- Click on Create Project
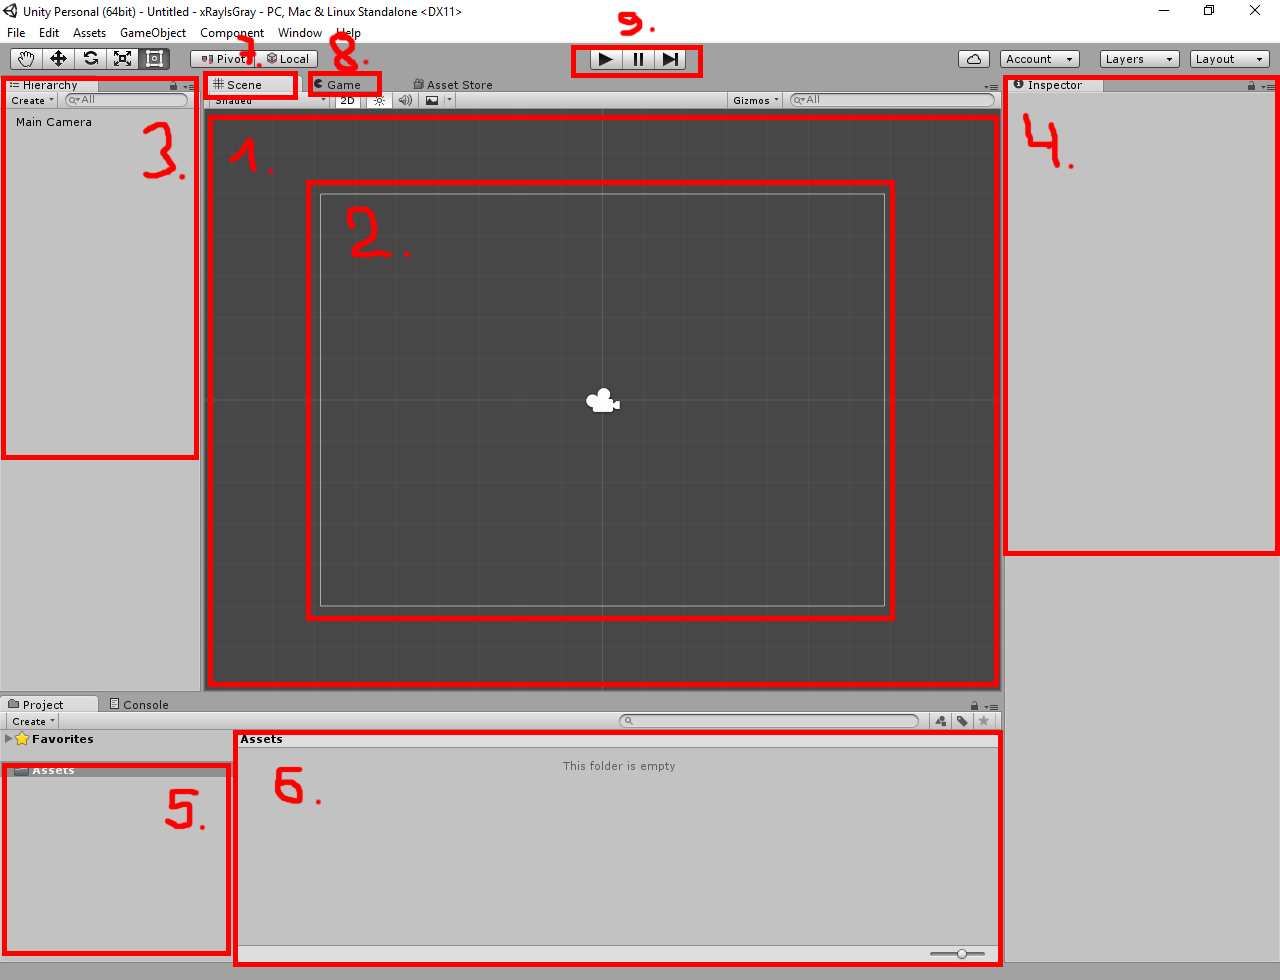
Now you should have Unity editor window opened. The important for us are:
1. Scene window (here we will make our game)
2. Camera view (this white box shows what we will see, if game is started)
3. Hierarchy window (here we will have all gameobjects in scene)
4. Inspector window (options for selected object)
5. Project window (filesystem of our project)
6. Assets window (assets that belongs to project "scenes, images, models, sound files...")
7. Scene tab
8. Game tab (you can adjust here camera resolution and see how it will be in the game)
9. Play/Pause/StepPlay Buttons (here you can start the game for testing)
You can adjust your editor's layout. Replace the windows as you want and save them as one layout. I will stay on default layout for this tutorial.
2. Step
We need 4 images for this game ("ground", "catcher", "bad Item", "good Item").1. Option:
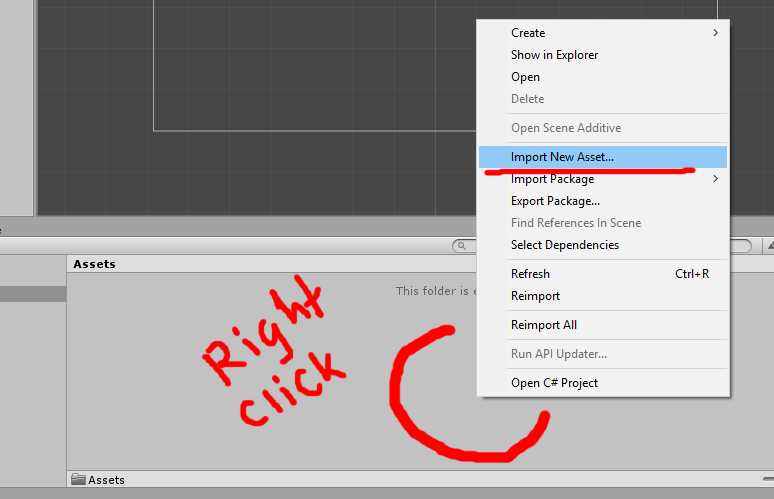
You can download one image, that I have painted ( image). Now we should import this image in our Unity project. Right click in Assets window and pick Import New Asset... Go to your download folder, choose downloaded Image catch2DImage and click Import.
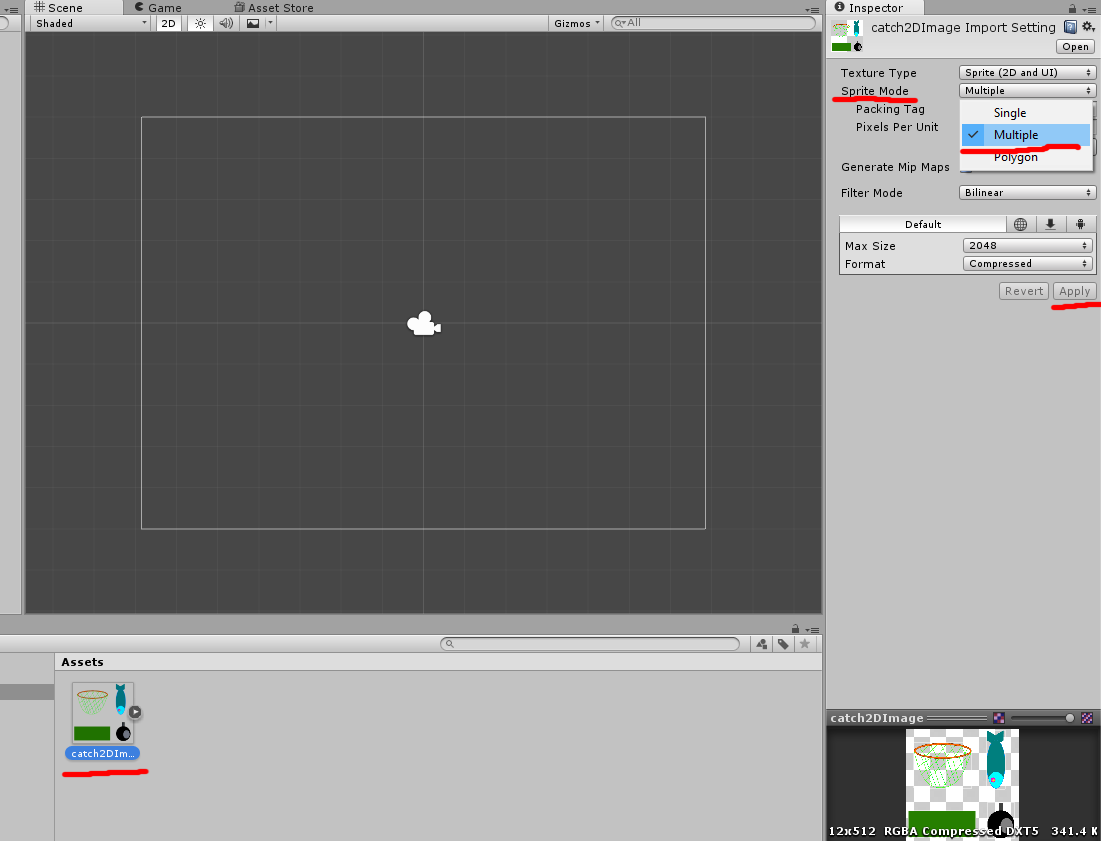
We should have now one image in Assets folder. As said, we need 4 images for this game ("ground", "catcher", "bad Item", "good Item"). So we can "say" to Unity, that this image is one multiple image and we can extract 4 images from them. Select catch2DImage in Assets. Go to Inspector and set Sprite Mode to Multiple. Click on Apply.
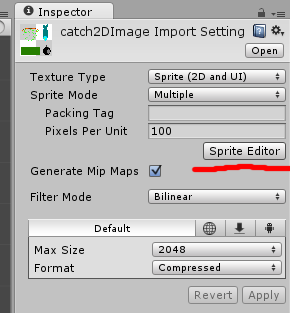
Now we can "extract" our 4 images. Be sure, that the image is selected. Go to it Inspector and click on Sprite Editor.
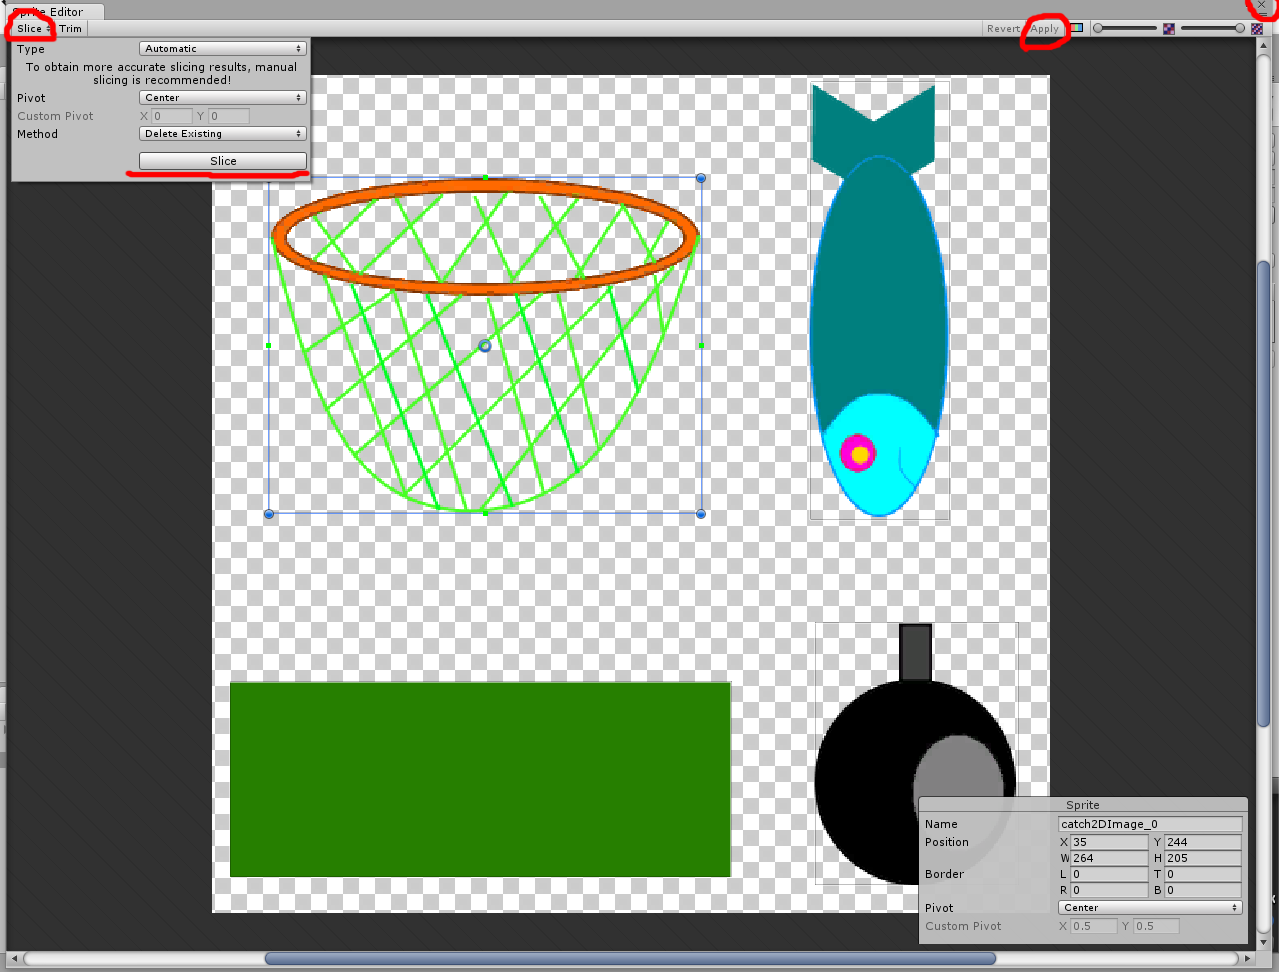
New window Sprite Editor will be opened. Click on Slice. Let all as default and click on Slice button. Click on Apply. You should see now one box above every picture. Sometimes you should manually adjust the sliced image. Close Sprite Editor.
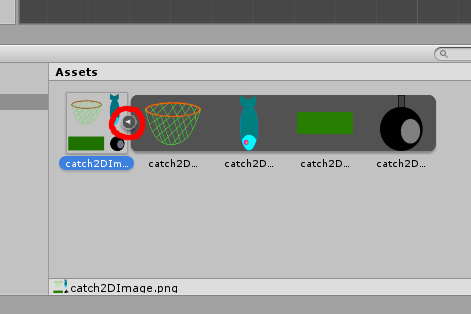
Select the image in Assets window and expand it. If all went good, you should see 4 picture now in this expanded view.
2. Option
You can use your own images too. Just import 4 pictures as new asset in Unity. Right click in asset window and pick Import New Asset... Go to your folder (where your images are saved), choose them and click Import.
3. Option
One other way to import something in Unity: just drag&drop object into Assets window.
3. Step
Let us make ground for our game. Click on ground image (the green box should be that) and drag&drop it in Scene. Be sure, that rectangle tool is selected and adjust the image as ground (hold with left mousebutton the sides and drag them). Select it in Hierarchy catch2DImage_2 right-click on it and rename it in Ground. Go to Inspector and set Order in Layer to 100.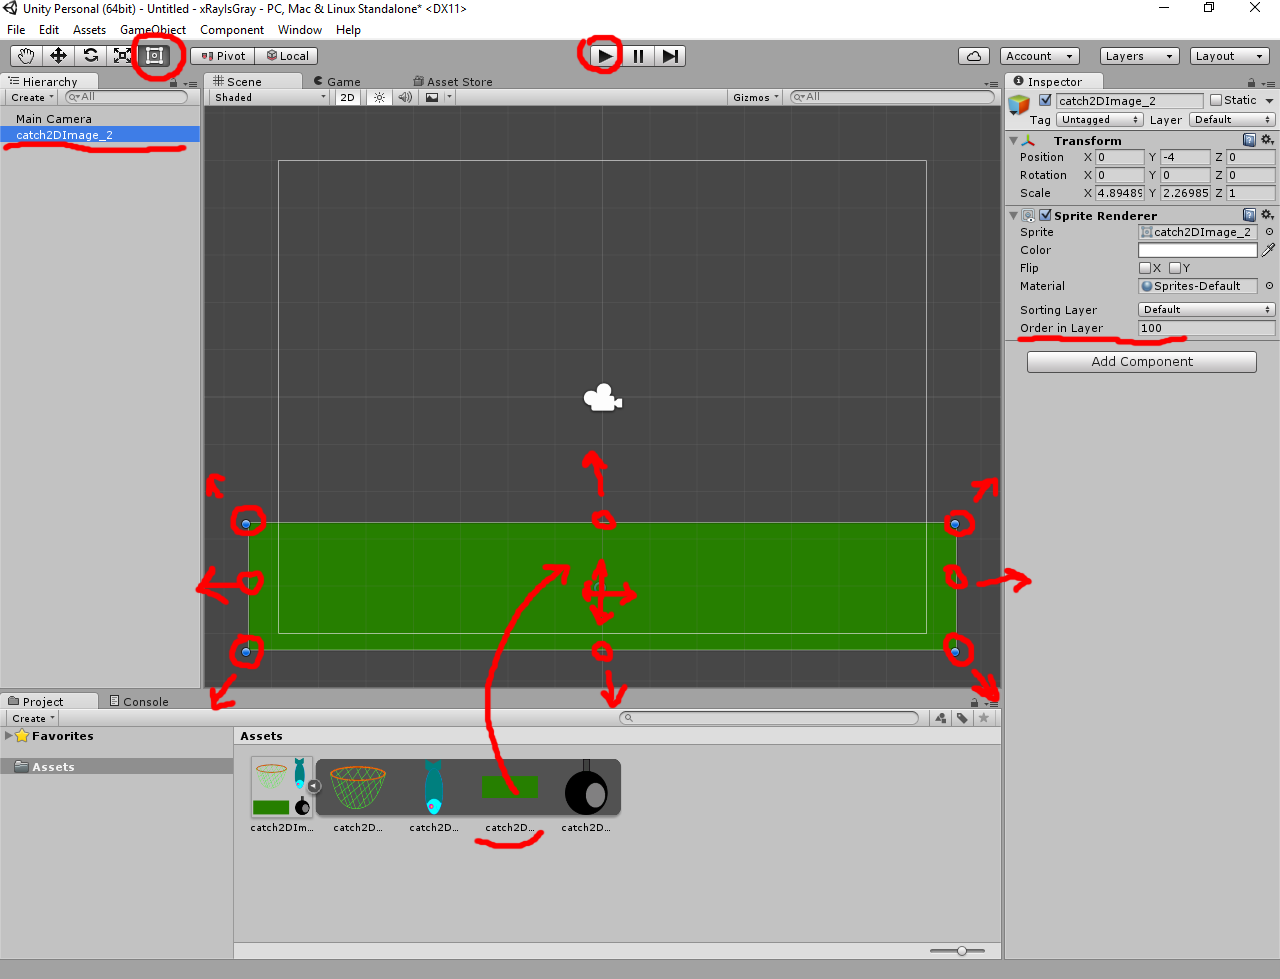
Order in Layer:
Order in Layer is importand for visibility by rendering. The sprites with bigger Order in Layer will be rendered over the sprites with lower Order in Layer. This value can be negativ too, then zero will be over -1, -10, ...Now we have just one sprite in the scene. We can see it, but other GameObjects cannot react with it. We should add physics2D component Box Collider2D to it. Select Ground in Hierarchy, go to Inspector. Click on Add Component -> Physics2D -> Box Collider 2D. Our Ground can now react with other Collider 2D in the game world.
Collider:
Colliders are in the Unity something like a physical body. You can check Unity Manual for exactly info.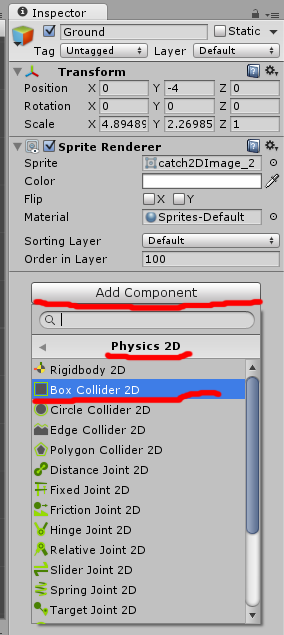
Ok, ground is ready.
4. Step
Let us make "Player - Catcher". Most of steps are similar as by Ground.- Add "Catcher" to scene (just hold and drag the image from Assets to Scene)
- Adjust it (be sure, that rectangle tool is selected)
- Choose it in Hierarchy and rename it to Player (right-click on it)
- Go to Inspector (Player should be selected) and add Box Collider 2D (click on Add Component)
- Our Player will be movable. He need one extra physics2D component Rigidbody2D.
Rigidbody:
Unity physics engine can controll GameObjects with Rigidbodies. Rigidbodies are important for physics calculation. You can check Unity Manual for exactly info.- In Player's Inspector set Tag to Player.
Tag:
Tag is something like a name for GameObject. It helps to identify the GameObject. Unity can handle tags more efficient as names. Check Unity Manual for info.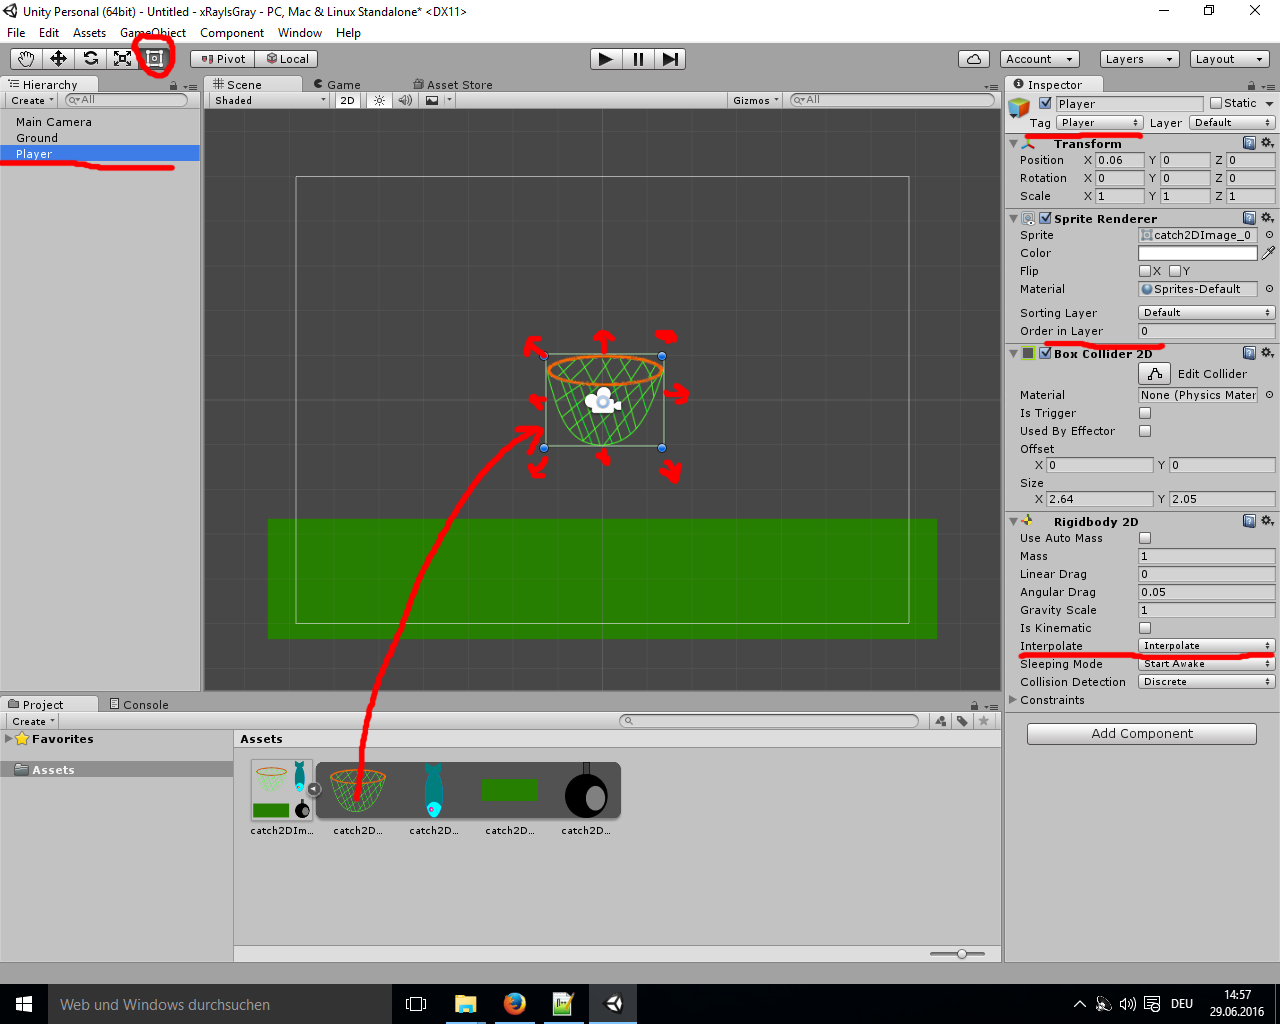
You can start the scene now. The player should fall and then stay on ground. Click on start again and return to scene view.
Our Player should move left or right. There are realy much options how we can do this. I will just change Velocity (speed) of Player's Rigibody2D. Now we will need some C# code. Right-click in Assets window. Choose: Create -> C# script. Name it playerMove. Be careful with spelling if you are coding.
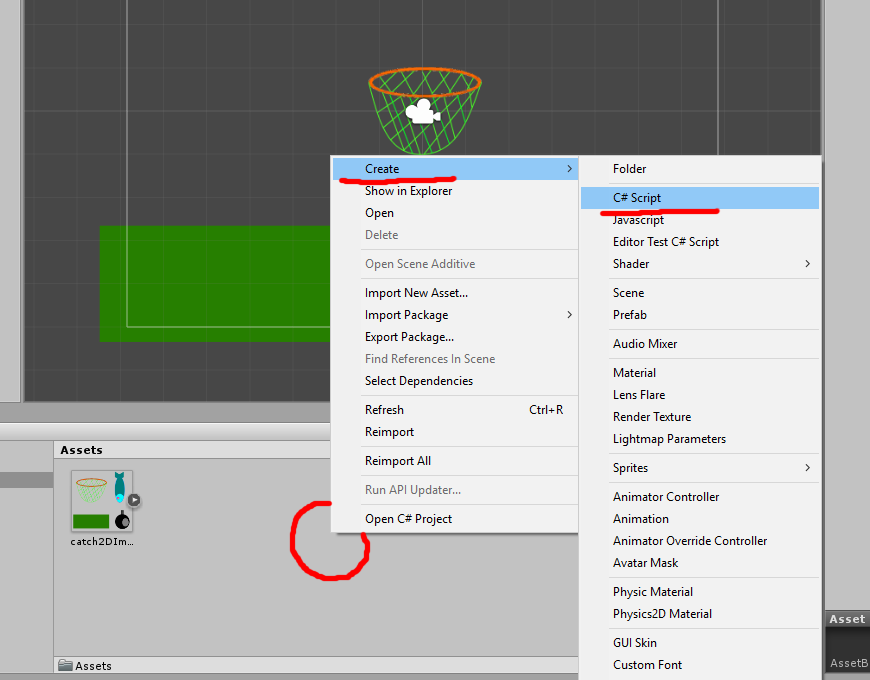
The Assets window should have now 2 files (or 5 if you are using your own picture).

Open playerMove C# script (double-click on it, or right-click and then select open). One C# editor will be opned. And you can see basic prototype for your script. It looks like this:
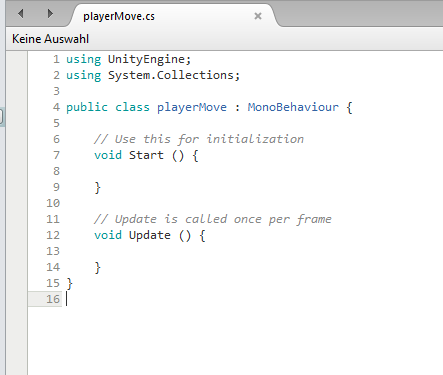
The colors or style can be different if you are using other C# editor. This is not important.
void Start () {} :the function will be executed only once at script's start. Check Unity Manual for info.
void Update () {} :the function will be executed every frame. Check Unity Manual for info.
void FixedUpdate () {} : the function will be executed every fixed time step. Unity don't calculate physics every frame. Instead it is calculating at fixed time step. Default step is 0.02 sec. Check Unity Manual for info. We don't have the function now in our script, we will use it later.
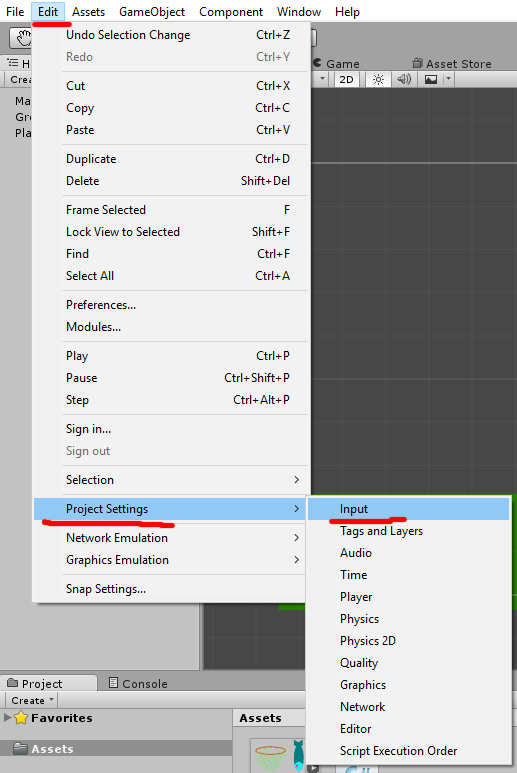
Unity has Input Manager, which can help you to check users's input. You can check the settings from Input Manager: Edit -> Project Setting -> Input. Then look at Inspector window. Don't change them at first. void Update () {} :the function will be executed every frame. Check Unity Manual for info.
void FixedUpdate () {} : the function will be executed every fixed time step. Unity don't calculate physics every frame. Instead it is calculating at fixed time step. Default step is 0.02 sec. Check Unity Manual for info. We don't have the function now in our script, we will use it later.
Input Manager:
Let us take a look at Input Manager. As example: Horizontal axis. If we hold left or A button, then value of this axis will be -1. If we hold right or D button, then value of this axis will be 1. If no of those buttons are pressed, then value is 0. OK, it is not absolutely correct, because value is float between -1 and 1. So with one joystick you can see it better. And we can acces on the values in Input Manager. You can check Unity Manual for exactly info.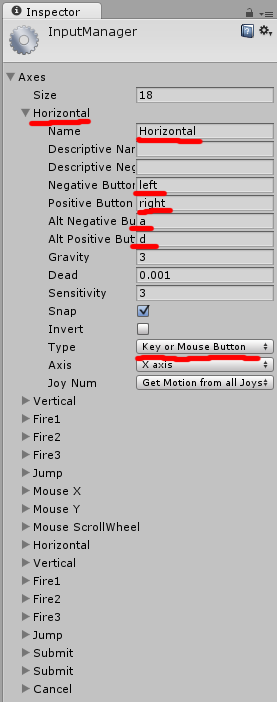
We know now, that we can get 3 state from Input Manager (-1 or 0 or 1), depended on pressed button. We need then one variable for moving speed and we can change velocity (speed) of Player's Rigidbody2D depended on axis value from Input Manager.
Velocity:
Let look us at velocity in Unity. Velocity is one vector. On the value of this vector we can see speed and moving direction of Rigidbody. We can write 3D vector as (x, y, z). If one gameobject is not moving, then its velocity is (0,0,0). With velocity (-5, 0, 0) the GameObject will move left with speed 5, with velocity (1, 0, 0) will move right with speed 1, with velocity (0, 2, 0) will move up with speed 2. Unity is 3D engine, so here is z-direction too. Positive z-direction is forward, negative - backward. For this tutorial we don't need z-direction (but don't forget about z-axis. If you place your GameObject back of the Camera, then you cannot see it in Camera View). You can check Unity Manual for exactly info.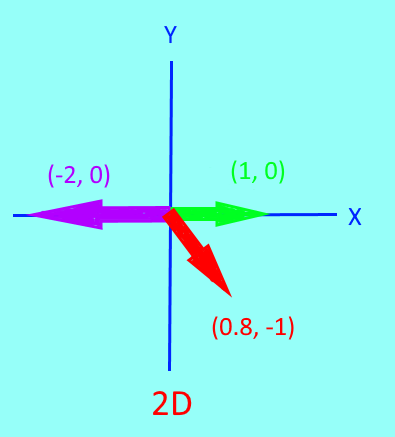
Now we can make C# moving script. I hope you can at least basic of one programming language.
- We need one float variable for speed. Make it public, so it can be changed from Inspector. One float variable for Horizontal axis value. One Vector2 variable for setting speed and direction of Rigibody2D.
public float speed;
float x;
Vector2 move;
- We will change velocity of Rigidbody2D. We need reference to Rigidbody2D.
float x;
Vector2 move;
Rigidbody2D rb;
- Now we can reference rb variable to Rigidbody2D. We should do it once at beginn. With GetComponent < Name > (); we can get Component of the GameObject. 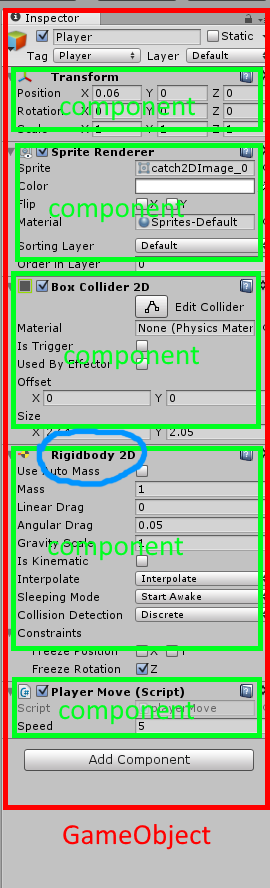
void Start () {
rb = GetComponent < Rigidbody2D > ();
}
For Rigidbody2D's changes we should use FixedUpdate. Check Unity Manual for details. We will get Horizontal axis value every time step (you can get acces on Input Manager with Input.). Then we will calculate moving vector depended on speed variable and Horizontal value (some words about rb.velocity.y. We replace y-value from calculated moving vector with y-value of rb.velocity. And the gameobject can fall because of gravity force. We should not replace with (x, 0), or Player will stay in air, if he is moving left or right). At the end we can change the Player's velocity with calculated vector.
rb = GetComponent < Rigidbody2D > ();
}
void FixedUpdate () {
x = Input.GetAxis ("Horizontal");
move = new Vector2 (x * speed, rb.velocity.y);
rb.velocity = move;
}
Here is the moving script: x = Input.GetAxis ("Horizontal");
move = new Vector2 (x * speed, rb.velocity.y);
rb.velocity = move;
}
Don't copypaste. Type it for learn. You can see how editor will help you. We don't need empty Update(), I have deleted it.
using UnityEngine;
using System.Collections;
public class playerMove : MonoBehaviour {
//visible from editor float variable for Player's moving speed (left/right)
public float speed;
//variable for Player's Rigibody2D component
Rigidbody2D rb;
//float variable for Horizontal axis value from Input Manager
float x;
//variable for calculated vector, which will be used for velocity changes
Vector2 move;
//this function will be executed once as script was enabled
void Start () {
//reference to Rigidbody2D Component
rb = GetComponent < Rigidbody2D > ();
}
//this function will be executed every fixed time step (default is 0.02)
void FixedUpdate () {
//set variable x to value, which we can get from Input Manager's Horizontal axis
x = Input.GetAxis ("Horizontal");
//calculate moving vector (left/right) and y value will stay unchanged
move = new Vector2 (x * speed, rb.velocity.y);
//change Player's velocity (move it left/right or stop)
rb.velocity = move;
}
}
Now add this script to Player. Select Player in Hierarchy window. Click on Add Component in Inspector -> Scripts -> Player Move. using System.Collections;
public class playerMove : MonoBehaviour {
//visible from editor float variable for Player's moving speed (left/right)
public float speed;
//variable for Player's Rigibody2D component
Rigidbody2D rb;
//float variable for Horizontal axis value from Input Manager
float x;
//variable for calculated vector, which will be used for velocity changes
Vector2 move;
//this function will be executed once as script was enabled
void Start () {
//reference to Rigidbody2D Component
rb = GetComponent < Rigidbody2D > ();
}
//this function will be executed every fixed time step (default is 0.02)
void FixedUpdate () {
//set variable x to value, which we can get from Input Manager's Horizontal axis
x = Input.GetAxis ("Horizontal");
//calculate moving vector (left/right) and y value will stay unchanged
move = new Vector2 (x * speed, rb.velocity.y);
//change Player's velocity (move it left/right or stop)
rb.velocity = move;
}
}
(alternativ you can select Player in Hierarchy window and then just drag&drop our moving script into Inspector window.)

Select Player in Hierarchy, go to Inspector window and set speed in Player Move script to something like 5.
Now you can click on Play and can try to move player with a-d or left - right buttons. Then go back to Scene view (click Play again)
5. Step
We need something to catch. Let us make one "good" GameObject. Take fish-image for that. Drag&drop fish image to Scene view.- Select it in Hierarchy window. Rename it to Fish.
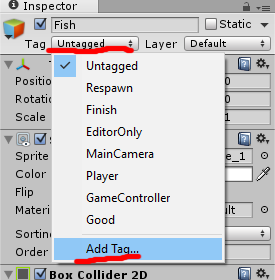
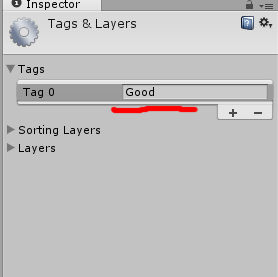
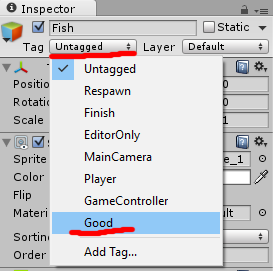
- Go to Inspector window and set Tag to Good (click on untagged -> Add New Tag -> Make new tag Good -> Go back (click on Fish in Hierarchy -> change the untagged to Good. We will need the tag later for check "what item was touched".

- Change Order in Layer to -10. So it will be rendered behind other GameObjects (we have Ground = 100, Player = 0).
- Add Rigidbody 2D (Add component -> Physics 2D -> Rigidbody 2D). Set Gravity Scale to 0.1. We don't need them fall to quickly.
- Set Interpolate to Interpolate (for more smoth moving).
- Add Box Collider 2D. Enable Is Trigger.
Collider is Trigger:
Trigger-Collider is something like ghost-mode for GameObject. Trigger-Collider will go through other Colliders. But we can check them, if they are toching each other. We will check later if Player has touched Fish. Check Unity Manual for details.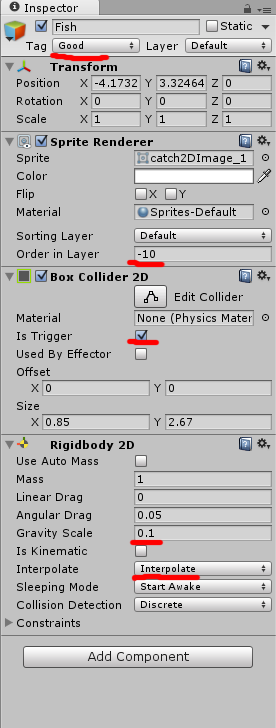
We will spawn later some fishes. If one fish was not catched, then this fish will go through the ground and fall down. We cannot see them, but Unity will still calculate them. We should delete this fish from scene. We can just destroy them after 5 sec alive. We need one little script for that.
Create C# script in Assets window (right-click in Assets -> Create -> C# Script). Name it timeDestroyer. Open it with (double-click or right-click -> Open).
We need float variable for alive-time (public for change from Inspector).
public float aliveTimer;
We need function to delete GameObject from the Scene. GameObjects can be destroyed with Destroy(gameObject, time); function (gameObject is current GameObject, where script is added. Time is delay befor GameObject will be destroyed). We can just put this function in Start () function. If Fish is spawned, Destroy will count alive time and then destroy the GameObject.
void Start () {
Destroy (gameObject, aliveTimer);
}
Now our destroy script should be:
Destroy (gameObject, aliveTimer);
}
using UnityEngine;
using System.Collections;
public class timeDestroyer : MonoBehaviour {
//how long GameObject will stay in the scene
public float aliveTimer;
//the function will be executed once at beginn
void Start () {
//Destroy funktion will delete gameObject (current GameObject) from the scene after aliveTimer seconds
Destroy (gameObject, aliveTimer);
}
}
Select Fish in Hierarchy. Go to Inspector and add our timeDestroyer script to it. Set Alive Timer to 5. using System.Collections;
public class timeDestroyer : MonoBehaviour {
//how long GameObject will stay in the scene
public float aliveTimer;
//the function will be executed once at beginn
void Start () {
//Destroy funktion will delete gameObject (current GameObject) from the scene after aliveTimer seconds
Destroy (gameObject, aliveTimer);
}
}

Now we have one Fish in Scene. Later we will need more of them. So we can make one Fish's template and just clone them. There is Prefab in Unity for that.
Prefab:
Prefab is something like template (blueprint) in Unity. You can make Prefab from any GameObject. And then we can create clones from the Prefab. The Prefab is independent from clones. We can change clones or destroy them. Check Unity Manual for details.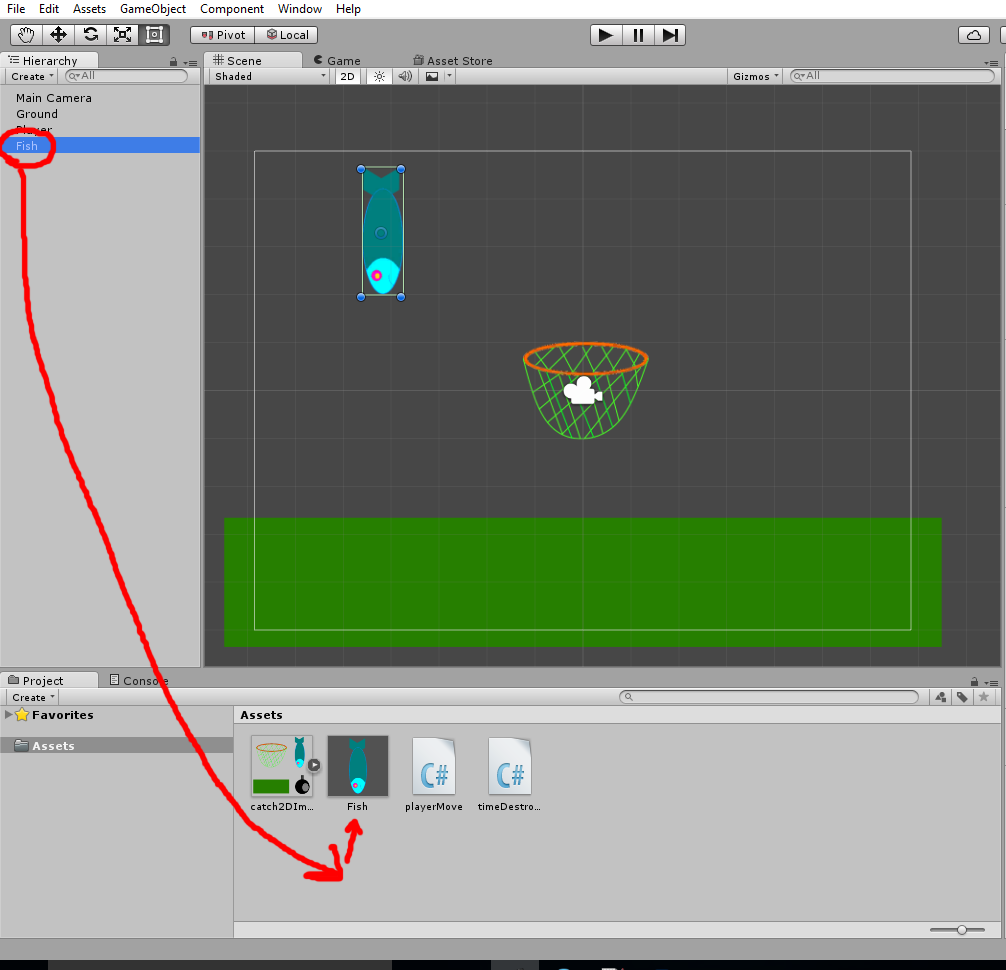
6. Step
Now we need one bad item to avoid it. This item will be allmost similar to Fish. Only its tag and image will be different. So we can just change our Fish. I hope, you have made prefab of Fish. Select Fish in Hierarchie window.- Rename it to Bomb (right-click -> Rename)
- Go to Inspector and change Tag to Bad (untagged -> add new tag -> +)
- Change image to bomb. Be sure that Bomb is selected in Hierarchy, drag&drop bomb image from Assets window to Sprite field in Sprite Renderer in Inspector (or click small circle near sprite field and choose bomb image.
- Adjust Collider2D. Click on Edit Collider in Inspector.
- Make prefab from bomb. Select Bomb in Hierarchy and drag&drop them in Assets window.
If Bomb's prefab was made, you can select Bomb in Hierarchy and delete it.
7. Step
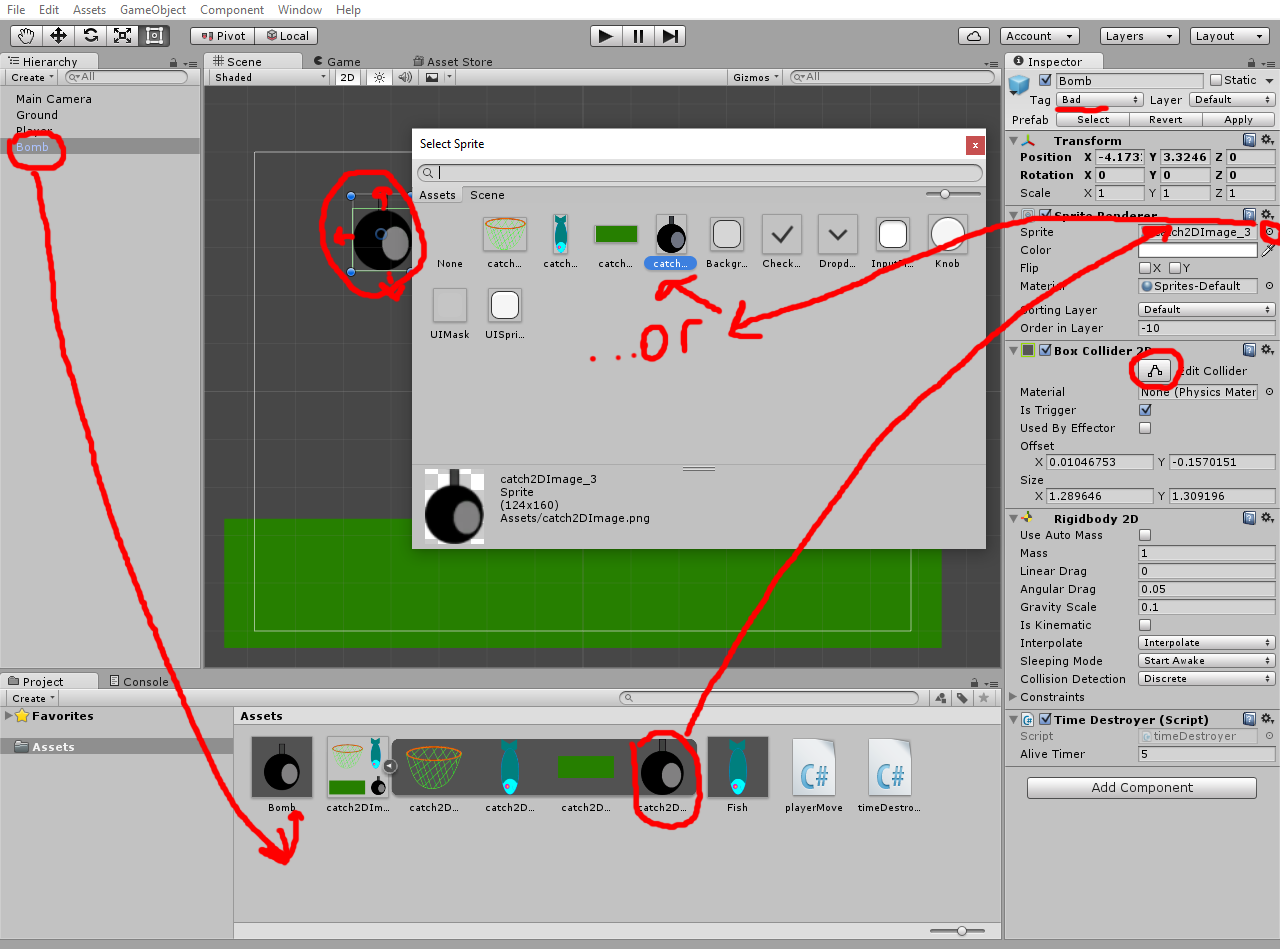
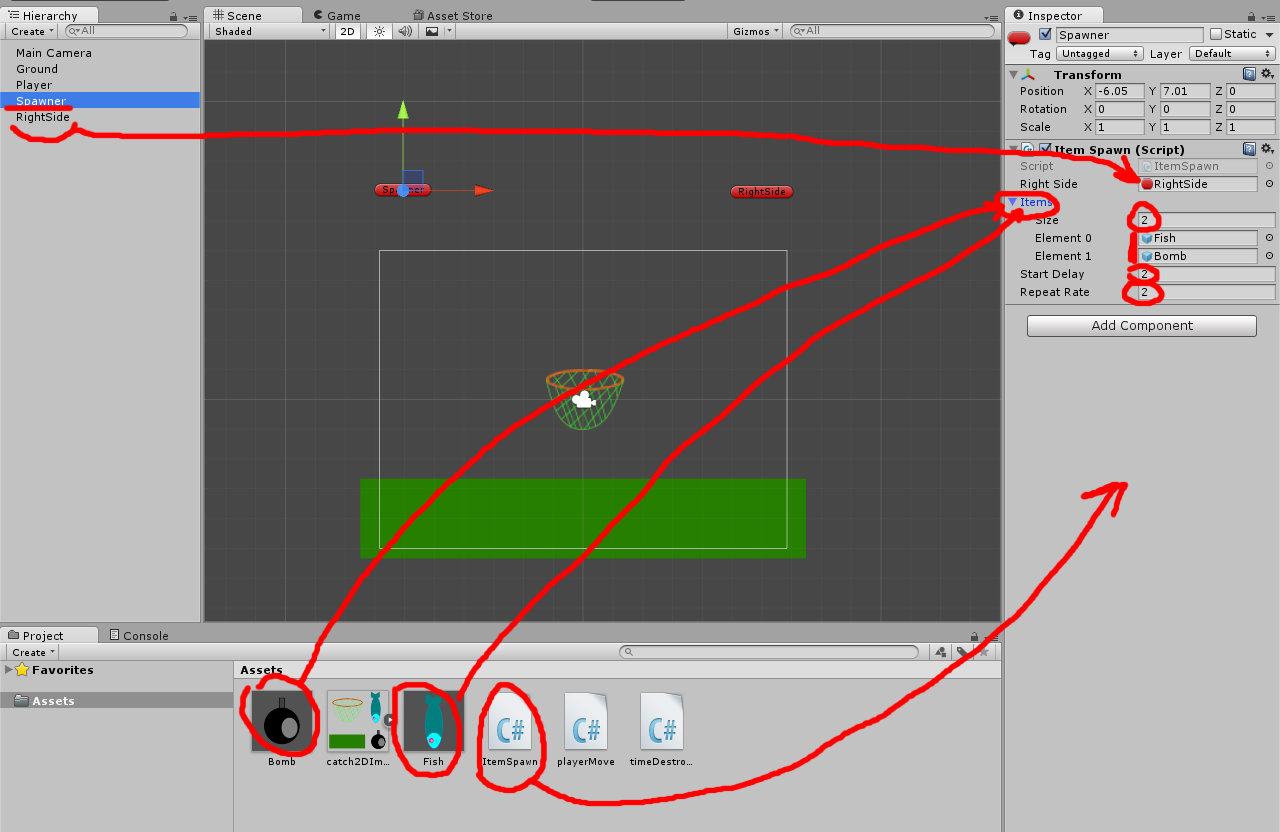
Now we will make spawner for items. The items should be spawned above Camera view. We need to set borders for spawn. Make at first one GameObject as spawn controller. Right-click into Hierarchy window -> Create Empty (be careful, don't make this empty gameobject child of other gameobject. You should deselect other gameojects befor making one empty gameobject! Other option: click button GameObject -> Create -> Empty.). Now we will have Empty GameObject in scene. Select this GameObject and rename it as Spawner (right-click). Go to Inspector and select one icon for better view in scene. Then set its z-position to 0 (if it is different as zero). Select moving tool and move Spawner on left side over the Camera view. We will use later this position as spawn position. Then right-click on Spawner in Hierarchy and Duplicate it. Move this duplicat on right side. Rename duplicat as RightSide. Check screenshot as example.
Now we can make spawn C# script. Create new C# script (right-click in Assets -> Create -> C# Script) and name it as ItemSpawn. Open it. How it will work: we will have one array with items for spawn (we have Fish and Bomb now). Then we can periodically spawn one random item from array. Spawn position will be random too. We can use Spawner y-position as y-position and random value between Spawner and RightSide as x-position.
We need variable for RightSide (we can take its position from Transform of this gameobject).
public GameObject RightSide;
Array for our spawn items. Make it public, we can fill it from Inspector later. Fish and Bomb will be members of the array.
public GameObject[] items;
Float variable for delay befor spawn start and spawns repeat rate.
public float startDelay, repeatRate;
We need something to periodically start our spawn function. We can use InvokeRepeating ("name", startDelay, repeatRate), where name is our spawn function. We should start this InvokeRepeating only once at Start ();.
void Start () {
InvokeRepeating ("Spawn", startDelay, repeatRate);
}
Now to the Spawn function. At first we should calculate random spawn position. This position will be 3D vector. For x-value we can take random x-value between Spawner and RightSide. As y-value we can take y-value from Spawner. And z-value will be 0.
InvokeRepeating ("Spawn", startDelay, repeatRate);
}
2D and Z-Axe:
Don't forget about z-position if you are making 2D games. Unity is 3D engine and if you place something behind the Camera, then the camera will not render this object. Default z-position for camera is -10. Default camera will render objects with z-position more then -10.
Vector3 pos = new Vector3 (Random.Range (gameObject.transform.position.x, RightSide.transform.position.x), gameObject.transform.position.y, 0);
Little explain about Transform component. Remember about GetComponent < Name > (); ? Transform component is exception. You can get this gameobject's component directly from script and don't need reference it. Just use gameObject.transform." and then .position or .rotation. If you are typing in editor, then you can see, what option you can use. As said, don't copy-paste much.
Now we have random position for items spawn. In Unity you can spawn one gameobject with Instantiate (gameobject, position, rotation). We will take one random gameobject from our array (item.length is size of our array. We don't need to calculate size manually. You can add later more items to array, and script should be working). We have random position. And the rotation will stay the same as Spawner's rotation (no rotation).
Instantiate (items [Random.Range (0, items.Length)], pos, gameObject.transform.rotation);
Our spawner script should be now:
using UnityEngine;
using System.Collections;
public class ItemSpawn : MonoBehaviour {
//GameObject, we will get its x-position to calculate max x-position from spawned item
public GameObject RightSide;
//array with gameobjects, wich will be spawned
public GameObject[] items;
//float variables: start delay befor first spawn, repeat delay between spawns
public float startDelay, repeatRate;
//will be executed once at start
void Start () {
//start spawn function
InvokeRepeating ("Spawn", startDelay, repeatRate);
}
//spawn function, will be executed all time with repeat rate
void Spawn () {
//calculate random position: x is random between Spawn and RightSide
Vector3 pos = new Vector3 (Random.Range (gameObject.transform.position.x, RightSide.transform.position.x), gameObject.transform.position.y, 0);
//place random gameobject from array into calculated position
Instantiate (items [Random.Range (0, items.Length)], pos, gameObject.transform.rotation);
}
}
Select now the Spawner in Hierarchy. Add this spawn script to it. Drag&drop RightSide gameobject from Hierarchy to RightSide field in script. Expand array (click on Items). Fill it with prefabs (drag&drop Fish and Bomb prefabs from Assets window on Items). Size of array should be 2. Set delay and rate to 2 each (you can adjust it later). using System.Collections;
public class ItemSpawn : MonoBehaviour {
//GameObject, we will get its x-position to calculate max x-position from spawned item
public GameObject RightSide;
//array with gameobjects, wich will be spawned
public GameObject[] items;
//float variables: start delay befor first spawn, repeat delay between spawns
public float startDelay, repeatRate;
//will be executed once at start
void Start () {
//start spawn function
InvokeRepeating ("Spawn", startDelay, repeatRate);
}
//spawn function, will be executed all time with repeat rate
void Spawn () {
//calculate random position: x is random between Spawn and RightSide
Vector3 pos = new Vector3 (Random.Range (gameObject.transform.position.x, RightSide.transform.position.x), gameObject.transform.position.y, 0);
//place random gameobject from array into calculated position
Instantiate (items [Random.Range (0, items.Length)], pos, gameObject.transform.rotation);
}
}
You can test the scene. Stop it, go again back to scene view.
8. Step
At last we should make "catcher" script. Our GameObjects have Collider2D. We can use Unity physics2D now and let them check, if objects are colliding. Our Bomb and Fish have Trigger Collider2D. We can use OnTriggerEnter2D () now.OnTrigger... Messages:
OnTriggerEnter2D () - will be started if collider2D went in triggerOnTriggerStay2D () - will be started if collider2D stays in trigger
OnTriggerExit2D () - will be started if collider2D leave the trigger
Check Unity Manual for info.
We need int variable as score.
public int score;
OnTriggerEnter2D has parameter Collider2D. We can check, which one GameObject went into the trigger. If we have one GameObject, we can get its Tag. If it is one Good item, we can increase score. If it is one Bad item, we can decrease score. Then we can destroy the other gameobject (that went in the catcher).
void OnTriggerEnter2D (Collider2D other) {
if (other.gameObject.tag == "Good") {
score = score + 10;
Destroy (other.gameObject);
}
if (other.gameObject.tag == "Bad") {
score = score - 10;
Destroy (other.gameObject);
}
}
Our itemChecker script should be now:
if (other.gameObject.tag == "Good") {
score = score + 10;
Destroy (other.gameObject);
}
if (other.gameObject.tag == "Bad") {
score = score - 10;
Destroy (other.gameObject);
}
}
using UnityEngine;
using System.Collections;
public class itemChecker : MonoBehaviour {
//variable for score counting
public int score;
//will be started, if one GameObject with Collider2D has touched the Trigger
void OnTriggerEnter2D (Collider2D other) {
//check if GameObjects Tag is Good
if (other.gameObject.tag == "Good") {
//if Tag is Good increase score
score = score + 10;
//delete GameObject, which went into Trigger, from the Scene
Destroy (other.gameObject);
}
//check if GameObjects Tag is Bad
if (other.gameObject.tag == "Bad") {
//if Tag is Bad decrease score
score = score - 10;
//delete GameObject, which went into Trigger, from the Scene
Destroy (other.gameObject);
}
}
}
Select now our Player in Hierarchy. Add itemChecker script to it in Inspector. using System.Collections;
public class itemChecker : MonoBehaviour {
//variable for score counting
public int score;
//will be started, if one GameObject with Collider2D has touched the Trigger
void OnTriggerEnter2D (Collider2D other) {
//check if GameObjects Tag is Good
if (other.gameObject.tag == "Good") {
//if Tag is Good increase score
score = score + 10;
//delete GameObject, which went into Trigger, from the Scene
Destroy (other.gameObject);
}
//check if GameObjects Tag is Bad
if (other.gameObject.tag == "Bad") {
//if Tag is Bad decrease score
score = score - 10;
//delete GameObject, which went into Trigger, from the Scene
Destroy (other.gameObject);
}
}
}

Save the scene as catchGame. Start the game with selected Player. You should can see how Score changes (in Player's Inspector).
The basic prototyp for one 2D catch game is ready. Check the Second Part for continue.
 this tutorial as unity package